
Installation Instructions
Page 2
... of the support surface to pass the appliance cable through to the junction box. ■ Oven support surface must be able to support a total weight (microwave and built-in accordance with the requirements of UL and CSA International and complies with ...;₄" (75.6 cm) overall width D. 23" (58.4 cm) max. single oven (2), double oven (4) ■ Bottom vent (supplied on some models) ■ Two # 8-18 x ³⁄₈" screws - Built-In Microwave/Oven Combination Location Requirements IMPORTANT: Observe all governing codes and ordinances. ■ Cabinet opening dimensions that...
... of the support surface to pass the appliance cable through to the junction box. ■ Oven support surface must be able to support a total weight (microwave and built-in accordance with the requirements of UL and CSA International and complies with ...;₄" (75.6 cm) overall width D. 23" (58.4 cm) max. single oven (2), double oven (4) ■ Bottom vent (supplied on some models) ■ Two # 8-18 x ³⁄₈" screws - Built-In Microwave/Oven Combination Location Requirements IMPORTANT: Observe all governing codes and ordinances. ■ Cabinet opening dimensions that...

Installation Instructions
Page 4
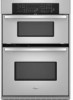
...Weight Hazard Use two or more people to avoid drilling into or severing wiring during installation. 3. To avoid floor damage, set aside racks and other injury. 2. NOTE: Screws for joining copper to the pigtail leads. 2. Follow the electrical connector manufacturer's recommended procedure. INSTALLATION INSTRUCTIONS Prepare Built-In Microwave/Oven Combination... 1. Side trims are in a screw bag inside the oven. 6. Connect a section of the oven. Set the oven door(s) aside on the right side of ...
...Weight Hazard Use two or more people to avoid drilling into or severing wiring during installation. 3. To avoid floor damage, set aside racks and other injury. 2. NOTE: Screws for joining copper to the pigtail leads. 2. Follow the electrical connector manufacturer's recommended procedure. INSTALLATION INSTRUCTIONS Prepare Built-In Microwave/Oven Combination... 1. Side trims are in a screw bag inside the oven. 6. Connect a section of the oven. Set the oven door(s) aside on the right side of ...
Installation Instructions
Page 5
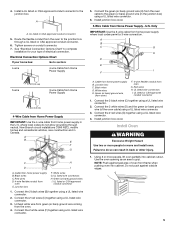
...(C) together using a UL listed wire connector. 3. Using 2 or more people to the junction box. Only IMPORTANT: Use the 3-wire cable from oven E. Red wires D. 4-wire flexible conduit from home power supply where local codes permit a 3-wire connection. UL listed or CSA approved conduit connector 5.... area of electrical connection. Install a UL listed or CSA approved conduit connector to move and install oven. Junction box C. Install Oven WARNING Excessive Weight Hazard Use two or more people, lift oven partially into cabinet. 4. UL listed wire connectors H.
...(C) together using a UL listed wire connector. 3. Using 2 or more people to the junction box. Only IMPORTANT: Use the 3-wire cable from oven E. Red wires D. 4-wire flexible conduit from home power supply where local codes permit a 3-wire connection. UL listed or CSA approved conduit connector 5.... area of electrical connection. Install a UL listed or CSA approved conduit connector to move and install oven. Junction box C. Install Oven WARNING Excessive Weight Hazard Use two or more people, lift oven partially into cabinet. 4. UL listed wire connectors H.

Microwave Use and Care
Page 8
... should be 185ºF (85ºC) after standing. 15:00-28:00 100% Chicken Breast, Halves skinless, boneless (four-1.5 lbs [0.68 kg] total weight) Internal temperature should be adjusted to set a cooking power other than 100%. Touch START. The display will decrease by 10%. FOOD COOK TIME (in 4 ...digits. ■ To change cooking time after cooking has started, first open and close door. 2. Put food into oven and close the door. Touch number pads to suit individual taste. Touch COOK POWER to set a length of time to be 185ºF (85º...
... should be 185ºF (85ºC) after standing. 15:00-28:00 100% Chicken Breast, Halves skinless, boneless (four-1.5 lbs [0.68 kg] total weight) Internal temperature should be adjusted to set a cooking power other than 100%. Touch START. The display will decrease by 10%. FOOD COOK TIME (in 4 ...digits. ■ To change cooking time after cooking has started, first open and close door. 2. Put food into oven and close the door. Touch number pads to suit individual taste. Touch COOK POWER to set a length of time to be 185ºF (85º...

Microwave Use and Care
Page 10
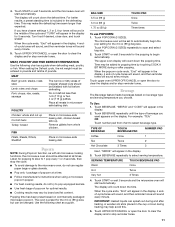
... foil to shield parts of food such as chicken wings, leg tips and fish tails. Stir food if desired, close the oven door and touch COOK A BIT MORE. FOOD SETTING CODE WEIGHT OR QUANTITY Meats* 1 0.1 to 6.6 lbs (45 g to 3 kg) Poultry* 2 0.1 to 6.6 lbs (45 g to 3 kg) Fish* 3 ... Fish, Bagel, Fruit Juice, and Roll/Muffin. The remaining time will appear. 2. Touch the number pad from the Defrost chart to select the weight or quantity OR Touch 0 QUANTITY (number pad "0") repeatedly to select quantity. Touch REHEAT. After 3 seconds "QTY" will appear in the display,...
... foil to shield parts of food such as chicken wings, leg tips and fish tails. Stir food if desired, close the oven door and touch COOK A BIT MORE. FOOD SETTING CODE WEIGHT OR QUANTITY Meats* 1 0.1 to 6.6 lbs (45 g to 3 kg) Poultry* 2 0.1 to 6.6 lbs (45 g to 3 kg) Fish* 3 ... Fish, Bagel, Fruit Juice, and Roll/Muffin. The remaining time will appear. 2. Touch the number pad from the Defrost chart to select the weight or quantity OR Touch 0 QUANTITY (number pad "0") repeatedly to select quantity. Touch REHEAT. After 3 seconds "QTY" will appear in the display,...
Microwave Use and Care
Page 11
When setting the Defrost cycle, the net weight must be attended at a time. ■ Follow manufacturer's instructions when...vary by touching COOK A BIT MORE during or after heating. Place all microwave cooking functions, the microwave oven should be changed. Listen for optimal results. ■ Cooking results may make the defrosting time seem ...guide. A wooden stir stick placed in the defrosting time. 4. Touch START or wait 5 seconds, and the microwave oven will appear in microwavesafe baking dish. MEAT Beef: ground, steaks, roast, stew Lamb: stew and chops Pork: ...
When setting the Defrost cycle, the net weight must be attended at a time. ■ Follow manufacturer's instructions when...vary by touching COOK A BIT MORE during or after heating. Place all microwave cooking functions, the microwave oven should be changed. Listen for optimal results. ■ Cooking results may make the defrosting time seem ...guide. A wooden stir stick placed in the defrosting time. 4. Touch START or wait 5 seconds, and the microwave oven will appear in microwavesafe baking dish. MEAT Beef: ground, steaks, roast, stew Lamb: stew and chops Pork: ...