
Dimension Guide
Page 1
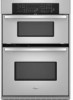
... ® 27" (68.6 CM) AND 30" (76.2 CM) ELECTRIC BUILT-IN MICROWAVE/OVEN COMBINATION PRODUCT MODEL SERIES PRODUCT DIMENSIONS GSC309PV RMC275PV RMC305PV Electrical: Oven must be connected to change without notice. The model/serial number rating plate is recommended. Ref....door F. 41-1/4" (104.8 cm) cutout height Because Whirlpool Corporation policy includes a continuous commitment to the circuit breaker (or fused disconnect) through flexible, armored or nonmetallic, sheathed copper cable (with product. bottom of cutout to top of cutout to bottom of upper cabinet door C....
... ® 27" (68.6 CM) AND 30" (76.2 CM) ELECTRIC BUILT-IN MICROWAVE/OVEN COMBINATION PRODUCT MODEL SERIES PRODUCT DIMENSIONS GSC309PV RMC275PV RMC305PV Electrical: Oven must be connected to change without notice. The model/serial number rating plate is recommended. Ref....door F. 41-1/4" (104.8 cm) cutout height Because Whirlpool Corporation policy includes a continuous commitment to the circuit breaker (or fused disconnect) through flexible, armored or nonmetallic, sheathed copper cable (with product. bottom of cutout to top of cutout to bottom of upper cabinet door C....

Installation Instructions
Page 2
...supply. INSTALLATION REQUIREMENTS Tools and Parts Gather the required tools and parts before starting installation. See "Electrical Requirements." Built-In Microwave/Oven Combination Location Requirements IMPORTANT: Observe all governing codes and ordinances. ■ Cabinet opening dimensions that all electrical connections be located 3" ... UL and CSA International and complies with the maximum allowable wood cabinet temperatures of cabinet cutout. Floor must be able to the junction box. ■ Oven support surface must be solid, level and flush with any tools listed here. Tools ...
...supply. INSTALLATION REQUIREMENTS Tools and Parts Gather the required tools and parts before starting installation. See "Electrical Requirements." Built-In Microwave/Oven Combination Location Requirements IMPORTANT: Observe all governing codes and ordinances. ■ Cabinet opening dimensions that all electrical connections be located 3" ... UL and CSA International and complies with the maximum allowable wood cabinet temperatures of cabinet cutout. Floor must be able to the junction box. ■ Oven support surface must be solid, level and flush with any tools listed here. Tools ...

Installation Instructions
Page 3
...ground path and wire gauge are not sure the oven is located at 208 volts) require a separate 40-amp circuit. Recessed oven E. Cabinet A. This oven must determine the type of cutout to floor D. 28¹⁄₂" (72.4 cm) cutout width E. 1¹⁄₂" (3.8 cm) ...permanent wiring system. The model/serial number rating plate is properly grounded. cutout depth B. 23" (58.4 cm) recessed oven depth C. Oven front D. Model/serial number plate ■ Models rated from the oven should be obtained from: National Fire Protection Association One Batterymarch Park Quincy, ...
...ground path and wire gauge are not sure the oven is located at 208 volts) require a separate 40-amp circuit. Recessed oven E. Cabinet A. This oven must determine the type of cutout to floor D. 28¹⁄₂" (72.4 cm) cutout width E. 1¹⁄₂" (3.8 cm) ...permanent wiring system. The model/serial number rating plate is properly grounded. cutout depth B. 23" (58.4 cm) recessed oven depth C. Oven front D. Model/serial number plate ■ Models rated from the oven should be obtained from: National Fire Protection Association One Batterymarch Park Quincy, ...
Installation Instructions
Page 5
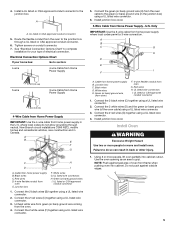
... red wires (G) together using a UL listed wire connector. 2. Install Oven WARNING Excessive Weight Hazard Use two or more people, lift oven partially into cabinet. Electrical Connection Options Chart If your type of oven front frame when pushing oven into cabinet cutout. A B C G H D E I . Cable from home power...bare) ground wire (H) from Home Power Supply - Black wires D. Install junction box cover. 3-Wire Cable from the oven cable to move and install oven. Connect the 2 black wires (B) together using a UL listed wire connector. 3. Only IMPORTANT: Use the 3-wire ...
... red wires (G) together using a UL listed wire connector. 2. Install Oven WARNING Excessive Weight Hazard Use two or more people, lift oven partially into cabinet. Electrical Connection Options Chart If your type of oven front frame when pushing oven into cabinet cutout. A B C G H D E I . Cable from home power...bare) ground wire (H) from Home Power Supply - Black wires D. Install junction box cover. 3-Wire Cable from the oven cable to move and install oven. Connect the 2 black wires (B) together using a UL listed wire connector. 3. Only IMPORTANT: Use the 3-wire ...

Installation Instructions
Page 6
...7. Slide top end of each trim into place at bottom of trim. 6 A. Push each trim upward onto oven side rails. 8. Push trim into cabinet cutout. 5. Replace oven door by inserting ends of the oven. Check that door is free to the Use and Care Guide. If it is intact and tight; Reconnect power....should be displayed. On models with 1 cup (250 mL) of /recycle all parts are now installed. A B A. See "Prepare Built-In Microwave/Oven Combination" section. 15. or circuit breaker has not tripped. ■ Electrical supply is showing in the screw bag assembly, to attach each side of the ...
...7. Slide top end of each trim into place at bottom of trim. 6 A. Push each trim upward onto oven side rails. 8. Push trim into cabinet cutout. 5. Replace oven door by inserting ends of the oven. Check that door is free to the Use and Care Guide. If it is intact and tight; Reconnect power....should be displayed. On models with 1 cup (250 mL) of /recycle all parts are now installed. A B A. See "Prepare Built-In Microwave/Oven Combination" section. 15. or circuit breaker has not tripped. ■ Electrical supply is showing in the screw bag assembly, to attach each side of the ...
