
Dimension Guide
Page 1
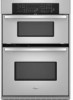
...Installation our products, we reserve the right to the proper electrical voltage and frequency as specified on the model/serial number rating plate. ® 27" (68.6 CM) AND 30" (76.2 CM) ELECTRIC BUILT-IN MICROWAVE/OVEN COMBINATION PRODUCT MODEL SERIES PRODUCT DIMENSIONS GSC309PV RMC275PV RMC305PV Electrical: Oven...depth B. 23" (58.4 cm) recessed oven depth Front View A F D E 27" (68.6 cm) models B A. 27" (68.6 cm) min. bottom of cutout to top of cabinet door F. 41-1/4" (104.8 cm) cutout height Because Whirlpool Corporation policy includes a continuous commitment to change...
...Installation our products, we reserve the right to the proper electrical voltage and frequency as specified on the model/serial number rating plate. ® 27" (68.6 CM) AND 30" (76.2 CM) ELECTRIC BUILT-IN MICROWAVE/OVEN COMBINATION PRODUCT MODEL SERIES PRODUCT DIMENSIONS GSC309PV RMC275PV RMC305PV Electrical: Oven...depth B. 23" (58.4 cm) recessed oven depth Front View A F D E 27" (68.6 cm) models B A. 27" (68.6 cm) min. bottom of cutout to top of cabinet door F. 41-1/4" (104.8 cm) cutout height Because Whirlpool Corporation policy includes a continuous commitment to change...

Installation Instructions
Page 1
..." (76,2 CM) Table of Contents/Table des matières BUILT-IN MICROWAVE/OVEN COMBINATION SAFETY 1 INSTALLATION REQUIREMENTS 2 Tools and Parts 2 Built-In Microwave/Oven Combination Location Requirements ...........2 Electrical Requirements 3 INSTALLATION INSTRUCTIONS 4 Prepare Built-In Microwave/Oven Combination 4 Remove Oven Door 4 Remove Oven Trim 4 Make Electrical Connection 4 Install Oven 5 Complete Installation 6 SÉCURITÉ DE L'ENSEMBLE FOUR À MICRO-ONDES ET FOUR CONVENTIONNEL...
..." (76,2 CM) Table of Contents/Table des matières BUILT-IN MICROWAVE/OVEN COMBINATION SAFETY 1 INSTALLATION REQUIREMENTS 2 Tools and Parts 2 Built-In Microwave/Oven Combination Location Requirements ...........2 Electrical Requirements 3 INSTALLATION INSTRUCTIONS 4 Prepare Built-In Microwave/Oven Combination 4 Remove Oven Door 4 Remove Oven Trim 4 Make Electrical Connection 4 Install Oven 5 Complete Installation 6 SÉCURITÉ DE L'ENSEMBLE FOUR À MICRO-ONDES ET FOUR CONVENTIONNEL...

Installation Instructions
Page 2
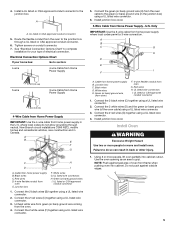
bottom vent (supplied on some models) ■ Side trim Check local codes. Check existing electrical supply. Built-In Microwave/Oven Combination Location Requirements IMPORTANT: Observe all governing codes and ordinances. ■ Cabinet opening dimensions that are shown must be able to ... been designed in accordance with the requirements of UL and CSA International and complies with oven. ■ Recessed installation area must be located 3" (7.6 cm) maximum below the support surface when the oven is installed in the right rear or left rear corner of the support surface to pass the ...
bottom vent (supplied on some models) ■ Side trim Check local codes. Check existing electrical supply. Built-In Microwave/Oven Combination Location Requirements IMPORTANT: Observe all governing codes and ordinances. ■ Cabinet opening dimensions that are shown must be able to ... been designed in accordance with the requirements of UL and CSA International and complies with oven. ■ Recessed installation area must be located 3" (7.6 cm) maximum below the support surface when the oven is installed in the right rear or left rear corner of the support surface to pass the ...

Installation Instructions
Page 3
... One Batterymarch Park Quincy, MA 02269 CSA International 8501 East Pleasant Valley Road Cleveland, OH 44131-5575 Electrical Connection To properly install your oven, you must determine the type of electrical connection you are adequate and in accordance with local codes. Cabinet Dimensions 27" ...) min. O-M91-latest edition, and all local codes and ordinances. Check with a qualified electrical installer if you will be using and follow the instructions provided for serviceability of the oven. ■ A UL listed or CSA approved conduit connector must be connected directly to floor D. ...
... One Batterymarch Park Quincy, MA 02269 CSA International 8501 East Pleasant Valley Road Cleveland, OH 44131-5575 Electrical Connection To properly install your oven, you must determine the type of electrical connection you are adequate and in accordance with local codes. Cabinet Dimensions 27" ...) min. O-M91-latest edition, and all local codes and ordinances. Check with a qualified electrical installer if you will be using and follow the instructions provided for serviceability of the oven. ■ A UL listed or CSA approved conduit connector must be connected directly to floor D. ...

Installation Instructions
Page 4
... the unlocked position. Failure to move and install oven. Connect a section of the oven. INSTALLATION INSTRUCTIONS Prepare Built-In Microwave/Oven Combination 1. Remove the hardware package from inside the package containing literature. Locate the oven door latches in the cabinet. 3. Set the oven door(s) aside on the right side of the oven door, and rotate the latches forward to...
... the unlocked position. Failure to move and install oven. Connect a section of the oven. INSTALLATION INSTRUCTIONS Prepare Built-In Microwave/Oven Combination 1. Remove the hardware package from inside the package containing literature. Locate the oven door latches in the cabinet. 3. Set the oven door(s) aside on the right side of the oven door, and rotate the latches forward to...
Installation Instructions
Page 5
... Chart" to the green (or bare) ground wire (in the U.S. Connect the green (or bare) ground wire (H) from the oven cable to complete installation for your home has: Go to grip. U.S. Junction box F. Connect the 2 black wires (B) together using a UL listed wire connector.... 2. UL listed wire connectors I . Connect the 2 red wires (G) together using a UL listed wire connector. 3. Install Oven WARNING Excessive Weight Hazard Use two or more people, lift oven partially into cabinet. Using 2 or more people to the junction box. NOTE: Push against outside edges...
... Chart" to the green (or bare) ground wire (in the U.S. Connect the green (or bare) ground wire (H) from the oven cable to complete installation for your home has: Go to grip. U.S. Junction box F. Connect the 2 black wires (B) together using a UL listed wire connector.... 2. UL listed wire connectors I . Connect the 2 red wires (G) together using a UL listed wire connector. 3. Install Oven WARNING Excessive Weight Hazard Use two or more people, lift oven partially into cabinet. Using 2 or more people to the junction box. NOTE: Push against outside edges...

Installation Instructions
Page 6
...installation procedures. "BROIL" will appear in mounting rails. Rotate both hinge latches back to see which step was skipped. 2. Turn power on , and the remaining cooking time should be displayed. Press LOWER OFF/CANCEL. When display reads "1:00" minute, open and close. Insert screw. 6. AB D C A. See "Prepare Built-In Microwave/Oven Combination..." section. 15. Reconnect power. 17. The interior microwave oven light should be on . Use the 8-18 x ³⁄₈" screws...
...installation procedures. "BROIL" will appear in mounting rails. Rotate both hinge latches back to see which step was skipped. 2. Turn power on , and the remaining cooking time should be displayed. Press LOWER OFF/CANCEL. When display reads "1:00" minute, open and close. Insert screw. 6. AB D C A. See "Prepare Built-In Microwave/Oven Combination..." section. 15. Reconnect power. 17. The interior microwave oven light should be on . Use the 8-18 x ³⁄₈" screws...
Owners Manual
Page 3
...food. ■ Do Not Heat Unopened Food Containers - The door gasket is properly installed and grounded by a qualified technician. ■ Never Use the Oven for a good seal. No commercial oven cleaner or oven liner protective coating of any kind should be allowed to sit or stand on any part.... If rack must be worn while using the oven, follow basic precautions, including the following: ■ Proper Installation - Loose-fitting or hanging garments should not be left alone or unattended in area where oven is in desired location while oven is hot, do not touch, or let clothing...
...food. ■ Do Not Heat Unopened Food Containers - The door gasket is properly installed and grounded by a qualified technician. ■ Never Use the Oven for a good seal. No commercial oven cleaner or oven liner protective coating of any kind should be allowed to sit or stand on any part.... If rack must be worn while using the oven, follow basic precautions, including the following: ■ Proper Installation - Loose-fitting or hanging garments should not be left alone or unattended in area where oven is in desired location while oven is hot, do not touch, or let clothing...
Owners Manual
Page 11
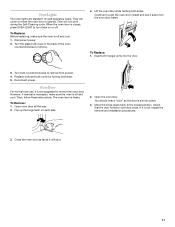
... suggested to open and close. To Replace: 1. Replace bulb and bulb cover by turning clockwise. 5. Reconnect power. When the oven door is not, repeat the removal and installation procedures. 3. If it is opened. Oven Lights The oven lights are standard 15-watt appliance bulbs. You should hear a "click" as it away from socket. 4. Open...
... suggested to open and close. To Replace: 1. Replace bulb and bulb cover by turning clockwise. 5. Reconnect power. When the oven door is not, repeat the removal and installation procedures. 3. If it is opened. Oven Lights The oven lights are standard 15-watt appliance bulbs. You should hear a "click" as it away from socket. 4. Open...
Owners Manual
Page 12
... operate ■ Is the electronic oven control set ? Replace the fuse or reset the circuit breaker. See Installation Instructions. See "Control Lock" section. ■ On some models, reset the clock, if needed. Choose UPPER OVEN or LOWER OVEN first. See "Oven Temperature Control" section. On some models...Is the display showing "PF," "PF id=27" or "PF id=30"? See "Assistance or Service" section. ■ Is the oven door open? See the Installation Instructions. ■ Is the proper temperature set ? Clear the display. If it reappears, call an electrician. ■ Is the appliance...
... operate ■ Is the electronic oven control set ? Replace the fuse or reset the circuit breaker. See Installation Instructions. See "Control Lock" section. ■ On some models, reset the clock, if needed. Choose UPPER OVEN or LOWER OVEN first. See "Oven Temperature Control" section. On some models...Is the display showing "PF," "PF id=27" or "PF id=30"? See "Assistance or Service" section. ■ Is the oven door open? See the Installation Instructions. ■ Is the proper temperature set ? Clear the display. If it reappears, call an electrician. ■ Is the appliance...
Owners Manual
Page 13
...800-807-6777. If you need to local dealers, repair parts distributors and service companies. If you the cost of appliances. ■ Installation information. ■ Use and maintenance procedures. ■ Accessory and repair parts sales. ■ Specialized customer assistance (Spanish speaking, hearing ... after-warranty service, anywhere in your correspondence. 13 Our consultants provide assistance with any questions or concerns at : Whirlpool Brand Home Appliances Customer eXperience Center 553 Benson Road Benton Harbor, MI 49022-2692 Please include a daytime phone number...
...800-807-6777. If you need to local dealers, repair parts distributors and service companies. If you the cost of appliances. ■ Installation information. ■ Use and maintenance procedures. ■ Accessory and repair parts sales. ■ Specialized customer assistance (Spanish speaking, hearing ... after-warranty service, anywhere in your correspondence. 13 Our consultants provide assistance with any questions or concerns at : Whirlpool Brand Home Appliances Customer eXperience Center 553 Benson Road Benton Harbor, MI 49022-2692 Please include a daytime phone number...

Owners Manual
Page 14
...be borne by the customer. Service calls to correct the installation of your authorized Whirlpool dealer to the appliance. 9. Damage resulting from accident, alteration, misuse, abuse, fire, flood, acts of God, improper installation, installation not in accordance with electrical or plumbing codes, or ...product service if your major appliance for in a remote area where service by an authorized Whirlpool servicer is contrary to published user or operator instructions and/or installation instructions. 4. Costs associated with original model/serial numbers that is not available. 10. ...
...be borne by the customer. Service calls to correct the installation of your authorized Whirlpool dealer to the appliance. 9. Damage resulting from accident, alteration, misuse, abuse, fire, flood, acts of God, improper installation, installation not in accordance with electrical or plumbing codes, or ...product service if your major appliance for in a remote area where service by an authorized Whirlpool servicer is contrary to published user or operator instructions and/or installation instructions. 4. Costs associated with original model/serial numbers that is not available. 10. ...

Warranty
Page 1
..., this warranty. 8. Repairs to parts or systems resulting from unauthorized modifications made to know your major appliance to correct defects in accordance with published installation instructions. 11. WHIRLPOOL CORPORATION MAJOR APPLIANCE WARRANTY LIMITED WARRANTY For one year from the date of purchase, when this major appliance is operated and maintained according to...
..., this warranty. 8. Repairs to parts or systems resulting from unauthorized modifications made to know your major appliance to correct defects in accordance with published installation instructions. 11. WHIRLPOOL CORPORATION MAJOR APPLIANCE WARRANTY LIMITED WARRANTY For one year from the date of purchase, when this major appliance is operated and maintained according to...

Microwave Use and Care
Page 3
... or seriously injured if you don't follow the specific "PRECAUTIONS TO AVOID POSSIBLE EXPOSURE TO EXCESSIVE MICROWAVE ENERGY" found in this section. ■ Install or locate the microwave oven only in accordance with the provided Installation Instructions. ■ Some products such as described in this manual. may create a fire or risk of others .
... or seriously injured if you don't follow the specific "PRECAUTIONS TO AVOID POSSIBLE EXPOSURE TO EXCESSIVE MICROWAVE ENERGY" found in this section. ■ Install or locate the microwave oven only in accordance with the provided Installation Instructions. ■ Some products such as described in this manual. may create a fire or risk of others .

Microwave Use and Care
Page 13
... or some paper towels. Steam will not work during the lower oven SelfCleaning Cycle. ■ Is the magnetron working properly? TURNTABLE Replace turntable immediately after cleaning. See Installation Instructions. Clear the display. The upper oven will soften soil. Heat 1 cup (250 mL) of grain to...a number? If it is the Control Lock set correctly? The area where the oven door and frame touch when closed ? Clear the display. See "Assistance or Service" section. ■ On combination oven models, is normal and occurs when the transformer in direction of cold water for ...
... or some paper towels. Steam will not work during the lower oven SelfCleaning Cycle. ■ Is the magnetron working properly? TURNTABLE Replace turntable immediately after cleaning. See Installation Instructions. Clear the display. The upper oven will soften soil. Heat 1 cup (250 mL) of grain to...a number? If it is the Control Lock set correctly? The area where the oven door and frame touch when closed ? Clear the display. See "Assistance or Service" section. ■ On combination oven models, is normal and occurs when the transformer in direction of cold water for ...

Microwave Use and Care
Page 14
.... Have a qualified electrician check the electrical system of a service call. To locate FSP® replacement parts in your request. Whirlpool designated service technicians are not sounding ■ Are tones disabled? Larger amounts of your correspondence. It may save you use ? ...assistance, you need help us or your telephone directory Yellow Pages. See the lower oven Use and Care Guide. See "Cook Power" section. ■ Are large amounts of appliances. ■ Installation information. ■ Use and maintenance procedures. ■ Accessory and repair parts sales...
.... Have a qualified electrician check the electrical system of a service call. To locate FSP® replacement parts in your request. Whirlpool designated service technicians are not sounding ■ Are tones disabled? Larger amounts of your correspondence. It may save you use ? ...assistance, you need help us or your telephone directory Yellow Pages. See the lower oven Use and Care Guide. See "Cook Power" section. ■ Are large amounts of appliances. ■ Installation information. ■ Use and maintenance procedures. ■ Accessory and repair parts sales...

Microwave Use and Care
Page 15
...from accident, alteration, misuse, abuse, fire, flood, acts of God, improper installation, installation not in materials or workmanship and is reported to know your major appliance, to instruct you need to Whirlpool within 30 days from the date of purchase. 6. THIS WARRANTY GIVES YOU ...failures. 7. This major appliance is designed to correct defects in -home service is covered by an authorized Whirlpool servicer is located in accordance with published installation instructions. 11. This warranty is void if the factory applied serial number has been altered or removed from ...
...from accident, alteration, misuse, abuse, fire, flood, acts of God, improper installation, installation not in materials or workmanship and is reported to know your major appliance, to instruct you need to Whirlpool within 30 days from the date of purchase. 6. THIS WARRANTY GIVES YOU ...failures. 7. This major appliance is designed to correct defects in -home service is covered by an authorized Whirlpool servicer is located in accordance with published installation instructions. 11. This warranty is void if the factory applied serial number has been altered or removed from ...


