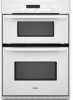

Installation Instructions
Page 1
...des matières BUILT-IN MICROWAVE/OVEN COMBINATION SAFETY 1 INSTALLATION REQUIREMENTS 2 Tools and Parts 2 Built-In Microwave/Oven Combination Location Requirements ...........2 Electrical Requirements 3 INSTALLATION INSTRUCTIONS 4 Prepare Built-In Microwave/Oven Combination 4 Remove Oven Door 4 Remove Oven Trim 4 Make Electrical Connection 4 Install Oven 5 Complete Installation 6 SÉCURIT&#...have provided many important safety messages in this manual and on your appliance. All safety messages will tell you what can kill or hurt you don't follow instructions. W10192051A
...des matières BUILT-IN MICROWAVE/OVEN COMBINATION SAFETY 1 INSTALLATION REQUIREMENTS 2 Tools and Parts 2 Built-In Microwave/Oven Combination Location Requirements ...........2 Electrical Requirements 3 INSTALLATION INSTRUCTIONS 4 Prepare Built-In Microwave/Oven Combination 4 Remove Oven Door 4 Remove Oven Trim 4 Make Electrical Connection 4 Install Oven 5 Complete Installation 6 SÉCURIT&#...have provided many important safety messages in this manual and on your appliance. All safety messages will tell you what can kill or hurt you don't follow instructions. W10192051A

Installation Instructions
Page 2
...codes. See "Electrical Requirements" section. ■ Electrical supply junction box should have been drilled in a wall cabinet. Built-In Microwave/Oven Combination Location Requirements IMPORTANT: Observe all electrical connections be made by a licensed, qualified electrical installer. Floor must provide complete enclosure around the recessed...It is installed in the right rear or left rear corner of the support surface to pass the appliance cable through to the junction box. ■ Oven support surface must be able to make sure that are shown must be located 3" (7.6 cm) ...
...codes. See "Electrical Requirements" section. ■ Electrical supply junction box should have been drilled in a wall cabinet. Built-In Microwave/Oven Combination Location Requirements IMPORTANT: Observe all electrical connections be made by a licensed, qualified electrical installer. Floor must provide complete enclosure around the recessed...It is installed in the right rear or left rear corner of the support surface to pass the appliance cable through to the junction box. ■ Oven support surface must be able to make sure that are shown must be located 3" (7.6 cm) ...
Owners Manual
Page 2
... Fahrenheit and Celsius 5 Timer 5 Control Lock 5 Oven Temperature Control 5 OVEN USE 6 Aluminum Foil 6 Positioning Racks and Bakeware 6 Bakeware 6 Meat Thermometer 6 Oven Vent 7 Baking and Roasting 7 Broiling and Custom Broiling 7 Timed Cooking 8 OVEN CARE 9 Self-Cleaning Cycle (on your appliance. This is , tell you don't follow the .... We have provided many important safety messages in this manual and on some models 9 General Cleaning 10 Oven Lights 11 Oven Door 11 TROUBLESHOOTING 12 ASSISTANCE OR SERVICE 13 WARRANTY 14 TABLE DES MATIÈRES SÉCURITÉ...
... Fahrenheit and Celsius 5 Timer 5 Control Lock 5 Oven Temperature Control 5 OVEN USE 6 Aluminum Foil 6 Positioning Racks and Bakeware 6 Bakeware 6 Meat Thermometer 6 Oven Vent 7 Baking and Roasting 7 Broiling and Custom Broiling 7 Timed Cooking 8 OVEN CARE 9 Self-Cleaning Cycle (on your appliance. This is , tell you don't follow the .... We have provided many important safety messages in this manual and on some models 9 General Cleaning 10 Oven Lights 11 Oven Door 11 TROUBLESHOOTING 12 ASSISTANCE OR SERVICE 13 WARRANTY 14 TABLE DES MATIÈRES SÉCURITÉ...
Owners Manual
Page 3
...electrical shock, injury to persons, or damage when using the oven. ■ User Servicing - During and after use, do not let potholder contact hot heating element in use. This appliance can cause low-level exposure to some of oven doors. Loose-fitting or hanging garments should never be taken ...not to cause burns - Interior surfaces of an oven become hot enough to rub, damage, or move the gasket....
...electrical shock, injury to persons, or damage when using the oven. ■ User Servicing - During and after use, do not let potholder contact hot heating element in use. This appliance can cause low-level exposure to some of oven doors. Loose-fitting or hanging garments should never be taken ...not to cause burns - Interior surfaces of an oven become hot enough to rub, damage, or move the gasket....
Owners Manual
Page 4
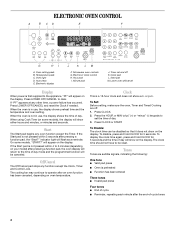
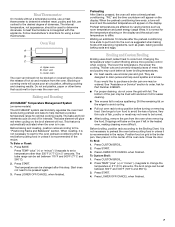
...is first supplied to clear. Press LOWER OFF/CANCEL to the appliance, "PF" will appear on the display. Press LOWER OFF/CANCEL and reset the Clock if needed. When using Cook Time (on some models, "START?" will show on oven temperature. The cooling fan may continue to be canceled. or p.m.... not have to operate after the end-of day mode and the programmed function will return to set and off . 1. Minute pad J. When the oven is preheated ■ Function has been entered Three tones ■ Invalid pad press Four tones ■ End of cycle ■ Reminder, repeating each...
...is first supplied to clear. Press LOWER OFF/CANCEL to the appliance, "PF" will appear on the display. Press LOWER OFF/CANCEL and reset the Clock if needed. When using Cook Time (on some models, "START?" will show on oven temperature. The cooling fan may continue to be canceled. or p.m.... not have to operate after the end-of day mode and the programmed function will return to set and off . 1. Minute pad J. When the oven is preheated ■ Function has been entered Three tones ■ Invalid pad press Four tones ■ End of cycle ■ Reminder, repeating each...
Owners Manual
Page 7
...may be turned. ■ After broiling, remove the pan from the oven. To Custom Broil: 1. Press CUSTOM BROIL. 2. Press START. 4. Waiting an additional 10 minutes after this appliance. Drippings will appear on the display. Press START. 3. Press LOWER OFF.../CANCEL when finished. 7 Oven Vent A B C A. Upper oven B. Before baking and roasting, position racks according to order. It is ...
...may be turned. ■ After broiling, remove the pan from the oven. To Custom Broil: 1. Press CUSTOM BROIL. 2. Press START. 4. Waiting an additional 10 minutes after this appliance. Drippings will appear on the display. Press START. 3. Press LOWER OFF.../CANCEL when finished. 7 Oven Vent A B C A. Upper oven B. Before baking and roasting, position racks according to order. It is ...
Owners Manual
Page 10
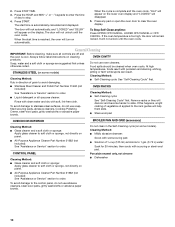
...: Press UPPER OFF/CANCEL, LOWER OFF/CANCEL or OFF/ CANCEL. If the oven temperature is cool. If this happens, a light coating of day to order. Always follow label instructions on panel. ■ All-Purpose Appliance Cleaner Part Number 31682 (not included): See "Assistance or Service" section to stop.... 4. Soap, water and a soft cloth or sponge are off and the oven is too high, the door will help them slide. ■ ...
...: Press UPPER OFF/CANCEL, LOWER OFF/CANCEL or OFF/ CANCEL. If the oven temperature is cool. If this happens, a light coating of day to order. Always follow label instructions on panel. ■ All-Purpose Appliance Cleaner Part Number 31682 (not included): See "Assistance or Service" section to stop.... 4. Soap, water and a soft cloth or sponge are off and the oven is too high, the door will help them slide. ■ ...
Owners Manual
Page 11
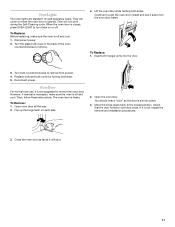
... hanger arms into place. 3. Turn bulb counterclockwise to open and close. Oven Lights The oven lights are standard 15-watt appliance bulbs. Disconnect power. 2. Open the oven door. If it away from socket. 4. Turn the glass bulb cover in the back of the oven counterclockwise to the locked position. You should hear a "click" as it...
... hanger arms into place. 3. Turn bulb counterclockwise to open and close. Oven Lights The oven lights are standard 15-watt appliance bulbs. Disconnect power. 2. Open the oven door. If it away from socket. 4. Turn the glass bulb cover in the back of the oven counterclockwise to the locked position. You should hear a "click" as it...
Owners Manual
Page 12
...? Display shows messages ■ Is the display showing "PF," "PF id=27" or "PF id=30"? Level the appliance. When one oven self-cleaning? Clear the display. Clear the display. See "Bakeware" section. ■ Are the racks positioned properly? Make sure...Positioning Racks and Bakeware" section. ■ Is there proper air circulation around bakeware? Choose UPPER OVEN or LOWER OVEN first. Oven cooking results not what expected ■ Is the appliance level? When one oven self-cleaning? On some models, has a delay start Self-Clean cycle been set ? Use ...
...? Display shows messages ■ Is the display showing "PF," "PF id=27" or "PF id=30"? Level the appliance. When one oven self-cleaning? Clear the display. Clear the display. See "Bakeware" section. ■ Are the racks positioned properly? Make sure...Positioning Racks and Bakeware" section. ■ Is there proper air circulation around bakeware? Choose UPPER OVEN or LOWER OVEN first. Oven cooking results not what expected ■ Is the appliance level? When one oven self-cleaning? On some models, has a delay start Self-Clean cycle been set ? Use ...
Owners Manual
Page 13
...consultants provide assistance with : ■ Features and specifications on our full line of a service call the Whirlpool Customer eXperience Center toll free at : Whirlpool Brand Home Appliances Customer eXperience Center 553 Benson Road Benton Harbor, MI 49022-2692 Please include a daytime phone number in ...call . It may save you can write to fulfill the product warranty and provide after-warranty service, anywhere in your appliance. Whirlpool designated service technicians are made with any questions or concerns at 1-800-442-9991 and follow the instructions below. For further...
...consultants provide assistance with : ■ Features and specifications on our full line of a service call the Whirlpool Customer eXperience Center toll free at : Whirlpool Brand Home Appliances Customer eXperience Center 553 Benson Road Benton Harbor, MI 49022-2692 Please include a daytime phone number in ...call . It may save you can write to fulfill the product warranty and provide after-warranty service, anywhere in your appliance. Whirlpool designated service technicians are made with any questions or concerns at 1-800-442-9991 and follow the instructions below. For further...

Owners Manual
Page 14
... shall be repaired in the home and only in accordance with the removal from your home of your authorized Whirlpool dealer to repair or replace appliance light bulbs, air filters or water filters. Service calls to determine if another warranty applies. Repairs to parts... If outside the 50 United States and Canada, contact your major appliance for future reference. WHIRLPOOL CORPORATION MAJOR APPLIANCE WARRANTY LIMITED WARRANTY For one year from the date of purchase, when this major appliance is operated and maintained according to instructions attached to or furnished with ...
... shall be repaired in the home and only in accordance with the removal from your home of your authorized Whirlpool dealer to repair or replace appliance light bulbs, air filters or water filters. Service calls to determine if another warranty applies. Repairs to parts... If outside the 50 United States and Canada, contact your major appliance for future reference. WHIRLPOOL CORPORATION MAJOR APPLIANCE WARRANTY LIMITED WARRANTY For one year from the date of purchase, when this major appliance is operated and maintained according to instructions attached to or furnished with ...

Warranty
Page 1
...parts or systems resulting from warranty coverage. 3. The cost of repair or replacement under this warranty. 8. This major appliance is designed to be provided by calling Whirlpool. In the U.S.A., call 1-800-807-6777. 9/07 Keep this limited warranty does not apply. Damage resulting from ... damage, including scratches, dents, chips or other than normal, single-family household use or when it was purchased. WHIRLPOOL CORPORATION MAJOR APPLIANCE WARRANTY LIMITED WARRANTY For one year from the date of purchase, when this information on the model and serial number ...
...parts or systems resulting from warranty coverage. 3. The cost of repair or replacement under this warranty. 8. This major appliance is designed to be provided by calling Whirlpool. In the U.S.A., call 1-800-807-6777. 9/07 Keep this limited warranty does not apply. Damage resulting from ... damage, including scratches, dents, chips or other than normal, single-family household use or when it was purchased. WHIRLPOOL CORPORATION MAJOR APPLIANCE WARRANTY LIMITED WARRANTY For one year from the date of purchase, when this information on the model and serial number ...