
Dimension Guide
Page 1
...packed with grounding wire). cutout depth B. 23" (58.4 cm) recessed oven depth Front View A F D E 27" (68.6 cm) models B A. 27" (68.6 cm) min. cabinet width B. 1" (2.5 cm) top of cutout to bottom of upper cabinet door C. 19-1/4" (48.9 cm) bottom of cabinet door F. 41-1/4" (104.8 cm) cutout height Because Whirlpool Corporation policy includes a ...58.4 cm) max. W10192051B 09-05-08 See the following illustration. ® 27" (68.6 CM) AND 30" (76.2 CM) ELECTRIC BUILT-IN MICROWAVE/OVEN COMBINATION PRODUCT MODEL SERIES PRODUCT DIMENSIONS GSC309PV RMC275PV RMC305PV Electrical...
...packed with grounding wire). cutout depth B. 23" (58.4 cm) recessed oven depth Front View A F D E 27" (68.6 cm) models B A. 27" (68.6 cm) min. cabinet width B. 1" (2.5 cm) top of cutout to bottom of upper cabinet door C. 19-1/4" (48.9 cm) bottom of cabinet door F. 41-1/4" (104.8 cm) cutout height Because Whirlpool Corporation policy includes a ...58.4 cm) max. W10192051B 09-05-08 See the following illustration. ® 27" (68.6 CM) AND 30" (76.2 CM) ELECTRIC BUILT-IN MICROWAVE/OVEN COMBINATION PRODUCT MODEL SERIES PRODUCT DIMENSIONS GSC309PV RMC275PV RMC305PV Electrical...

Installation Instructions
Page 2
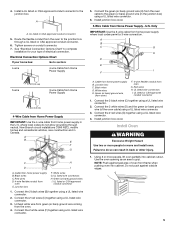
...29³⁄₄" (75.6 cm) overall width D. 23" (58.4 cm) max. Check existing electrical supply. Built-In Microwave/Oven Combination Location Requirements IMPORTANT: Observe all governing codes and ordinances. ■ Cabinet opening dimensions that all electrical connections be located 3" (7.6 cm) maximum... below the support surface when the oven is required. See "Electrical Requirements" section. ■ Electrical supply junction box should have been drilled in oven) of cabinet cutout. IMPORTANT: To avoid damage to your cabinets, check with the...
...29³⁄₄" (75.6 cm) overall width D. 23" (58.4 cm) max. Check existing electrical supply. Built-In Microwave/Oven Combination Location Requirements IMPORTANT: Observe all governing codes and ordinances. ■ Cabinet opening dimensions that all electrical connections be located 3" (7.6 cm) maximum... below the support surface when the oven is required. See "Electrical Requirements" section. ■ Electrical supply junction box should have been drilled in oven) of cabinet cutout. IMPORTANT: To avoid damage to your cabinets, check with the...

Installation Instructions
Page 3
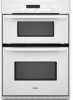
... conduit provided is located at the bottom of cabinet door F. 41¹⁄₄" (104.8 cm) cutout height 30" (76.2 cm) models A. 30" (76.2 cm) min. bottom of the oven. ■ A UL listed or CSA approved conduit connector must be connected directly to the junction box....if you will be using and follow the instructions provided for serviceability of cutout to floor D. 25¹⁄₂" (64.8 cm) cutout width E. 1¹⁄₂" (3.8 cm) min. cutout depth B. 23" (58.4 cm) recessed oven depth C. Oven front D. Model/serial number plate ■ Models rated from : ...
... conduit provided is located at the bottom of cabinet door F. 41¹⁄₄" (104.8 cm) cutout height 30" (76.2 cm) models A. 30" (76.2 cm) min. bottom of the oven. ■ A UL listed or CSA approved conduit connector must be connected directly to the junction box....if you will be using and follow the instructions provided for serviceability of cutout to floor D. 25¹⁄₂" (64.8 cm) cutout width E. 1¹⁄₂" (3.8 cm) min. cutout depth B. 23" (58.4 cm) recessed oven depth C. Oven front D. Model/serial number plate ■ Models rated from : ...
Installation Instructions
Page 5
.... 2. Connect the 2 white wires (D) and the green (or bare) ground wire (of oven front frame when pushing oven into cabinet cutout. NOTE: Push against outside edges. 5 UL listed or CSA approved conduit connector 5. Tighten screws on conduit connector. 7. A B E F G C H D I . A. Cable from oven E. White wires E. Install junction box cover. Failure to grip. Junction box F. Connect the...
.... 2. Connect the 2 white wires (D) and the green (or bare) ground wire (of oven front frame when pushing oven into cabinet cutout. NOTE: Push against outside edges. 5 UL listed or CSA approved conduit connector 5. Tighten screws on conduit connector. 7. A B E F G C H D I . A. Cable from oven E. White wires E. Install junction box cover. Failure to grip. Junction box F. Connect the...

Installation Instructions
Page 6
...oven into cabinet cutout. Securely fasten oven to push oven completely into cabinet and center oven into cabinet cutout. 5. Replace oven racks. 11. Complete Installation 1. Dispose of/recycle all parts are now installed. If oven(s) does not operate, check the following instructions to remove screws attaching the shipping feet. 4. Set microwave oven...both hinge latches back to the oven. "PF" should stop cooking. If there is not, repeat the removal and installation procedures. Press BROIL. See "Prepare Built-In Microwave/Oven Combination" section. 15. Push each...
...oven into cabinet cutout. Securely fasten oven to push oven completely into cabinet and center oven into cabinet cutout. 5. Replace oven racks. 11. Complete Installation 1. Dispose of/recycle all parts are now installed. If oven(s) does not operate, check the following instructions to remove screws attaching the shipping feet. 4. Set microwave oven...both hinge latches back to the oven. "PF" should stop cooking. If there is not, repeat the removal and installation procedures. Press BROIL. See "Prepare Built-In Microwave/Oven Combination" section. 15. Push each...
