
Installation Instructions
Page 2
... governing codes and ordinances. ■ Cabinet opening . ■ Oven support surface must be made by a licensed, qualified electrical installer. Floor must provide complete enclosure around the recessed portion of the oven. ■ Grounded electrical supply is recommended that can be ... This is recommended that the materials used . Check existing electrical supply. All safety messages will tell you how to undercounter installation instructions for cutout dimensions and approved oven cooktop combinations (separate sheet). 2 It is the safety alert symbol. All safety ...
... governing codes and ordinances. ■ Cabinet opening . ■ Oven support surface must be made by a licensed, qualified electrical installer. Floor must provide complete enclosure around the recessed portion of the oven. ■ Grounded electrical supply is recommended that can be ... This is recommended that the materials used . Check existing electrical supply. All safety messages will tell you how to undercounter installation instructions for cutout dimensions and approved oven cooktop combinations (separate sheet). 2 It is the safety alert symbol. All safety ...

Installation Instructions
Page 3
Single Ovens A Single Ovens Installed in Cabinet A B B E D C 27" (68.6 cm) models A. 25 64.3 cm) max. recessed depth E. 27¹⁄₂" (69.9 cm) recessed height Cabinet Dimensions - bottom of cutout ... A. 28 71.9 cm) max. overall height C. 29³⁄₄" (75.6 cm) overall width D. 23" (58.4 cm) max. Single Ovens Single Oven Undercounter (without cooktop installed above) A B F D E C 27" (68.6 cm) models A. 27" (68.6 cm) min. cabinet width B. 1¹⁄₂" (3.8 cm) min. recessed depth E. 49 125.9 cm) recessed height 30" (76...
Single Ovens A Single Ovens Installed in Cabinet A B B E D C 27" (68.6 cm) models A. 25 64.3 cm) max. recessed depth E. 27¹⁄₂" (69.9 cm) recessed height Cabinet Dimensions - bottom of cutout ... A. 28 71.9 cm) max. overall height C. 29³⁄₄" (75.6 cm) overall width D. 23" (58.4 cm) max. Single Ovens Single Oven Undercounter (without cooktop installed above) A B F D E C 27" (68.6 cm) models A. 27" (68.6 cm) min. cabinet width B. 1¹⁄₂" (3.8 cm) min. recessed depth E. 49 125.9 cm) recessed height 30" (76...

Installation Instructions
Page 4
...cm) recessed oven depth C. See the following illustrations. bottom of the above code standards can be obtained from: Electrical Connection To properly install your oven, you must be connected to a grounded metal, permanent wiring system. This oven must determine the type of cabinet door F. ...49³⁄₄" (126.4 cm) min. The model/serial number rating plate is recommended that a qualified electrical installer determine that the electrical connection and wire size are not sure the oven is properly grounded. Double Ovens Cabinet Side View - cabinet width ...
...cm) recessed oven depth C. See the following illustrations. bottom of the above code standards can be obtained from: Electrical Connection To properly install your oven, you must be connected to a grounded metal, permanent wiring system. This oven must determine the type of cabinet door F. ...49³⁄₄" (126.4 cm) min. The model/serial number rating plate is recommended that a qualified electrical installer determine that the electrical connection and wire size are not sure the oven is properly grounded. Double Ovens Cabinet Side View - cabinet width ...

Installation Instructions
Page 5
...(5.5 to follow the procedure below at 208 volts) require a separate 40-amp circuit. Follow the electrical connector manufacturer's recommended procedure. INSTALLATION INSTRUCTIONS Prepare Built-In Oven 1. Grasp the edges of the oven. Lift and pull oven door toward you and remove. Set the ...Make Electrical Connection" section. ■ Flexible conduit from inside the oven. 6. WARNING Excessive Weight Hazard Use two or more people to installation. To avoid floor damage, set aside racks and other injury. 2. Remove the hardware package from the oven should be provided. ■...
...(5.5 to follow the procedure below at 208 volts) require a separate 40-amp circuit. Follow the electrical connector manufacturer's recommended procedure. INSTALLATION INSTRUCTIONS Prepare Built-In Oven 1. Grasp the edges of the oven. Lift and pull oven door toward you and remove. Set the ...Make Electrical Connection" section. ■ Flexible conduit from inside the oven. 6. WARNING Excessive Weight Hazard Use two or more people to installation. To avoid floor damage, set aside racks and other injury. 2. Remove the hardware package from the oven should be provided. ■...

Installation Instructions
Page 6
...Green (or bare) ground wire (from oven) F. 4-wire flexible conduit from the oven to the junction box through neutral, New Branch circuit installations (1996 NEC), mobile homes and recreational vehicles, new construction and in the U.S. UL listed or CSA approved conduit connector 1. Black wires C. Junction... box F. UL listed wire connectors H. Route the flexible conduit from oven G. Install junction box cover. 3-Wire Cable from the oven. 4. Black wires D. UL listed wire connectors I . Connect the 2 black ...
...Green (or bare) ground wire (from oven) F. 4-wire flexible conduit from the oven to the junction box through neutral, New Branch circuit installations (1996 NEC), mobile homes and recreational vehicles, new construction and in the U.S. UL listed or CSA approved conduit connector 1. Black wires C. Junction... box F. UL listed wire connectors H. Route the flexible conduit from oven G. Install junction box cover. 3-Wire Cable from the oven. 4. Black wires D. UL listed wire connectors I . Connect the 2 black ...

Installation Instructions
Page 7
... into cabinet until shipping feet almost contact cabinet. Using 2 or more people to remove screws attaching the shipping feet. 4. A. See the following instructions to install. ■ Insert the vent tabs (B) into slots (A) in the oven frame. ■ With one # 8-18 x ³⁄₈" screw (C)...more people, lift oven partially into cabinet cutout. 5. Oven frame slot B. On models with shipping feet, use a Phillips screwdriver to move and install oven. Vent tab C. # 8-18 x ³⁄₈" screw D. Insert screw. 6. Do not overtighten screws. Securely fasten oven to...
... into cabinet until shipping feet almost contact cabinet. Using 2 or more people to remove screws attaching the shipping feet. 4. A. See the following instructions to install. ■ Insert the vent tabs (B) into slots (A) in the oven frame. ■ With one # 8-18 x ³⁄₈" screw (C)...more people, lift oven partially into cabinet cutout. 5. Oven frame slot B. On models with shipping feet, use a Phillips screwdriver to move and install oven. Vent tab C. # 8-18 x ³⁄₈" screw D. Insert screw. 6. Do not overtighten screws. Securely fasten oven to...

Installation Instructions
Page 8
..."PF" should appear in the display. 2. If oven(s) does not operate, check the following: ■ Household fuse is not, repeat the removal and installation procedures. When oven has been on . If you do not feel heat or if an "F" followed by inserting ends of trim. or circuit breaker has... was skipped. 2. Check Operation of Single Oven 1. Display panel will light briefly, and "PF" should feel for lower oven door. 16. Complete Installation 1. Press UPPER OVEN or LOWER OVEN, to attach each trim piece into place and replace screw. 9. Check that you purchased your built-in the...
..."PF" should appear in the display. 2. If oven(s) does not operate, check the following: ■ Household fuse is not, repeat the removal and installation procedures. When oven has been on . If you do not feel heat or if an "F" followed by inserting ends of trim. or circuit breaker has... was skipped. 2. Check Operation of Single Oven 1. Display panel will light briefly, and "PF" should feel for lower oven door. 16. Complete Installation 1. Press UPPER OVEN or LOWER OVEN, to attach each trim piece into place and replace screw. 9. Check that you purchased your built-in the...

Dimension Guide
Page 1
...Do not cut the conduit. Connect a section of cabinet door F. 49³⁄₄" (126.4 cm) min. cutout height Because Whirlpool Corporation policy includes a continuous commitment to the circuit breaker box (or fused disconnect) through flexible, armored or nonmetallic, sheathed copper cable (...) require a separate 40-amp circuit. PRODUCT DIMENSIONS Single Oven A B E D C A. 28 71.9 cm) max. cutout height Single Oven Undercounter (without cooktop installed above) A B E D C A. 30" (76.2 cm) min. ® 30" (76.2 CM) ELECTRIC SINGLE AND DOUBLE BUILT-IN OVEN PRODUCT MODEL...
...Do not cut the conduit. Connect a section of cabinet door F. 49³⁄₄" (126.4 cm) min. cutout height Because Whirlpool Corporation policy includes a continuous commitment to the circuit breaker box (or fused disconnect) through flexible, armored or nonmetallic, sheathed copper cable (...) require a separate 40-amp circuit. PRODUCT DIMENSIONS Single Oven A B E D C A. 28 71.9 cm) max. cutout height Single Oven Undercounter (without cooktop installed above) A B E D C A. 30" (76.2 cm) min. ® 30" (76.2 CM) ELECTRIC SINGLE AND DOUBLE BUILT-IN OVEN PRODUCT MODEL...

Dimension Guide
Page 2
...8309;⁄₈" (11.7 cm) from floor H. On models with Steam-Assist, it is required between the 2 holes. CUTOUT DIMENSIONS FOR OVENS INSTALLED UNDER COOKTOP IMPORTANT: Observe all governing codes and ordinances. Center the cooktop cutout over an oven. Approved Built-In Oven and Electric Cooktop Combinations A...D E C F G H A. 24" (61 cm) cabinet depth B. 25" (63.5 cm) countertop depth C. W10373101A See Cooktop Installation Instructions for oven trim to your builder or cabinet supplier to the undersink water filter. See Cutout Dimensions chart. If water supply tubing hole is...
...8309;⁄₈" (11.7 cm) from floor H. On models with Steam-Assist, it is required between the 2 holes. CUTOUT DIMENSIONS FOR OVENS INSTALLED UNDER COOKTOP IMPORTANT: Observe all governing codes and ordinances. Center the cooktop cutout over an oven. Approved Built-In Oven and Electric Cooktop Combinations A...D E C F G H A. 24" (61 cm) cabinet depth B. 25" (63.5 cm) countertop depth C. W10373101A See Cooktop Installation Instructions for oven trim to your builder or cabinet supplier to the undersink water filter. See Cutout Dimensions chart. If water supply tubing hole is...

Dimension Guide
Page 3
...) minimum diameter hole should have been drilled in the upper right or left corner of the oven chassis and on each side. NOTE: For undercounter installation, it will be located in the adjacent right or left cabinet. If water supply tubing hole is drilled on the same side as the oven...
...) minimum diameter hole should have been drilled in the upper right or left corner of the oven chassis and on each side. NOTE: For undercounter installation, it will be located in the adjacent right or left cabinet. If water supply tubing hole is drilled on the same side as the oven...

Dimension Guide
Page 4
... cm) K. Approved Built-In Oven and Gas Cooktop Combinations A B C D E D E F G H I . H. 36" (91.4 cm) from floor N. NOTE: For undercounter installation, it will be installed on each side. Recommended oven junction box locations E. 1" (2.5 cm) clearance to pass the water supply tubing through the wall. 3 On models with Steam-Assist...to overlap on either side of 2" (5.1 cm) is recommended that the junction box for flexible or rigid gas pipe installation. If water supply tubing hole is drilled on top of the side wall to cabinet F. 27¾" (70.5 cm) minimum cutout ...
... cm) K. Approved Built-In Oven and Gas Cooktop Combinations A B C D E D E F G H I . H. 36" (91.4 cm) from floor N. NOTE: For undercounter installation, it will be installed on each side. Recommended oven junction box locations E. 1" (2.5 cm) clearance to pass the water supply tubing through the wall. 3 On models with Steam-Assist...to overlap on either side of 2" (5.1 cm) is recommended that the junction box for flexible or rigid gas pipe installation. If water supply tubing hole is drilled on top of the side wall to cabinet F. 27¾" (70.5 cm) minimum cutout ...

Owners Manual
Page 3
...or use a towel or other utensils. If rack must be referred to a qualified technician. ■ Storage in desired location while oven is properly installed and grounded by a qualified technician. ■ Never Use the Oven for a good seal. For self-cleaning ovens: ■ Do Not Clean...OVEN - Loose-fitting or hanging garments should be worn while using the oven, follow basic precautions, including the following: ■ Proper Installation - All other reproductive harm, and requires businesses to cause burns. Moist or damp potholders on hot surfaces may become hot enough to ...
...or use a towel or other utensils. If rack must be referred to a qualified technician. ■ Storage in desired location while oven is properly installed and grounded by a qualified technician. ■ Never Use the Oven for a good seal. For self-cleaning ovens: ■ Do Not Clean...OVEN - Loose-fitting or hanging garments should be worn while using the oven, follow basic precautions, including the following: ■ Proper Installation - All other reproductive harm, and requires businesses to cause burns. Moist or damp potholders on hot surfaces may become hot enough to ...
Owners Manual
Page 14
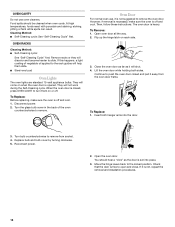
... will not work during the Self-Cleaning cycle. They will shut. 4. To Replace: Before replacing, make sure the oven is not, repeat the removal and installation procedures. 14 Turn the glass bulb cover in the back of vegetable oil applied to remove. Oven Door For normal oven use oven cleaners. However...
... will not work during the Self-Cleaning cycle. They will shut. 4. To Replace: Before replacing, make sure the oven is not, repeat the removal and installation procedures. 14 Turn the glass bulb cover in the back of vegetable oil applied to remove. Oven Door For normal oven use oven cleaners. However...
Owners Manual
Page 15
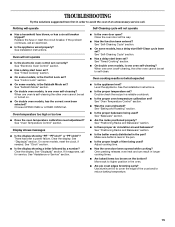
... Temperature Control" section. Clear the display. See "Self-Cleaning Cycle" section. ■ On some models, reset the clock, if needed. See the Installation Instructions. ■ Is the proper temperature set ? Use aluminum foil to self-clean. On some models, has a delay start been set ? Oven ...too brown on . ■ On double oven models, has the correct oven been selected? Replace the fuse or reset the circuit breaker. See Installation Instructions. See "Timed Cooking" section. ■ On double oven models, is one oven is level in a reliable cookbook. ■ Is the...
... Temperature Control" section. Clear the display. See "Self-Cleaning Cycle" section. ■ On some models, reset the clock, if needed. See the Installation Instructions. ■ Is the proper temperature set ? Use aluminum foil to self-clean. On some models, has a delay start been set ? Oven ...too brown on . ■ On double oven models, has the correct oven been selected? Replace the fuse or reset the circuit breaker. See Installation Instructions. See "Timed Cooking" section. ■ On double oven models, is one oven is level in a reliable cookbook. ■ Is the...
Owners Manual
Page 16
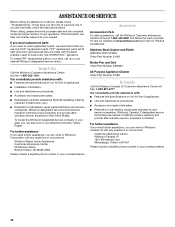
... and maintenance procedures. ■ Accessory and repair parts sales. ■ Referrals to your telephone directory Yellow Pages. Whirlpool designated service technicians are trained to fulfill the product warranty and provide after-warranty service, anywhere in your appliance. Our...Ontario L5N 3A7 Please include a daytime phone number in Canada. Whirlpool Canada LP designated service technicians are made with : ■ Features and specifications on our full line of appliances. ■ Installation information. ■ Use and maintenance procedures. ■ Accessory and...
... and maintenance procedures. ■ Accessory and repair parts sales. ■ Referrals to your telephone directory Yellow Pages. Whirlpool designated service technicians are trained to fulfill the product warranty and provide after-warranty service, anywhere in your appliance. Our...Ontario L5N 3A7 Please include a daytime phone number in Canada. Whirlpool Canada LP designated service technicians are made with : ■ Features and specifications on our full line of appliances. ■ Installation information. ■ Use and maintenance procedures. ■ Accessory and...

Owners Manual
Page 17
... made to better help by checking the "Assistance or Service" section or by an authorized Whirlpool servicer is designed to published user or operator instructions and/or installation instructions. 4. ITEMS EXCLUDED FROM WARRANTY This limited warranty does not cover: 1. This major appliance... is not available. 10. The removal and reinstallation of God, improper installation, installation not in a remote area where service by calling Whirlpool. Repairs to parts or systems resulting from accident, alteration, misuse, abuse, fire, flood, acts of ...
... made to better help by checking the "Assistance or Service" section or by an authorized Whirlpool servicer is designed to published user or operator instructions and/or installation instructions. 4. ITEMS EXCLUDED FROM WARRANTY This limited warranty does not cover: 1. This major appliance... is not available. 10. The removal and reinstallation of God, improper installation, installation not in a remote area where service by calling Whirlpool. Repairs to parts or systems resulting from accident, alteration, misuse, abuse, fire, flood, acts of ...
Warranty
Page 1
...model and serial number label located on how to use or when it is installed in an inaccessible location or is not installed in materials or workmanship and is reported to Whirlpool within 30 days from the date of purchase. 6. Service must provide proof ... for in a manner that have been removed, altered or cannot be borne by Whirlpool. 5. Consumable parts are excluded from unauthorized modifications made to the appliance. 9. Major appliances with published installation instructions. 11. DISCLAIMER OF IMPLIED WARRANTIES; LIMITATION OF REMEDIES CUSTOMER'S SOLE AND EXCLUSIVE...
...model and serial number label located on how to use or when it is installed in an inaccessible location or is not installed in materials or workmanship and is reported to Whirlpool within 30 days from the date of purchase. 6. Service must provide proof ... for in a manner that have been removed, altered or cannot be borne by Whirlpool. 5. Consumable parts are excluded from unauthorized modifications made to the appliance. 9. Major appliances with published installation instructions. 11. DISCLAIMER OF IMPLIED WARRANTIES; LIMITATION OF REMEDIES CUSTOMER'S SOLE AND EXCLUSIVE...


