

Use and Care Guide
Page 2
... Lock 7 Vent Fan 7 Cooktop Light 7 Demo Mode 7 MICROWAVE OVEN USE 8 Food Characteristics 8 Cooking Guidelines 8 Cookware and Dinnerware 9 Aluminum Foil and Metal 9 Microwave Cooking Power 10 Manual Cooking 10 Cooking in Stages (or steps 10 Quick Touch Cooking 11 Doneness 11 Preset Cooking 11 Reheating 12 2-4 Plates 12 Defrosting 12 Warm Hold...
... Lock 7 Vent Fan 7 Cooktop Light 7 Demo Mode 7 MICROWAVE OVEN USE 8 Food Characteristics 8 Cooking Guidelines 8 Cookware and Dinnerware 9 Aluminum Foil and Metal 9 Microwave Cooking Power 10 Manual Cooking 10 Cooking in Stages (or steps 10 Quick Touch Cooking 11 Doneness 11 Preset Cooking 11 Reheating 12 2-4 Plates 12 Defrosting 12 Warm Hold...
Use and Care Guide
Page 3
... and touch electrical parts involving a risk of electric shock. Do not leave paper products, cooking utensils, or food in the cavity when not in this manual. Do not use . [] Liquids, such as they may create a fire or risk of electric shock. [] Do not clean with narrow necks. -...necessary when used by qualified service personnel. It is not designed for examination, repair, or adjustment. [] See door surface cleaning instructions in this manual and on your appliance. Remove wire twist-ties from the microwave oven is not working properly, or if it has been damaged or dropped. []...
... and touch electrical parts involving a risk of electric shock. Do not leave paper products, cooking utensils, or food in the cavity when not in this manual. Do not use . [] Liquids, such as they may create a fire or risk of electric shock. [] Do not clean with narrow necks. -...necessary when used by qualified service personnel. It is not designed for examination, repair, or adjustment. [] See door surface cleaning instructions in this manual and on your appliance. Remove wire twist-ties from the microwave oven is not working properly, or if it has been damaged or dropped. []...
Use and Care Guide
Page 5
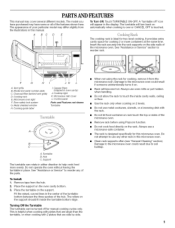
... soil buildup. Do not cook food directly on . A BC D E To Turn Off: Touch TURNTABLE ON-OFE A "turntable off for manual cooking cycles only. The turntable will turn back on the side walls of your particular model may have purchased may differ slightly from the illustrations... in this manual. Grease filters (shipped in place. Control panel Parts and Features not shown Turntable A. See "Assistance or Service" to the microwave oven...
... soil buildup. Do not cook food directly on . A BC D E To Turn Off: Touch TURNTABLE ON-OFE A "turntable off for manual cooking cycles only. The turntable will turn back on the side walls of your particular model may have purchased may differ slightly from the illustrations... in this manual. Grease filters (shipped in place. Control panel Parts and Features not shown Turntable A. See "Assistance or Service" to the microwave oven...

Use and Care Guide
Page 6
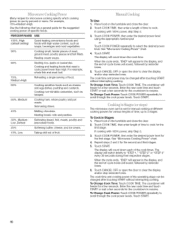
... the display. The speed of day. 3. The CANCEL OFF pad stops most functions except for FAST. 3. To Adjust Scroll Speed: 1. Touching ADD 30 SEC during a manual cook cycle will add 30 seconds of day mode and the programmed function will appear on the display. MICROWAVEOVENCONTROL QUICK TOUCH POPCORNBEVERAGE PIZZA ® BAKED...
... the display. The speed of day. 3. The CANCEL OFF pad stops most functions except for FAST. 3. To Adjust Scroll Speed: 1. Touching ADD 30 SEC during a manual cook cycle will add 30 seconds of day mode and the programmed function will appear on the display. MICROWAVEOVENCONTROL QUICK TOUCH POPCORNBEVERAGE PIZZA ® BAKED...
Use and Care Guide
Page 10
...-cycle tones will count down each of time, up to 3 stages. The cook time and cooking power of the operating stage can be set for manual cooking at different cooking powers for various lengths of the cook times. Enter the new cook time and touch START or wait a few seconds for...
...-cycle tones will count down each of time, up to 3 stages. The cook time and cooking power of the operating stage can be set for manual cooking at different cooking powers for various lengths of the cook times. Enter the new cook time and touch START or wait a few seconds for...
Use and Care Guide
Page 12
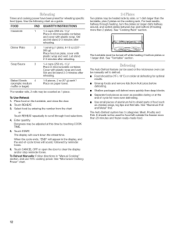
...container, and cover with plastic wrap and vent. Two plates may be heated side by reminder tones. 6. The Auto Defrost feature can be manually set to defrost. • Food should not be turned off while heating 2 bottom plates or 1 larger dish. FOOD PAD QUANTITY/INSTRUCTION ... used for reheating specific food types. See "Turntable" section. Touch REHEAT. 3. See "Aluminum Foil and Metal" first. To Reheat Manually: Follow directions in microwavable container. Cover with plastic wrap and vent. Times and cooking power have been preset for food left outside the...
...container, and cover with plastic wrap and vent. Two plates may be heated side by reminder tones. 6. The Auto Defrost feature can be manually set to defrost. • Food should not be turned off while heating 2 bottom plates or 1 larger dish. FOOD PAD QUANTITY/INSTRUCTION ... used for reheating specific food types. See "Turntable" section. Touch REHEAT. 3. See "Aluminum Foil and Metal" first. To Reheat Manually: Follow directions in microwavable container. Cover with plastic wrap and vent. Times and cooking power have been preset for food left outside the...
Use and Care Guide
Page 13
... -cycle tones sound. 13 Fish can be set from 0.2 to 4.4 Ib (90 g to 3 kg). To Defrost Manually: Follow directions in pounds. Unwrap food, place on the turntable and close the door. 2. Enter the weight in "Manual Cooking" section, and use 30% cooking power. See "Microwave Cooking Power" chart. Touch CANCEL OFF or...
... -cycle tones sound. 13 Fish can be set from 0.2 to 4.4 Ib (90 g to 3 kg). To Defrost Manually: Follow directions in pounds. Unwrap food, place on the turntable and close the door. 2. Enter the weight in "Manual Cooking" section, and use 30% cooking power. See "Microwave Cooking Power" chart. Touch CANCEL OFF or...

Installation Instructions
Page 1
... 7... You can kill or hurt you don't immediately follow instructions. IMPORTANT: Read Installation Instructions thoroughly before beginning installation. Remove Mounting Plate 4.. Drill Holes in this manual and on your particular model may differ slightly from the illustration in these installation instructions. Install Damper Assembly 9.. Rotate Blower Motor 4.. Locate Wall Stud(s 6.. Attach...
... 7... You can kill or hurt you don't immediately follow instructions. IMPORTANT: Read Installation Instructions thoroughly before beginning installation. Remove Mounting Plate 4.. Drill Holes in this manual and on your particular model may differ slightly from the illustration in these installation instructions. Install Damper Assembly 9.. Rotate Blower Motor 4.. Locate Wall Stud(s 6.. Attach...


