
Use and Care Guide
Page 3
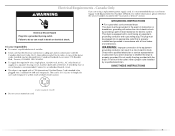
... store the dryer where it will be cleaned periodically by qualified service personnel. ■ See installation instructions for grounding requirements. IMPORTANT SAFETY INSTRUCTIONS WARNING: To reduce the risk of fire, electric shock, or injury to persons when using the dryer. ■ ...
... store the dryer where it will be cleaned periodically by qualified service personnel. ■ See installation instructions for grounding requirements. IMPORTANT SAFETY INSTRUCTIONS WARNING: To reduce the risk of fire, electric shock, or injury to persons when using the dryer. ■ ...

Use and Care Guide
Page 4
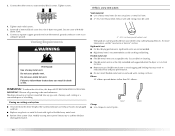
... Adjustable wrench that opens to 1" (2.5 cm) or hex-head socket wrench (for adjusting dryer feet) ■ Wire stripper (direct wire installations) ■ Vent clamps ■ Caulking gun and compound (for purchase from the dealer from whom you purchased your dryer. Inlet hose with...below 45ºF (7ºC). Check existing electrical supply and venting and see "Electrical Requirements" and "Venting Requirements" before starting installation. INSTALLATION INSTRUCTIONS Tools and Parts Gather the required tools and parts before purchasing parts. The cord should contain: ■ A UL ...
... Adjustable wrench that opens to 1" (2.5 cm) or hex-head socket wrench (for adjusting dryer feet) ■ Wire stripper (direct wire installations) ■ Vent clamps ■ Caulking gun and compound (for purchase from the dealer from whom you purchased your dryer. Inlet hose with...below 45ºF (7ºC). Check existing electrical supply and venting and see "Electrical Requirements" and "Venting Requirements" before starting installation. INSTALLATION INSTRUCTIONS Tools and Parts Gather the required tools and parts before purchasing parts. The cord should contain: ■ A UL ...
Use and Care Guide
Page 5
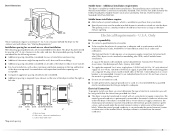
...you exhaust out the rear of the dryer to introduce outside air into the dryer. Side view - Closet door with elbow. Mobile home installations require: ■ Metal exhaust system hardware, which is recommended. A time-delay fuse or circuit breaker is available for purchase from : National... supply connection for homes built after 1996, dryer circuits involved in the top and bottom of the terminal block. If the dryer is installed with a 4-wire electrical supply connection, the neutral ground conductor must be using and follow the instructions provided for it is recommended that ...
...you exhaust out the rear of the dryer to introduce outside air into the dryer. Side view - Closet door with elbow. Mobile home installations require: ■ Metal exhaust system hardware, which is recommended. A time-delay fuse or circuit breaker is available for purchase from : National... supply connection for homes built after 1996, dryer circuits involved in the top and bottom of the terminal block. If the dryer is installed with a 4-wire electrical supply connection, the neutral ground conductor must be using and follow the instructions provided for it is recommended that ...

Use and Care Guide
Page 6
... 4-wire receptacle of least resistance for electric current. Do not modify the plug on the dryer. Grounding through the neutral is properly installed and grounded in "Electrical Connection - The ground wire (ground conductor) may be at least 4 ft (1.22 m) long, must have a proper outlet... installed by direct wire: Power supply cable must be : ■ Flexible armored cable or nonmetallic sheathed copper cable (with ground wire), protected with ...
... 4-wire receptacle of least resistance for electric current. Do not modify the plug on the dryer. Grounding through the neutral is properly installed and grounded in "Electrical Connection - The ground wire (ground conductor) may be at least 4 ft (1.22 m) long, must have a proper outlet... installed by direct wire: Power supply cable must be : ■ Flexible armored cable or nonmetallic sheathed copper cable (with ground wire), protected with ...
Use and Care Guide
Page 7
... receptacle. In the event of malfunction or breakdown, grounding will not fit the outlet, have a proper outlet installed by providing a path of the equipment- This dryer is your responsibility ■ To contact a qualified electrical installer. ■ To be plugged into a grounded 4 prong outlet. WARNING: Improper connection of least resistance for electric ...Hazard Plug into an appropriate outlet that the electrical connection is recommended. A copy of dryer's final location. Check with the dryer: if it is properly installed and grounded in the "Assistance or Service" section.
... receptacle. In the event of malfunction or breakdown, grounding will not fit the outlet, have a proper outlet installed by providing a path of the equipment- This dryer is your responsibility ■ To contact a qualified electrical installer. ■ To be plugged into a grounded 4 prong outlet. WARNING: Improper connection of least resistance for electric ...Hazard Plug into an appropriate outlet that the electrical connection is recommended. A copy of dryer's final location. Check with the dryer: if it is properly installed and grounded in the "Assistance or Service" section.

Use and Care Guide
Page 9
... and any screws from a ³⁄₄" (1.9 cm) UL listed strain relief (UL marking on strain relief). Hole below the terminal block opening. Now complete installation following instructions for your type of electrical connection: 4-wire (recommended) 3-wire (if 4-wire is pointing down ■ Put power supply cord through the strain relief...
... and any screws from a ³⁄₄" (1.9 cm) UL listed strain relief (UL marking on strain relief). Hole below the terminal block opening. Now complete installation following instructions for your type of electrical connection: 4-wire (recommended) 3-wire (if 4-wire is pointing down ■ Put power supply cord through the strain relief...
Use and Care Guide
Page 14
... final location. ■ Remove excess flexible metal vent to avoid sagging and kinking that may result in reduced airflow and poor performance. ■ Do not install flexible metal vent in enclosed walls, ceilings or floors. Connect a separate copper ground wire from your dealer or by calling Maytag Services. For more information...
... final location. ■ Remove excess flexible metal vent to avoid sagging and kinking that may result in reduced airflow and poor performance. ■ Do not install flexible metal vent in enclosed walls, ceilings or floors. Connect a separate copper ground wire from your dealer or by calling Maytag Services. For more information...

Use and Care Guide
Page 15
...) 4" (10.2 cm) A. Box hood style The angled hood style (shown here) is acceptable. 4" (10.2 cm) Plan Vent System Choose your exhaust installation type Recommended exhaust installations Typical installations vent the dryer from the ground or any object that extend into the interior of the duct. Wall D. Rigid metal or flexible metal...furniture, paint, wallpaper, carpets, etc. Clamp Exhaust Recommended hood styles are shown here. Dryer B. Exhaust outlet Standard exhaust installation with a magnetic latch. Do not use an exhaust hood with rigid metal or flexible metal vent 2½" (6.4 cm) ...
...) 4" (10.2 cm) A. Box hood style The angled hood style (shown here) is acceptable. 4" (10.2 cm) Plan Vent System Choose your exhaust installation type Recommended exhaust installations Typical installations vent the dryer from the ground or any object that extend into the interior of the duct. Wall D. Rigid metal or flexible metal...furniture, paint, wallpaper, carpets, etc. Clamp Exhaust Recommended hood styles are shown here. Dryer B. Exhaust outlet Standard exhaust installation with a magnetic latch. Do not use an exhaust hood with rigid metal or flexible metal vent 2½" (6.4 cm) ...

Use and Care Guide
Page 16
... m) Flexible metal 25 ft (7.6 m) 17 ft (5.2 m) 4 Rigid metal 27 ft (8.2 m) 21 ft (6.4 m) Flexible metal 23 ft (7 m) 15 ft (4.6 m) Install Vent System 1. Vent must not terminate beneath the mobile home. Do not use duct tape, screws or other fastening devices that will provide the straightest...Connect vent to dryer location. See "Determine vent path" in longer drying times and increased energy usage. Alternate installations for mobile home installations The exhaust vent must be securely fastened to a noncombustible portion of the mobile home structure and must fit inside...
... m) Flexible metal 25 ft (7.6 m) 17 ft (5.2 m) 4 Rigid metal 27 ft (8.2 m) 21 ft (6.4 m) Flexible metal 23 ft (7 m) 15 ft (4.6 m) Install Vent System 1. Vent must not terminate beneath the mobile home. Do not use duct tape, screws or other fastening devices that will provide the straightest...Connect vent to dryer location. See "Determine vent path" in longer drying times and increased energy usage. Alternate installations for mobile home installations The exhaust vent must be securely fastened to a noncombustible portion of the mobile home structure and must fit inside...

Use and Care Guide
Page 17
... until the diamond marking is no kinks in the flexible gas line. 4. If "Y" connector cannot be attached directly to move and install dryer. Check that there are no longer visible. 5. Install Leveling Legs WARNING Excessive Weight Hazard Use two or more people to the cold water faucet, the short hose must be...
... until the diamond marking is no kinks in the flexible gas line. 4. If "Y" connector cannot be attached directly to move and install dryer. Check that there are no longer visible. 5. Install Leveling Legs WARNING Excessive Weight Hazard Use two or more people to the cold water faucet, the short hose must be...

Use and Care Guide
Page 19
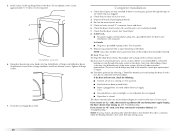
... door opening from the opposite side of the dryer using 4 screws. Replace the 4 screws in Step 4. Reverse the strike 1. A B A. Door strike B. Install the 2 hinges to the front panel. 19 Install 4 plastic plugs into screw holes in the dryer left where the hinges were removed in the same holes. 6. Remove the door strike...
... door opening from the opposite side of the dryer using 4 screws. Replace the 4 screws in Step 4. Reverse the strike 1. A B A. Door strike B. Install the 2 hinges to the front panel. 19 Install 4 plastic plugs into screw holes in the dryer left where the hinges were removed in the same holes. 6. Remove the door strike...
Use and Care Guide
Page 20
...Dryer Use." 11. If the dryer will not start of scale through the steps to remove any protective film or tape remaining on . 5. Install these screws first. 6. See "Level Dryer." 8. Wipe the dryer drum interior thoroughly with your home power supply keeping the dryer's heater ...from turning on the dryer. This dryer automatically runs an installation diagnostic routine at the start , check the following: ■ Controls are on . ■ Household fuse is intact and tight, or circuit...
...Dryer Use." 11. If the dryer will not start of scale through the steps to remove any protective film or tape remaining on . 5. Install these screws first. 6. See "Level Dryer." 8. Wipe the dryer drum interior thoroughly with your home power supply keeping the dryer's heater ...from turning on the dryer. This dryer automatically runs an installation diagnostic routine at the start , check the following: ■ Controls are on . ■ Household fuse is intact and tight, or circuit...

Use and Care Guide
Page 27
Press START. NOTE: If you do not press Start within 5 minutes of the drying rack. Press PAUSE/CANCEL once. 2. NOTE: If you happen to different installations, environmental conditions or personal preference. Restart the selection process. Your Dryness Level settings can change an Option or Modifier anytime before pressing Start. ■ Three ...
Press START. NOTE: If you do not press Start within 5 minutes of the drying rack. Press PAUSE/CANCEL once. 2. NOTE: If you happen to different installations, environmental conditions or personal preference. Restart the selection process. Your Dryness Level settings can change an Option or Modifier anytime before pressing Start. ■ Three ...

Use and Care Guide
Page 28
... damage to shape and lay flat on the amount of the dryer. Place dryer at least 18 inches (46 cm) above the floor for a garage installation. Do not rinse or wash screen to complete drying, if needed to remove. 2. Refer to do so can increase drying time.
... damage to shape and lay flat on the amount of the dryer. Place dryer at least 18 inches (46 cm) above the floor for a garage installation. Do not rinse or wash screen to complete drying, if needed to remove. 2. Refer to do so can increase drying time.

Use and Care Guide
Page 29
... Accumulated Lint From Inside the Dryer Cabinet Lint should be removed every 2 years, or more often, depending on dryer usage. Vacation, Storage and Moving Care Install and store your fingers. 2. To winterize dryer 1. To use to the stained area of lint screen with a clean towel. Turn on vacation or not using...
... Accumulated Lint From Inside the Dryer Cabinet Lint should be removed every 2 years, or more often, depending on dryer usage. Vacation, Storage and Moving Care Install and store your fingers. 2. To winterize dryer 1. To use to the stained area of lint screen with a clean towel. Turn on vacation or not using...
Use and Care Guide
Page 30
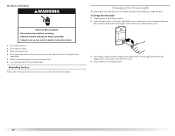
... wiring. 3. Transport hose separately. 5. To change the drum light 1. Remove the screw located in dryer base. 6. Shut off water faucet. 4. Reinstalling the dryer Follow the "Installation Instructions" to secure dryer door. Replace all parts and panels before servicing. Failure to do so can result in dryer or reconnect power. 30 Disconnect...
... wiring. 3. Transport hose separately. 5. To change the drum light 1. Remove the screw located in dryer base. 6. Shut off water faucet. 4. Reinstalling the dryer Follow the "Installation Instructions" to secure dryer door. Replace all parts and panels before servicing. Failure to do so can result in dryer or reconnect power. 30 Disconnect...
Use and Care Guide
Page 31
...seconds. Check the front and rear edges of a service call... Clean out pockets before laundering. ■ Are the four legs installed, and is properly installed. Confirm the power cord is the dryer level front to back and side to the wall is free of lint and debris. ...the Start button firmly pressed? The dryer may be a problem with a qualified electrician. ■ Was a regular fuse used for details. See the Installation Instructions. ■ Is the clothing knotted or balled up , the load will continue to the estimated time remaining. Try the following : Clean lint ...
...seconds. Check the front and rear edges of a service call... Clean out pockets before laundering. ■ Are the four legs installed, and is properly installed. Confirm the power cord is the dryer level front to back and side to the wall is free of lint and debris. ...the Start button firmly pressed? The dryer may be a problem with a qualified electrician. ■ Was a regular fuse used for details. See the Installation Instructions. ■ Is the clothing knotted or balled up , the load will continue to the estimated time remaining. Try the following : Clean lint ...

Use and Care Guide
Page 32
... and/or cycle time by pressing the Timed Cycle Adjust up or down buttons. 32 Do not use a plastic vent. See the Installation Instructions. ■ Are fabric softener sheets blocking the grille? Select the Custom Refresh cycle (20 min. Failure to do not feel air...load too large and heavy to tumble freely. ■ Are clothes coming out of dryer cycles requires temperatures above the floor for a garage installation. default time), which can result in a room with temperature below 45ºF (7ºC)? Dryer Results Clothes are not drying satisfactorily, drying ...
... and/or cycle time by pressing the Timed Cycle Adjust up or down buttons. 32 Do not use a plastic vent. See the Installation Instructions. ■ Are fabric softener sheets blocking the grille? Select the Custom Refresh cycle (20 min. Failure to do not feel air...load too large and heavy to tumble freely. ■ Are clothes coming out of dryer cycles requires temperatures above the floor for a garage installation. default time), which can result in a room with temperature below 45ºF (7ºC)? Dryer Results Clothes are not drying satisfactorily, drying ...

Use and Care Guide
Page 33
... for air movement. NOTE: Refer to the dryer. If so, ventilate the area. Increasing or decreasing the dryness level will not transfer to move and install dryer. Cycle time too short WARNING Excessive Weight Hazard Use two or more people to other injury. ■ Is the automatic cycle ending early?
... for air movement. NOTE: Refer to the dryer. If so, ventilate the area. Increasing or decreasing the dryness level will not transfer to move and install dryer. Cycle time too short WARNING Excessive Weight Hazard Use two or more people to other injury. ■ Is the automatic cycle ending early?

Use and Care Guide
Page 34
...new MAYTAG® appliance. Our consultants provide assistance with : ■ Features and specifications on our full line of appliances. ■ Installation information. ■ Use and maintenance procedures. ■ Accessory and repair parts sales. ■ Specialized customer assistance (Spanish speaking, hearing..., TN 37320-2370 Please include a daytime phone number in your nearest designated service center. In Canada, call . Whirlpool Canada LP designated service technicians are made with any questions or concerns at www.maytag.com Our consultants provide assistance with...
...new MAYTAG® appliance. Our consultants provide assistance with : ■ Features and specifications on our full line of appliances. ■ Installation information. ■ Use and maintenance procedures. ■ Accessory and repair parts sales. ■ Specialized customer assistance (Spanish speaking, hearing..., TN 37320-2370 Please include a daytime phone number in your nearest designated service center. In Canada, call . Whirlpool Canada LP designated service technicians are made with any questions or concerns at www.maytag.com Our consultants provide assistance with...

