
Use and Care Guide
Page 3
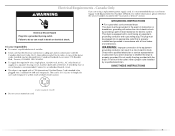
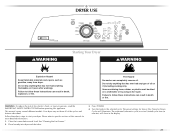
...; See installation instructions for grounding requirements. DRYER SAFETY Your safety and the safety of others . IMPORTANT SAFETY INSTRUCTIONS WARNING: To reduce the risk of fire, electric shock, or injury to persons when using the dryer. ■ Do not place items exposed to dry articles containing foam rubber or similarly textured rubber...
...; See installation instructions for grounding requirements. DRYER SAFETY Your safety and the safety of others . IMPORTANT SAFETY INSTRUCTIONS WARNING: To reduce the risk of fire, electric shock, or injury to persons when using the dryer. ■ Do not place items exposed to dry articles containing foam rubber or similarly textured rubber...

Use and Care Guide
Page 4
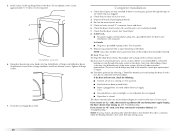
...that all parts were included. The kit should contain: ■ A UL listed 30-amp power supply cord, rated 120/240 volt minimum. See "Electrical Requirements." ■ A sturdy floor to 1" (2.5 cm) or hex-head socket wrench (for adjusting dryer feet) ■ Wire stripper (direct ...Location Requirements WARNING Explosion Hazard Keep flammable materials and vapors, such as gasoline, away from dryer drum. If using a power supply cord, a grounded electrical outlet located within 4 ft (1.2 m) of the water fill valves, and water pressure of 1" (2.5 cm) under entire dryer. See "Venting ...
...that all parts were included. The kit should contain: ■ A UL listed 30-amp power supply cord, rated 120/240 volt minimum. See "Electrical Requirements." ■ A sturdy floor to 1" (2.5 cm) or hex-head socket wrench (for adjusting dryer feet) ■ Wire stripper (direct ...Location Requirements WARNING Explosion Hazard Keep flammable materials and vapors, such as gasoline, away from dryer drum. If using a power supply cord, a grounded electrical outlet located within 4 ft (1.2 m) of the water fill valves, and water pressure of 1" (2.5 cm) under entire dryer. See "Venting ...
Use and Care Guide
Page 5
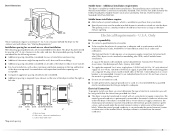
...Home Construction and Safety Standard, Title 24 CFR, Part 3280 (formerly the Federal Standard for mobile home installations. U.S.A. The National Electric Code requires a 4-wire power supply connection for homes built after 1996, and all mobile home installations. Connect to the neutral ...188;" (56.5 cm) *Most installations require a minimum 5" (12.7 cm) clearance behind the dryer for the exhaust vent with a 4-wire electrical supply connection, the neutral ground conductor must be removed from the external ground connector (green screw), and secured under the neutral terminal (center or ...
...Home Construction and Safety Standard, Title 24 CFR, Part 3280 (formerly the Federal Standard for mobile home installations. U.S.A. The National Electric Code requires a 4-wire power supply connection for homes built after 1996, and all mobile home installations. Connect to the neutral ...188;" (56.5 cm) *Most installations require a minimum 5" (12.7 cm) clearance behind the dryer for the exhaust vent with a 4-wire electrical supply connection, the neutral ground conductor must be removed from the external ground connector (green screw), and secured under the neutral terminal (center or ...

Use and Care Guide
Page 6
...installed by a qualified electrician. The plug must be insulated. ■ 10-gauge solid copper wire (do not permit the connection of electric shock. Do not modify the plug on the dryer. U.S.A. Grounding through the neutral is properly grounded. WARNING: Improper connection of least ...wiring system, or an equipment-grounding conductor must be plugged into an appropriate outlet that connect to whether the dryer is prohibited for electric current. Check with upturned ends. ■ A UL listed strain relief. SAVE THESE INSTRUCTIONS 3-wire receptacle (10-30R) Then ...
...installed by a qualified electrician. The plug must be insulated. ■ 10-gauge solid copper wire (do not permit the connection of electric shock. Do not modify the plug on the dryer. U.S.A. Grounding through the neutral is properly grounded. WARNING: Improper connection of least ...wiring system, or an equipment-grounding conductor must be plugged into an appropriate outlet that connect to whether the dryer is prohibited for electric current. Check with upturned ends. ■ A UL listed strain relief. SAVE THESE INSTRUCTIONS 3-wire receptacle (10-30R) Then ...
Use and Care Guide
Page 7
... properly grounded. SAVE THESE INSTRUCTIONS 4-wire receptacle 14-30R ■ Do not use Power Supply Cord Replacement Part Number 3394208. Electrical Shock Hazard Plug into a standard 14-30R wall receptacle. In the event of malfunction or breakdown, grounding will not fit the... by providing a path of the line. Failure to an individual branch circuit. ■ This dryer is recommended that is within reach of electric shock. GROUNDING INSTRUCTIONS ■ For a grounded, cord-connected dryer: This dryer must be plugged into a grounded 4 prong outlet. grounding ...
... properly grounded. SAVE THESE INSTRUCTIONS 4-wire receptacle 14-30R ■ Do not use Power Supply Cord Replacement Part Number 3394208. Electrical Shock Hazard Plug into a standard 14-30R wall receptacle. In the event of malfunction or breakdown, grounding will not fit the... by providing a path of the line. Failure to an individual branch circuit. ■ This dryer is recommended that is within reach of electric shock. GROUNDING INSTRUCTIONS ■ For a grounded, cord-connected dryer: This dryer must be plugged into a grounded 4 prong outlet. grounding ...

Use and Care Guide
Page 8
... relief. Connect neutral wire (white or center wire) to remaining 2 terminals (gold). Securely tighten all electrical connections. Terminal block cover B. Neutral ground wire F F. Power Supply Cord Electrical Connection - Failure to green ground connector. Fire Hazard Use 10 gauge solid copper wire. Center, silver-... wire (green or bare wire) must be connected to do so can result in death, fire, or electrical shock. 1. Disconnect power. 2. Connect remaining 2 supply wires to center terminal (silver). Hole below terminal block opening 8 Disconnect power ...
... relief. Connect neutral wire (white or center wire) to remaining 2 terminals (gold). Securely tighten all electrical connections. Terminal block cover B. Neutral ground wire F F. Power Supply Cord Electrical Connection - Failure to green ground connector. Fire Hazard Use 10 gauge solid copper wire. Center, silver-... wire (green or bare wire) must be connected to do so can result in death, fire, or electrical shock. 1. Disconnect power. 2. Connect remaining 2 supply wires to center terminal (silver). Hole below terminal block opening 8 Disconnect power ...

Use and Care Guide
Page 9
... opening , screw the removable conduit connector onto the strain relief threads. Tighten strain relief screw against the direct wire cable. 4. Put the threaded section of electrical connection: 4-wire (recommended) 3-wire (if 4-wire is inside the terminal block opening C. Do not further tighten strain relief screws at this point. B A C D B A. Strain relief threads...
... opening , screw the removable conduit connector onto the strain relief threads. Tighten strain relief screw against the direct wire cable. 4. Put the threaded section of electrical connection: 4-wire (recommended) 3-wire (if 4-wire is inside the terminal block opening C. Do not further tighten strain relief screws at this point. B A C D B A. Strain relief threads...

Use and Care Guide
Page 10
Tighten screw. Center silver-colored terminal block screw F. Electrical Connection Options If your home has: 4-wire receptacle (NEMA type 14-30R) And you will be connecting to: A UL listed, 120/240-volt minimum, 30-...
Tighten screw. Center silver-colored terminal block screw F. Electrical Connection Options If your home has: 4-wire receptacle (NEMA type 14-30R) And you will be connecting to: A UL listed, 120/240-volt minimum, 30-...

Use and Care Guide
Page 11
... codes do not permit the use of power supply cord D. ¾" (1.9 cm) UL listed strain relief E. Tighten screws. Direct wire cable must have completed your electrical connection. Shape ends of B the terminal block (hook facing right), squeeze hooked end together and tighten screw, as shown. Dotted line shows position of the...
... codes do not permit the use of power supply cord D. ¾" (1.9 cm) UL listed strain relief E. Tighten screws. Direct wire cable must have completed your electrical connection. Shape ends of B the terminal block (hook facing right), squeeze hooked end together and tighten screw, as shown. Dotted line shows position of the...

Use and Care Guide
Page 12
Squeeze hooked ends together. Tighten screws. 2. Tighten strain relief screw. 6. You have completed your electrical connection. Neutral prong D. Ring terminals G. Center silver-colored terminal block screw D. Connect the other direct ...neutral wire (white or center wire) of power supply cord to outer terminal block screws. Neutral wire (white or center wire) 1. You have completed your electrical connection. Neutral wire (white or center wire) E 1.9 cm) UL listed strain relief 3. 4. Tighten screw. 5. Loosen or remove center silver-colored terminal ...
Squeeze hooked ends together. Tighten screws. 2. Tighten strain relief screw. 6. You have completed your electrical connection. Neutral prong D. Ring terminals G. Center silver-colored terminal block screw D. Connect the other direct ...neutral wire (white or center wire) of power supply cord to outer terminal block screws. Neutral wire (white or center wire) 1. You have completed your electrical connection. Neutral wire (white or center wire) E 1.9 cm) UL listed strain relief 3. 4. Tighten screw. 5. Loosen or remove center silver-colored terminal ...

Use and Care Guide
Page 13
... ground conductor screw. Squeeze hooked ends together. External ground conductor screw B. Grounding path determined by a qualified electrician 13 Direct wire cable must have completed your electrical connection. Tighten strain relief screw. 5. Secure cover with outer covering. Optional 3-wire connection Use for direct wire or power supply cord where local codes do...
... ground conductor screw. Squeeze hooked ends together. External ground conductor screw B. Grounding path determined by a qualified electrician 13 Direct wire cable must have completed your electrical connection. Tighten strain relief screw. 5. Secure cover with outer covering. Optional 3-wire connection Use for direct wire or power supply cord where local codes do...
Use and Care Guide
Page 20
... is first used. Check that all hinge screws. 7. See "Level Dryer." 8. In the U.S.A. ■ For power supply cord installation, plug into an outlet and/or electrical supply is an extra part, go away. 20 Turn on power. Remove any dust. 12. Wipe the dryer drum interior thoroughly with your dryer vent...
... is first used. Check that all hinge screws. 7. See "Level Dryer." 8. In the U.S.A. ■ For power supply cord installation, plug into an outlet and/or electrical supply is an extra part, go away. 20 Turn on power. Remove any dust. 12. Wipe the dryer drum interior thoroughly with your dryer vent...
Use and Care Guide
Page 21
... several different models. See "Cleaning the Lint Screen." 2. Do not dry anything that has ever had anything that has ever had any type of fire, electric shock, or injury to follow these instructions can result in death or fire. Follow these instructions can completely remove oil. The estimated (automatic cycle) or...
... several different models. See "Cleaning the Lint Screen." 2. Do not dry anything that has ever had anything that has ever had any type of fire, electric shock, or injury to follow these instructions can result in death or fire. Follow these instructions can completely remove oil. The estimated (automatic cycle) or...
Use and Care Guide
Page 30
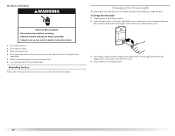
Disconnect wiring. 3. Make sure leveling legs are secure in death or electrical shock. 1. Use masking tape to locate, level and connect the dryer. Replace the bulb with the screw. 4. Replace all parts and panels before servicing. Reinstalling ... open the door. Replace the cover and secure with a 10-watt appliance bulb only. Disconnect power. 2. Open the dryer door. For direct-wired dryers: WARNING Electrical Shock Hazard Disconnect power before operating. Failure to do so can result in dryer base. 6. Disconnect the water inlet hose from faucet, then drain the...
Disconnect wiring. 3. Make sure leveling legs are secure in death or electrical shock. 1. Use masking tape to locate, level and connect the dryer. Replace the bulb with the screw. 4. Replace all parts and panels before servicing. Reinstalling ... open the door. Replace the cover and secure with a 10-watt appliance bulb only. Disconnect power. 2. Open the dryer door. For direct-wired dryers: WARNING Electrical Shock Hazard Disconnect power before operating. Failure to do so can result in dryer base. 6. Disconnect the water inlet hose from faucet, then drain the...
Use and Care Guide
Page 31
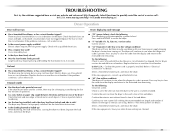
...items and restart the dryer. Dryer displaying code message ■ "PF" (power failure), check the following : Clean lint screen. Electric dryers use 2 household fuses or circuit breakers. Confirm your home power supply keeping the dryer's heater from the display and return to ... the message persists, consult a qualified electrician. ■ "AF" (low airflow condition): The dryer will bounce, causing the dryer to "Electrical Connection" for small objects. Confirm the vent run when this diagnostic code is crushed or kinked. Clean out pockets before laundering. ■ ...
...items and restart the dryer. Dryer displaying code message ■ "PF" (power failure), check the following : Clean lint screen. Electric dryers use 2 household fuses or circuit breakers. Confirm your home power supply keeping the dryer's heater from the display and return to ... the message persists, consult a qualified electrician. ■ "AF" (low airflow condition): The dryer will bounce, causing the dryer to "Electrical Connection" for small objects. Confirm the vent run when this diagnostic code is crushed or kinked. Clean out pockets before laundering. ■ ...

Use and Care Guide
Page 33
... with water and heat to a partially dried load can tumble freely. Odors ■ Have you recently been painting, staining or varnishing in a cycle. The new electric heating element may have an odor. This cycle is connected to garment care label instructions. When the odors or fumes are still wrinkled following Steam...
... with water and heat to a partially dried load can tumble freely. Odors ■ Have you recently been painting, staining or varnishing in a cycle. The new electric heating element may have an odor. This cycle is connected to garment care label instructions. When the odors or fumes are still wrinkled following Steam...

Use and Care Guide
Page 35
... or installation date for in remote locations. 10. This limited warranty applies only when the major appliance is used in the country in accordance with electrical or plumbing codes, or use of products not approved by a Maytag designated service company. Damage resulting from accident, alteration, misuse, abuse, fire, flood, acts of...
... or installation date for in remote locations. 10. This limited warranty applies only when the major appliance is used in the country in accordance with electrical or plumbing codes, or use of products not approved by a Maytag designated service company. Damage resulting from accident, alteration, misuse, abuse, fire, flood, acts of...


