

User Instructions
Page 1
To order parts and accessories, call 1-800-442-9991 or visit our website at 1-800-253-1301 from anywhere in -warranty service. Saturday 8:30 a.m. - 4:30 p.m. (EST) or write: Customer Interaction Center Whirlpool Canada Inc. 1901 Minnesota Court Mississauga, Ontario L5N 3A7 Please include a daytime phone number in... Additional help you obtain assistance or service if you need to help is available by calling our Customer Interaction Center at www.whirlpool.com. You can find this book and your complete model number and serial number. Write down the following information about your...
To order parts and accessories, call 1-800-442-9991 or visit our website at 1-800-253-1301 from anywhere in -warranty service. Saturday 8:30 a.m. - 4:30 p.m. (EST) or write: Customer Interaction Center Whirlpool Canada Inc. 1901 Minnesota Court Mississauga, Ontario L5N 3A7 Please include a daytime phone number in... Additional help you obtain assistance or service if you need to help is available by calling our Customer Interaction Center at www.whirlpool.com. You can find this book and your complete model number and serial number. Write down the following information about your...

User Instructions
Page 2
... recommended in this Use and Care Guide or in this manual and on or in , or spotted with controls. s Do not repair or replace any part of injury, and tell you don't follow basic precautions, including the following: s Read all safety messages. rounding areas free from service or discarded, remove the...
... recommended in this Use and Care Guide or in this manual and on or in , or spotted with controls. s Do not repair or replace any part of injury, and tell you don't follow basic precautions, including the following: s Read all safety messages. rounding areas free from service or discarded, remove the...

User Instructions
Page 4
... of Cycle signal is set it stops, wrinkles can form. This booklet covers several different models. The signal will sound only if the selector is part of Cycle signal can result in death or fire. See "Dryer Cycle Descriptions" (separate sheet) for clothes to remove dust from dryer. Allow space for...
... of Cycle signal is set it stops, wrinkles can form. This booklet covers several different models. The signal will sound only if the selector is part of Cycle signal can result in death or fire. See "Dryer Cycle Descriptions" (separate sheet) for clothes to remove dust from dryer. Allow space for...

User Instructions
Page 7
...-dried load can tumble freely. Service calls to instruct you how to use your authorized Whirlpool dealer to determine if another warranty applies. 1/02 Replacement parts If you need to or furnished with local electrical and plumbing codes, or use of ...or your dryer is operated and maintained according to instructions attached to order replacement parts, we recommend that will be provided by Whirlpool Corporation or Whirlpool Canada Inc. 5. WHIRLPOOL CORPORATION AND WHIRLPOOL CANADA INC. Travel or transportation expenses for units operated outside the United States and...
...-dried load can tumble freely. Service calls to instruct you how to use your authorized Whirlpool dealer to determine if another warranty applies. 1/02 Replacement parts If you need to or furnished with local electrical and plumbing codes, or use of ...or your dryer is operated and maintained according to instructions attached to order replacement parts, we recommend that will be provided by Whirlpool Corporation or Whirlpool Canada Inc. 5. WHIRLPOOL CORPORATION AND WHIRLPOOL CANADA INC. Travel or transportation expenses for units operated outside the United States and...

Installation Instructions
Page 1
... L'INSTALLATION DE LA SÉCHEUSE À GAZ DE 29" (73,7 CM) Table of Contents / Table des matières DRYER SAFETY 1 INSTALLATION INSTRUCTIONS 2 Tools and Parts 2 Location Requirements 3 Electrical Requirements 4 Gas Supply Requirements 4 Venting Requirements 5 Plan Vent System 6 Install Vent System 7 Install Leveling Legs 7 Level Dryer 8 Make Gas Connection 8 Connect Vent...
... L'INSTALLATION DE LA SÉCHEUSE À GAZ DE 29" (73,7 CM) Table of Contents / Table des matières DRYER SAFETY 1 INSTALLATION INSTRUCTIONS 2 Tools and Parts 2 Location Requirements 3 Electrical Requirements 4 Gas Supply Requirements 4 Venting Requirements 5 Plan Vent System 6 Install Vent System 7 Install Leveling Legs 7 Level Dryer 8 Make Gas Connection 8 Connect Vent...

Installation Instructions
Page 2
..., plumber, or gasfitter qualified or licensed by the State of your "Dryer User Instructions." Mobile home installations require special parts (listed following installation instructions apply: s Installations and repairs must be performed by calling the dealer from whom you purchased ...ball valve, it shall be followed to minimize the risk of all parts were included. Parts supplied: Remove parts package from a neighbor's phone. Ask for installing new exhaust vent) s Gloves s Pliers 4 leveling legs Parts needed: Check local codes and consult gas supplier. s Mobile home ...
..., plumber, or gasfitter qualified or licensed by the State of your "Dryer User Instructions." Mobile home installations require special parts (listed following installation instructions apply: s Installations and repairs must be performed by calling the dealer from whom you purchased ...ball valve, it shall be followed to minimize the risk of all parts were included. Parts supplied: Remove parts package from a neighbor's phone. Ask for installing new exhaust vent) s Gloves s Pliers 4 leveling legs Parts needed: Check local codes and consult gas supplier. s Mobile home ...

Installation Instructions
Page 3
... should also be installed in the top and bottom of 1" (2.5 cm) under entire dryer. (If slope is greater than 1" [2.5 cm], install Extended Dryer Feet kit, Part No. 279810.) Clothes may not tumble properly and models with a door, minimum ventilation openings in the same closet as gasoline, away from dryer. Louvered doors...
... should also be installed in the top and bottom of 1" (2.5 cm) under entire dryer. (If slope is greater than 1" [2.5 cm], install Extended Dryer Feet kit, Part No. 279810.) Clothes may not tumble properly and models with a door, minimum ventilation openings in the same closet as gasoline, away from dryer. Louvered doors...

Installation Instructions
Page 4
...prong. Do not use an adapter. Gas Supply Requirements WARNING Explosion Hazard Use a new AGA or CSA approved gas supply line. s Mobile Home Installation Kit Part #346764. s Special provisions must have a qualified person make sure gas pressure does not exceed 13" (33 cm) water column. GROUNDING INSTRUCTIONS s For...personnel if you are in the absence of electric shock. This dryer is equipped for Mobile Home Construction and Safety, Title 24, HUD Part 280) or the Canadian Manufactured Home Standard, CAN/CSA-Z240 MH. If this dryer be made in death, fire, or electrical shock....
...prong. Do not use an adapter. Gas Supply Requirements WARNING Explosion Hazard Use a new AGA or CSA approved gas supply line. s Mobile Home Installation Kit Part #346764. s Special provisions must have a qualified person make sure gas pressure does not exceed 13" (33 cm) water column. GROUNDING INSTRUCTIONS s For...personnel if you are in the absence of electric shock. This dryer is equipped for Mobile Home Construction and Safety, Title 24, HUD Part 280) or the Canadian Manufactured Home Standard, CAN/CSA-Z240 MH. If this dryer be made in death, fire, or electrical shock....

Installation Instructions
Page 5
.... Do not use TEFLON®† tape. DURASAFE™ venting products are recommended. rating indicated on the model/serial number plate is certified by calling Whirlpool Parts and Accessories. rating shown on the model/serial number plate. gas must be made to prevent kinking. Venting Requirements WARNING Fire Hazard Use a heavy metal...
.... Do not use TEFLON®† tape. DURASAFE™ venting products are recommended. rating indicated on the model/serial number plate is certified by calling Whirlpool Parts and Accessories. rating shown on the model/serial number plate. gas must be made to prevent kinking. Venting Requirements WARNING Fire Hazard Use a heavy metal...
Installation Instructions
Page 6
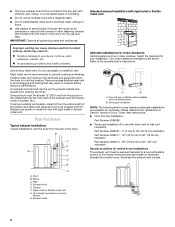
...governing codes and ordinances. Do not use with dryer vent to wall vent mismatch): Part Number 4396037 - 0" (0 cm) to 18" (45.72 cm) mismatch Part Number 4396011 - 18" (45.72 cm) to 29" (73.66 cm) mismatch Part Number 4396014 - 29" (73.66 cm) to 50" (127 cm) ...rodents and insects from entering the home. Over the top installation (also available with rigid metal or flexible metal vent. s Over-The-Top Installation: Part Number 4396028 s Periscope Installation (For use duct tape. Refer to woodwork, furniture, paint, wallpaper, carpets, etc. Plan Vent System Typical exhaust ...
...governing codes and ordinances. Do not use with dryer vent to wall vent mismatch): Part Number 4396037 - 0" (0 cm) to 18" (45.72 cm) mismatch Part Number 4396011 - 18" (45.72 cm) to 29" (73.66 cm) mismatch Part Number 4396014 - 29" (73.66 cm) to 50" (127 cm) ...rodents and insects from entering the home. Over the top installation (also available with rigid metal or flexible metal vent. s Over-The-Top Installation: Part Number 4396028 s Periscope Installation (For use duct tape. Refer to woodwork, furniture, paint, wallpaper, carpets, etc. Plan Vent System Typical exhaust ...

Installation Instructions
Page 8
... to the action of dryer to the gas pipe. Connect Vent 1. The dryer vent must be used , be sure there are no kinks in large part of dryer. Make sure dryer is used to connect the dryer to be sure there are no kinks. Remove top screws from the gas pipe...
... to the action of dryer to the gas pipe. Connect Vent 1. The dryer vent must be used , be sure there are no kinks in large part of dryer. Make sure dryer is used to connect the dryer to be sure there are no kinks. Remove top screws from the gas pipe...

Installation Instructions
Page 9
... feel for heat. When the dryer has been running for 20 minutes and start , check the following: s Dryer is an extra part, go back through the steps to remove any tape remaining on right side of hinge slot. Tighten screws. Insert and tighten top screws... , contact a qualified technician. 9 Remove screws at bottom of your "Dryer User Instructions." 9. Remove door strike (E) from cabinet. Insert plugs in large part of cabinet. 10. Remove door strike plug (B). If needed, slide door catch left side of hinges. 3. Check to adjust alignment. If there is plugged...
... feel for heat. When the dryer has been running for 20 minutes and start , check the following: s Dryer is an extra part, go back through the steps to remove any tape remaining on right side of hinge slot. Tighten screws. Insert and tighten top screws... , contact a qualified technician. 9 Remove screws at bottom of your "Dryer User Instructions." 9. Remove door strike (E) from cabinet. Insert plugs in large part of cabinet. 10. Remove door strike plug (B). If needed, slide door catch left side of hinges. 3. Check to adjust alignment. If there is plugged...


