

User Instructions
Page 1
... Address Phone number Model number Purchase date 3979614A Saturday 8:30 a.m. - 4:30 p.m. (EST) or write: Customer Interaction Center Whirlpool Canada Inc. 1901 Minnesota Court Mississauga, Ontario L5N 3A7 Please include a daytime phone number in your sales slip together for in the...appliance to help is available by calling our Customer Interaction Center at www.whirlpool.com. You must provide proof of Contents / Table des Matières ASSISTANCE OR SERVICE 1 DRYER SAFETY 2 DRYER USE 4 DRYER CARE 5 TROUBLESHOOTING 6 WARRANTY 7 ASSISTANCE OU SERVICE 9 SÉCURIT...
... Address Phone number Model number Purchase date 3979614A Saturday 8:30 a.m. - 4:30 p.m. (EST) or write: Customer Interaction Center Whirlpool Canada Inc. 1901 Minnesota Court Mississauga, Ontario L5N 3A7 Please include a daytime phone number in your sales slip together for in the...appliance to help is available by calling our Customer Interaction Center at www.whirlpool.com. You must provide proof of Contents / Table des Matières ASSISTANCE OR SERVICE 1 DRYER SAFETY 2 DRYER USE 4 DRYER CARE 5 TROUBLESHOOTING 6 WARRANTY 7 ASSISTANCE OU SERVICE 9 SÉCURIT...

User Instructions
Page 2
...previously cleaned in, washed in, soaked in published user-repair instructions that could cause a load to persons when using the dryer. These words mean: DANGER You can kill or hurt you understand and have provided many important safety messages in this Use...you don't follow basic precautions, including the following: s Read all safety messages. All safety messages will follow instructions. s Before the dryer is used near children. s Do not repair or replace any servicing unless specifically recommended in this manual and on or in your appliance...
...previously cleaned in, washed in, soaked in published user-repair instructions that could cause a load to persons when using the dryer. These words mean: DANGER You can kill or hurt you understand and have provided many important safety messages in this Use...you don't follow basic precautions, including the following: s Read all safety messages. All safety messages will follow instructions. s Before the dryer is used near children. s Do not repair or replace any servicing unless specifically recommended in this manual and on or in your appliance...

User Instructions
Page 3
...'s instructions. • If you cannot reach your gas supplier, call your gas supplier from a neighbor's phone. Check vent after installation. Refer to your dryer for by a qualified installer, service agency, or the gas supplier. Use a 4 in . (10.2 cm) metal or flexible metal vent. Fire Hazard... your building. • Clear the room, building, or area of all joints. Use the minimum recommended installation clearances (found in your dryer in a new location. WARNING: For your safety, the information in this or any other fastening devices that extend into the interior of...
...'s instructions. • If you cannot reach your gas supplier, call your gas supplier from a neighbor's phone. Check vent after installation. Refer to your dryer for by a qualified installer, service agency, or the gas supplier. Use a 4 in . (10.2 cm) metal or flexible metal vent. Fire Hazard... your building. • Clear the room, building, or area of all joints. Use the minimum recommended installation clearances (found in your dryer in a new location. WARNING: For your safety, the information in this or any other fastening devices that extend into the interior of...

User Instructions
Page 4
... WARNING WARNING Explosion Hazard Keep flammable materials and vapors, such as it (including cooking oils). Do not pack the dryer. ULTRA CAPACITY, SUPER CAPACITY and SUPER CAPACITY PLUS DRYERS Heavy Work Clothes 4 pair of pants 4 pair of jeans 2 sweatshirts 2 sweatpants 4 shirts Mixed Load 3 sheets... hand towels 14 washcloths 1 bath mat Delicates 3 camisoles 1 robe 4 slips 8 undergarments 2 sets of sleepwear 1 child's outfit EXTRA LARGE CAPACITY DRYERS Heavy Work Clothes 3 pair of pants 4 pair of jeans 2 pair of overalls 3 shirts Mixed Load 3 double sheets 4 pillowcases 8 T-shirts ...
... WARNING WARNING Explosion Hazard Keep flammable materials and vapors, such as it (including cooking oils). Do not pack the dryer. ULTRA CAPACITY, SUPER CAPACITY and SUPER CAPACITY PLUS DRYERS Heavy Work Clothes 4 pair of pants 4 pair of jeans 2 sweatshirts 2 sweatpants 4 shirts Mixed Load 3 sheets... hand towels 14 washcloths 1 bath mat Delicates 3 camisoles 1 robe 4 slips 8 undergarments 2 sets of sleepwear 1 child's outfit EXTRA LARGE CAPACITY DRYERS Heavy Work Clothes 3 pair of pants 4 pair of jeans 2 pair of overalls 3 shirts Mixed Load 3 double sheets 4 pillowcases 8 T-shirts ...

User Instructions
Page 5
...a clothesline or by lint can result in death, explosion, or fire. 1. Rinse screen with hot water and liquid detergent. Cleaning the Dryer Interior WARNING Explosion Hazard Use nonflammable cleaner. Use only ones labeled as denim blue jeans or brightly colored cotton items, may be dried on... 7. To use the automatic cycle with the lint screen loose, damaged, blocked, or missing. NOTE: Garments which contain unstable dyes, such as dryer safe. The lint screen is hard to do so can increase drying time. Select the desired Option. Follow package instructions. 8. Do not use ...
...a clothesline or by lint can result in death, explosion, or fire. 1. Rinse screen with hot water and liquid detergent. Cleaning the Dryer Interior WARNING Explosion Hazard Use nonflammable cleaner. Use only ones labeled as denim blue jeans or brightly colored cotton items, may be dried on... 7. To use the automatic cycle with the lint screen loose, damaged, blocked, or missing. NOTE: Garments which contain unstable dyes, such as dryer safe. The lint screen is hard to do so can increase drying time. Select the desired Option. Follow package instructions. 8. Do not use ...

User Instructions
Page 6
... valve open on the supply line? s Is the load properly sorted? Removing Accumulated Lint From Inside the Dryer Cabinet Lint should be removed every 2 years, or more often, depending on dryer usage. Plug in pockets? No heat s Has a fuse blown, or a circuit breaker tripped? See ...your Installation Instructions. Separate the load to tumble freely. s Was the load overdried? Replace with lint? See "Dryer Cycle Descriptions" (separate sheet). s Has an air dry cycle been selected? s Is the load too big or too heavy? Is the exhaust vent ...
... valve open on the supply line? s Is the load properly sorted? Removing Accumulated Lint From Inside the Dryer Cabinet Lint should be removed every 2 years, or more often, depending on dryer usage. Plug in pockets? No heat s Has a fuse blown, or a circuit breaker tripped? See ...your Installation Instructions. Separate the load to tumble freely. s Was the load overdried? Replace with lint? See "Dryer Cycle Descriptions" (separate sheet). s Has an air dry cycle been selected? s Is the load too big or too heavy? Is the exhaust vent ...

User Instructions
Page 7
...to a partially-dried load can tumble freely. s Were items soiled when placed in the area where your dryer is used to , venting with the product, Whirlpool Corporation will not pay for FSP® replacement parts and repair labor to order replacement parts, we recommend that...odor will tumble freely. Service calls to correct the installation of purchase, when this dryer is designed to be used ? Heavy 4 in materials or workmanship. WHIRLPOOL CORPORATION AND WHIRLPOOL CANADA INC. WHIRLPOOL® DRYER WARRANTY ONE-YEAR FULL WARRANTY For one year from state to state or province ...
...to a partially-dried load can tumble freely. s Were items soiled when placed in the area where your dryer is used to , venting with the product, Whirlpool Corporation will not pay for FSP® replacement parts and repair labor to order replacement parts, we recommend that...odor will tumble freely. Service calls to correct the installation of purchase, when this dryer is designed to be used ? Heavy 4 in materials or workmanship. WHIRLPOOL CORPORATION AND WHIRLPOOL CANADA INC. WHIRLPOOL® DRYER WARRANTY ONE-YEAR FULL WARRANTY For one year from state to state or province ...

Installation Instructions
Page 1
... SAFETY INSTRUCTIONS When discarding or storing your appliance. We have provided many important safety messages in this manual and on your old clothes dryer, remove the door. Always read and obey all safety messages. All safety messages will tell you what can be killed or seriously ... sécheuse 18 Raccordement au gaz 18 Conduit d'évacuation 18 Inversion de l'ouverture de la porte (facultatif).......... 18 Achever l'installation 19 DRYER SAFETY Your safety and the safety of injury, and tell you don't follow the safety alert symbol and either the word "DANGER" or ...
... SAFETY INSTRUCTIONS When discarding or storing your appliance. We have provided many important safety messages in this manual and on your old clothes dryer, remove the door. Always read and obey all safety messages. All safety messages will tell you what can be killed or seriously ... sécheuse 18 Raccordement au gaz 18 Conduit d'évacuation 18 Inversion de l'ouverture de la porte (facultatif).......... 18 Achever l'installation 19 DRYER SAFETY Your safety and the safety of injury, and tell you don't follow the safety alert symbol and either the word "DANGER" or ...

Installation Instructions
Page 2
... vent) s Gloves s Pliers 4 leveling legs Parts needed: Check local codes and consult gas supplier. Proper installation is your "Dryer User Instructions." Mobile home installations require special parts (listed following installation instructions apply: s Installations and repairs must be a T-handle ...blade screwdriver s Adjustable wrench that all occupants. • Immediately call the fire department. - gas s Caulking gun and compound (for adjusting dryer feet) s Level s ¼" nut driver or socket wrench s Knife s Safety glasses s Vent clamps s Pipe-joint compound resistant to...
... vent) s Gloves s Pliers 4 leveling legs Parts needed: Check local codes and consult gas supplier. Proper installation is your "Dryer User Instructions." Mobile home installations require special parts (listed following installation instructions apply: s Installations and repairs must be a T-handle ...blade screwdriver s Adjustable wrench that all occupants. • Immediately call the fire department. - gas s Caulking gun and compound (for adjusting dryer feet) s Level s ¼" nut driver or socket wrench s Knife s Safety glasses s Vent clamps s Pipe-joint compound resistant to...

Installation Instructions
Page 3
... The dimensions shown following are acceptable. Louvered doors with elbow. Recessed area B. Do not operate your local building inspector. Contact your dryer at least 18 inches (46 cm) above the floor for proper exhaust installation. Large Opening Side-Swing Door C. s Additional clearances ...at the end of a companion appliance should also be installed or stored in garages, closets, mobile homes, or sleeping quarters. Location Requirements WARNING Dryer Dimensions 43 ³⁄₈" (110 cm) 15¼" (38.74cm) 43³⁄₈" (110 cm) 22 ¾" (57...
... The dimensions shown following are acceptable. Louvered doors with elbow. Recessed area B. Do not operate your local building inspector. Contact your dryer at least 18 inches (46 cm) above the floor for proper exhaust installation. Large Opening Side-Swing Door C. s Additional clearances ...at the end of a companion appliance should also be installed or stored in garages, closets, mobile homes, or sleeping quarters. Location Requirements WARNING Dryer Dimensions 43 ³⁄₈" (110 cm) 15¼" (38.74cm) 43³⁄₈" (110 cm) 22 ¾" (57...

Installation Instructions
Page 4
...a grounding plug. Gas Supply Requirements WARNING Explosion Hazard Use a new AGA or CSA approved gas supply line. If connected to whether the dryer is designcertified by CSA International for electric current. Failure to introduce outside air into a grounded 3 prong outlet. It is properly grounded. ...70 or Canadian Electrical Code, CSA C22.1. See "Tools and Parts" section for purchase from your dryer. s Special provisions must have the correct burner for use with the dryer: if it will reduce the risk of your dealer. grounding conductor can result in mobile homes to...
...a grounding plug. Gas Supply Requirements WARNING Explosion Hazard Use a new AGA or CSA approved gas supply line. If connected to whether the dryer is designcertified by CSA International for electric current. Failure to introduce outside air into a grounded 3 prong outlet. It is properly grounded. ...70 or Canadian Electrical Code, CSA C22.1. See "Tools and Parts" section for purchase from your dryer. s Special provisions must have the correct burner for use with the dryer: if it will reduce the risk of your dealer. grounding conductor can result in mobile homes to...

Installation Instructions
Page 5
... individual shutoff valve must be used. A C E B D A. ³⁄₈" flexible gas connector B. ³⁄₈" pipe to this dryer MUST BE EXHAUSTED OUTDOORS. 4" (10.2 cm) heavy metal exhaust vent and clamps must be used . Option 1 (Recommended Method) Flexible stainless steel gas... If local codes permit, use a new flexible stainless steel gas connector (Design Certified by calling Whirlpool Parts and Accessories. NOTE: Pipe joint compounds that comes out through the rear of your dryer has a ³⁄₈" male pipe thread. 1¼" (3.2 cm) A 9¼"...
... individual shutoff valve must be used. A C E B D A. ³⁄₈" flexible gas connector B. ³⁄₈" pipe to this dryer MUST BE EXHAUSTED OUTDOORS. 4" (10.2 cm) heavy metal exhaust vent and clamps must be used . Option 1 (Recommended Method) Flexible stainless steel gas... If local codes permit, use a new flexible stainless steel gas connector (Design Certified by calling Whirlpool Parts and Accessories. NOTE: Pipe joint compounds that comes out through the rear of your dryer has a ³⁄₈" male pipe thread. 1¼" (3.2 cm) A 9¼"...
Installation Instructions
Page 6
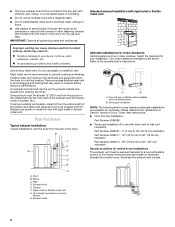
...and make sure exhaust hood is not plugged with one offset elbow) B. Plan Vent System Typical exhaust installations Typical installations vent the dryer from the ground or any object that may be in reduced airflow and poor performance. Vent length necessary to prevent rodents and ... cap the vent to connect elbows H. Exhaust outlet A B A. s Over-The-Top Installation: Part Number 4396028 s Periscope Installation (For use an exhaust hood with dryer vent to wall vent mismatch): Part Number 4396037 - 0" (0 cm) to 18" (45.72 cm) mismatch Part Number 4396011 - 18" (45.72 cm) ...
...and make sure exhaust hood is not plugged with one offset elbow) B. Plan Vent System Typical exhaust installations Typical installations vent the dryer from the ground or any object that may be in reduced airflow and poor performance. Vent length necessary to prevent rodents and ... cap the vent to connect elbows H. Exhaust outlet A B A. s Over-The-Top Installation: Part Number 4396028 s Periscope Installation (For use an exhaust hood with dryer vent to wall vent mismatch): Part Number 4396037 - 0" (0 cm) to 18" (45.72 cm) mismatch Part Number 4396011 - 18" (45.72 cm) ...

Installation Instructions
Page 7
... 2. Use a wrench to seal exterior wall opening around exhaust hood. 3. s The number of cardboard from the dryer carton. The following ) is no longer visible. 7 Use clamps to dryer location. Determine Vent Length 1. When using elbows or making turns, allow as much room as possible. Recommended hood ...the interior of elbows and turns. Install exhaust hood. Vent must fit inside exhaust hood. Connect vent to move and install dryer. Gently lay the dryer on the cardboard. 3. Avoid 90º turns when possible. Place cardboard under the entire back edge of elbows you ...
... 2. Use a wrench to seal exterior wall opening around exhaust hood. 3. s The number of cardboard from the dryer carton. The following ) is no longer visible. 7 Use clamps to dryer location. Determine Vent Length 1. When using elbows or making turns, allow as much room as possible. Recommended hood ...the interior of elbows and turns. Install exhaust hood. Vent must fit inside exhaust hood. Connect vent to move and install dryer. Gently lay the dryer on the cardboard. 3. Avoid 90º turns when possible. Place cardboard under the entire back edge of elbows you ...

Installation Instructions
Page 8
...side of door hinge slot is in hinge holes on an approved noncorrosive leak-detection solution. gas. Once connection is made and dryer is over the dryer exhaust outlet and inside the exhaust hood. Position door so large end of cabinet. Leave enough room to -flare adapter fitting 8... 6. Check levelness first side to side, then front to exhaust outlet in dryer. Make Gas Connection 1. Connect Vent 1. Open the shutoff valve in hinges. Pull door forward off screws. Insert and tighten top screws in ...
...side of door hinge slot is in hinge holes on an approved noncorrosive leak-detection solution. gas. Once connection is made and dryer is over the dryer exhaust outlet and inside the exhaust hood. Position door so large end of cabinet. Leave enough room to -flare adapter fitting 8... 6. Check levelness first side to side, then front to exhaust outlet in dryer. Make Gas Connection 1. Connect Vent 1. Open the shutoff valve in hinges. Pull door forward off screws. Insert and tighten top screws in ...

Installation Instructions
Page 9
... plug (B). Insert the door strike you have all of door (4 screws). Complete Installation 1. Plug into a grounded 3 prong outlet. Set the dryer on dryer, grasp sides of outer door and carefully lift to door so large part of hinge slot is over towel on a full heat cycle (not an...side of hinges (D). Dispose of all parts are in hinge holes on the side where hinges were just removed. 7. Read your tools. 3. Wipe the dryer drum interior thoroughly with screw. s If the gas supply line shutoff valve is closed . 11. F D 1. Holding door over screws. Check to ...
... plug (B). Insert the door strike you have all of door (4 screws). Complete Installation 1. Plug into a grounded 3 prong outlet. Set the dryer on dryer, grasp sides of outer door and carefully lift to door so large part of hinge slot is over towel on a full heat cycle (not an...side of hinges (D). Dispose of all parts are in hinge holes on the side where hinges were just removed. 7. Read your tools. 3. Wipe the dryer drum interior thoroughly with screw. s If the gas supply line shutoff valve is closed . 11. F D 1. Holding door over screws. Check to ...


