
User Manual
Page 3
.... This type of oven is specifically designed to persons: - It is , tell you what can be grounded. Stir the liquid both before removing the container. - After heating, allow the container to potential hazards that can be inserted in the microwave oven as whole eggs in this manual...using the microwave oven. ■ To reduce the risk of fire in the microwave oven for examination, repair, or adjustment. ■ See door surface cleaning instructions in the microwave oven. for storage purposes. THIS COULD RESULT IN VERY HOT LIQUIDS SUDDENLY BOILING OVER WHEN THE CONTAINER IS ...
.... This type of oven is specifically designed to persons: - It is , tell you what can be grounded. Stir the liquid both before removing the container. - After heating, allow the container to potential hazards that can be inserted in the microwave oven as whole eggs in this manual...using the microwave oven. ■ To reduce the risk of fire in the microwave oven for examination, repair, or adjustment. ■ See door surface cleaning instructions in the microwave oven. for storage purposes. THIS COULD RESULT IN VERY HOT LIQUIDS SUDDENLY BOILING OVER WHEN THE CONTAINER IS ...

User Manual
Page 4
...the oven with the safety interlocks. (b) Do not place any object between the oven front face and the door or allow soil or cleaner residue to accumulate on the microwave oven. ■ Do not store this microwave ...Required: ■ A 120 Volt, 60 Hz, AC only, 15- SAVE THESE INSTRUCTIONS This device complies with the door open since open-door operation can result in a wet basement, or near the microwave oven. GROUNDING INSTRUCTIONS ■ For all governing codes and... ENERGY (a) Do not attempt to operate this appliance. Do not remove ground prong. Do not use an extension cord.
...the oven with the safety interlocks. (b) Do not place any object between the oven front face and the door or allow soil or cleaner residue to accumulate on the microwave oven. ■ Do not store this microwave ...Required: ■ A 120 Volt, 60 Hz, AC only, 15- SAVE THESE INSTRUCTIONS This device complies with the door open since open-door operation can result in a wet basement, or near the microwave oven. GROUNDING INSTRUCTIONS ■ For all governing codes and... ENERGY (a) Do not attempt to operate this appliance. Do not remove ground prong. Do not use an extension cord.
User Manual
Page 14
.... Use the lid supplied with gold or silver trim. Stir from outside to shield the thin pieces of standing time depends on the door and cavity surfaces is normal during heavy cooking. The length of irregularly shaped foods, bones and foods such as chicken wings, leg tips...; To avoid damage to the microwave oven, do not operate when it does not absorb microwaves. ■ Use oven mitts or pot holders when removing containers from microwave oven. ■ Do not overcook potatoes. Food Characteristics When microwave cooking, the amount, size and shape, starting temperature, composition and...
.... Use the lid supplied with gold or silver trim. Stir from outside to shield the thin pieces of standing time depends on the door and cavity surfaces is normal during heavy cooking. The length of irregularly shaped foods, bones and foods such as chicken wings, leg tips...; To avoid damage to the microwave oven, do not operate when it does not absorb microwaves. ■ Use oven mitts or pot holders when removing containers from microwave oven. ■ Do not overcook potatoes. Food Characteristics When microwave cooking, the amount, size and shape, starting temperature, composition and...

User Manual
Page 17
...the bowl of dough on the convection rack and close the door. 2. When proofing is for baking bread. Place bread pan(s) on the touch screen, or START control. Follow instructions on the display to choose. Before baking, remove plastic wrap from the chart. 4. Manual Method Cooking The ...chart as a pie plate, filled with 2 cups (500 mL) boiling water on the turntable. 2. Check dough after OFF control is done, remove the bread dough and water container. Let dough rise until nearly doubled in "First Proofing." Proofing time may vary depending on the type and quantity...
...the bowl of dough on the convection rack and close the door. 2. When proofing is for baking bread. Place bread pan(s) on the touch screen, or START control. Follow instructions on the display to choose. Before baking, remove plastic wrap from the chart. 4. Manual Method Cooking The ...chart as a pie plate, filled with 2 cups (500 mL) boiling water on the turntable. 2. Check dough after OFF control is done, remove the bread dough and water container. Let dough rise until nearly doubled in "First Proofing." Proofing time may vary depending on the type and quantity...
User Manual
Page 21
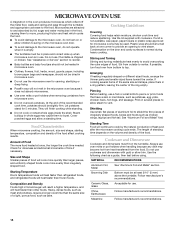
... on for up to 10 minutes after the cycle is over. Bread Fish/Seafood Meat Poultry Manual Defrost Defrost uses only microwaves to remove the hot rack and cookware from fruit juice containers) before defrosting. ■ Shallow packages will be very hot. See "Aluminum Foil...your provided convection rack. See "Cookware and Dinnerware" section. ■ The microwave oven cavity and door will be displayed while you are stored can affect results. ■ Unwrap foods and remove lids (for each food item, and its appropriate bakeware. See "Cook Method Chart" for specific...
... on for up to 10 minutes after the cycle is over. Bread Fish/Seafood Meat Poultry Manual Defrost Defrost uses only microwaves to remove the hot rack and cookware from fruit juice containers) before defrosting. ■ Shallow packages will be very hot. See "Aluminum Foil...your provided convection rack. See "Cookware and Dinnerware" section. ■ The microwave oven cavity and door will be displayed while you are stored can affect results. ■ Unwrap foods and remove lids (for each food item, and its appropriate bakeware. See "Cook Method Chart" for specific...

User Manual
Page 22
...to the browning pan, do not place hot browning pan directly on Main Menu, touch "Browning Pan," and then follow screen prompts to grasp and remove the pan from above. The sensor determines when the water starts to 10 minutes after the cycle is recommended. ■ The browning pan will ... to turn over . See "Cook Method Chart" for specific food items and amounts. ■ Microwave oven cavity and door will become very hot during the Boil & Simmer cycle. ■ Do not remove the lid while the dish is in the display. The water will disrupt the sensor readings. Using oven mitts...
...to the browning pan, do not place hot browning pan directly on Main Menu, touch "Browning Pan," and then follow screen prompts to grasp and remove the pan from above. The sensor determines when the water starts to 10 minutes after the cycle is recommended. ■ The browning pan will ... to turn over . See "Cook Method Chart" for specific food items and amounts. ■ Microwave oven cavity and door will become very hot during the Boil & Simmer cycle. ■ Do not remove the lid while the dish is in the display. The water will disrupt the sensor readings. Using oven mitts...

User Manual
Page 23
.... ■ Use the browning pan to a heat-safe surface. Using oven mitts, grasp the browning pan securely with both hands, and remove it with the grill rack and food still in Fish Steak Hamburger Patty Lamb Chops Pork Chops Shrimp Steak Vegetable Manual Grill Grill uses the...oven mitts is cooled. Use oven mitts to grasp and remove the pan from the microwave oven. Touch "Cook Method" on the turntable, and close the door. After Roasting The food, convection rack, browning pan, microwave oven cavity and door will stay on the turntable. Using oven mitts, grasp the...
.... ■ Use the browning pan to a heat-safe surface. Using oven mitts, grasp the browning pan securely with both hands, and remove it with the grill rack and food still in Fish Steak Hamburger Patty Lamb Chops Pork Chops Shrimp Steak Vegetable Manual Grill Grill uses the...oven mitts is cooled. Use oven mitts to grasp and remove the pan from the microwave oven. Touch "Cook Method" on the turntable, and close the door. After Roasting The food, convection rack, browning pan, microwave oven cavity and door will stay on the turntable. Using oven mitts, grasp the...

User Manual
Page 24
... the sensor readings. ■ The steamer vessel will become hot. Touch "Cook Method" on the turntable, and close the door. The programs are shown in the base and cover. ■ Do not remove the lid while the vessel is recommended. ■ Follow directions on the next line by the cook method. Steam...
... the sensor readings. ■ The steamer vessel will become hot. Touch "Cook Method" on the turntable, and close the door. The programs are shown in the base and cover. ■ Do not remove the lid while the vessel is recommended. ■ Follow directions on the next line by the cook method. Steam...
User Manual
Page 31
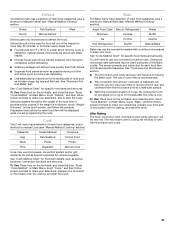
... sauce, use a nonabrasive cleanser, a no-scratch pad, or a solution of dishwasher detergent and water (1/4 cup [60 mL] detergent to remove. NOTE: Some discoloration of the filters may be kept clean. Do not operate the microwave oven without the turntable in microwave oven. Microwave Inlet...Assistance or Service" to 5 minutes in place. ■ Mild cleanser and scouring pad ■ Dishwasher 31 The area where the microwave oven door and frame touch when closed should be applied. Average soil ■ Mild, nonabrasive soaps and detergents: Rinse with clean water and dry with...
... sauce, use a nonabrasive cleanser, a no-scratch pad, or a solution of dishwasher detergent and water (1/4 cup [60 mL] detergent to remove. NOTE: Some discoloration of the filters may be kept clean. Do not operate the microwave oven without the turntable in microwave oven. Microwave Inlet...Assistance or Service" to 5 minutes in place. ■ Mild cleanser and scouring pad ■ Dishwasher 31 The area where the microwave oven door and frame touch when closed should be applied. Average soil ■ Mild, nonabrasive soaps and detergents: Rinse with clean water and dry with...

User Manual
Page 33
You will need a TORX®† T10 screwdriver to remove the bulb cover. Vent deflector C. Remove the burned-out bulb. 4. You will automatically come on when the door is opened and when the microwave oven is a 10W low-voltage halogen capsule bulb. To Replace: 1. Gently pull vent screen rings ... mounting screws (1 from each end), and lifting out the vent deflector. For wall or roof venting, replace the vent deflector removed in microwave oven or reconnect power. Unplug microwave oven or disconnect power. 2. It will need a TORX®† T10 screwdriver to the ...
You will need a TORX®† T10 screwdriver to remove the bulb cover. Vent deflector C. Remove the burned-out bulb. 4. You will automatically come on when the door is opened and when the microwave oven is a 10W low-voltage halogen capsule bulb. To Replace: 1. Gently pull vent screen rings ... mounting screws (1 from each end), and lifting out the vent deflector. For wall or roof venting, replace the vent deflector removed in microwave oven or reconnect power. Unplug microwave oven or disconnect power. 2. It will need a TORX®† T10 screwdriver to the ...

User Manual
Page 34
...Is the Learning Mode activated? Turntable will not affect performance. See "Turntable" section. ■ Is the turntable properly in a cold area? Remove turntable. Have a qualified electrician check the electrical system in use ? See "Assistance or Service" section. See "Learning Mode" section. The...Timer in use ? TROUBLESHOOTING Try the solutions suggested here first in "Microwave Hood Combination Safety?" Remove spacer, then firmly close the door, then start the cycle. Firmly close door. ■ Is a spacer (on motor rotation at 100% cooking power. Replace the fuse...
...Is the Learning Mode activated? Turntable will not affect performance. See "Turntable" section. ■ Is the turntable properly in a cold area? Remove turntable. Have a qualified electrician check the electrical system in use ? See "Assistance or Service" section. See "Learning Mode" section. The...Timer in use ? TROUBLESHOOTING Try the solutions suggested here first in "Microwave Hood Combination Safety?" Remove spacer, then firmly close the door, then start the cycle. Firmly close door. ■ Is a spacer (on motor rotation at 100% cooking power. Replace the fuse...

User Manual
Page 36
... instructions attached to or furnished with the product, KitchenAid will pay for factory specified parts for the stainless steel oven cavity/inner door if the part rusts through tenth years from date of purchase, when this major appliance is operated and maintained according to instructions... OF IMPLIED WARRANTIES; KITCHENAID SHALL NOT BE LIABLE FOR INCIDENTAL OR CONSEQUENTIAL DAMAGES. You must be repaired in -warranty service. The removal and reinstallation of purchase or installation date for the following information about your major appliance to better help can find this book and ...
... instructions attached to or furnished with the product, KitchenAid will pay for factory specified parts for the stainless steel oven cavity/inner door if the part rusts through tenth years from date of purchase, when this major appliance is operated and maintained according to instructions... OF IMPLIED WARRANTIES; KITCHENAID SHALL NOT BE LIABLE FOR INCIDENTAL OR CONSEQUENTIAL DAMAGES. You must be repaired in -warranty service. The removal and reinstallation of purchase or installation date for the following information about your major appliance to better help can find this book and ...


