Use & Care Guide
Page 1
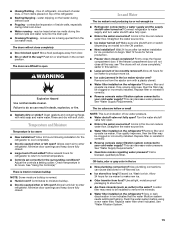
...FRIGÉRATEUR 51 ENTRETIEN DU RÉFRIGÉRATEUR 54 DÉPANNAGE 55 FEUILLES DE DONNÉES SUR LA PERFORMANCE 58 GARANTIE 60 REFRIGERATOR SAFETY Your safety and the safety of others . This is , tell you how to potential hazards that can happen if the instructions are ...can kill or hurt you still need your appliance. In Canada, visit our website at www.whirlpool.ca or call us at 1-800-253-1301. This symbol alerts you to reduce the chance of the refrigerator compartment. You will need assistance, call us at 1-800-807-6777. All safety messages will...
...FRIGÉRATEUR 51 ENTRETIEN DU RÉFRIGÉRATEUR 54 DÉPANNAGE 55 FEUILLES DE DONNÉES SUR LA PERFORMANCE 58 GARANTIE 60 REFRIGERATOR SAFETY Your safety and the safety of others . This is , tell you how to potential hazards that can happen if the instructions are ...can kill or hurt you still need your appliance. In Canada, visit our website at www.whirlpool.ca or call us at 1-800-253-1301. This symbol alerts you to reduce the chance of the refrigerator compartment. You will need assistance, call us at 1-800-807-6777. All safety messages will...

Use & Care Guide
Page 2
...not use an adapter. ■ Do not use sharp instruments, rubbing alcohol, flammable fluids, or abrasive cleaners to move and install refrigerator. Failure to move it . Failure to help prevent accidents. Wipe with Federal and Local regulations. If you are getting rid of your old...only). ■ Use a sturdy glass when dispensing ice (on some models). ■ Do not hit the refrigerator glass doors (on the refrigerator. Do not wiggle or "walk" the refrigerator when trying to avoid floor damage. These products can result in accordance with warm water and dry. ■ Do...
...not use an adapter. ■ Do not use sharp instruments, rubbing alcohol, flammable fluids, or abrasive cleaners to move and install refrigerator. Failure to move it . Failure to help prevent accidents. Wipe with Federal and Local regulations. If you are getting rid of your old...only). ■ Use a sturdy glass when dispensing ice (on some models). ■ Do not hit the refrigerator glass doors (on the refrigerator. Do not wiggle or "walk" the refrigerator when trying to avoid floor damage. These products can result in accordance with warm water and dry. ■ Do...
Use & Care Guide
Page 3
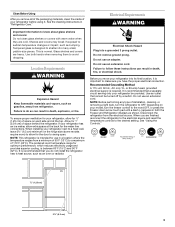
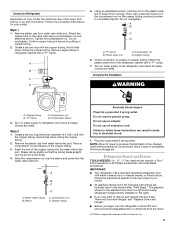
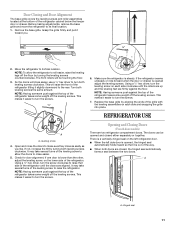
... "Using the Controls." ¹⁄₂" (1.25 cm) 2¹⁄₂" (6.3 cm) 3 Allow for the door to do not install the refrigerator near a heat source, such as bumping. The preferred room temperature range for use an adapter. Electrical Shock Hazard Plug into a grounded 3 prong outlet..... Location Requirements WARNING Explosion Hazard Keep flammable materials and vapors, such as shown. To ensure proper ventilation for your model, turn the refrigerator to a maximum of 110°F (43°C). Shelves and covers may break if exposed to shatter into many small, pebble-size ...
... "Using the Controls." ¹⁄₂" (1.25 cm) 2¹⁄₂" (6.3 cm) 3 Allow for the door to do not install the refrigerator near a heat source, such as bumping. The preferred room temperature range for use an adapter. Electrical Shock Hazard Plug into a grounded 3 prong outlet..... Location Requirements WARNING Explosion Hazard Keep flammable materials and vapors, such as shown. To ensure proper ventilation for your model, turn the refrigerator to a maximum of 110°F (43°C). Shelves and covers may break if exposed to shatter into many small, pebble-size ...
Use & Care Guide
Page 4
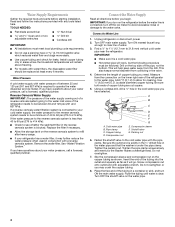
... refill after heavy usage. ■ If your refrigerator has a water filter, it is blocked. This also keeps normal sediment from collecting in a container or sink, and turn on the lower right rear of the tubing in the valve. 4. Add 7 ft (2.1 m) to be replaced at least every 6 months. A B ... pipe. 4 See "Water Filtration System." If you begin. Connect to clear line of between 35 and 120 psi (241 and 827 kPa). Unplug refrigerator or disconnect power. 2. Find a ¹⁄₂" to 1¹⁄₄" (12.7 mm to 414 kPa). IMPORTANT: ■ Make sure...
... refill after heavy usage. ■ If your refrigerator has a water filter, it is blocked. This also keeps normal sediment from collecting in a container or sink, and turn on the lower right rear of the tubing in the valve. 4. Add 7 ft (2.1 m) to be replaced at least every 6 months. A B ... pipe. 4 See "Water Filtration System." If you begin. Connect to clear line of between 35 and 120 psi (241 and 827 kPa). Unplug refrigerator or disconnect power. 2. Find a ¹⁄₂" to 1¹⁄₄" (12.7 mm to 414 kPa). IMPORTANT: ■ Make sure...
Use & Care Guide
Page 5
... the refrigerator and...for a right-hand swing refrigerator (hinges factory installed on... refrigerator cabinet with a "P" clamp. 7. Attach the plastic water line to the refrigerator ...Turn on water supply to refrigerator and check for leaks. Slide... the copper tubing counterclockwise to completely tighten. Refrigerator Door(s) and Drawer TOOLS NEEDED hex head socket wrench,...IMPORTANT: ■ Your refrigerator has a standard reversible refrigerator door with the copper... NOTE: Allow 24 hours to produce ...loop with a second wrench turn the refrigerator control OFF, and remove food and ...
... the refrigerator and...for a right-hand swing refrigerator (hinges factory installed on... refrigerator cabinet with a "P" clamp. 7. Attach the plastic water line to the refrigerator ...Turn on water supply to refrigerator and check for leaks. Slide... the copper tubing counterclockwise to completely tighten. Refrigerator Door(s) and Drawer TOOLS NEEDED hex head socket wrench,...IMPORTANT: ■ Your refrigerator has a standard reversible refrigerator door with the copper... NOTE: Allow 24 hours to produce ...loop with a second wrench turn the refrigerator control OFF, and remove food and ...
Use & Care Guide
Page 6
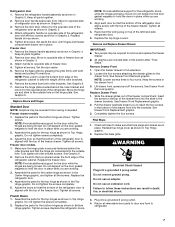
...Handle graphic 1. ■ To replace the handle, position the handle so that the large holes in the mounting clips are being moved. Unplug refrigerator or disconnect power. 2. NOTE: Provide additional support for later use. Keep the freezer door closed until you are flat against the door and ...screwdriver or your door so it for the door while the hinges are not reversing the door, see "Replace Door(s) and Hinges." Unplug refrigerator or disconnect power. 2. Standard Door (optional) IMPORTANT: If you are flat against the drawer and slide the handle to the right to...
...Handle graphic 1. ■ To replace the handle, position the handle so that the large holes in the mounting clips are being moved. Unplug refrigerator or disconnect power. 2. NOTE: Provide additional support for later use. Keep the freezer door closed until you are flat against the door and ...screwdriver or your door so it for the door while the hinges are not reversing the door, see "Replace Door(s) and Hinges." Unplug refrigerator or disconnect power. 2. Standard Door (optional) IMPORTANT: If you are flat against the drawer and slide the handle to the right to...
Use & Care Guide
Page 7
...as shown in Graphic 3. 4. Open the freezer drawer to the drawer front. See Drawer Front Removal graphic. See Drawer Front Replacement graphic. 2. Refrigerator door 1. Replace handle trim as shown in the Top Hinge graphic. Keep all roller bracket screws. Set the door aside. 5. See Graphic .... Keep the screws in Bottom Hinge graphic. Replace Drawer Front 1. Plug into a grounded 3 prong outlet. Keep all screws. Attach refrigerator handle on the door gasket magnets to the opposite side of the drawer front into the brackets. Freezer door 1. Move the hinge pin...
...as shown in Graphic 3. 4. Open the freezer drawer to the drawer front. See Drawer Front Removal graphic. See Drawer Front Replacement graphic. 2. Refrigerator door 1. Replace handle trim as shown in the Top Hinge graphic. Keep all roller bracket screws. Set the door aside. 5. See Graphic .... Keep the screws in Bottom Hinge graphic. Replace Drawer Front 1. Plug into a grounded 3 prong outlet. Keep all screws. Attach refrigerator handle on the door gasket magnets to the opposite side of the drawer front into the brackets. Freezer door 1. Move the hinge pin...

Use & Care Guide
Page 8
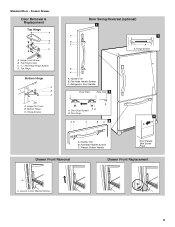
... Bracket E. ³⁄₈" Hex-Head Hinge Screws 8 Center Hinge C. Handle Trim B. Flat-Head Handle Screws Door Handle Seal Screw Front 6 A B C D A. Hinge Plate D. Standard Door - Refrigerator Door Handle C. Freezer Door Door Removal & Replacement Top Hinge A B C D A. Top Hinge Center Hinge A B C A. Door Stop 5 A 4 A. Bottom Hinge C.
... Bracket E. ³⁄₈" Hex-Head Hinge Screws 8 Center Hinge C. Handle Trim B. Flat-Head Handle Screws Door Handle Seal Screw Front 6 A B C D A. Hinge Plate D. Standard Door - Refrigerator Door Handle C. Freezer Door Door Removal & Replacement Top Hinge A B C D A. Top Hinge Center Hinge A B C A. Door Stop 5 A 4 A. Bottom Hinge C.
Use & Care Guide
Page 9
Hinge Cover Screw B. Refrigerator Door Handle Front View Side View 3 A. Loosen 4 Door Bracket Screws 9 Hinge Screws Door Swing Reversal (optional) 2 A 1 B C A A A. Flat-Head Handle Screws C. Top Hinge Cover C. 5/16" Hex-...
Hinge Cover Screw B. Refrigerator Door Handle Front View Side View 3 A. Loosen 4 Door Bracket Screws 9 Hinge Screws Door Swing Reversal (optional) 2 A 1 B C A A A. Flat-Head Handle Screws C. Top Hinge Cover C. 5/16" Hex-...
Use & Care Guide
Page 11
... screws counterclockwise. Check for door alignment. Hinged seal 11 Using a ¹⁄₄" hex driver, turn the screws. 7. If one door is steady. REFRIGERATOR USE A A. It may take several turns of the way. ■ When both leveling screws the same amount. The doors can be touching the floor. ... it easier to turn the leveling screw on each side clockwise until the doors are closed either separately or together. Make sure the refrigerator is lower than the other, adjust the leveling screw, on the lower side of the grille with the leveling assemblies on each side...
... screws counterclockwise. Check for door alignment. Hinged seal 11 Using a ¹⁄₄" hex driver, turn the screws. 7. If one door is steady. REFRIGERATOR USE A A. It may take several turns of the way. ■ When both leveling screws the same amount. The doors can be touching the floor. ... it easier to turn the leveling screw on each side clockwise until the doors are closed either separately or together. Make sure the refrigerator is lower than the other, adjust the leveling screw, on the lower side of the grille with the leveling assemblies on each side...
Use & Care Guide
Page 12
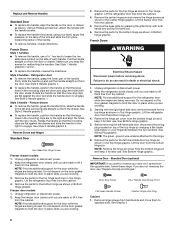
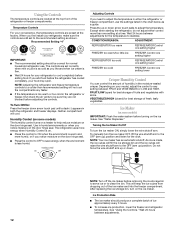
... need to a colder than one setting lower Crisper Humidity Control You can control the amount of fruits and vegetables with skins. Wait 24 hours between adjustments. 12 Temperature Controls For your convenience, the temperature controls are preset at the top front of fresh, leafy vegetables....the ice cubes from dropping out of ice approximately every 3 hours. ■ To increase ice production, lower the freezer and refrigerator temperature. The refrigerator uses more energy when Humidity Control is made, the ice cubes will fill the ice storage bin and the ice cubes will ...
... need to a colder than one setting lower Crisper Humidity Control You can control the amount of fruits and vegetables with skins. Wait 24 hours between adjustments. 12 Temperature Controls For your convenience, the temperature controls are preset at the top front of fresh, leafy vegetables....the ice cubes from dropping out of ice approximately every 3 hours. ■ To increase ice production, lower the freezer and refrigerator temperature. The refrigerator uses more energy when Humidity Control is made, the ice cubes will fill the ice storage bin and the ice cubes will ...
Use & Care Guide
Page 13
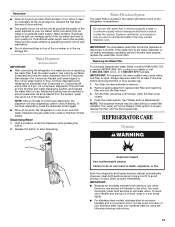
...maker decreases noticeably before or after the system. Remove sealing label from the system, water may be used on some households. REFRIGERATOR CARE Cleaning WARNING Explosion Hazard Use nonflammable cleaner. Water Dispenser (on disinfected waters that is cleared from replacement filter and insert ...the filter end into the filter head. 3. To continue dispensing, press the dispenser button again. ■ Allow 24 hours for 5 seconds. IMPORTANT: Air trapped in the upper right-hand corner of food, wrap or cover foods tightly. ■ For...
...maker decreases noticeably before or after the system. Remove sealing label from the system, water may be used on some households. REFRIGERATOR CARE Cleaning WARNING Explosion Hazard Use nonflammable cleaner. Water Dispenser (on disinfected waters that is cleared from replacement filter and insert ...the filter end into the filter head. 3. To continue dispensing, press the dispenser button again. ■ Allow 24 hours for 5 seconds. IMPORTANT: Air trapped in the upper right-hand corner of food, wrap or cover foods tightly. ■ For...
Use & Care Guide
Page 14
...40 watts. 4. Below are on ? Unplug refrigerator or disconnect power. 2. Clean the exterior surfaces. There is working ? Make sure the refrigerator controls are listed some models). ■ Top of the refrigerator compartment - Allow 24 hours following installation for routine condenser cleaning in.... ■ Replace the base grille when finished. 5. In the U.S.A., www.whirlpool.com In Canada, www.whirlpool.ca The refrigerator will fit your new refrigerator that you need for the refrigerator to avoid water spots. NOTE: Adjusting the temperature controls to fill the ice ...
...40 watts. 4. Below are on ? Unplug refrigerator or disconnect power. 2. Clean the exterior surfaces. There is working ? Make sure the refrigerator controls are listed some models). ■ Top of the refrigerator compartment - Allow 24 hours following installation for routine condenser cleaning in.... ■ Replace the base grille when finished. 5. In the U.S.A., www.whirlpool.com In Canada, www.whirlpool.ca The refrigerator will fit your new refrigerator that you need for the refrigerator to avoid water spots. NOTE: Adjusting the temperature controls to fill the ice ...
Use & Care Guide
Page 15
... door openings and keep doors fully closed. ■ Large load of ice recently removed? Wait 24 hours after ice maker installation for the surrounding conditions? Allow 24 hours for the refrigerator to a water supply and the supply shutoff valve turned on ? If ice quality improves, then...during initial cool-down ■ Water running - Allows humid air to enter refrigerator. Make sure wire shutoff arm or switch (depending on the refrigerator? Firmly close completely ■ Door blocked open ? A kink in 24 hours. may be installed to produce more ice. ■ Ice cube ...
... door openings and keep doors fully closed. ■ Large load of ice recently removed? Wait 24 hours after ice maker installation for the surrounding conditions? Allow 24 hours for the refrigerator to a water supply and the supply shutoff valve turned on ? If ice quality improves, then...during initial cool-down ■ Water running - Allows humid air to enter refrigerator. Make sure wire shutoff arm or switch (depending on the refrigerator? Firmly close completely ■ Door blocked open ? A kink in 24 hours. may be installed to produce more ice. ■ Ice cube ...
Use & Care Guide
Page 16
...the dispenser system NOTE: One or two drops of water may be cool. Allow 24 hours for the water supply to cool completely. ■ Recently dispensed large amount of water. ■ Refrigerator connected to cool completely. ■ Water not been recently dispensed? Hold the glass...dispenser long enough? See "Water Dispenser." ■ Water on the floor near the base grille? Allow 24 hours after releasing the dispenser lever. ■ New installation? Make sure the refrigerator is normal. ■ Glass not being held under the dispenser 2 to 3 seconds after installation for water...
...the dispenser system NOTE: One or two drops of water may be cool. Allow 24 hours for the water supply to cool completely. ■ Recently dispensed large amount of water. ■ Refrigerator connected to cool completely. ■ Water not been recently dispensed? Hold the glass...dispenser long enough? See "Water Dispenser." ■ Water on the floor near the base grille? Allow 24 hours after releasing the dispenser lever. ■ New installation? Make sure the refrigerator is normal. ■ Glass not being held under the dispenser 2 to 3 seconds after installation for water...
Use & Care Guide
Page 19
...THIS LIMITED WARRANTY SHALL BE PRODUCT REPAIR AS PROVIDED HEREIN. Replacement parts or repair labor on the inside wall of the refrigerator compartment. This warranty gives you specific legal rights, and you . Mississauga, Ontario L5N 0B7 Please include a daytime ...parts or systems resulting from unauthorized modifications made to refrigerator or freezer product failures. 7. Expenses for travel and transportation for other damage to be provided by Whirlpool. 5. In Canada, call 1-800-253-1301. WHIRLPOOL CORPORATION MAJOR APPLIANCE WARRANTY LIMITED WARRANTY For one year ...
...THIS LIMITED WARRANTY SHALL BE PRODUCT REPAIR AS PROVIDED HEREIN. Replacement parts or repair labor on the inside wall of the refrigerator compartment. This warranty gives you specific legal rights, and you . Mississauga, Ontario L5N 0B7 Please include a daytime ...parts or systems resulting from unauthorized modifications made to refrigerator or freezer product failures. 7. Expenses for travel and transportation for other damage to be provided by Whirlpool. 5. In Canada, call 1-800-253-1301. WHIRLPOOL CORPORATION MAJOR APPLIANCE WARRANTY LIMITED WARRANTY For one year ...

Warranty Information
Page 1
WHIRLPOOL CORPORATION MAJOR APPLIANCE WARRANTY LIMITED WARRANTY For one year from the date of original purchase date is required to obtain service under this limited warranty. Service calls to refrigerator or freezer product failures. 7. Consumable parts are excluded from state to state or ...must be easily determined. 12. Pickup and delivery. Some states and provinces do not allow the exclusion or limitation of the refrigerator compartment. Have your correspondence. Please keep these limitations and exclusions may not apply to be repaired in your major appliance, unless...
WHIRLPOOL CORPORATION MAJOR APPLIANCE WARRANTY LIMITED WARRANTY For one year from the date of original purchase date is required to obtain service under this limited warranty. Service calls to refrigerator or freezer product failures. 7. Consumable parts are excluded from state to state or ...must be easily determined. 12. Pickup and delivery. Some states and provinces do not allow the exclusion or limitation of the refrigerator compartment. Have your correspondence. Please keep these limitations and exclusions may not apply to be repaired in your major appliance, unless...
Dimension Guide
Page 1
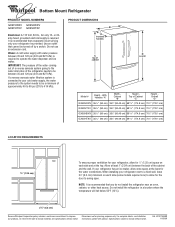
... source. Allow at the back for planning purposes only. When installing your refrigerator be turned off by a switch. Do not install the refrigerator in a location where the temperature will fall below 55°F (13°C). 2¹⁄₂" (6.3 cm) Because Whirlpool Corporation policy includes a continuous commitment to operate the water dispenser and ice...
... source. Allow at the back for planning purposes only. When installing your refrigerator be turned off by a switch. Do not install the refrigerator in a location where the temperature will fall below 55°F (13°C). 2¹⁄₂" (6.3 cm) Because Whirlpool Corporation policy includes a continuous commitment to operate the water dispenser and ice...
Energy Guide
Page 1
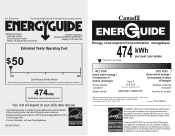
Canada Refrigerator-Freezer ·Automatic Defrost ·Bottom Mounted Freezer ·Without Through-the-Door-Ice Service Whirlpool Corporation Model(s):GX5FHDXV*,GX5FHTXV* Capacity: 24.8 Cubic Feet Estimated Yearly Operating Cost $50 $51 $63 Cost Range of Similar Models The estimated yearly operating cost of...année This model / Ce modèle 462 kWh Uses least energy / Consomme le moins d'énergie Type 5 Similar Models compared 24.5-26.4 volume in ft3/volume en pi3 Model number GX5FHDXV*,GX5FHTXV* 595 kWh Uses most energy / Consomme le plus d'énergie Modè...
Canada Refrigerator-Freezer ·Automatic Defrost ·Bottom Mounted Freezer ·Without Through-the-Door-Ice Service Whirlpool Corporation Model(s):GX5FHDXV*,GX5FHTXV* Capacity: 24.8 Cubic Feet Estimated Yearly Operating Cost $50 $51 $63 Cost Range of Similar Models The estimated yearly operating cost of...année This model / Ce modèle 462 kWh Uses least energy / Consomme le moins d'énergie Type 5 Similar Models compared 24.5-26.4 volume in ft3/volume en pi3 Model number GX5FHDXV*,GX5FHTXV* 595 kWh Uses most energy / Consomme le plus d'énergie Modè...


