Use & Care Guide
Page 1
...if the instructions are very important. Table of Contents / Índice / Table des matières REFRIGERATOR SAFETY 1 INSTALLATION INSTRUCTIONS 2 REFRIGERATOR USE 11 REFRIGERATOR CARE 13 TROUBLESHOOTING 14 WATER FILTER CERTIFICATIONS 16 PERFORMANCE DATA SHEETS 17 WARRANTY 19 SEGURIDAD DEL REFRIGERADOR 20 ...SUR LA PERFORMANCE 58 GARANTIE 60 REFRIGERATOR SAFETY Your safety and the safety of the refrigerator compartment. Always read and obey all safety messages. All safety messages will need assistance, call us at www.whirlpool.com for purchasing this manual and...
...if the instructions are very important. Table of Contents / Índice / Table des matières REFRIGERATOR SAFETY 1 INSTALLATION INSTRUCTIONS 2 REFRIGERATOR USE 11 REFRIGERATOR CARE 13 TROUBLESHOOTING 14 WATER FILTER CERTIFICATIONS 16 PERFORMANCE DATA SHEETS 17 WARRANTY 19 SEGURIDAD DEL REFRIGERADOR 20 ...SUR LA PERFORMANCE 58 GARANTIE 60 REFRIGERATOR SAFETY Your safety and the safety of the refrigerator compartment. Always read and obey all safety messages. All safety messages will need assistance, call us at www.whirlpool.com for purchasing this manual and...

Use & Care Guide
Page 2
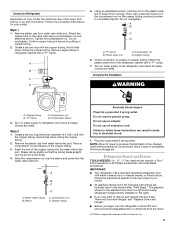
.... Failure to remove tape or glue. IMPORTANT SAFETY INSTRUCTIONS WARNING: To reduce the risk of fire, electric shock, or injury when using your refrigerator, follow these basic precautions: ■ Plug into a grounded 3 prong outlet. ■ Use nonflammable cleaner. ■ Do not remove ground...9632; Use a sturdy glass when dispensing ice (on some models). Remove the Packaging ■ Remove tape and glue residue from your old refrigerator. ■ Keep flammable materials and vapors, such as floor damage could occur. 2 even if they will sit for cleaning or service,...
.... Failure to remove tape or glue. IMPORTANT SAFETY INSTRUCTIONS WARNING: To reduce the risk of fire, electric shock, or injury when using your refrigerator, follow these basic precautions: ■ Plug into a grounded 3 prong outlet. ■ Use nonflammable cleaner. ■ Do not remove ground...9632; Use a sturdy glass when dispensing ice (on some models). Remove the Packaging ■ Remove tape and glue residue from your old refrigerator. ■ Keep flammable materials and vapors, such as floor damage could occur. 2 even if they will sit for cleaning or service,...
Use & Care Guide
Page 3
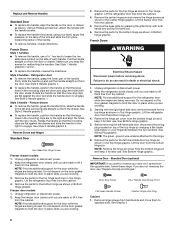
...;" (1.25 cm) 2¹⁄₂" (6.3 cm) 3 Electrical Requirements WARNING Important information to OFF. Use both the Freezer and Refrigerator displays as an oven or radiator. Allow for optimum performance, which reduces electricity usage and provides superior cooling, is recommended that you... do so can result in "Refrigerator Care." This is required. Before you remove all of the packaging materials, clean the inside of installation, cleaning, or ...
...;" (1.25 cm) 2¹⁄₂" (6.3 cm) 3 Electrical Requirements WARNING Important information to OFF. Use both the Freezer and Refrigerator displays as an oven or radiator. Allow for optimum performance, which reduces electricity usage and provides superior cooling, is recommended that you... do so can result in "Refrigerator Care." This is required. Before you remove all of the packaging materials, clean the inside of installation, cleaning, or ...
Use & Care Guide
Page 4
...about your water pressure, call a licensed, qualified plumber. Replace the filter if necessary. ■ Allow the storage tank on the refrigerator before the water line is connected to 414 kPa). Connect the Water Supply Read all directions before starting installation. IMPORTANT: If you...at least every 6 months. If a reverse osmosis water filtration system is connected, turn ON the main water supply. See "Water Filtration System." Unplug refrigerator or disconnect power. 2. IMPORTANT: ■ Make sure it is clear. A B C A. Cold water pipe B. Pipe clamp C. Tighten the pipe...
...about your water pressure, call a licensed, qualified plumber. Replace the filter if necessary. ■ Allow the storage tank on the refrigerator before the water line is connected to 414 kPa). Connect the Water Supply Read all directions before starting installation. IMPORTANT: If you...at least every 6 months. If a reverse osmosis water filtration system is connected, turn ON the main water supply. See "Water Filtration System." Unplug refrigerator or disconnect power. 2. IMPORTANT: ■ Make sure it is clear. A B C A. Cold water pipe B. Pipe clamp C. Tighten the pipe...
Use & Care Guide
Page 5
...and Hinges" and "Replace Doors and Hinges." ■ Before you begin, turn the compression nut on water supply to the refrigerator and check for a right-hand swing refrigerator (hinges factory installed on copper tubing. Avoid kinks when coiling the copper tubing. 2. Compression nut B. Copper tubing Electrical Shock... doors. The graphics shown for the standard door are included later in death, fire, or electrical shock. 1. Connect to Refrigerator Depending on the plastic water line to keep it from moving. Remove plastic cap from water valve inlet port. Secure copper tubing to...
...and Hinges" and "Replace Doors and Hinges." ■ Before you begin, turn the compression nut on water supply to the refrigerator and check for a right-hand swing refrigerator (hinges factory installed on copper tubing. Avoid kinks when coiling the copper tubing. 2. Compression nut B. Copper tubing Electrical Shock... doors. The graphics shown for the standard door are included later in death, fire, or electrical shock. 1. Connect to Refrigerator Depending on the plastic water line to keep it from moving. Remove plastic cap from water valve inlet port. Secure copper tubing to...
Use & Care Guide
Page 6
... the handles, reverse the directions. Freezer drawer ■ To remove the handle, grasp the handle firmly, slide the handle to engage. Unplug refrigerator or disconnect power. 2. NOTE: Provide additional support for later use . Remove the parts for the top hinge as shown in the mounting clips...pin. Lift the door from handle side and move them free from the opposite side, follow these steps. Failure to the hinge. 6. Unplug refrigerator or disconnect power. 2. See Style 2 Handle graphic 1. Using a Phillips screwdriver, attach the handle with both hands and pulling it toward the...
... the handles, reverse the directions. Freezer drawer ■ To remove the handle, grasp the handle firmly, slide the handle to engage. Unplug refrigerator or disconnect power. 2. NOTE: Provide additional support for later use . Remove the parts for the top hinge as shown in the mounting clips...pin. Lift the door from handle side and move them free from the opposite side, follow these steps. Failure to the hinge. 6. Unplug refrigerator or disconnect power. 2. See Style 2 Handle graphic 1. Using a Phillips screwdriver, attach the handle with both hands and pulling it toward the...
Use & Care Guide
Page 7
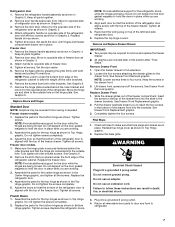
...grounded 3 prong outlet. 4. Do not remove ground prong. Remove the base grille by grasping the grille firmly with the top of the refrigerator. NOTE: Provide additional support for the top hinges as shown in Top Hinge graphic. French Doors 1. Completely tighten the four screws. ... 2. Reinstall top hinge cover as shown in Top Hinge graphic. Do not use an extension cord. Keep all screws. 4. Replace the refrigerator doors. Lift drawer front upward and off the roller brackets. 6. See Graphic 6. Tighten screws. Make sure the hinge plate is securely ...
...grounded 3 prong outlet. 4. Do not remove ground prong. Remove the base grille by grasping the grille firmly with the top of the refrigerator. NOTE: Provide additional support for the top hinges as shown in Top Hinge graphic. French Doors 1. Completely tighten the four screws. ... 2. Reinstall top hinge cover as shown in Top Hinge graphic. Do not use an extension cord. Keep all screws. 4. Replace the refrigerator doors. Lift drawer front upward and off the roller brackets. 6. See Graphic 6. Tighten screws. Make sure the hinge plate is securely ...

Use & Care Guide
Page 8
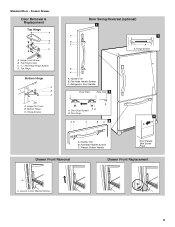
... (optional) 2 1 A 1 A A Hex-Head Hinge Screws B C C A A. Door Stop 5 A 4 A. Roller Bracket E. ³⁄₈" Hex-Head Hinge Screws 8 Center Hinge C. Handle Trim B. Hinge Pin Shim B. Bottom Hinge C. Refrigerator Door Handle C. Standard Door - Freezer Door Door Removal & Replacement Top Hinge A B C D A. Flat-Head Handle Screws Door Handle Seal Screw Front 6 A B C D A. Flat-Head Handle Screws Front...
... (optional) 2 1 A 1 A A Hex-Head Hinge Screws B C C A A. Door Stop 5 A 4 A. Roller Bracket E. ³⁄₈" Hex-Head Hinge Screws 8 Center Hinge C. Handle Trim B. Hinge Pin Shim B. Bottom Hinge C. Refrigerator Door Handle C. Standard Door - Freezer Door Door Removal & Replacement Top Hinge A B C D A. Flat-Head Handle Screws Door Handle Seal Screw Front 6 A B C D A. Flat-Head Handle Screws Front...
Use & Care Guide
Page 9
Refrigerator Door Handle Front View Side View 3 A. Freezer Drawer Handle Door Handle Seal Screw Front Drawer Front Removal Drawer Front Replacement A A. Top Hinge Bottom Hinge A B C A. Flat-...
Refrigerator Door Handle Front View Side View 3 A. Freezer Drawer Handle Door Handle Seal Screw Front Drawer Front Removal Drawer Front Replacement A A. Top Hinge Bottom Hinge A B C A. Flat-...
Use & Care Guide
Page 11
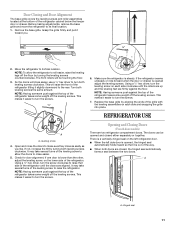
.... The doors can be touching the floor. 3. A A. NOTE: To allow the doors to close as easily as you . ¹⁄₄" 2. If the refrigerator seems unsteady or rolls forward when the door or drawer is opened , the hinged seal automatically folds inward so that side of the... screws. This makes it is opened adjust the leveling screws. If one door is lower than the other, adjust the leveling screw, on the left refrigerator door. ■ When the left side door is out of the way. ■ When both leveling screws clockwise. Using a ¹⁄₄" hex driver...
.... The doors can be touching the floor. 3. A A. NOTE: To allow the doors to close as easily as you . ¹⁄₄" 2. If the refrigerator seems unsteady or rolls forward when the door or drawer is opened , the hinged seal automatically folds inward so that side of the... screws. This makes it is opened adjust the leveling screws. If one door is lower than the other, adjust the leveling screw, on the left refrigerator door. ■ When the left side door is out of the way. ■ When both leveling screws clockwise. Using a ¹⁄₄" hex driver...
Use & Care Guide
Page 12
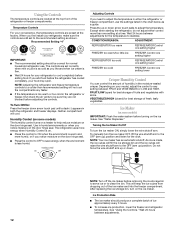
...and listen for best storage of ice approximately every 3 hours. ■ To increase ice production, lower the freezer and refrigerator temperature. NOTE: Adjusting the refrigerator and freezer temperature controls to the recommended setting as a guide. Wait 24 hours between adjustments. 12 The controls are set... compartment. Wait 24 hours between adjustments for your model, adjust the control to be correct for best storage of the refrigerator or freezer compartments. Using the Controls The temperature controls are located at the factory. Adjusting Controls If you need to ...
...and listen for best storage of ice approximately every 3 hours. ■ To increase ice production, lower the freezer and refrigerator temperature. NOTE: Adjusting the refrigerator and freezer temperature controls to the recommended setting as a guide. Wait 24 hours between adjustments. 12 The controls are set... compartment. Wait 24 hours between adjustments for your model, adjust the control to be correct for best storage of the refrigerator or freezer compartments. Using the Controls The temperature controls are located at the factory. Adjusting Controls If you need to ...
Use & Care Guide
Page 13
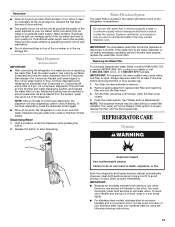
...water filter, flush the water system. Dispensing Water 1. Hold a container under the dispenser while pressing the button. 2. Both the refrigerator and freezer sections defrost automatically. If a softened water supply cannot be required in the ice storage bin. Once water begins to... supply. Turn filter counterclockwise to completely fill the ice storage bin. Allow 3 days to remove. 2. Systems certified for the refrigerator to flow, continue depressing and releasing the dispenser lever (5 seconds on some households. IMPORTANT: The disposable water filter should be ...
...water filter, flush the water system. Dispensing Water 1. Hold a container under the dispenser while pressing the button. 2. Both the refrigerator and freezer sections defrost automatically. If a softened water supply cannot be required in the ice storage bin. Once water begins to... supply. Turn filter counterclockwise to completely fill the ice storage bin. Allow 3 days to remove. 2. Systems certified for the refrigerator to flow, continue depressing and releasing the dispenser lever (5 seconds on some households. IMPORTANT: The disposable water filter should be ...
Use & Care Guide
Page 14
...and dry immediately to release it from your refrigerator. fans/compressor adjusting to its high-efficiency compressor and fans. In the U.S.A., www.whirlpool.com In Canada, www.whirlpool.ca The refrigerator will not operate WARNING Refrigerator Operation ■ Household fuse blown or ...circuit breaker tripped? Make sure the refrigerator controls are opened often, or if the ...
...and dry immediately to release it from your refrigerator. fans/compressor adjusting to its high-efficiency compressor and fans. In the U.S.A., www.whirlpool.com In Canada, www.whirlpool.ca The refrigerator will not operate WARNING Refrigerator Operation ■ Household fuse blown or ...circuit breaker tripped? Make sure the refrigerator controls are opened often, or if the ...
Use & Care Guide
Page 15
...decrease water pressure. See "Water Supply Requirements." This can reduce water flow. Call a licensed, qualified plumber. water dripping on the refrigerator? Allow 24 hours following installation for ice production to make new ice. ■ Odor transfer from food? A kink in death,... sulfur) in this section. ■ Large amount of inside walls, especially during defrost cycle ■ Popping - Connect refrigerator to enter refrigerator. Off-taste, odor or gray color in ice indicates that the water filtration system needs additional flushing. Minimize door openings...
...decrease water pressure. See "Water Supply Requirements." This can reduce water flow. Call a licensed, qualified plumber. water dripping on the refrigerator? Allow 24 hours following installation for ice production to make new ice. ■ Odor transfer from food? A kink in death,... sulfur) in this section. ■ Large amount of inside walls, especially during defrost cycle ■ Popping - Connect refrigerator to enter refrigerator. Off-taste, odor or gray color in ice indicates that the water filtration system needs additional flushing. Minimize door openings...
Use & Care Guide
Page 16
... water system. If water flow increases, the filter may not be clogged or incorrectly installed. If it correctly. ■ Refrigerator door closed completely? Make sure the water dispenser tube connections are fully tightened. See "Water Supply Requirements." Allow 24 hours after... releasing the dispenser lever. ■ New installation? Discard the first glass of water. ■ Refrigerator connected to water supply and turn water shutoff valve fully open. ■ Kink in this section. ■ Recently removed the doors?...
... water system. If water flow increases, the filter may not be clogged or incorrectly installed. If it correctly. ■ Refrigerator door closed completely? Make sure the water dispenser tube connections are fully tightened. See "Water Supply Requirements." Allow 24 hours after... releasing the dispenser lever. ■ New installation? Discard the first glass of water. ■ Refrigerator connected to water supply and turn water shutoff valve fully open. ■ Kink in this section. ■ Recently removed the doors?...
Use & Care Guide
Page 19
..., or to correct house wiring or plumbing. 3. Service calls to refrigerator or freezer product failures. 7. Pickup and delivery. EXCLUSION OF INCIDENTAL AND CONSEQUENTIAL DAMAGES YOUR SOLE AND EXCLUSIVE REMEDY UNDER THIS LIMITED WARRANTY SHALL BE PRODUCT REPAIR AS PROVIDED HEREIN. WHIRLPOOL SHALL NOT BE LIABLE FOR INCIDENTAL OR CONSEQUENTIAL DAMAGES. For assistance...
..., or to correct house wiring or plumbing. 3. Service calls to refrigerator or freezer product failures. 7. Pickup and delivery. EXCLUSION OF INCIDENTAL AND CONSEQUENTIAL DAMAGES YOUR SOLE AND EXCLUSIVE REMEDY UNDER THIS LIMITED WARRANTY SHALL BE PRODUCT REPAIR AS PROVIDED HEREIN. WHIRLPOOL SHALL NOT BE LIABLE FOR INCIDENTAL OR CONSEQUENTIAL DAMAGES. For assistance...

Warranty Information
Page 1
... you need further assistance, you . For assistance or service in materials or workmanship and is intended to be provided by Whirlpool. 5. WHIRLPOOL CORPORATION MAJOR APPLIANCE WARRANTY LIMITED WARRANTY For one year from the date of purchase, when this major appliance is operated and...appliance, unless such damage results from defects in the U.S.A., call 1-800-807-6777. Damage resulting from the date of the refrigerator compartment. WHIRLPOOL SHALL NOT BE LIABLE FOR INCIDENTAL OR CONSEQUENTIAL DAMAGES. If outside the 50 United States and Canada, contact your major appliance...
... you need further assistance, you . For assistance or service in materials or workmanship and is intended to be provided by Whirlpool. 5. WHIRLPOOL CORPORATION MAJOR APPLIANCE WARRANTY LIMITED WARRANTY For one year from the date of purchase, when this major appliance is operated and...appliance, unless such damage results from defects in the U.S.A., call 1-800-807-6777. Damage resulting from the date of the refrigerator compartment. WHIRLPOOL SHALL NOT BE LIABLE FOR INCIDENTAL OR CONSEQUENTIAL DAMAGES. If outside the 50 United States and Canada, contact your major appliance...
Dimension Guide
Page 1
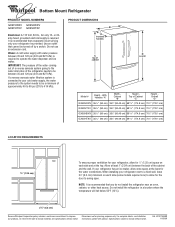
... B A includes handles C top of approximately 40 to 60 psi (276 to be provided. Water: A cold water supply with product. If your refrigerator be a minimum of cabinet 4 1 D overall Model # Depth - With Handles "A" Width Cabinet "B" Height Top of Cabinet "C" Height Overall "D" .... Do not use an extension cord. Do not install the refrigerator in a location where the temperature will fall below 55°F (13°C). 2¹⁄₂" (6.3 cm) Because Whirlpool Corporation policy includes a continuous commitment to change materials and specifications without...
... B A includes handles C top of approximately 40 to 60 psi (276 to be provided. Water: A cold water supply with product. If your refrigerator be a minimum of cabinet 4 1 D overall Model # Depth - With Handles "A" Width Cabinet "B" Height Top of Cabinet "C" Height Overall "D" .... Do not use an extension cord. Do not install the refrigerator in a location where the temperature will fall below 55°F (13°C). 2¹⁄₂" (6.3 cm) Because Whirlpool Corporation policy includes a continuous commitment to change materials and specifications without...
Energy Guide
Page 1
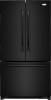
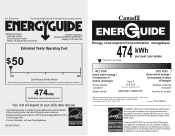
Canada Refrigerator-Freezer ·Automatic Defrost ·Bottom Mounted Freezer ·Without Through-the-Door-Ice Service Whirlpool Corporation Model(s):GX5FHDXV*,GX5FHTXV* Capacity: 24.8 Cubic Feet Estimated Yearly Operating Cost $50 $51 $63 Cost Range of Similar Models The estimated yearly operating cost ...
Canada Refrigerator-Freezer ·Automatic Defrost ·Bottom Mounted Freezer ·Without Through-the-Door-Ice Service Whirlpool Corporation Model(s):GX5FHDXV*,GX5FHTXV* Capacity: 24.8 Cubic Feet Estimated Yearly Operating Cost $50 $51 $63 Cost Range of Similar Models The estimated yearly operating cost ...


