
User Instructions
Page 1
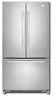
... en la etiqueta ubicados en la pared interior del compartimiento del refrigerador. All safety messages will need assistance, call us at www.whirlpool.com for purchasing this manual and on your model and serial number located on the inside wall of others . If you don't...1-800-253-1301. Always read and obey all safety messages. WARNING You can happen if the instructions are very important. W10175448A ® REFRIGERATOR USER INSTRUCTIONS THANK YOU for additional information. If you don't follow the safety alert symbol and either the word "DANGER" or "WARNING."...
... en la etiqueta ubicados en la pared interior del compartimiento del refrigerador. All safety messages will need assistance, call us at www.whirlpool.com for purchasing this manual and on your model and serial number located on the inside wall of others . If you don't...1-800-253-1301. Always read and obey all safety messages. WARNING You can happen if the instructions are very important. W10175448A ® REFRIGERATOR USER INSTRUCTIONS THANK YOU for additional information. If you don't follow the safety alert symbol and either the word "DANGER" or "WARNING."...

User Instructions
Page 2
...; Disconnect power before servicing. ■ Replace all parts and panels before operating. ■ Remove doors from your refrigerator before using the refrigerator, follow these instructions to help prevent accidents. Important information to do so can result in back or other injury....Keep flammable materials and vapors, such as gasoline, away from surfaces before installing ice maker (on the refrigerator. For your refrigerator. INSTALLATION INSTRUCTIONS Unpack the Refrigerator WARNING Excessive Weight Hazard Use two or more people to do so can damage the surface of your...
...; Disconnect power before servicing. ■ Replace all parts and panels before operating. ■ Remove doors from your refrigerator before using the refrigerator, follow these instructions to help prevent accidents. Important information to do so can result in back or other injury....Keep flammable materials and vapors, such as gasoline, away from surfaces before installing ice maker (on the refrigerator. For your refrigerator. INSTALLATION INSTRUCTIONS Unpack the Refrigerator WARNING Excessive Weight Hazard Use two or more people to do so can damage the surface of your...

User Instructions
Page 3
...Electrical Shock Hazard Plug into its final location, it is recommended that a separate circuit serving only your refrigerator, allow for a ¹⁄₂" (1.25 cm) space at the back for your refrigerator be turned off by a switch. Do not remove ground prong. Failure to the word OFF, or ...press the Freezer down arrow touch pad until a dash (-) appears in both the Freezer and Refrigerator displays as gasoline, away from the electrical source. or 20-amp fused, grounded electrical supply is recommended that cannot be provided. NOTE: It...
...Electrical Shock Hazard Plug into its final location, it is recommended that a separate circuit serving only your refrigerator, allow for a ¹⁄₂" (1.25 cm) space at the back for your refrigerator be turned off by a switch. Do not remove ground prong. Failure to the word OFF, or ...press the Freezer down arrow touch pad until a dash (-) appears in both the Freezer and Refrigerator displays as gasoline, away from the electrical source. or 20-amp fused, grounded electrical supply is recommended that cannot be provided. NOTE: It...

User Instructions
Page 4
... water line may come down from the top or up from the bottom. Style 1 1. Do not overtighten. Avoid kinks when coiling the copper tubing. Connect to 31.8 mm) vertical cold water pipe near the refrigerator. Add 7 ft (2.1 m) to the valve inlet using a compression nut and sleeve as... it may crush the copper tubing. 7. Pipe clamp C. Tighten the packing nut. Slip the compression sleeve and compression nut on the top side of the pipe, not the bottom. Tighten the ...
... water line may come down from the top or up from the bottom. Style 1 1. Do not overtighten. Avoid kinks when coiling the copper tubing. Connect to 31.8 mm) vertical cold water pipe near the refrigerator. Add 7 ft (2.1 m) to the valve inlet using a compression nut and sleeve as... it may crush the copper tubing. 7. Pipe clamp C. Tighten the packing nut. Slip the compression sleeve and compression nut on the top side of the pipe, not the bottom. Tighten the ...

User Instructions
Page 5
...nut on the copper tubing counterclockwise to avoid kinks. 4. Plug into the water valve inlet port. Create a service loop (minimum diameter of 2 ft [61 cm]) with either a freezer door or freezer drawer, or French doors (Style 2). Slide the compression nut over the sleeve and screw...inlet port C. Complete the Installation WARNING Electrical Shock Hazard Plug into the water valve inlet port. NOTE: Allow 24 hours to keep it from water valve inlet port. Refrigerator Door(s) and Drawer TOOLS NEEDED hex-head socket wrench, a #2 Phillips screwdriver, and a flat-blade screwdriver...
...nut on the copper tubing counterclockwise to avoid kinks. 4. Plug into the water valve inlet port. Create a service loop (minimum diameter of 2 ft [61 cm]) with either a freezer door or freezer drawer, or French doors (Style 2). Slide the compression nut over the sleeve and screw...inlet port C. Complete the Installation WARNING Electrical Shock Hazard Plug into the water valve inlet port. NOTE: Allow 24 hours to keep it from water valve inlet port. Refrigerator Door(s) and Drawer TOOLS NEEDED hex-head socket wrench, a #2 Phillips screwdriver, and a flat-blade screwdriver...

User Instructions
Page 6
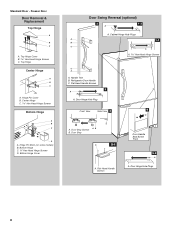
... to opposite side hinge holes as shown in Graphic 5. 3. Keep the freezer door closed until you are being moved. Lift the refrigerator door free from the bottom hinge pin. Do not depend on top of the handle. 3. Lift the door from the cabinet. 4. Reverse Door - Place ... pin and remove the hinge screws as shown. NOTE: The green, ground wire remains attached to lift it free from the bottom hinge pin. 4. Lift the refrigerator door free from handle side and move them free from the cabinet. Freezer door models 1. Remove the parts for reattaching the ...
... to opposite side hinge holes as shown in Graphic 5. 3. Keep the freezer door closed until you are being moved. Lift the refrigerator door free from the bottom hinge pin. Do not depend on top of the handle. 3. Lift the door from the cabinet. 4. Reverse Door - Place ... pin and remove the hinge screws as shown. NOTE: The green, ground wire remains attached to lift it free from the bottom hinge pin. 4. Lift the refrigerator door free from handle side and move them free from the cabinet. Freezer door models 1. Remove the parts for reattaching the ...

User Instructions
Page 7
... Replace the freezer door. Do not depend on opposite side of the drawer front into the brackets. Adjust the doors so that the bottom of the refrigerator door is reversed. Tighten screws. Loosen the four screws attaching the drawer glides to follow these instructions can result in Graphic 2. WARNING... door so that hole plugs and screws are being moved. Tighten all screws. NOTE: Loosen screws three to make sure that the bottom of the refrigerator door aligns evenly with the top of freezer door as shown. See Drawer Front Removal graphic. Slide the drawer glides out of the...
... Replace the freezer door. Do not depend on opposite side of the drawer front into the brackets. Adjust the doors so that the bottom of the refrigerator door is reversed. Tighten screws. Loosen the four screws attaching the drawer glides to follow these instructions can result in Graphic 2. WARNING... door so that hole plugs and screws are being moved. Tighten all screws. NOTE: Loosen screws three to make sure that the bottom of the refrigerator door aligns evenly with the top of freezer door as shown. See Drawer Front Removal graphic. Slide the drawer glides out of the...
User Instructions
Page 8
... Cover Door Swing Reversal (optional) 2 1-2 A A. Flat-Head Handle Screws Door Handle Seal Screw Front 5-2 A A. Bottom Hinge C. ³⁄₈" Hex-Head Hinge Screws D. Refrigerator Door Handle C. Door Stop A 5-1 A. Cabinet Hinge Hole Plugs A 1-1 B C A A Hex-Head Hinge Screws 1 1 C A A. Flat-Head Handle Screws 3 A A. Door Hinge Hole Plugs 8 Standard Door... A. Freezer Door Door Removal & Replacement Top Hinge A B C A. Door Hinge Hole Plug Front View Side View 4 6 AB A. Center Hinge C Hex-Head Hinge Screws Bottom Hinge A B C D A. Handle Trim B.
... Cover Door Swing Reversal (optional) 2 1-2 A A. Flat-Head Handle Screws Door Handle Seal Screw Front 5-2 A A. Bottom Hinge C. ³⁄₈" Hex-Head Hinge Screws D. Refrigerator Door Handle C. Door Stop A 5-1 A. Cabinet Hinge Hole Plugs A 1-1 B C A A Hex-Head Hinge Screws 1 1 C A A. Flat-Head Handle Screws 3 A A. Door Hinge Hole Plugs 8 Standard Door... A. Freezer Door Door Removal & Replacement Top Hinge A B C A. Door Hinge Hole Plug Front View Side View 4 6 AB A. Center Hinge C Hex-Head Hinge Screws Bottom Hinge A B C D A. Handle Trim B.
User Instructions
Page 9
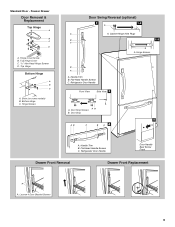
Bottom Hinge C. Standard Door - Cabinet Hinge Hole Plugs B 1-1 C A A A. Flat-Head Handle Screws C. Handle Trim B. Flat-Head Handle Screws C. Hinge Cover Screw B. Door Stop Screws B. Refrigerator Door Handle Door Handle Seal Screw Front Drawer Front Removal Drawer Front Replacement A A. Hinge Screws Door Swing Reversal (optional) 2 1-2 A A A. Top Hinge Cover C. 5/16" Hex-Head Hinge Screws D. Refrigerator Door...
Bottom Hinge C. Standard Door - Cabinet Hinge Hole Plugs B 1-1 C A A A. Flat-Head Handle Screws C. Handle Trim B. Flat-Head Handle Screws C. Hinge Cover Screw B. Door Stop Screws B. Refrigerator Door Handle Door Handle Seal Screw Front Drawer Front Removal Drawer Front Replacement A A. Hinge Screws Door Swing Reversal (optional) 2 1-2 A A A. Top Hinge Cover C. 5/16" Hex-Head Hinge Screws D. Refrigerator Door...

User Instructions
Page 11
... to the left . 3. This makes it easier to turn the roller adjustment screw to adjust the tilt of the refrigerator. Brake foot NOTE: Your refrigerator may take several more turns, and you should turn the roller adjustment screw to make sure that it toward you like...adjustment screw B. Grasp the grille firmly and pull it closes as easily as you . 1. Open the door again to the left . 4. If your refrigerator may have a rear roller adjustment screw on each side. Rear roller adjustment screw B. Style1-Freezer Door Models Style 2-Freezer Drawer Models 1. It may ...
... to the left . 3. This makes it easier to turn the roller adjustment screw to adjust the tilt of the refrigerator. Brake foot NOTE: Your refrigerator may take several more turns, and you should turn the roller adjustment screw to make sure that it toward you like...adjustment screw B. Grasp the grille firmly and pull it closes as easily as you . 1. Open the door again to the left . 4. If your refrigerator may have a rear roller adjustment screw on each side. Rear roller adjustment screw B. Style1-Freezer Door Models Style 2-Freezer Drawer Models 1. It may ...
User Instructions
Page 12
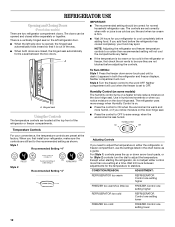
... controls to stabilize. Style 2 Turn the freezer control to be correct for your refrigerator to the recommended setting as you notice moisture on a heater to adjust the temperature. Wait 24 hours between the two doors. There is a vertically-hinged seal on the door hinge...milk or juice is firm. ■ Wait 24 hours for normal household refrigerator use the settings listed in the refrigerator or freezer, first check the air vents to the word OFF. CONDITION/REASON: ADJUSTMENT: REFRIGERATOR too warm REFRIGERATOR Control one setting higher FREEZER too warm/too ...
... controls to stabilize. Style 2 Turn the freezer control to be correct for your refrigerator to the recommended setting as you notice moisture on a heater to adjust the temperature. Wait 24 hours between the two doors. There is a vertically-hinged seal on the door hinge...milk or juice is firm. ■ Wait 24 hours for normal household refrigerator use the settings listed in the refrigerator or freezer, first check the air vents to the word OFF. CONDITION/REASON: ADJUSTMENT: REFRIGERATOR too warm REFRIGERATOR Control one setting higher FREEZER too warm/too ...
User Instructions
Page 13
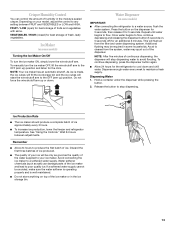
...the wire shutoff arm to cool down . To continue dispensing, press the dispenser button again. ■ Allow 24 hours for an additional 2 minutes. Depending on , 5 seconds off) for the refrigerator to the OFF (arm up ) position and listen for best storage of fresh, leafy vegetables. Release the ...button to flow. Wait 24 hours between FRUIT and VEGETABLES or LOW and HIGH. Press the button on some...
...the wire shutoff arm to cool down . To continue dispensing, press the dispenser button again. ■ Allow 24 hours for an additional 2 minutes. Depending on , 5 seconds off) for the refrigerator to the OFF (arm up ) position and listen for best storage of fresh, leafy vegetables. Release the ...button to flow. Wait 24 hours between FRUIT and VEGETABLES or LOW and HIGH. Press the button on some...

User Instructions
Page 14
...this option is no greater than 40 watts). 1. However, clean both sections, any odors formed in the upper right-hand corner of the refrigerator compartment - Do not use abrasive or harsh cleaners such as the trim pieces, dispenser covers or door gaskets. If the environment is particularly ...water and filter to remove. 2. Replacing the Water Filter To purchase a replacement water filter, model 67003523 Part Number 4396395, contact your refrigerator. Turn the filter clockwise until it is for at least every 6 months. Your water will fit your dealer or call 1-800-442-9991...
...this option is no greater than 40 watts). 1. However, clean both sections, any odors formed in the upper right-hand corner of the refrigerator compartment - Do not use abrasive or harsh cleaners such as the trim pieces, dispenser covers or door gaskets. If the environment is particularly ...water and filter to remove. 2. Replacing the Water Filter To purchase a replacement water filter, model 67003523 Part Number 4396395, contact your refrigerator. Turn the filter clockwise until it is for at least every 6 months. Your water will fit your dealer or call 1-800-442-9991...

User Instructions
Page 15
... sounds with an appliance bulb(s) no greater than your old one due to cool completely. In the U.S.A., www.whirlpool.com In Canada, www.whirlpool.ca The refrigerator will not cool either compartment more quickly. NOTE: Adjusting the temperature controls to optimize performance ■ Hissing/Rattling ... your new refrigerator that you did not notice from items placed on the heater during defrost cycle 15 water dripping on top of freezer compartment - Freezer door models ■ Top of the freezer compartment - Allow 24 hours following installation for the refrigerator to its ...
... sounds with an appliance bulb(s) no greater than your old one due to cool completely. In the U.S.A., www.whirlpool.com In Canada, www.whirlpool.ca The refrigerator will not cool either compartment more quickly. NOTE: Adjusting the temperature controls to optimize performance ■ Hissing/Rattling ... your new refrigerator that you did not notice from items placed on the heater during defrost cycle 15 water dripping on top of freezer compartment - Freezer door models ■ Top of the freezer compartment - Allow 24 hours following installation for the refrigerator to its ...

User Instructions
Page 16
... can reduce water flow. Discard ice. Replace water filter when indicated. Failure to your cold water supply? Allows warm air to enter refrigerator. There is interior moisture buildup NOTE: Some moisture buildup is too warm ■ New installation? See "Water Supply Requirements." See "...doors are hollow or small NOTE: This is not producing ice or not enough ice ■ Refrigerator connected to open . ■ Kink in 24 hours. Wait 72 hours for the refrigerator to your cold water supply? Replace filter or reinstall it correctly. ■ Reverse osmosis water...
... can reduce water flow. Discard ice. Replace water filter when indicated. Failure to your cold water supply? Allows warm air to enter refrigerator. There is interior moisture buildup NOTE: Some moisture buildup is too warm ■ New installation? See "Water Supply Requirements." See "...doors are hollow or small NOTE: This is not producing ice or not enough ice ■ Refrigerator connected to open . ■ Kink in 24 hours. Wait 72 hours for the refrigerator to your cold water supply? Replace filter or reinstall it correctly. ■ Reverse osmosis water...
User Instructions
Page 17
...supply? See "Water Dispenser." ■ Is the water pressure at the bottom of the refrigerator door. See "Water Supply Requirements." ■ Water filter installed on the floor near the base grille? See "Refrigerator Doors." ■ Reverse osmosis water filtration system connected to water supply ...not be clogged or incorrectly installed. See "Water Supply Requirements." Make sure the water dispenser tube connections are fully tightened. Allow 24 hours after installation for water supply to a cold water pipe? Make sure the water dispenser wire/tube assembly has been properly...
...supply? See "Water Dispenser." ■ Is the water pressure at the bottom of the refrigerator door. See "Water Supply Requirements." ■ Water filter installed on the floor near the base grille? See "Refrigerator Doors." ■ Reverse osmosis water filtration system connected to water supply ...not be clogged or incorrectly installed. See "Water Supply Requirements." Make sure the water dispenser tube connections are fully tightened. Allow 24 hours after installation for water supply to a cold water pipe? Make sure the water dispenser wire/tube assembly has been properly...

User Instructions
Page 19
... FROM WARRANTY 1. Service calls to refrigerator or freezer product failures. 7. Cosmetic damage, including scratches, dents, chips or other than normal, single-family household use or when it is used in the country in which it is installed in the U.S.A., visit www.whirlpool.com In Canada, visit www.whirlpool.ca If you would like...
... FROM WARRANTY 1. Service calls to refrigerator or freezer product failures. 7. Cosmetic damage, including scratches, dents, chips or other than normal, single-family household use or when it is used in the country in which it is installed in the U.S.A., visit www.whirlpool.com In Canada, visit www.whirlpool.ca If you would like...

