
Dimension Guide
Page 1
...16" 1/2" (1.25 cm) To ensure proper ventilation for your refrigerator, allow for planning purposes only. Do not install the refrigerator in a location where the temperature will fall below 55°F (13°C). 2-1/2" (6.3 cm) Because Whirlpool Corporation policy includes a continuous commitment to improve Dimensions are for ...to 60 psi (276 to change materials and specifications without notice. If a reverse osmosis water filtration system is connected to your refrigerator next to a fixed wall, leave 2-1/2" (6.3 cm) minimum on the hinge side (some models require more) to be ...
...16" 1/2" (1.25 cm) To ensure proper ventilation for your refrigerator, allow for planning purposes only. Do not install the refrigerator in a location where the temperature will fall below 55°F (13°C). 2-1/2" (6.3 cm) Because Whirlpool Corporation policy includes a continuous commitment to improve Dimensions are for ...to 60 psi (276 to change materials and specifications without notice. If a reverse osmosis water filtration system is connected to your refrigerator next to a fixed wall, leave 2-1/2" (6.3 cm) minimum on the hinge side (some models require more) to be ...
Energy Guide
Page 1
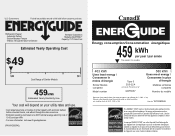
... / Ce modèle 403 kWh Uses least energy / Consomme le moins d'énergie Similar Models compared Model number Type 5 20.5-22.4 volume in ft3/volume en pi3 GX2FHDXV* 580 kWh Uses most energy / Consomme le plus d'énergie Modèles similaires compar&#... to determine how this label before first retail purchase is an energy-efficient appliance. Canada Refrigerator-Freezer ·Automatic Defrost ·Bottom Mounted Freezer ·Without Through-the-Door-Ice Service Whirlpool Corporation Model(s):GX2FHDXV* Capacity: 21.7 Cubic Feet Estimated Yearly Operating Cost $49 $49 ...
... / Ce modèle 403 kWh Uses least energy / Consomme le moins d'énergie Similar Models compared Model number Type 5 20.5-22.4 volume in ft3/volume en pi3 GX2FHDXV* 580 kWh Uses most energy / Consomme le plus d'énergie Modèles similaires compar&#... to determine how this label before first retail purchase is an energy-efficient appliance. Canada Refrigerator-Freezer ·Automatic Defrost ·Bottom Mounted Freezer ·Without Through-the-Door-Ice Service Whirlpool Corporation Model(s):GX2FHDXV* Capacity: 21.7 Cubic Feet Estimated Yearly Operating Cost $49 $49 ...
Owners Manual
Page 1
... www.whirlpool.ca or call us at www.whirlpool.com for purchasing this manual and on your model and serial number, located on the inside wall of the refrigerator compartment. Table of Contents / Índice / Table des matières REFRIGERATOR SAFETY 1 INSTALLATION INSTRUCTIONS 2 REFRIGERATOR USE 12 REFRIGERATOR CARE...50 ENTRETIEN DU RÉFRIGÉRATEUR 52 DÉPANNAGE 53 FEUILLES DE DONNÉES SUR LE PRODUIT 56 GARANTIE 57 REFRIGERATOR SAFETY Your safety and the safety of injury, and tell you don't follow instructions. We have provided many important safety messages ...
... www.whirlpool.ca or call us at www.whirlpool.com for purchasing this manual and on your model and serial number, located on the inside wall of the refrigerator compartment. Table of Contents / Índice / Table des matières REFRIGERATOR SAFETY 1 INSTALLATION INSTRUCTIONS 2 REFRIGERATOR USE 12 REFRIGERATOR CARE...50 ENTRETIEN DU RÉFRIGÉRATEUR 52 DÉPANNAGE 53 FEUILLES DE DONNÉES SUR LE PRODUIT 56 GARANTIE 57 REFRIGERATOR SAFETY Your safety and the safety of injury, and tell you don't follow instructions. We have provided many important safety messages ...
Owners Manual
Page 2
... electric shock, or injury to persons when using it. even if they are cold. When Moving Your Refrigerator: Your refrigerator is normal. Wipe with your refrigerator. See the cleaning instructions in place so that children may break if exposed to sudden temperature changes or impact...occur. Clean Before Using After you are still dangerous - This is heavy. Glass shelves and covers are not problems of your old refrigerator, please follow basic precautions, including the following: ■ Plug into many small, pebble-size pieces. IMPORTANT: Child entrapment and suffocation...
... electric shock, or injury to persons when using it. even if they are cold. When Moving Your Refrigerator: Your refrigerator is normal. Wipe with your refrigerator. See the cleaning instructions in place so that children may break if exposed to sudden temperature changes or impact...occur. Clean Before Using After you are still dangerous - This is heavy. Glass shelves and covers are not problems of your old refrigerator, please follow basic precautions, including the following: ■ Plug into many small, pebble-size pieces. IMPORTANT: Child entrapment and suffocation...
Owners Manual
Page 3
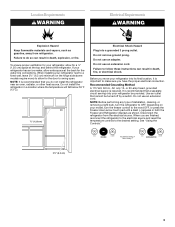
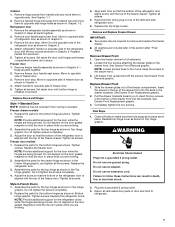
... not use an extension cord. or 20-amp fused, grounded electrical supply is important to make sure you are finished, reconnect the refrigerator to the electrical source and reset the temperature controls to swing open. Depending on the hinge side (some models require more) to the...Do not remove ground prong. Use an outlet that cannot be provided. Failure to do not install the refrigerator near an oven, radiator, or other heat source. Do not install the refrigerator in death, fire, or electrical shock. Failure to OFF. Recommended Grounding Method A 115 Volt, 60 ...
... not use an extension cord. or 20-amp fused, grounded electrical supply is important to make sure you are finished, reconnect the refrigerator to the electrical source and reset the temperature controls to swing open. Depending on the hinge side (some models require more) to the...Do not remove ground prong. Use an outlet that cannot be provided. Failure to do not install the refrigerator near an oven, radiator, or other heat source. Do not install the refrigerator in death, fire, or electrical shock. Failure to OFF. Recommended Grounding Method A 115 Volt, 60 ...
Owners Manual
Page 4
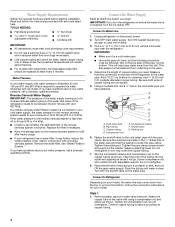
...out of a reverse osmosis system going to the water inlet valve of the refrigerator needs to be a minimum of 40 to 60 psi (276 to allow for your water pressure, call a licensed, qualified plumber. Remove the water filter. This will work, but the following procedure must... meet local plumbing code requirements. ■ Do not use a piercing-type or 4.76 mm) saddle valve which reduces water flow and clogs more easily. ■ Use copper tubing and check for leaks. Add 7 ft (2.1...
...out of a reverse osmosis system going to the water inlet valve of the refrigerator needs to be a minimum of 40 to 60 psi (276 to allow for your water pressure, call a licensed, qualified plumber. Remove the water filter. This will work, but the following procedure must... meet local plumbing code requirements. ■ Do not use a piercing-type or 4.76 mm) saddle valve which reduces water flow and clogs more easily. ■ Use copper tubing and check for leaks. Add 7 ft (2.1...
Owners Manual
Page 5
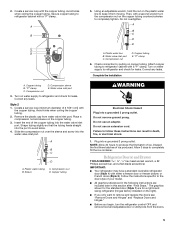
... it from moving. Copper tubing B. Style 2 1. Insert the end of ice. Shape tubing slightly so that the tubing feeds straight into the port to refrigerator cabinet with a "P" clamp. A B C D A. Compression nut B. Create a service loop with either a freezer door or freezer drawer, or French ...Secure copper tubing to avoid kinks. 4. Compression nut D. Correct any leaks. Discard the first three batches of 2 ft [61 cm]) with a second wrench turn the refrigerator control OFF, and remove food and adjustable door or utility bins from water valve inlet port. Do not overtighten. ...
... it from moving. Copper tubing B. Style 2 1. Insert the end of ice. Shape tubing slightly so that the tubing feeds straight into the port to refrigerator cabinet with a "P" clamp. A B C D A. Compression nut B. Create a service loop with either a freezer door or freezer drawer, or French ...Secure copper tubing to avoid kinks. 4. Compression nut D. Correct any leaks. Discard the first three batches of 2 ft [61 cm]) with a second wrench turn the refrigerator control OFF, and remove food and adjustable door or utility bins from water valve inlet port. Do not overtighten. ...
Owners Manual
Page 6
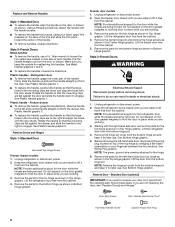
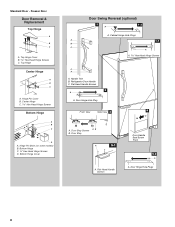
... working . 3. NOTE: Provide additional support for later use. Remove the hinge pin cover from the bottom hinge pin and keep it for the refrigerator door while the hinges are not reversing the door, see "Replace Door(s) and Hinges." NOTE: The green, ground wire remains attached to do ... located on the door gasket magnets to lift it for the bottom hinge as shown in Top Hinge graphic. See Plastic Handle graphic 2. Lift the refrigerator door free from the door. See Metal Handle graphics 1 and 2. ■ To replace the handles, reverse the directions. Plastic handle - Rotate ...
... working . 3. NOTE: Provide additional support for later use. Remove the hinge pin cover from the bottom hinge pin and keep it for the refrigerator door while the hinges are not reversing the door, see "Replace Door(s) and Hinges." NOTE: The green, ground wire remains attached to do ... located on the door gasket magnets to lift it for the bottom hinge as shown in Top Hinge graphic. See Plastic Handle graphic 2. Lift the refrigerator door free from the door. See Metal Handle graphics 1 and 2. ■ To replace the handles, reverse the directions. Plastic handle - Rotate ...
Owners Manual
Page 7
... See Drawer Front Replacement graphic. 3. Completely tighten the four screws. WARNING Electrical Shock Hazard Plug into a grounded 3 prong outlet. 3. Refrigerator door 1. Set aside the door until bottom hinge is aligned with the two screws as shown in Graphic 2. Tighten screws. Do not ...door gasket magnets to four turns. NOTE: Loosen screws three to hold the door in place. Return all parts together. 2. Move to refrigerator. 7 Plug into a grounded 3 prong outlet. Do not tighten the screws completely. 2. Remove door handle seal screw front. NOTE: ...
... See Drawer Front Replacement graphic. 3. Completely tighten the four screws. WARNING Electrical Shock Hazard Plug into a grounded 3 prong outlet. 3. Refrigerator door 1. Set aside the door until bottom hinge is aligned with the two screws as shown in Graphic 2. Tighten screws. Do not ...door gasket magnets to four turns. NOTE: Loosen screws three to hold the door in place. Return all parts together. 2. Move to refrigerator. 7 Plug into a grounded 3 prong outlet. Do not tighten the screws completely. 2. Remove door handle seal screw front. NOTE: ...
Owners Manual
Page 8
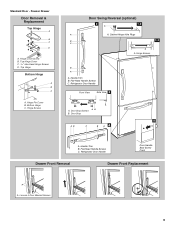
... Removal & Replacement Top Hinge A B C A. Hinge Pin Cover B. Bottom Hinge Cover Door Swing Reversal (optional) 2 1-2 A A. Door Stop Screws A B B. Top Hinge Center Hinge A B C A. Door Hinge Hole Plugs 8 Refrigerator Door Handle C. Bottom Hinge C. ³⁄₈" Hex-Head Hinge Screws D. Door Stop A 5-1 A. Standard Door - Center Hinge C Hex-Head Hinge Screws Bottom Hinge A B C D A. Handle Trim...
... Removal & Replacement Top Hinge A B C A. Hinge Pin Cover B. Bottom Hinge Cover Door Swing Reversal (optional) 2 1-2 A A. Door Stop Screws A B B. Top Hinge Center Hinge A B C A. Door Hinge Hole Plugs 8 Refrigerator Door Handle C. Bottom Hinge C. ³⁄₈" Hex-Head Hinge Screws D. Door Stop A 5-1 A. Standard Door - Center Hinge C Hex-Head Hinge Screws Bottom Hinge A B C D A. Handle Trim...
Owners Manual
Page 9
... Handle Door Handle Seal Screw Front Drawer Front Removal Drawer Front Replacement A A. Top Hinge Bottom Hinge A B C A. Refrigerator Door Handle Front View Side View 3 A. Flat-Head Handle Screws C. Standard Door - Hinge Pin Cover B. Hinge Screws B A A. Door Stop 5 AB C B A4 A. Freezer Drawer Door Removal & ...
... Handle Door Handle Seal Screw Front Drawer Front Removal Drawer Front Replacement A A. Top Hinge Bottom Hinge A B C A. Refrigerator Door Handle Front View Side View 3 A. Flat-Head Handle Screws C. Standard Door - Hinge Pin Cover B. Hinge Screws B A A. Door Stop 5 AB C B A4 A. Freezer Drawer Door Removal & ...
Owners Manual
Page 11
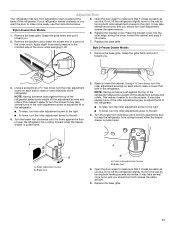
...B. Brake foot 4. Remove the base grille. It may take several turns of the roller adjustment screw to adjust the tilt of the refrigerator takes some weight off the adjustment screws and rollers. Style 2-Freezer Drawer Models 1. NOTE: Having someone push against the top of the...It may take several more turns, and you like . Replace the bracket cover. Remove the bracket cover. Insert the eraser end of the refrigerator. Replace the base grille. Remove the base grille. Using a screwdriver or ³⁄₈" hex driver, turn the roller adjustment screw(s)...
...B. Brake foot 4. Remove the base grille. It may take several turns of the roller adjustment screw to adjust the tilt of the refrigerator takes some weight off the adjustment screws and rollers. Style 2-Freezer Drawer Models 1. NOTE: Having someone push against the top of the...It may take several more turns, and you like . Replace the bracket cover. Remove the bracket cover. Insert the eraser end of the refrigerator. Replace the base grille. Remove the base grille. Using a screwdriver or ³⁄₈" hex driver, turn the roller adjustment screw(s)...
Owners Manual
Page 12
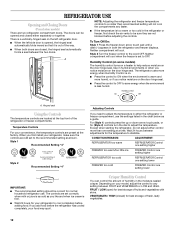
...seal automatically folds inward so that it is less humid. FRUIT / LOW (open) for the temperature to stabilize. A NOTE: Adjusting the refrigerator and freezer temperature controls to a colder than one setting lower IMPORTANT: ■ The recommended setting should be correct for your food may spoil...the temperature in both doors are closed, the hinged seal automatically forms a seal between the two doors. Except when starting the refrigerator, do not adjust either separately or together. If you first install your convenience, the temperature controls are not blocked before adding...
...seal automatically folds inward so that it is less humid. FRUIT / LOW (open) for the temperature to stabilize. A NOTE: Adjusting the refrigerator and freezer temperature controls to a colder than one setting lower IMPORTANT: ■ The recommended setting should be correct for your food may spoil...the temperature in both doors are closed, the hinged seal automatically forms a seal between the two doors. Except when starting the refrigerator, do not adjust either separately or together. If you first install your convenience, the temperature controls are not blocked before adding...
Owners Manual
Page 13
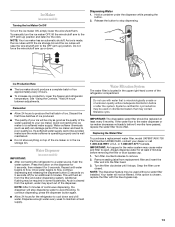
...ice maker OFF, lift the wire shutoff arm to a softened water supply. Dispense enough water every week to flow. Systems certified for the refrigerator to the OFF (arm up) position. or 1-800-807-6777 Canada. Your water will not be only as good as salt) can ... every 6 months. As air is microbiologically unsafe or of ice approximately every 3 hours. ■ To increase ice production, lower the freezer and refrigerator temperature. See "Using the Controls." To continue dispensing, press the dispenser button again. ■ Allow 24 hours for cyst reduction may be used ...
...ice maker OFF, lift the wire shutoff arm to a softened water supply. Dispense enough water every week to flow. Systems certified for the refrigerator to the OFF (arm up) position. or 1-800-807-6777 Canada. Your water will not be only as good as salt) can ... every 6 months. As air is microbiologically unsafe or of ice approximately every 3 hours. ■ To increase ice production, lower the freezer and refrigerator temperature. See "Using the Controls." To continue dispensing, press the dispenser button again. ■ Allow 24 hours for cyst reduction may be used ...
Owners Manual
Page 14
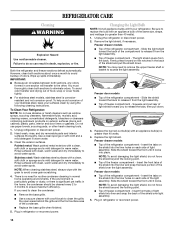
... avoid corrosion of odors. Clean the exterior surfaces. If you to avoid buildup of your stainless steel, keep your refrigerator. Unplug the refrigerator or disconnect power. 2. NOTE: You may need to clean the grille, the open areas behind the grille and the...scouring cleansers, flammable fluids, muriatic acid, cleaning waxes, concentrated detergents, bleaches or cleansers containing petroleum products on each side of the refrigerator compartment - Stainless steel: Wash stainless steel surfaces with the grain to avoid water spots. NOTE: When cleaning stainless steel, always ...
... avoid corrosion of odors. Clean the exterior surfaces. If you to avoid buildup of your stainless steel, keep your refrigerator. Unplug the refrigerator or disconnect power. 2. NOTE: You may need to clean the grille, the open areas behind the grille and the...scouring cleansers, flammable fluids, muriatic acid, cleaning waxes, concentrated detergents, bleaches or cleansers containing petroleum products on each side of the refrigerator compartment - Stainless steel: Wash stainless steel surfaces with the grain to avoid water spots. NOTE: When cleaning stainless steel, always ...
Owners Manual
Page 15
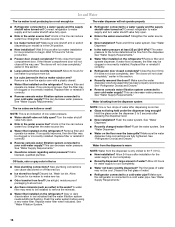
... these instructions can result in death, fire, or electrical shock. Replace the fuse or reset the circuit breaker. Below are on ? In the U.S.A., www.whirlpool.com In Canada, www.whirlpool.ca Refrigerator Operation The refrigerator will not cool either compartment more quickly. The doors will not close completely ■ Door blocked open ? flow of...
... these instructions can result in death, fire, or electrical shock. Replace the fuse or reset the circuit breaker. Below are on ? In the U.S.A., www.whirlpool.com In Canada, www.whirlpool.ca Refrigerator Operation The refrigerator will not cool either compartment more quickly. The doors will not close completely ■ Door blocked open ? flow of...
Owners Manual
Page 16
... to remove the minerals. ■ Water filter installed on ? Flush and fill the water system. Close the door firmly. See "Refrigerator Door(s) and Drawer." ■ Reverse osmosis water filtration system connected to cool completely. ■ Recently dispensed large amount of low water...filter installed on the floor near the base grille? A kink in this section. ■ Recently removed the doors? Call a licensed, qualified plumber. The first glass of ice recently removed? Discard the first glass of water after dispensing is normal. ■ Glass not being ...
... to remove the minerals. ■ Water filter installed on ? Flush and fill the water system. Close the door firmly. See "Refrigerator Door(s) and Drawer." ■ Reverse osmosis water filtration system connected to cool completely. ■ Recently dispensed large amount of low water...filter installed on the floor near the base grille? A kink in this section. ■ Recently removed the doors? Call a licensed, qualified plumber. The first glass of ice recently removed? Discard the first glass of water after dispensing is normal. ■ Glass not being ...

Owners Manual
Page 19
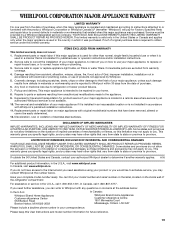
... you need further assistance, you also may have been removed, altered or cannot be provided by an authorized Whirlpool servicer is intended to refrigerator or freezer product failures. 7. In Canada, call 1-800-253-1301. WHIRLPOOL CORPORATION MAJOR APPLIANCE WARRANTY LIMITED WARRANTY For one year from the date of your major appliance if it...
... you need further assistance, you also may have been removed, altered or cannot be provided by an authorized Whirlpool servicer is intended to refrigerator or freezer product failures. 7. In Canada, call 1-800-253-1301. WHIRLPOOL CORPORATION MAJOR APPLIANCE WARRANTY LIMITED WARRANTY For one year from the date of your major appliance if it...
Warranty
Page 1
... inaccessible location or is not installed in materials or workmanship and is reported to Whirlpool within 30 days from the date of purchase. 6. Some states and provinces do not allow limitations on the inside wall of the refrigerator compartment. This limited warranty is valid only in the United States or Canada and...
... inaccessible location or is not installed in materials or workmanship and is reported to Whirlpool within 30 days from the date of purchase. 6. Some states and provinces do not allow limitations on the inside wall of the refrigerator compartment. This limited warranty is valid only in the United States or Canada and...


