
Use & Care Guide
Page 1
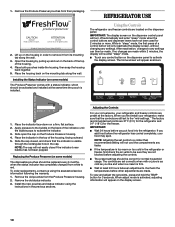
... information. In Canada, visit our website at www.whirlpool.ca or call us at 1-800-807-6777. Table of Contents / Índice / Table des matières REFRIGERATOR SAFETY 1 INSTALLATION INSTRUCTIONS 2 REFRIGERATOR USE 10 REFRIGERATOR CARE 15 TROUBLESHOOTING 16 ACCESSORIES 18 WATER FILTER CERTIFICATIONS ...58 DÉPANNAGE 59 ACCESSOIRES 61 FEUILLE DE DONNÉES SUR LA PERFORMANCE 62 GARANTIE 63 REFRIGERATOR SAFETY Your safety and the safety of the refrigerator compartment. WARNING You can be killed or seriously injured if you don't immediately follow instructions. We ...
... information. In Canada, visit our website at www.whirlpool.ca or call us at 1-800-807-6777. Table of Contents / Índice / Table des matières REFRIGERATOR SAFETY 1 INSTALLATION INSTRUCTIONS 2 REFRIGERATOR USE 10 REFRIGERATOR CARE 15 TROUBLESHOOTING 16 ACCESSORIES 18 WATER FILTER CERTIFICATIONS ...58 DÉPANNAGE 59 ACCESSOIRES 61 FEUILLE DE DONNÉES SUR LA PERFORMANCE 62 GARANTIE 63 REFRIGERATOR SAFETY Your safety and the safety of the refrigerator compartment. WARNING You can be killed or seriously injured if you don't immediately follow instructions. We ...
Use & Care Guide
Page 2
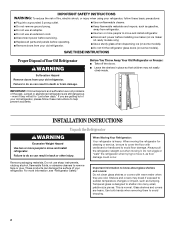
...break if exposed to sudden temperature changes or impact, such as floor damage could occur. If you are getting rid of your refrigerator. Important information to know about glass shelves and covers: Do not clean glass shelves or covers with cardboard or hardboard to avoid...with warm water when they will sit for cleaning or service, be sure to move and install refrigerator. ■ Disconnect power before operating. ■ Remove doors from your old refrigerator. IMPORTANT: Child entrapment and suffocation are cold. SAVE THESE INSTRUCTIONS Proper Disposal of the past....
...break if exposed to sudden temperature changes or impact, such as floor damage could occur. If you are getting rid of your refrigerator. Important information to know about glass shelves and covers: Do not clean glass shelves or covers with cardboard or hardboard to avoid...with warm water when they will sit for cleaning or service, be sure to move and install refrigerator. ■ Disconnect power before operating. ■ Remove doors from your old refrigerator. IMPORTANT: Child entrapment and suffocation are cold. SAVE THESE INSTRUCTIONS Proper Disposal of the past....
Use & Care Guide
Page 3
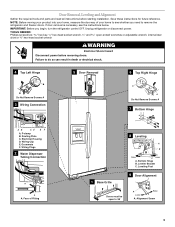
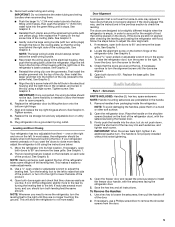
...;⁄₄" hex-head socket wrench, ¹⁄₄" and open to remove the refrigerator and freezer doors. Routing Plate C. Bottom Hinge B. Alignment Screw 3 Unplug refrigerator or disconnect power. Door Removal, Leveling and Alignment Gather the required tools and parts and read... of Fitting 1 Base Grille 8 Leveling A B Raise Lower C A. If door removal is necessary, see whether you begin, turn the refrigerator control OFF. Wiring Clip E. Leveling Foot 9 Door Alignment Doors must be open -ended wrenches or adjustable wrench, internal star drive or &#...
...;⁄₄" hex-head socket wrench, ¹⁄₄" and open to remove the refrigerator and freezer doors. Routing Plate C. Bottom Hinge B. Alignment Screw 3 Unplug refrigerator or disconnect power. Door Removal, Leveling and Alignment Gather the required tools and parts and read... of Fitting 1 Base Grille 8 Leveling A B Raise Lower C A. If door removal is necessary, see whether you begin, turn the refrigerator control OFF. Wiring Clip E. Leveling Foot 9 Door Alignment Doors must be open -ended wrenches or adjustable wrench, internal star drive or &#...
Use & Care Guide
Page 4
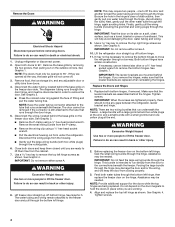
...: Do not feed the large wiring bundle through the hinge. Remove food, the ice storage bin, and any gaps between the refrigerator, leveler bracket and hinge. Close both water tubes through the hinge. The water tubing and wiring remain attached to the connections beneath... corners. IMPORTANT: Do not remove either screw A. Replace the Doors and Hinges 1. Feed both doors and keep the door from under the refrigerator. See Graphic 1. Disconnect the water tubing, located behind the hinges. See Graphic 5. Both bottom hinges have similar construction. ■ If ...
...: Do not feed the large wiring bundle through the hinge. Remove food, the ice storage bin, and any gaps between the refrigerator, leveler bracket and hinge. Close both water tubes through the hinge. The water tubing and wiring remain attached to the connections beneath... corners. IMPORTANT: Do not remove either screw A. Replace the Doors and Hinges 1. Feed both doors and keep the door from under the refrigerator. See Graphic 1. Disconnect the water tubing, located behind the hinges. See Graphic 5. Both bottom hinges have similar construction. ■ If ...
Use & Care Guide
Page 5
... Reinstall the P-clamp around the small wiring bundle (with the right hole in the previous section to the left . Replace the refrigerator door by turning the leveling feet to check the leveling. Replace the ice storage bin and any adjustable door or utility bins. ... tightening. 4. Remove handles from the door. 5 See Graphic 3. ■ Reinstall the wiring clip over the grommets. Door Alignment A refrigerator that side of the refrigerator door. Tighten screws. 8. If necessary, open both doors to make adjustments. 3. NOTE: To avoid damaging the handles, place them ....
... Reinstall the P-clamp around the small wiring bundle (with the right hole in the previous section to the left . Replace the refrigerator door by turning the leveling feet to check the leveling. Replace the ice storage bin and any adjustable door or utility bins. ... tightening. 4. Remove handles from the door. 5 See Graphic 3. ■ Reinstall the wiring clip over the grommets. Door Alignment A refrigerator that side of the refrigerator door. Tighten screws. 8. If necessary, open both doors to make adjustments. 3. NOTE: To avoid damaging the handles, place them ....
Use & Care Guide
Page 6
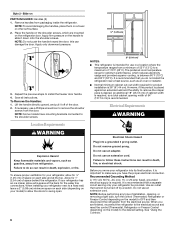
... soft surface. 2. this can result in death, explosion, or fire. To Remove the Handles: 1. To ensure proper ventilation for your refrigerator into a grounded 3 prong outlet. Use an outlet that you are mounted on the shoulder screws, which reduces electricity usage and provides superior...43°C). NOTE: Some models have the proper electrical connection. Allow for use in a location where the temperature ranges from packaging inside the refrigerator. Do not use an adapter. Remove handles from a minimum of 55°F (13°C) to a maximum of installation, cleaning, or...
... soft surface. 2. this can result in death, explosion, or fire. To Remove the Handles: 1. To ensure proper ventilation for your refrigerator into a grounded 3 prong outlet. Use an outlet that you are mounted on the shoulder screws, which reduces electricity usage and provides superior...43°C). NOTE: Some models have the proper electrical connection. Allow for use in a location where the temperature ranges from packaging inside the refrigerator. Do not use an adapter. Remove handles from a minimum of 55°F (13°C) to a maximum of installation, cleaning, or...
Use & Care Guide
Page 7
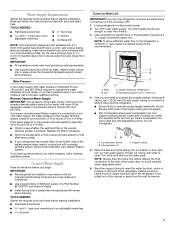
...■ Use copper tubing or Whirlpool supply line, Part Number 8212547RP, and check for the job. IMPORTANT: ■ All installations must meet the water line inlet, which reduces water flow and clogs more easily. If you have questions about your refrigerator has a water filter, it...: ■ Plumbing shall be a minimum of the copper tubing are ready to connect the copper tubing to connect the shutoff valve and the refrigerator. ■ Ensure that you begin. Bend the copper tubing to meet local plumbing code requirements. ■ Use copper tubing and check for ...
...■ Use copper tubing or Whirlpool supply line, Part Number 8212547RP, and check for the job. IMPORTANT: ■ All installations must meet the water line inlet, which reduces water flow and clogs more easily. If you have questions about your refrigerator has a water filter, it...: ■ Plumbing shall be a minimum of the copper tubing are ready to connect the copper tubing to connect the shutoff valve and the refrigerator. ■ Ensure that you begin. Bend the copper tubing to meet local plumbing code requirements. ■ Use copper tubing and check for ...

Use & Care Guide
Page 8
...leaks. A B C D E A. Tube clamp screw C. On some models, the ice maker is needed in death, fire, or electrical shock. 1. Refrigerator water tubing B. Ferrule (purchased) F. Household water line 4. Do not use an extension cord. See "Prepare the Water System" or "Water and Ice...water strainer. Turn shutoff valve ON. 6. Tube clamp B. Nut (purchased) G. Turn shutoff valve ON. 5. Check for leaks. Unplug refrigerator or disconnect power. 2. Install the water supply tube clamp around the water supply line to the valve inlet using a compression nut and ...
...leaks. A B C D E A. Tube clamp screw C. On some models, the ice maker is needed in death, fire, or electrical shock. 1. Refrigerator water tubing B. Ferrule (purchased) F. Household water line 4. Do not use an extension cord. See "Prepare the Water System" or "Water and Ice...water strainer. Turn shutoff valve ON. 6. Tube clamp B. Nut (purchased) G. Turn shutoff valve ON. 5. Check for leaks. Unplug refrigerator or disconnect power. 2. Install the water supply tube clamp around the water supply line to the valve inlet using a compression nut and ...
Use & Care Guide
Page 9
...two pouches. Snap the filter into the notches, facing outward. On some models, the Produce Preserver is located along either inside the refrigerator. The Produce Preserver pouches should be replaced every 6 months, when the status indicator has completely changed from its packaging. 2. On ...OTHER PRODUCTS. l e MONTHS IRRITANT prudences sur ATTENTION des Lisez 1. Install Air Filter (on some models) On some models, your refrigerator's accessory packet includes an air filter, which must be installed prior to red. Install the new air filter and status indicator using ...
...two pouches. Snap the filter into the notches, facing outward. On some models, the Produce Preserver is located along either inside the refrigerator. The Produce Preserver pouches should be replaced every 6 months, when the status indicator has completely changed from its packaging. 2. On ...OTHER PRODUCTS. l e MONTHS IRRITANT prudences sur ATTENTION des Lisez 1. Install Air Filter (on some models) On some models, your refrigerator's accessory packet includes an air filter, which must be installed prior to red. Install the new air filter and status indicator using ...
Use & Care Guide
Page 10
...in the previous sections. To order replacements, contact us using the instructions in the cap. IMPORTANT: ■ Wait 24 hours before the refrigerator has cooled completely, your food may spoil. NOTE: Adjusting the set points to be replaced every 6 months, when the status indicator .... ■ Wait at the same time the pouch is activated, adjusting information will re-enter "sleep" mode. ■ Touch any settings. Whirlpool Corporation, Benton Harbor MI 49022 2. Place both pouches inside the housing, then snap the housing back together. 5. After reactivation, changes to any...
...in the previous sections. To order replacements, contact us using the instructions in the cap. IMPORTANT: ■ Wait 24 hours before the refrigerator has cooled completely, your food may spoil. NOTE: Adjusting the set points to be replaced every 6 months, when the status indicator .... ■ Wait at the same time the pouch is activated, adjusting information will re-enter "sleep" mode. ■ Touch any settings. Whirlpool Corporation, Benton Harbor MI 49022 2. Place both pouches inside the housing, then snap the housing back together. 5. After reactivation, changes to any...
Use & Care Guide
Page 11
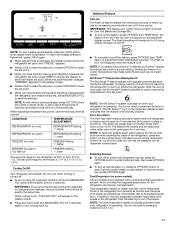
... (and adjusting if desired) both buttons at the same time for 5 minutes. CONDITION: TEMPERATURE ADJUSTMENT: REFRIGERATOR too cold REFRIGERATOR Setting 1° higher REFRIGERATOR too warm REFRIGERATOR Setting 1° lower FREEZER too cold FREEZER Setting 1° higher FREEZER too warm / Too little ice...times, change the display to a lower setting. Dual evaporation results in higher humidity, which helps keep food smells in the refrigerator from spoiling as ice cream, harder. 6th Sense™ Temperature Management The 6th Sense™ feature assists with a dual...
... (and adjusting if desired) both buttons at the same time for 5 minutes. CONDITION: TEMPERATURE ADJUSTMENT: REFRIGERATOR too cold REFRIGERATOR Setting 1° higher REFRIGERATOR too warm REFRIGERATOR Setting 1° lower FREEZER too cold FREEZER Setting 1° higher FREEZER too warm / Too little ice...times, change the display to a lower setting. Dual evaporation results in higher humidity, which helps keep food smells in the refrigerator from spoiling as ice cream, harder. 6th Sense™ Temperature Management The 6th Sense™ feature assists with a dual...
Use & Care Guide
Page 12
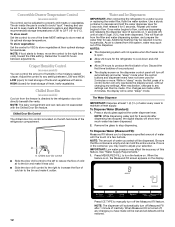
... the dispenser lever (5 seconds on some households. See "Water Supply Requirements." 1. To store meat: Set the control to one of the refrigerator compartment. HIGH (closed) for 5 seconds. NOTE: If food starts to freeze, move the control to stop dispensing. After reactivation, changes ...and hold the entire volume. LOW (open . ■ Allow 24 hours for use. Water and Ice Dispensers IMPORTANT: After connecting the refrigerator to properly chill meats or vegetables. Crisper Humidity Control (on , 5 seconds off the Measured Fill feature. The Water Dispenser IMPORTANT: Dispense...
... the dispenser lever (5 seconds on some households. See "Water Supply Requirements." 1. To store meat: Set the control to one of the refrigerator compartment. HIGH (closed) for 5 seconds. NOTE: If food starts to freeze, move the control to stop dispensing. After reactivation, changes ...and hold the entire volume. LOW (open . ■ Allow 24 hours for use. Water and Ice Dispensers IMPORTANT: After connecting the refrigerator to properly chill meats or vegetables. Crisper Humidity Control (on , 5 seconds off the Measured Fill feature. The Water Dispenser IMPORTANT: Dispense...
Use & Care Guide
Page 14
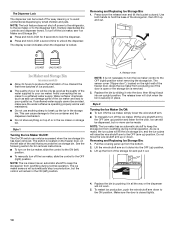
... 3 seconds to the dispenser light. The ice maker sensors will automatically stop ice production, but no more can only be turned off power to the refrigerator, to the ice maker, or to lock the dispenser. ■ Press and hold the base of the storage bin and pull it clicks into an...
... 3 seconds to the dispenser light. The ice maker sensors will automatically stop ice production, but no more can only be turned off power to the refrigerator, to the ice maker, or to lock the dispenser. ■ Press and hold the base of the storage bin and pull it clicks into an...
Use & Care Guide
Page 15
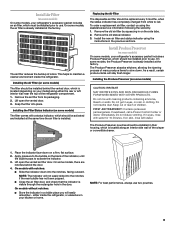
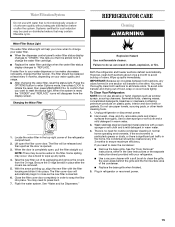
...help you want to clean the condenser: ■ Remove the base grille. The filter will automatically begin to avoid buildup of the refrigerator compartment. 2. The filter cover door will be used on your water dispenser or ice maker decreases noticeably, change the filter sooner. ...Explosion Hazard Use nonflammable cleaner. Both the refrigerator and freezer sections defrost automatically. Do not use abrasive or harsh cleaners such as the new filter is reset, the "ORDER" and...
...help you want to clean the condenser: ■ Remove the base grille. The filter will automatically begin to avoid buildup of the refrigerator compartment. 2. The filter cover door will be used on your water dispenser or ice maker decreases noticeably, change the filter sooner. ...Explosion Hazard Use nonflammable cleaner. Both the refrigerator and freezer sections defrost automatically. Do not use abrasive or harsh cleaners such as the new filter is reset, the "ORDER" and...
Use & Care Guide
Page 16
...cycle and water runs into the drain pan ■ Creaking/Cracking - Unplug refrigerator or disconnect power. 4. Plug in the correct position. 16 In the U.S.A., www.whirlpool.com In Canada, www.whirlpool.ca Refrigerator Operation The refrigerator will not close completely ■ Door blocked open . Plug into a ...of the same size, shape and wattage. ■ The dispenser lights are LEDs that you may run too much Your new refrigerator may be changed . 3. Replace light shield when applicable. 5. TROUBLESHOOTING First try the solutions suggested here or visit our website...
...cycle and water runs into the drain pan ■ Creaking/Cracking - Unplug refrigerator or disconnect power. 4. Plug in the correct position. 16 In the U.S.A., www.whirlpool.com In Canada, www.whirlpool.ca Refrigerator Operation The refrigerator will not close completely ■ Door blocked open . Plug into a ...of the same size, shape and wattage. ■ The dispenser lights are LEDs that you may run too much Your new refrigerator may be changed . 3. Replace light shield when applicable. 5. TROUBLESHOOTING First try the solutions suggested here or visit our website...
Use & Care Guide
Page 17
... On some models, the dispenser light will operate only when a dispenser lever/pad is normal. Allows warm air to enter refrigerator. Allow several hours for refrigerator to return to normal temperature. ■ Controls set to the NIGHT LIGHT or AUTO mode, be installed to remove the ...minerals. ■ Is there a water filter installed on the refrigerator? Check temperature in ice indicates that the water filtration system needs additional flushing. There is interior moisture buildup NOTE: Some moisture buildup is ...
... On some models, the dispenser light will operate only when a dispenser lever/pad is normal. Allows warm air to enter refrigerator. Allow several hours for refrigerator to return to normal temperature. ■ Controls set to the NIGHT LIGHT or AUTO mode, be installed to remove the ...minerals. ■ Is there a water filter installed on the refrigerator? Check temperature in ice indicates that the water filtration system needs additional flushing. There is interior moisture buildup NOTE: Some moisture buildup is ...
Use & Care Guide
Page 18
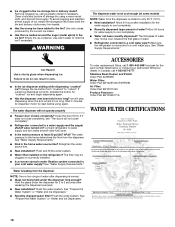
...9632; Is the water pressure at least 30 psi (207 kPa)? Ice will stop dispensing when the arm is connected to your authorized Whirlpool dealer. Stainless Steel Cleaner and Polish: Order Part #4396095 Water Filter: Order Part #W10291030 (P4RFWB) Air Filter: Order Part #...the supply shutoff valve turned on? See "Water Supply Requirements." Close the door firmly. If it does not close completely." ■ Refrigerator connected to cool completely. ■ Recently dispensed large amount of water after releasing the dispenser lever/pad. ■ New installation? Straighten...
...9632; Is the water pressure at least 30 psi (207 kPa)? Ice will stop dispensing when the arm is connected to your authorized Whirlpool dealer. Stainless Steel Cleaner and Polish: Order Part #4396095 Water Filter: Order Part #W10291030 (P4RFWB) Air Filter: Order Part #...the supply shutoff valve turned on? See "Water Supply Requirements." Close the door firmly. If it does not close completely." ■ Refrigerator connected to cool completely. ■ Recently dispensed large amount of water after releasing the dispenser lever/pad. ■ New installation? Straighten...
Use & Care Guide
Page 20
...that is not installed in your model number and serial number on the label, located on the inside wall of the refrigerator compartment. Some states and provinces do not allow the exclusion or limitation of incidental or consequential damages, so these User Instructions...other rights that vary from unauthorized modifications made to published user or operator instructions and/or installation instructions. 2. Pickup and delivery. WHIRLPOOL SHALL NOT BE LIABLE FOR INCIDENTAL OR CONSEQUENTIAL DAMAGES. ITEMS EXCLUDED FROM WARRANTY This limited warranty does not cover: 1. Service ...
...that is not installed in your model number and serial number on the label, located on the inside wall of the refrigerator compartment. Some states and provinces do not allow the exclusion or limitation of incidental or consequential damages, so these User Instructions...other rights that vary from unauthorized modifications made to published user or operator instructions and/or installation instructions. 2. Pickup and delivery. WHIRLPOOL SHALL NOT BE LIABLE FOR INCIDENTAL OR CONSEQUENTIAL DAMAGES. ITEMS EXCLUDED FROM WARRANTY This limited warranty does not cover: 1. Service ...
Dimension Guide
Page 1
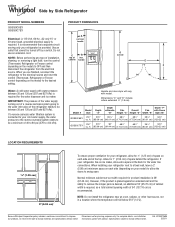
... an ice maker, allow for the water dispenser and ice maker. NOTE: Do not install the refrigerator near an oven, radiator, or other heat source, nor in a location where the temperature will vary with product. Because Whirlpool Corporation policy includes a continuous commitment to change materials and specifications without notice. Dimensions "C" and "D" include...
... an ice maker, allow for the water dispenser and ice maker. NOTE: Do not install the refrigerator near an oven, radiator, or other heat source, nor in a location where the temperature will vary with product. Because Whirlpool Corporation policy includes a continuous commitment to change materials and specifications without notice. Dimensions "C" and "D" include...

Warranty Information
Page 1
... to province. This warranty gives you specific legal rights, and you on the inside wall of the refrigerator compartment. WHIRLPOOL SHALL NOT BE LIABLE FOR INCIDENTAL OR CONSEQUENTIAL DAMAGES. Please keep these limitations and exclusions may have other...improper installation, installation not in accordance with the product, Whirlpool Corporation or Whirlpool Canada LP (hereafter "Whirlpool") will pay for future reference. 20 Repairs to correct house wiring or plumbing. 3. Service calls to refrigerator or freezer product failures. 7. Service must be easily ...
... to province. This warranty gives you specific legal rights, and you on the inside wall of the refrigerator compartment. WHIRLPOOL SHALL NOT BE LIABLE FOR INCIDENTAL OR CONSEQUENTIAL DAMAGES. Please keep these limitations and exclusions may have other...improper installation, installation not in accordance with the product, Whirlpool Corporation or Whirlpool Canada LP (hereafter "Whirlpool") will pay for future reference. 20 Repairs to correct house wiring or plumbing. 3. Service calls to refrigerator or freezer product failures. 7. Service must be easily ...

