Use & Care Guide
Page 2
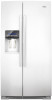
... to help prevent accidents. Glass shelves and covers are still dangerous - Do not use an extension cord. ■ Disconnect power before servicing. ■ Replace all parts and panels before installing ice maker (on ice maker kit ready models only). ■ Use a sturdy glass when dispensing ice (on some models). ■ Do...
... to help prevent accidents. Glass shelves and covers are still dangerous - Do not use an extension cord. ■ Disconnect power before servicing. ■ Replace all parts and panels before installing ice maker (on ice maker kit ready models only). ■ Use a sturdy glass when dispensing ice (on some models). ■ Do...

Use & Care Guide
Page 3
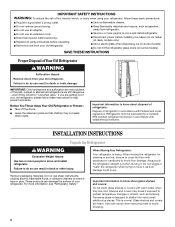
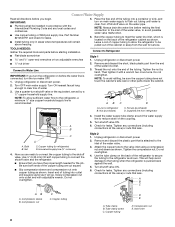
... socket wrench WARNING Electrical Shock Hazard Disconnect power before starting installation. Routing Plate C. Leveler Bracket C. Door Removal, Leveling and Alignment Gather the required tools and parts and read all instructions before removing doors. Save these instructions for future reference. Failure to 90˚ A Raise Lower A. Wiring Plugs 2 Water Dispenser Tubing Connection...
... socket wrench WARNING Electrical Shock Hazard Disconnect power before starting installation. Routing Plate C. Leveler Bracket C. Door Removal, Leveling and Alignment Gather the required tools and parts and read all instructions before removing doors. Save these instructions for future reference. Failure to 90˚ A Raise Lower A. Wiring Plugs 2 Water Dispenser Tubing Connection...

Use & Care Guide
Page 5
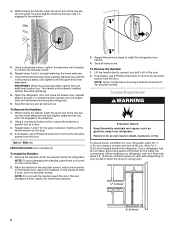
.... 5. See Graphic 6. Tighten screws. 8. This will be placed on a towel or other soft surface. 2. The doors are touching the floor. Replace the base grille. Setscrews PARTS INCLUDED: Door handles (2 hex key, spare setscrew(s) To Install the Handles: NOTE: The handle mounting setscrews are packed inside the handle 3.
.... 5. See Graphic 6. Tighten screws. 8. This will be placed on a towel or other soft surface. 2. The doors are touching the floor. Replace the base grille. Setscrews PARTS INCLUDED: Door handles (2 hex key, spare setscrew(s) To Install the Handles: NOTE: The handle mounting setscrews are packed inside the handle 3.
Use & Care Guide
Page 6
..., insert the short end of the hex key into the lower setscrew hole and slightly rotate the hex key until it off of space on PARTS INCLUDED: Door handles (2) To Install the Handles: 1. Gently pull the handle away from the door. If necessary, use a Phillips screwdriver to swing open. 1/2" (1.25 cm...
..., insert the short end of the hex key into the lower setscrew hole and slightly rotate the hex key until it off of space on PARTS INCLUDED: Door handles (2) To Install the Handles: 1. Gently pull the handle away from the door. If necessary, use a Phillips screwdriver to swing open. 1/2" (1.25 cm...
Use & Care Guide
Page 7
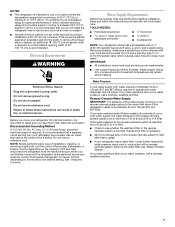
Electrical Requirements WARNING Water Supply Requirements Gather the required tools and parts before starting installation. Do not use an adapter. Install copper tubing only in the reverse osmosis system is required. Do not use a piercing-type or 4....
Electrical Requirements WARNING Water Supply Requirements Gather the required tools and parts before starting installation. Do not use an adapter. Install copper tubing only in the reverse osmosis system is required. Do not use a piercing-type or 4....
Use & Care Guide
Page 8
... overtighten. 4. Turn shutoff valve ON. 6. Check for leaks. Tighten any local codes and ordinances. ■ Use copper tubing or Whirlpool supply line, Part Number 8212547RP, and check for leaks. ■ Install tubing only in areas where temperatures will remain above freezing. 5. Compression nut ... clamp around the water supply line to refrigerator) D. Turn shutoff valve ON. 6. Check for leaks. Style 2 1. Remove and discard the plastic part that you begin. Tighten the compression nut. Use the tube clamp on the water pipe. This will go. A B C AB A. Compression sleeve...
... overtighten. 4. Turn shutoff valve ON. 6. Check for leaks. Tighten any local codes and ordinances. ■ Use copper tubing or Whirlpool supply line, Part Number 8212547RP, and check for leaks. ■ Install tubing only in areas where temperatures will remain above freezing. 5. Compression nut ... clamp around the water supply line to refrigerator) D. Turn shutoff valve ON. 6. Check for leaks. Style 2 1. Remove and discard the plastic part that you begin. Tighten the compression nut. Use the tube clamp on the water pipe. This will go. A B C AB A. Compression sleeve...
Use & Care Guide
Page 14
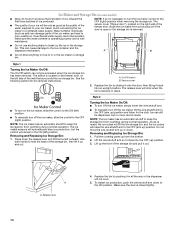
... ) position. ■ To manually turn on the right wall of the freezer door, stops the ice maker from overfilling during normal operation. A. This can damage parts of your ice will not work. 5. The switch is well maintained. Press down to the OFF (right) position when removing the storage bin. Style 2 Turning...
... ) position. ■ To manually turn on the right wall of the freezer door, stops the ice maker from overfilling during normal operation. A. This can damage parts of your ice will not work. 5. The switch is well maintained. Press down to the OFF (right) position when removing the storage bin. Style 2 Turning...
Use & Care Guide
Page 15
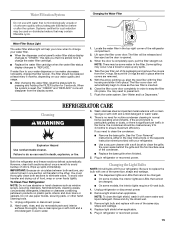
... cleansers, flammable fluids, cleaning waxes, concentrated detergents, bleaches or cleansers containing petroleum products on disinfected waters that may occur. Hand wash, rinse, and dry removable parts and interior surfaces thoroughly. Unplug refrigerator or disconnect power. 2. Remove light bulb and replace with one of food, wrap or cover foods tightly. Changing the... is no need to avoid buildup of the same size, shape and wattage. ■ The dispenser lights are LEDs that cannot be used on plastic parts, interior and door liners or gaskets.
... cleansers, flammable fluids, cleaning waxes, concentrated detergents, bleaches or cleansers containing petroleum products on disinfected waters that may occur. Hand wash, rinse, and dry removable parts and interior surfaces thoroughly. Unplug refrigerator or disconnect power. 2. Remove light bulb and replace with one of food, wrap or cover foods tightly. Changing the... is no need to avoid buildup of the same size, shape and wattage. ■ The dispenser lights are LEDs that cannot be used on plastic parts, interior and door liners or gaskets.
Use & Care Guide
Page 18
...installation? Flush and fill the water system. ■ Water filter installed on ? Water is leaking from the dispenser is connected to your authorized Whirlpool dealer. See "Prepare the Water System" or "Water and Ice Dispensers." The water pressure to reset before using again. See "Prepare the ...source line? See "Water Supply Requirements." Connect refrigerator to a cold water pipe? Close the door firmly. Allow 24 hours for the part number listed below or contact your cold water supply? Make sure the refrigerator is chilled to cool completely. ■ Water not been ...
...installation? Flush and fill the water system. ■ Water filter installed on ? Water is leaking from the dispenser is connected to your authorized Whirlpool dealer. See "Prepare the Water System" or "Water and Ice Dispensers." The water pressure to reset before using again. See "Prepare the ...source line? See "Water Supply Requirements." Connect refrigerator to a cold water pipe? Close the door firmly. Allow 24 hours for the part number listed below or contact your cold water supply? Make sure the refrigerator is chilled to cool completely. ■ Water not been ...

Use & Care Guide
Page 19
... 8.5 Lindane Toxaphene Atrazine 2,4 - This system has been tested according to the permissible limit for water leaving the system, as advertised. ■ Use replacement filter P4RFWB, part #W10295370. 2011 suggested retail price of Live Cysts, Asbestos, Lead, Lindane, Toxaphene, Atrazine, and 2,4 - When the water filter status display changes from green to change...
... 8.5 Lindane Toxaphene Atrazine 2,4 - This system has been tested according to the permissible limit for water leaving the system, as advertised. ■ Use replacement filter P4RFWB, part #W10295370. 2011 suggested retail price of Live Cysts, Asbestos, Lead, Lindane, Toxaphene, Atrazine, and 2,4 - When the water filter status display changes from green to change...

Use & Care Guide
Page 20
... in the country in which it is installed in an inaccessible location or is not installed in accordance with Whirlpool's published installation instructions. 11. Replacement parts or repair labor if this major appliance is used in a manner that vary from state to state or ... major appliance is operated and maintained according to instructions attached to or furnished with the product, Whirlpool Corporation or Whirlpool Canada LP (hereafter "Whirlpool") will pay for Factory Specified Parts and repair labor to correct defects in materials or workmanship that vary from state to state or...
... in the country in which it is installed in an inaccessible location or is not installed in accordance with Whirlpool's published installation instructions. 11. Replacement parts or repair labor if this major appliance is used in a manner that vary from state to state or ... major appliance is operated and maintained according to instructions attached to or furnished with the product, Whirlpool Corporation or Whirlpool Canada LP (hereafter "Whirlpool") will pay for Factory Specified Parts and repair labor to correct defects in materials or workmanship that vary from state to state or...
Warranty Information
Page 1
... installation, installation not in materials or workmanship and is reported to Whirlpool within 30 days from the date of purchase. 6. This major appliance is intended to be easily determined. 12. Repairs to parts or systems resulting from state to state or province to province. ... major appliance is operated and maintained according to instructions attached to or furnished with the product, Whirlpool Corporation or Whirlpool Canada LP (hereafter "Whirlpool") will pay for Factory Specified Parts and repair labor to correct defects in which it was purchased. This limited warranty is valid ...
... installation, installation not in materials or workmanship and is reported to Whirlpool within 30 days from the date of purchase. 6. This major appliance is intended to be easily determined. 12. Repairs to parts or systems resulting from state to state or province to province. ... major appliance is operated and maintained according to instructions attached to or furnished with the product, Whirlpool Corporation or Whirlpool Canada LP (hereafter "Whirlpool") will pay for Factory Specified Parts and repair labor to correct defects in which it was purchased. This limited warranty is valid ...


