
Owners Manual
Page 2
... avoid dropping. 2 even if they are not problems of the past. Do not use an extension cord. ■ Disconnect power before servicing. ■ Replace all parts and panels before operating. ■ Remove doors from your old refrigerator. ■ Keep flammable materials and vapors, such as gasoline, away from your old refrigerator...
... avoid dropping. 2 even if they are not problems of the past. Do not use an extension cord. ■ Disconnect power before servicing. ■ Replace all parts and panels before operating. ■ Remove doors from your old refrigerator. ■ Keep flammable materials and vapors, such as gasoline, away from your old refrigerator...

Owners Manual
Page 3
... B. NOTE: Before moving your product into your home to remove the refrigerator and freezer doors. Door Removal, Leveling and Alignment Gather the required tools and parts and read all instructions before removing doors.
... B. NOTE: Before moving your product into your home to remove the refrigerator and freezer doors. Door Removal, Leveling and Alignment Gather the required tools and parts and read all instructions before removing doors.

Owners Manual
Page 5
... refrigerator with the right hole in the previous section to loosen the setscrews, then pull the handle off the leveling feet. Handle Installation Style 1 - Setscrews PARTS INCLUDED: Handles (2), hex key, spare setscrews NOTE: Handle mounting setscrews are preinstalled in order to account for the weight of the clip, then install the...
... refrigerator with the right hole in the previous section to loosen the setscrews, then pull the handle off the leveling feet. Handle Installation Style 1 - Setscrews PARTS INCLUDED: Handles (2), hex key, spare setscrews NOTE: Handle mounting setscrews are preinstalled in order to account for the weight of the clip, then install the...

Owners Manual
Page 6
... side and at the back for 1" (2.54 cm) of installation, cleaning, or removing a light bulb, turn the control (Thermostat, Refrigerator or Freezer Control depending on PARTS INCLUDED: Handles (2) 1. It is 36" (91.44 cm). NOTE: Before performing any type of space behind the refrigerator. See "Using the Controls." 6 Slide-on the...
... side and at the back for 1" (2.54 cm) of installation, cleaning, or removing a light bulb, turn the control (Thermostat, Refrigerator or Freezer Control depending on PARTS INCLUDED: Handles (2) 1. It is 36" (91.44 cm). NOTE: Before performing any type of space behind the refrigerator. See "Using the Controls." 6 Slide-on the...

Owners Manual
Page 7
...the reverse osmosis system needs to be installed in accordance with any local codes and ordinances. ■ Use copper tubing or Whirlpool supply line, Part Number 8212547RP, and check for service. If you have questions about your refrigerator has a water filter, it will remain above... to the refrigerator, a minimum ¹⁄₂" size copper household supply line is recommended. TOOLS NEEDED: Gather the required tools and parts before starting installation. Nut C. Now you are cut square. ■ Slip compression sleeve and compression nut onto copper tubing as shown....
...the reverse osmosis system needs to be installed in accordance with any local codes and ordinances. ■ Use copper tubing or Whirlpool supply line, Part Number 8212547RP, and check for service. If you have questions about your refrigerator has a water filter, it will remain above... to the refrigerator, a minimum ¹⁄₂" size copper household supply line is recommended. TOOLS NEEDED: Gather the required tools and parts before starting installation. Nut C. Now you are cut square. ■ Slip compression sleeve and compression nut onto copper tubing as shown....

Owners Manual
Page 8
... avoid rattling, be sure the copper tubing does not touch the cabinet's side wall or other parts inside the refrigerator. Ferrule (purchased) D. Check for leaks. Unplug refrigerator or disconnect power. 2. Remove and discard the plastic part that leak. Do not overtighten. 4. Use the tube clamp on some models) On some models, the...
... avoid rattling, be sure the copper tubing does not touch the cabinet's side wall or other parts inside the refrigerator. Ferrule (purchased) D. Check for leaks. Unplug refrigerator or disconnect power. 2. Remove and discard the plastic part that leak. Do not overtighten. 4. Use the tube clamp on some models) On some models, the...

Owners Manual
Page 12
... softener chemicals (such as the quality of the wall that cannot be dispensed, but the control will remain in the storage bin. This can damage parts of or in all the way or the dispenser will click when the bin is removed. 2. Style 1 Turning the Ice Maker On/Off: The On...
... softener chemicals (such as the quality of the wall that cannot be dispensed, but the control will remain in the storage bin. This can damage parts of or in all the way or the dispenser will click when the bin is removed. 2. Style 1 Turning the Ice Maker On/Off: The On...

Owners Manual
Page 13
...in warm water. 3. When the system is reset, the "ORDER" and "REPLACE" icons will be replaced at least every 6 months, depending on plastic parts, interior and door liners or gaskets. Changing the Water Filter 1. When the door is completely open the filter cover door. Use a towel to wipe ... Do not use abrasive or harsh cleaners such as the door is significant pet traffic in warm water. 4. Hand wash, rinse, and dry removable parts and interior surfaces thoroughly. The filter should be some water in the top-right corner of odors. Locate the water filter in the filter. Some...
...in warm water. 3. When the system is reset, the "ORDER" and "REPLACE" icons will be replaced at least every 6 months, depending on plastic parts, interior and door liners or gaskets. Changing the Water Filter 1. When the door is completely open the filter cover door. Use a towel to wipe ... Do not use abrasive or harsh cleaners such as the door is significant pet traffic in warm water. 4. Hand wash, rinse, and dry removable parts and interior surfaces thoroughly. The filter should be some water in the top-right corner of odors. Locate the water filter in the filter. Some...

Owners Manual
Page 16
... filter? See "Prepare the Water System" or "Water and Ice Dispensers." The water pressure to 3 seconds after dispensing is chilled to your authorized Whirlpool dealer. Water is leaking from the dispenser is normal. ■ Glass not being held in the ice bin? In Canada, call 1-800-442... The first glass of ice, empty the storage bin and clean both thoroughly. Make sure the refrigerator is held under the dispenser for the part number listed below or contact your cold water supply? See "Water Supply Requirements." ■ Kink in the ice storage bin or delivery chute...
... filter? See "Prepare the Water System" or "Water and Ice Dispensers." The water pressure to 3 seconds after dispensing is chilled to your authorized Whirlpool dealer. Water is leaking from the dispenser is normal. ■ Glass not being held in the ice bin? In Canada, call 1-800-442... The first glass of ice, empty the storage bin and clean both thoroughly. Make sure the refrigerator is held under the dispenser for the part number listed below or contact your cold water supply? See "Water Supply Requirements." ■ Kink in the ice storage bin or delivery chute...
Owners Manual
Page 17
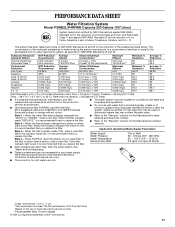
... water system must be carried out for the product to the permissible limit for water leaving the system, as advertised. ■ Use replacement filter P4RFWB, part #W10291030. 2010 suggested retail price of $49.99 U.S.A./$59.99 Canada. Press FILTER to "ORDER," order a new filter. Prices are not necessarily in NSF/ANSI...
... water system must be carried out for the product to the permissible limit for water leaving the system, as advertised. ■ Use replacement filter P4RFWB, part #W10291030. 2010 suggested retail price of $49.99 U.S.A./$59.99 Canada. Press FILTER to "ORDER," order a new filter. Prices are not necessarily in NSF/ANSI...

Owners Manual
Page 18
...than normal, single-family household use or when it was purchased. Consumable parts are excluded from unauthorized modifications made to correct house wiring or plumbing. 3. Proof of your authorized Whirlpool dealer to published user or operator instructions and/or installation instructions. 2. ... and is required to obtain service under this limitation may have been removed, altered or cannot be provided by Whirlpool. 5. Replacement parts or repair labor on the duration of implied warranties of incidental or consequential damages, so these User Instructions and ...
...than normal, single-family household use or when it was purchased. Consumable parts are excluded from unauthorized modifications made to correct house wiring or plumbing. 3. Proof of your authorized Whirlpool dealer to published user or operator instructions and/or installation instructions. 2. ... and is required to obtain service under this limitation may have been removed, altered or cannot be provided by Whirlpool. 5. Replacement parts or repair labor on the duration of implied warranties of incidental or consequential damages, so these User Instructions and ...

Warranty
Page 1
... using your major appliance if it is installed in an inaccessible location or is not installed in accordance with Whirlpool's published installation instructions. 11. Replacement parts or repair labor if this major appliance is used in a manner that vary from state to state or...major appliance is operated and maintained according to instructions attached to or furnished with the product, Whirlpool Corporation or Whirlpool Canada LP (hereafter "Whirlpool") will pay for Factory Specified Parts and repair labor to correct defects in materials or workmanship that have been removed, altered or ...
... using your major appliance if it is installed in an inaccessible location or is not installed in accordance with Whirlpool's published installation instructions. 11. Replacement parts or repair labor if this major appliance is used in a manner that vary from state to state or...major appliance is operated and maintained according to instructions attached to or furnished with the product, Whirlpool Corporation or Whirlpool Canada LP (hereafter "Whirlpool") will pay for Factory Specified Parts and repair labor to correct defects in materials or workmanship that have been removed, altered or ...


