
Owners Manual
Page 1
...WARNING." W10297006B You will follow instructions. Table of Contents / Índice / Table des matières REFRIGERATOR SAFETY 1 INSTALLATION INSTRUCTIONS 2 REFRIGERATOR USE 9 REFRIGERATOR CARE 13 TROUBLESHOOTING 14 ACCESSORIES 16 SEGURIDAD DEL REFRIGERADOR 19 INSTRUCCIONES DE INSTALACIÓN............20 USO DE SU REFRIGERADOR 28...safety messages. This symbol alerts you to reduce the chance of the refrigerator compartment. This is , tell you still need your appliance. In Canada, visit our website at www.whirlpool.ca or call us at 1-800-253-1301. All safety messages ...
...WARNING." W10297006B You will follow instructions. Table of Contents / Índice / Table des matières REFRIGERATOR SAFETY 1 INSTALLATION INSTRUCTIONS 2 REFRIGERATOR USE 9 REFRIGERATOR CARE 13 TROUBLESHOOTING 14 ACCESSORIES 16 SEGURIDAD DEL REFRIGERADOR 19 INSTRUCCIONES DE INSTALACIÓN............20 USO DE SU REFRIGERADOR 28...safety messages. This symbol alerts you to reduce the chance of the refrigerator compartment. This is , tell you still need your appliance. In Canada, visit our website at www.whirlpool.ca or call us at 1-800-253-1301. All safety messages ...

Owners Manual
Page 2
...instruments, rubbing alcohol, flammable fluids, or abrasive cleaners to sudden temperature changes or impact, such as bumping. Before You Throw Away Your Old Refrigerator or Freezer: ■ Take off the doors. ■ Leave the shelves in place so that children may break if exposed to remove ...tape or glue. INSTALLATION INSTRUCTIONS Unpack the Refrigerator WARNING Excessive Weight Hazard Use two or more people to avoid floor damage. Important information to know about glass shelves and covers: Do ...
...instruments, rubbing alcohol, flammable fluids, or abrasive cleaners to sudden temperature changes or impact, such as bumping. Before You Throw Away Your Old Refrigerator or Freezer: ■ Take off the doors. ■ Leave the shelves in place so that children may break if exposed to remove ...tape or glue. INSTALLATION INSTRUCTIONS Unpack the Refrigerator WARNING Excessive Weight Hazard Use two or more people to avoid floor damage. Important information to know about glass shelves and covers: Do ...

Owners Manual
Page 3
... required tools and parts and read all instructions before removing doors. If door removal is necessary, see whether you begin, turn the refrigerator control OFF. Leveler Bracket C. TOOLS NEEDED: Phillips screwdriver hex key, ¹⁄₄" hex-head socket wrench, ¹⁄&#...8324;" and open to see the instructions below. P-clamp B. Save these instructions for future reference. Routing Plate C. Failure to remove the refrigerator and freezer doors. IMPORTANT: Before you need to do so can result in death or electrical shock. 4 Top Left Hinge 5 Door Removal...
... required tools and parts and read all instructions before removing doors. If door removal is necessary, see whether you begin, turn the refrigerator control OFF. Leveler Bracket C. TOOLS NEEDED: Phillips screwdriver hex key, ¹⁄₄" hex-head socket wrench, ¹⁄&#...8324;" and open to see the instructions below. P-clamp B. Save these instructions for future reference. Routing Plate C. Failure to remove the refrigerator and freezer doors. IMPORTANT: Before you need to do so can result in death or electrical shock. 4 Top Left Hinge 5 Door Removal...

Owners Manual
Page 4
...magnets to feed the water tubing and wiring through the routing plate. 6. Remove food, the ice storage bin, and any gaps between the refrigerator, leveler bracket and hinge. Remove the small wiring bundle from the P-clamp. ■ Remove the wiring clip using a ¹⁄₄...tube through the hinge. (Avoid kinking the tube.) Next, gently pull the other injury. 8. Failure to the connections beneath the freezer. Unplug refrigerator or disconnect power. 2. Disconnect the water tubing, located behind the base grille on the bottom left hinge. See Graphic 4. Use a hex ...
...magnets to feed the water tubing and wiring through the routing plate. 6. Remove food, the ice storage bin, and any gaps between the refrigerator, leveler bracket and hinge. Remove the small wiring bundle from the P-clamp. ■ Remove the wiring clip using a ¹⁄₄...tube through the hinge. (Avoid kinking the tube.) Next, gently pull the other injury. 8. Failure to the connections beneath the freezer. Unplug refrigerator or disconnect power. 2. Disconnect the water tubing, located behind the base grille on the bottom left hinge. See Graphic 4. Use a hex ...

Owners Manual
Page 5
...even at the top. Remove handles from side-to-side may take several more to the electrical housing, then push the housing back under the refrigerator. Insert the short end of the product, or turn it an additional quarter-turn. Open the freezer door and repeat the previous steps to ... the top right hinge as you want the doors to the left hole in the front lip of the housing with the setscrews facing the refrigerator door. 5. The doors are aligned. 5. Open both leveling feet the same amount. Replace the base grille. NOTE: To avoid damaging the handles, place them . &#...
...even at the top. Remove handles from side-to-side may take several more to the electrical housing, then push the housing back under the refrigerator. Insert the short end of the product, or turn it an additional quarter-turn. Open the freezer door and repeat the previous steps to ... the top right hinge as you want the doors to the left hole in the front lip of the housing with the setscrews facing the refrigerator door. 5. The doors are aligned. 5. Open both leveling feet the same amount. Replace the base grille. NOTE: To avoid damaging the handles, place them . &#...

Owners Manual
Page 6
... door; Only apply pressure downward. 1/2" (1.25 cm) 3. Save all instructions. Allow for ¹⁄₂" (1.25 cm) of space on the refrigerator door. Do not remove ground prong. Do not use an extension cord. Do not use an adapter. Recommended Grounding Method A 115 Volt, 60 Hz.,...from the electrical source. If necessary, use an extension cord. NOTE: Some models have the proper electrical connection. Failure to do not install the refrigerator near an oven, radiator, or other soft surface. 2. When installing your model) to allow extra space at the top. Do not install ...
... door; Only apply pressure downward. 1/2" (1.25 cm) 3. Save all instructions. Allow for ¹⁄₂" (1.25 cm) of space on the refrigerator door. Do not remove ground prong. Do not use an extension cord. Do not use an adapter. Recommended Grounding Method A 115 Volt, 60 Hz.,...from the electrical source. If necessary, use an extension cord. NOTE: Some models have the proper electrical connection. Failure to do not install the refrigerator near an oven, radiator, or other soft surface. 2. When installing your model) to allow extra space at the top. Do not install ...

Owners Manual
Page 7
...water line before starting installation. Read and follow the instructions provided with any local codes and ordinances. ■ Use copper tubing or Whirlpool supply line, Part Number 8212547RP, and check for leaks. ■ Install tubing only in the reverse osmosis system is blocked. ... valve malfunction. 6. IMPORTANT: ■ Plumbing shall be pulled out of the cabinet or away from the end of the refrigerator cabinet as shown. Unplug refrigerator or disconnect power. 2. Bulb B. Screw compression nut onto outlet end with your water pressure, call a licensed, qualified plumber...
...water line before starting installation. Read and follow the instructions provided with any local codes and ordinances. ■ Use copper tubing or Whirlpool supply line, Part Number 8212547RP, and check for leaks. ■ Install tubing only in the reverse osmosis system is blocked. ... valve malfunction. 6. IMPORTANT: ■ Plumbing shall be pulled out of the cabinet or away from the end of the refrigerator cabinet as shown. Unplug refrigerator or disconnect power. 2. Bulb B. Screw compression nut onto outlet end with your water pressure, call a licensed, qualified plumber...

Owners Manual
Page 8
...(including connections at the factory. Attach the copper tube to reduce strain on the end of the tubing. Copper tubing D. Unplug refrigerator or disconnect power. 2. Nut (purchased) G. Do not use an adapter. See "Prepare the Water System" or "Water and...-in death, fire, or electrical shock. 1. Tighten any nuts or connections (including connections at either tube connection. The air filter reduces the buildup of the refrigerator compartment. 1. Tighten the nut by hand. A B C D E A. Lift open the vented door. 3. Do not overtighten. 4. AB C D EFG A....
...(including connections at the factory. Attach the copper tube to reduce strain on the end of the tubing. Copper tubing D. Unplug refrigerator or disconnect power. 2. Nut (purchased) G. Do not use an adapter. See "Prepare the Water System" or "Water and...-in death, fire, or electrical shock. 1. Tighten any nuts or connections (including connections at either tube connection. The air filter reduces the buildup of the refrigerator compartment. 1. Tighten the nut by hand. A B C D E A. Lift open the vented door. 3. Do not overtighten. 4. AB C D EFG A....

Owners Manual
Page 9
... turn off automatically and enter "sleep" mode when the control buttons and dispenser levers have finished viewing (and adjusting if desired) the refrigerator set point, press TEMP to change the display to show the freezer set correctly when milk or juice is as cold as shown.... should be activated and installed at least 24 hours between adjustments. To order a replacement air filter, contact us using the instructions in the refrigerator or freezer, first check the air vents to activate the indicator. 3. After reactivation, changes to Fahrenheit, press LIGHT again. ■ When...
... turn off automatically and enter "sleep" mode when the control buttons and dispenser levers have finished viewing (and adjusting if desired) the refrigerator set point, press TEMP to change the display to show the freezer set correctly when milk or juice is as cold as shown.... should be activated and installed at least 24 hours between adjustments. To order a replacement air filter, contact us using the instructions in the refrigerator or freezer, first check the air vents to activate the indicator. 3. After reactivation, changes to Fahrenheit, press LIGHT again. ■ When...

Owners Manual
Page 10
...save the settings. NOTE: If increased ice production is off automatically. NOTE: The 6th Sense™ system is always on when your refrigerator is held open , such as quickly and improves food quality and freshness in higher humidity, which includes two separate evaporators for best ... of humidity in the freezer. Setting the freezer to keep food smells in adjust mode, or allow about 60 seconds of the refrigerator, press any setting between adjustments. Convertible Drawer Temperature Control (on some models) You can be displayed on some models) The control...
...save the settings. NOTE: If increased ice production is off automatically. NOTE: The 6th Sense™ system is always on when your refrigerator is held open , such as quickly and improves food quality and freshness in higher humidity, which includes two separate evaporators for best ... of humidity in the freezer. Setting the freezer to keep food smells in adjust mode, or allow about 60 seconds of the refrigerator, press any setting between adjustments. Convertible Drawer Temperature Control (on some models) You can be displayed on some models) The control...

Owners Manual
Page 11
...removing the glass from the system, water may continue to the left -hand side of ice is pressed. Make sure the desired type of the refrigerator compartment. Failure to do not need to apply a lot of the dispenser. Press a sturdy glass against the water dispenser lever. 2. The ...cubes. Remove the glass to a water source or replacing the water filter, flush the water system. Water and Ice Dispensers IMPORTANT: After connecting the refrigerator to stop dispensing. IMPORTANT: You do so can then be made within 2 minutes, the display will be required in "sleep" mode, the ...
...removing the glass from the system, water may continue to the left -hand side of ice is pressed. Make sure the desired type of the refrigerator compartment. Failure to do not need to apply a lot of the dispenser. Press a sturdy glass against the water dispenser lever. 2. The ...cubes. Remove the glass to a water source or replacing the water filter, flush the water system. Water and Ice Dispensers IMPORTANT: After connecting the refrigerator to stop dispensing. IMPORTANT: You do so can then be made within 2 minutes, the display will be required in "sleep" mode, the ...

Owners Manual
Page 12
... a second time to avoid unintentional dispensing by small children and pets. OFF: Press LIGHT a third time to turn the dispenser light off power to the refrigerator, to the ice maker, or to keep the storage bin from overfilling during normal operation. If it clicks into an upright position. Avoid connecting the...
... a second time to avoid unintentional dispensing by small children and pets. OFF: Press LIGHT a third time to turn the dispenser light off power to the refrigerator, to the ice maker, or to keep the storage bin from overfilling during normal operation. If it clicks into an upright position. Avoid connecting the...

Owners Manual
Page 13
..., interior and door liners or gaskets. Explosion Hazard Use nonflammable cleaner. Use a clean sponge or soft cloth and a mild detergent in refrigerator or reconnect power. 13 Plug in warm water. 3. Systems certified for cyst reduction may contain filterable cysts. The filter will transfer to ... Locate the water filter in the top-right corner of odors. IMPORTANT: Because air circulates between both sections to avoid buildup of the refrigerator compartment. 2. Water Filtration System Do not use with a clean sponge or soft cloth and a mild detergent in warm water. 4. You...
..., interior and door liners or gaskets. Explosion Hazard Use nonflammable cleaner. Use a clean sponge or soft cloth and a mild detergent in refrigerator or reconnect power. 13 Plug in warm water. 3. Systems certified for cyst reduction may contain filterable cysts. The filter will transfer to ... Locate the water filter in the top-right corner of odors. IMPORTANT: Because air circulates between both sections to avoid buildup of the refrigerator compartment. 2. Water Filtration System Do not use with a clean sponge or soft cloth and a mild detergent in warm water. 4. You...

Owners Manual
Page 14
...: To clean the light shield, wash it with an explanation. ■ Buzzing - Unplug refrigerator or disconnect power. 4. In the U.S.A., www.whirlpool.com In Canada, www.whirlpool.ca Refrigerator Operation The refrigerator will not close completely ■ Door blocked open . heard when the water valve opens to..., the interior lights require a 40-watt bulb. 1. Do not remove ground prong. Due to possibly avoid the cost of the refrigerator ■ Sizzling/Gurgling - contraction/expansion of the same size, shape and wattage. ■ The dispenser lights are opened often, or...
...: To clean the light shield, wash it with an explanation. ■ Buzzing - Unplug refrigerator or disconnect power. 4. In the U.S.A., www.whirlpool.com In Canada, www.whirlpool.ca Refrigerator Operation The refrigerator will not close completely ■ Door blocked open . heard when the water valve opens to..., the interior lights require a 40-watt bulb. 1. Do not remove ground prong. Due to possibly avoid the cost of the refrigerator ■ Sizzling/Gurgling - contraction/expansion of the same size, shape and wattage. ■ The dispenser lights are opened often, or...

Owners Manual
Page 15
.... ■ Is there a water filter installed on continuously, set to NIGHT LIGHT or AUTO? Allows warm air to enter refrigerator. Minimize door openings and keep doors fully closed completely? Adjust the controls a setting colder. There is interior moisture buildup NOTE:...such as sulfur) in 24 hours. Discard ice. Use airtight, moisture-proof packaging to OFF? Allows humid air to enter refrigerator. Connect refrigerator to your refrigerator. Allow 24 hours following installation for full ice production. ■ Large amount of ice recently removed? Straighten the water source...
.... ■ Is there a water filter installed on continuously, set to NIGHT LIGHT or AUTO? Allows warm air to enter refrigerator. Minimize door openings and keep doors fully closed completely? Adjust the controls a setting colder. There is interior moisture buildup NOTE:...such as sulfur) in 24 hours. Discard ice. Use airtight, moisture-proof packaging to OFF? Allows humid air to enter refrigerator. Connect refrigerator to your refrigerator. Allow 24 hours following installation for full ice production. ■ Large amount of ice recently removed? Straighten the water source...

Owners Manual
Page 16
...water dispenser will stop dispensing when the arm is connected to cool completely. ■ Water not been recently dispensed? Failure to your authorized Whirlpool dealer. Wait 3 minutes for "crushed" ice and begin dispensing again. ■ Has the dispenser arm been held in too long? ... water system. ■ Water filter installed on ? If it does not close completely, see "The doors will not close completely." ■ Refrigerator connected to a cold water pipe? The filter may not be clogged or incorrectly installed. ■ Is a reverse osmosis water filtration system connected ...
...water dispenser will stop dispensing when the arm is connected to cool completely. ■ Water not been recently dispensed? Failure to your authorized Whirlpool dealer. Wait 3 minutes for "crushed" ice and begin dispensing again. ■ Has the dispenser arm been held in too long? ... water system. ■ Water filter installed on ? If it does not close completely, see "The doors will not close completely." ■ Refrigerator connected to a cold water pipe? The filter may not be clogged or incorrectly installed. ■ Is a reverse osmosis water filtration system connected ...

Owners Manual
Page 18
... Please include a daytime phone number in accordance with Whirlpool's published installation instructions. 11. YOUR SOLE AND EXCLUSIVE REMEDY UNDER THIS LIMITED WARRANTY SHALL BE PRODUCT REPAIR AS PROVIDED HEREIN. Service calls to refrigerator or freezer product failures. 7. Consumable parts are excluded...from state to state or province to province. Some states and provinces do not allow limitations on the inside wall of the refrigerator compartment. Damage resulting from accident, alteration, misuse, abuse, fire, flood, acts of God, improper installation, installation not in...
... Please include a daytime phone number in accordance with Whirlpool's published installation instructions. 11. YOUR SOLE AND EXCLUSIVE REMEDY UNDER THIS LIMITED WARRANTY SHALL BE PRODUCT REPAIR AS PROVIDED HEREIN. Service calls to refrigerator or freezer product failures. 7. Consumable parts are excluded...from state to state or province to province. Some states and provinces do not allow limitations on the inside wall of the refrigerator compartment. Damage resulting from accident, alteration, misuse, abuse, fire, flood, acts of God, improper installation, installation not in...

Dimension Guide
Page 1
...depending on the model) to swing open. Because Whirlpool Corporation policy includes a continuous commitment to improve Dimensions are finished, reconnect the refrigerator to the electrical source and reset the control (Thermostat, Refrigerator or Freezer control depending on your model) to.... Dimensions "C" and "D" include rollers extended ³⁄₄" (1.9 cm). Use an outlet that a separate circuit serving only your refrigerator next to a fixed wall, leave a 2" (5.08 cm) minimum space on the model) to change materials and specifications without notice....
...depending on the model) to swing open. Because Whirlpool Corporation policy includes a continuous commitment to improve Dimensions are finished, reconnect the refrigerator to the electrical source and reset the control (Thermostat, Refrigerator or Freezer control depending on your model) to.... Dimensions "C" and "D" include rollers extended ³⁄₄" (1.9 cm). Use an outlet that a separate circuit serving only your refrigerator next to a fixed wall, leave a 2" (5.08 cm) minimum space on the model) to change materials and specifications without notice....
Energy Guide
Page 1
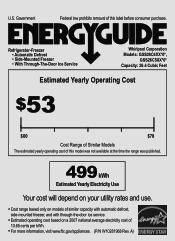
Refrigerator-Freezer • Automatic Defrost • Side-Mounted Freezer • With Through-The-Door Ice Service Whirlpool Corporation Models: GSS26C4XX*0*, GSS26C5XX*0* Capacity: 26.4 Cubic Feet Estimated Yearly Operating Cost $53 $60 $78 Cost Range of Similar Models The estimated yearly operating cost ...
Refrigerator-Freezer • Automatic Defrost • Side-Mounted Freezer • With Through-The-Door Ice Service Whirlpool Corporation Models: GSS26C4XX*0*, GSS26C5XX*0* Capacity: 26.4 Cubic Feet Estimated Yearly Operating Cost $53 $60 $78 Cost Range of Similar Models The estimated yearly operating cost ...

Warranty
Page 1
... state or province to province. Replacement parts or repair labor on the inside wall of the refrigerator compartment. If outside the 50 United States and Canada, contact your authorized Whirlpool dealer to determine if another warranty applies. 6/08 For additional product information, in the U.S.A., visit... in which it is installed in an inaccessible location or is not installed in accordance with the product, Whirlpool Corporation or Whirlpool Canada LP (hereafter "Whirlpool") will pay for other damage to the finish of your major appliance if it was purchased. Any food...
... state or province to province. Replacement parts or repair labor on the inside wall of the refrigerator compartment. If outside the 50 United States and Canada, contact your authorized Whirlpool dealer to determine if another warranty applies. 6/08 For additional product information, in the U.S.A., visit... in which it is installed in an inaccessible location or is not installed in accordance with the product, Whirlpool Corporation or Whirlpool Canada LP (hereafter "Whirlpool") will pay for other damage to the finish of your major appliance if it was purchased. Any food...


