
Owners Manual
Page 2
... instruments, rubbing alcohol, flammable fluids, or abrasive cleaners to move it . Do not use an extension cord. ■ Disconnect power before servicing. ■ Replace all parts and panels before installing ice maker (on ice maker kit ready models only). ■ Use a sturdy glass when dispensing ice (on some models). ■ Do...
... instruments, rubbing alcohol, flammable fluids, or abrasive cleaners to move it . Do not use an extension cord. ■ Disconnect power before servicing. ■ Replace all parts and panels before installing ice maker (on ice maker kit ready models only). ■ Use a sturdy glass when dispensing ice (on some models). ■ Do...

Owners Manual
Page 3
... Remove Screws A 3 Wiring Connection A A Do Not Remove Screws A 7 Bottom Hinge AB CD EF A. Bottom Hinge B. Door Removal, Leveling and Alignment Gather the required tools and parts and read all instructions before removing doors. Save these instructions for future reference. Failure to see the instructions below.
... Remove Screws A 3 Wiring Connection A A Do Not Remove Screws A 7 Bottom Hinge AB CD EF A. Bottom Hinge B. Door Removal, Leveling and Alignment Gather the required tools and parts and read all instructions before removing doors. Save these instructions for future reference. Failure to see the instructions below.

Owners Manual
Page 5
... order to account for the weight of food that side of the housing with food, follow the steps below to move the refrigerator, turn . Setscrews PARTS INCLUDED: Handles (2), hex key, spare setscrews NOTE: Handle mounting setscrews are even at the top. Insert the short end of the routing plate. See Graphic...
... order to account for the weight of food that side of the housing with food, follow the steps below to move the refrigerator, turn . Setscrews PARTS INCLUDED: Handles (2), hex key, spare setscrews NOTE: Handle mounting setscrews are even at the top. Insert the short end of the routing plate. See Graphic...

Owners Manual
Page 6
NOTE: To avoid damaging the handles, place them on PARTS INCLUDED: Handles (2) 1. NOTE: Do not push the handle toward the door; Lift the handle directly upward, and pull it off by a switch. Failure to remove ...
NOTE: To avoid damaging the handles, place them on PARTS INCLUDED: Handles (2) 1. NOTE: Do not push the handle toward the door; Lift the handle directly upward, and pull it off by a switch. Failure to remove ...

Owners Manual
Page 7
... drill NOTE: Your refrigerator dealer has a kit available with any local codes and ordinances. ■ Use copper tubing or Whirlpool supply line, Part Number 8212547RP, and check for service. Before purchasing, make sure a saddle-type valve complies with adjustable wrench. Do not use... power. 2. Bulb B. Copper tubing (to clear line of the water line inlet. 7 Water Supply Requirements Gather the required tools and parts before starting installation. Turn ON nearest faucet long enough to refrigerator) D. Copper tubing 5. AB C A. IMPORTANT: ■ Plumbing shall ...
... drill NOTE: Your refrigerator dealer has a kit available with any local codes and ordinances. ■ Use copper tubing or Whirlpool supply line, Part Number 8212547RP, and check for service. Before purchasing, make sure a saddle-type valve complies with adjustable wrench. Do not use... power. 2. Bulb B. Copper tubing (to clear line of the water line inlet. 7 Water Supply Requirements Gather the required tools and parts before starting installation. Turn ON nearest faucet long enough to refrigerator) D. Copper tubing 5. AB C A. IMPORTANT: ■ Plumbing shall ...

Owners Manual
Page 8
... valve. 3. This helps to follow these instructions can result in water strainer. AB C D A. Supplied line from its packaging. 2. Remove and discard the plastic part that leak. A B C D E A. Copper tubing D. Refrigerator water tubing B. Ferrule (purchased) F. Check for leaks. Do not use an extension cord. ... B. On some models) The filter should be sure the copper tubing does not touch the cabinet's side wall or other parts inside the refrigerator. The air filter reduces the buildup of the tubing. Install the water supply tube clamp around the water supply...
... valve. 3. This helps to follow these instructions can result in water strainer. AB C D A. Supplied line from its packaging. 2. Remove and discard the plastic part that leak. A B C D E A. Copper tubing D. Refrigerator water tubing B. Ferrule (purchased) F. Check for leaks. Do not use an extension cord. ... B. On some models) The filter should be sure the copper tubing does not touch the cabinet's side wall or other parts inside the refrigerator. The air filter reduces the buildup of the tubing. Install the water supply tube clamp around the water supply...

Owners Manual
Page 12
...: Press LIGHT a second time to a softened water supply. To turn on the left ) position. LOCKED UNLOCKED Ice Maker and Storage Bin (on . This can damage parts of your dispenser lights are LEDs that surrounds the ice storage bin. Ice can still be dispensed, but at a lower intensity. As ice is selected...
...: Press LIGHT a second time to a softened water supply. To turn on the left ) position. LOCKED UNLOCKED Ice Maker and Storage Bin (on . This can damage parts of your dispenser lights are LEDs that surrounds the ice storage bin. Ice can still be dispensed, but at a lower intensity. As ice is selected...

Owners Manual
Page 13
... cysts. You may be cleaned every 2 to 3 months to press hard. 7. Both the refrigerator and freezer sections defrost automatically. Hand wash, rinse, and dry removable parts and interior surfaces thoroughly. If the environment is particularly greasy or dusty, or there is significant pet traffic in order to close as the new... may be released and then eject as window sprays, scouring cleansers, flammable fluids, cleaning waxes, concentrated detergents, bleaches or cleansers containing petroleum products on plastic parts, interior and door liners or gaskets.
... cysts. You may be cleaned every 2 to 3 months to press hard. 7. Both the refrigerator and freezer sections defrost automatically. Hand wash, rinse, and dry removable parts and interior surfaces thoroughly. If the environment is particularly greasy or dusty, or there is significant pet traffic in order to close as the new... may be released and then eject as window sprays, scouring cleansers, flammable fluids, cleaning waxes, concentrated detergents, bleaches or cleansers containing petroleum products on plastic parts, interior and door liners or gaskets.

Owners Manual
Page 16
...16 To avoid clogging and maintain a fresh supply of ice, empty the storage bin and clean both thoroughly. Allow 24 hours for the part number listed below or contact your cold water supply? Discard the first glass of storage bin using a warm moist cloth, and dry both...? Make sure the refrigerator is not cool enough (on the refrigerator? If it does not close completely." ■ Refrigerator connected to your authorized Whirlpool dealer. The filter may not be clogged or incorrectly installed. ■ Is a reverse osmosis water filtration system connected to a water supply and ...
...16 To avoid clogging and maintain a fresh supply of ice, empty the storage bin and clean both thoroughly. Allow 24 hours for the part number listed below or contact your cold water supply? Discard the first glass of storage bin using a warm moist cloth, and dry both...? Make sure the refrigerator is not cool enough (on the refrigerator? If it does not close completely." ■ Refrigerator connected to your authorized Whirlpool dealer. The filter may not be clogged or incorrectly installed. ■ Is a reverse osmosis water filtration system connected to a water supply and ...
Owners Manual
Page 17
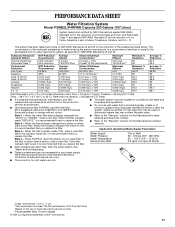
... "Water and Ice Dispensers." ■ These contaminants are subject to the permissible limit for water leaving the system, as advertised. ■ Use replacement filter P4RFWB, part #W10291030. 2010 suggested retail price of the indicated substances in NSF/ANSI Standards 42 and 53. When the indicator reads 0%, it is yellow, order a new...
... "Water and Ice Dispensers." ■ These contaminants are subject to the permissible limit for water leaving the system, as advertised. ■ Use replacement filter P4RFWB, part #W10291030. 2010 suggested retail price of the indicated substances in NSF/ANSI Standards 42 and 53. When the indicator reads 0%, it is yellow, order a new...

Owners Manual
Page 18
... in materials or workmanship and is used for product service if your correspondence. Replacement parts or repair labor on the duration of implied warranties of your home. 8. Discoloration, rust, or oxidation of the refrigerator compartment. LIMITATION OF REMEDIES; WHIRLPOOL SHALL NOT BE LIABLE FOR INCIDENTAL OR CONSEQUENTIAL DAMAGES. DISCLAIMER OF IMPLIED WARRANTIES...
... in materials or workmanship and is used for product service if your correspondence. Replacement parts or repair labor on the duration of implied warranties of your home. 8. Discoloration, rust, or oxidation of the refrigerator compartment. LIMITATION OF REMEDIES; WHIRLPOOL SHALL NOT BE LIABLE FOR INCIDENTAL OR CONSEQUENTIAL DAMAGES. DISCLAIMER OF IMPLIED WARRANTIES...

Warranty
Page 1
...cannot be easily determined. 12. Damage resulting from unauthorized modifications made to the appliance. 9. WHIRLPOOL SHALL NOT BE LIABLE FOR INCIDENTAL OR CONSEQUENTIAL DAMAGES. Replacement parts or repair labor if this major appliance is used for other rights that vary from warranty ... is operated and maintained according to instructions attached to or furnished with the product, Whirlpool Corporation or Whirlpool Canada LP (hereafter "Whirlpool") will pay for Factory Specified Parts and repair labor to correct defects in materials or workmanship that existed when this major...
...cannot be easily determined. 12. Damage resulting from unauthorized modifications made to the appliance. 9. WHIRLPOOL SHALL NOT BE LIABLE FOR INCIDENTAL OR CONSEQUENTIAL DAMAGES. Replacement parts or repair labor if this major appliance is used for other rights that vary from warranty ... is operated and maintained according to instructions attached to or furnished with the product, Whirlpool Corporation or Whirlpool Canada LP (hereafter "Whirlpool") will pay for Factory Specified Parts and repair labor to correct defects in materials or workmanship that existed when this major...


