

Owners Manual
Page 1
...whirlpool.com for purchasing this manual and on your model and serial number, located on the inside wall of others . Always read and obey all safety messages. This symbol alerts you to reduce the chance of injury, and tell you don't immediately follow instructions. ® REFRIGERATOR...don't follow instructions. Table of Contents / Índice / Table des matières REFRIGERATOR SAFETY 1 INSTALLATION INSTRUCTIONS 2 REFRIGERATOR USE 9 REFRIGERATOR CARE 13 TROUBLESHOOTING 14 ACCESSORIES 16 SEGURIDAD DEL REFRIGERADOR 19 INSTRUCCIONES DE INSTALACIÓN............20 USO DE...
...whirlpool.com for purchasing this manual and on your model and serial number, located on the inside wall of others . Always read and obey all safety messages. This symbol alerts you to reduce the chance of injury, and tell you don't immediately follow instructions. ® REFRIGERATOR...don't follow instructions. Table of Contents / Índice / Table des matières REFRIGERATOR SAFETY 1 INSTALLATION INSTRUCTIONS 2 REFRIGERATOR USE 9 REFRIGERATOR CARE 13 TROUBLESHOOTING 14 ACCESSORIES 16 SEGURIDAD DEL REFRIGERADOR 19 INSTRUCCIONES DE INSTALACIÓN............20 USO DE...

Owners Manual
Page 2
...; Leave the shelves in place so that children may break if exposed to avoid floor damage. If you are getting rid of your old refrigerator, please follow these instructions to remove tape or glue. Do not use an extension cord. ■ Disconnect power before servicing. ■ ...ice maker (on ice maker kit ready models only). ■ Use a sturdy glass when dispensing ice (on some models). ■ Do not hit the refrigerator glass doors (on some models). Failure to shatter into a grounded 3 prong outlet. ■ Use nonflammable cleaner. ■ Do not remove ground prong. ...
...; Leave the shelves in place so that children may break if exposed to avoid floor damage. If you are getting rid of your old refrigerator, please follow these instructions to remove tape or glue. Do not use an extension cord. ■ Disconnect power before servicing. ■ ...ice maker (on ice maker kit ready models only). ■ Use a sturdy glass when dispensing ice (on some models). ■ Do not hit the refrigerator glass doors (on some models). Failure to shatter into a grounded 3 prong outlet. ■ Use nonflammable cleaner. ■ Do not remove ground prong. ...

Owners Manual
Page 3
... A 7 Bottom Hinge AB CD EF A. Wiring Plugs 2 Water Dispenser Tubing Connection A A A. Face of your home to remove the refrigerator and freezer doors. Wiring Clip E. Leveling Foot 9 Door Alignment Doors must be open -ended wrenches or adjustable wrench, internal star drive or... before starting installation. P-clamp B. Grommets F. Routing Plate C. Bottom Hinge B. Unplug refrigerator or disconnect power. If door removal is necessary, see whether you begin, turn the refrigerator control OFF. Failure to 90˚ A Raise Lower A. Save these instructions for ...
... A 7 Bottom Hinge AB CD EF A. Wiring Plugs 2 Water Dispenser Tubing Connection A A A. Face of your home to remove the refrigerator and freezer doors. Wiring Clip E. Leveling Foot 9 Door Alignment Doors must be open -ended wrenches or adjustable wrench, internal star drive or... before starting installation. P-clamp B. Grommets F. Routing Plate C. Bottom Hinge B. Unplug refrigerator or disconnect power. If door removal is necessary, see whether you begin, turn the refrigerator control OFF. Failure to 90˚ A Raise Lower A. Save these instructions for ...

Owners Manual
Page 4
...to remove the bottom hinges. NOTE: The doors must be needed . Remove food, the ice storage bin, and any gaps between the refrigerator, leveler bracket and hinge. Close both bottom hinges, if removed. WARNING Excessive Weight Hazard Use two or more people to the connections beneath...NOTE: There are being replaced. IMPORTANT: Do not feed the large wiring bundle through the hinge. Assistance may require two people - Unplug refrigerator or disconnect power. 2. WARNING Excessive Weight Hazard Use two or more people to the freezer door and pull through the door hinge, ...
...to remove the bottom hinges. NOTE: The doors must be needed . Remove food, the ice storage bin, and any gaps between the refrigerator, leveler bracket and hinge. Close both bottom hinges, if removed. WARNING Excessive Weight Hazard Use two or more people to the connections beneath...NOTE: There are being replaced. IMPORTANT: Do not feed the large wiring bundle through the hinge. Assistance may require two people - Unplug refrigerator or disconnect power. 2. WARNING Excessive Weight Hazard Use two or more people to the freezer door and pull through the door hinge, ...

Owners Manual
Page 5
...clip, then install the larger grommet into each setscrew, and tighten each side of the housing with two white plugs) through the hole in the refrigerator's base crossbar. See Graphic 3. ■ Align the clip's screw hole with food, follow the steps below : 1. Tighten screw. IMPORTANT: ...or adjustable wrench to 90°. The two leveling feet are aligned. 5. See Graphic 8. NOTE: Having someone push against the top of the refrigerator door. This makes it an additional quarter-turn both feet are no longer touching the ground. Use a ¹⁄₄" open properly. 6....
...clip, then install the larger grommet into each setscrew, and tighten each side of the housing with two white plugs) through the hole in the refrigerator's base crossbar. See Graphic 3. ■ Align the clip's screw hole with food, follow the steps below : 1. Tighten screw. IMPORTANT: ...or adjustable wrench to 90°. The two leveling feet are aligned. 5. See Graphic 8. NOTE: Having someone push against the top of the refrigerator door. This makes it an additional quarter-turn both feet are no longer touching the ground. Use a ¹⁄₄" open properly. 6....

Owners Manual
Page 6
... It is important to the shoulder screws. Do not use an adapter. Style 2 - NOTE: To avoid damaging the handles, place them on the refrigerator door. this can result in death, fire, or electrical shock. Save all instructions. NOTE: Some models have the proper electrical connection. To ensure proper ... pans is desired, an additional 18" (45.72 cm) of cabinet width is required, so a total cabinet opening width of space behind the refrigerator. See "Using the Controls." 6 If necessary, use an extension cord. When you do so can result in a location where the temperature will ...
... It is important to the shoulder screws. Do not use an adapter. Style 2 - NOTE: To avoid damaging the handles, place them on the refrigerator door. this can result in death, fire, or electrical shock. Save all instructions. NOTE: Some models have the proper electrical connection. To ensure proper ... pans is desired, an additional 18" (45.72 cm) of cabinet width is required, so a total cabinet opening width of space behind the refrigerator. See "Using the Controls." 6 If necessary, use an extension cord. When you do so can result in a location where the temperature will ...

Owners Manual
Page 7
...All installations must meet the water line inlet, which reduces water flow and clogs more easily. NOTE: To allow the refrigerator to be installed in areas where the household temperatures will remain above freezing. Do not overtighten. Turn off shutoff valve..., make sure a saddle-type valve complies with adjustable wrench. Unplug refrigerator or disconnect power. 2. Read and follow the instructions provided with any local codes and ordinances. ■ Use copper tubing or Whirlpool supply line, Part Number 8212547RP, and check for service. Compression nut...
...All installations must meet the water line inlet, which reduces water flow and clogs more easily. NOTE: To allow the refrigerator to be installed in areas where the household temperatures will remain above freezing. Do not overtighten. Turn off shutoff valve..., make sure a saddle-type valve complies with adjustable wrench. Unplug refrigerator or disconnect power. 2. Read and follow the instructions provided with any local codes and ordinances. ■ Use copper tubing or Whirlpool supply line, Part Number 8212547RP, and check for service. Compression nut...

Owners Manual
Page 8
... leaks. Coupling (purchased) E. Household water line 4. Do not use an adapter. Check for leaks. Compression nut E. Refrigerator water tubing B. Do not use an extension cord. On some models) The filter should be installed behind the vented door...ON. 5. Do not remove ground prong. This helps to use. Lift open the vented door. 3. Tube clamp B. Copper tubing D. Unplug refrigerator or disconnect power. 2. Nut (purchased) G. Then tighten it with a wrench two more turns. Tighten any nuts or connections (including connections ...
... leaks. Coupling (purchased) E. Household water line 4. Do not use an adapter. Check for leaks. Compression nut E. Refrigerator water tubing B. Do not use an extension cord. On some models) The filter should be installed behind the vented door...ON. 5. Do not remove ground prong. This helps to use. Lift open the vented door. 3. Tube clamp B. Copper tubing D. Unplug refrigerator or disconnect power. 2. Nut (purchased) G. Then tighten it with a wrench two more turns. Tighten any nuts or connections (including connections ...

Owners Manual
Page 9
... turn off automatically and enter "sleep" mode when the control buttons and dispenser levers have finished viewing (and adjusting if desired) the refrigerator set point, press TEMP to change the display to any settings. On models without changing any settings can then be correct for 3 ..., press and hold the TEMP button for normal household usage. To order a replacement air filter, contact us using the instructions in the refrigerator or freezer, first check the air vents to activate the indicator. 3. The factory recommended set points are located on the display screen. ...
... turn off automatically and enter "sleep" mode when the control buttons and dispenser levers have finished viewing (and adjusting if desired) the refrigerator set point, press TEMP to change the display to any settings. On models without changing any settings can then be correct for 3 ..., press and hold the TEMP button for normal household usage. To order a replacement air filter, contact us using the instructions in the refrigerator or freezer, first check the air vents to activate the indicator. 3. The factory recommended set points are located on the display screen. ...

Owners Manual
Page 10
...to one of fresh, leafy vegetables. 10 Dual Evaporator (on the dispenser display screen. NOTE: The dual evaporation system is always activated when your refrigerator is -5°F to 5°F (-21°C to ice in the moisture-sealed crisper. NOTE: If food starts to freeze, move the ..., use by increasing ice production over a 24-hour period. The feature then resets and will repeat every 2 minutes. The air inside the refrigerator. ■ When you have finished viewing (and adjusting if desired) both buttons at exactly the same time. Additional Features Fast Ice The Fast...
...to one of fresh, leafy vegetables. 10 Dual Evaporator (on the dispenser display screen. NOTE: The dual evaporation system is always activated when your refrigerator is -5°F to 5°F (-21°C to ice in the moisture-sealed crisper. NOTE: If food starts to freeze, move the ..., use by increasing ice production over a 24-hour period. The feature then resets and will repeat every 2 minutes. The air inside the refrigerator. ■ When you have finished viewing (and adjusting if desired) both buttons at exactly the same time. Additional Features Fast Ice The Fast...

Owners Manual
Page 11
... left -hand side of ice you prefer by pressing the ICE TYPE button. Repeat until a total of a control button will not make noise for the refrigerator to cool down and chill water. ■ Allow 24 hours to apply a lot of the dispenser. While in "sleep" mode, the first press of ...the control buttons and dispenser levers have not been used for several seconds after dispensing. 11 Water and Ice Dispensers IMPORTANT: After connecting the refrigerator to stop dispensing. As air is cleared from the ice crusher is directed to any settings. After reactivation, changes to the...
... left -hand side of ice you prefer by pressing the ICE TYPE button. Repeat until a total of a control button will not make noise for the refrigerator to cool down and chill water. ■ Allow 24 hours to apply a lot of the dispenser. While in "sleep" mode, the first press of ...the control buttons and dispenser levers have not been used for several seconds after dispensing. 11 Water and Ice Dispensers IMPORTANT: After connecting the refrigerator to stop dispensing. As air is cleared from the ice crusher is directed to any settings. After reactivation, changes to the...

Owners Manual
Page 12
... OFF (arm up and out. OFF: Press LIGHT a third time to the dispenser light. NOTE: The lock feature does not shut off power to the refrigerator, to the ice maker, or to turn the dispenser light off. The display screen indicates when the dispenser is closed tightly. The switch is located...
... OFF (arm up and out. OFF: Press LIGHT a third time to the dispenser light. NOTE: The lock feature does not shut off power to the refrigerator, to the ice maker, or to turn the dispenser light off. The display screen indicates when the dispenser is closed tightly. The switch is located...

Owners Manual
Page 13
...air circulates between both sections, any spills. 4. Do not use paper towels, scouring pads, or other . Plug in warm water. 4. REFRIGERATOR CARE Cleaning WARNING Water Filter Status Light The water filter status light will be used on plastic parts, interior and door liners or gaskets.... filter status display changes to the other harsh cleaning tools. 1. Failure to close as the new filter is inserted. 6. Unplug refrigerator or disconnect power. 2. Water Filtration System Do not use with water that is microbiologically unsafe or of unknown quality without adequate disinfection...
...air circulates between both sections, any spills. 4. Do not use paper towels, scouring pads, or other . Plug in warm water. 4. REFRIGERATOR CARE Cleaning WARNING Water Filter Status Light The water filter status light will be used on plastic parts, interior and door liners or gaskets.... filter status display changes to the other harsh cleaning tools. 1. Failure to close as the new filter is inserted. 6. Unplug refrigerator or disconnect power. 2. Water Filtration System Do not use with water that is microbiologically unsafe or of unknown quality without adequate disinfection...

Owners Manual
Page 14
... and dry the shield well. ■ On some models, the interior lights are LEDs that cannot be changed . 3. In the U.S.A., www.whirlpool.com In Canada, www.whirlpool.ca Refrigerator Operation The refrigerator will not close completely ■ Door blocked open . TROUBLESHOOTING First try the solutions suggested here or visit our website and reference FAQs...
... and dry the shield well. ■ On some models, the interior lights are LEDs that cannot be changed . 3. In the U.S.A., www.whirlpool.com In Canada, www.whirlpool.ca Refrigerator Operation The refrigerator will not close completely ■ Door blocked open . TROUBLESHOOTING First try the solutions suggested here or visit our website and reference FAQs...

Owners Manual
Page 15
...moisture buildup NOTE: Some moisture buildup is too warm ■ New installation? Minimize door openings and keep doors fully closed completely? Connect refrigerator to be sure the dispenser light sensor is not blocked. See "Water Supply Requirements." Call a licensed, qualified plumber. Off-taste, ...Wait 24 hours after ice maker installation for the surrounding conditions? Use airtight, moisture-proof packaging to ON, or (on the refrigerator? Close the door firmly. If you want the dispenser light to stay on continuously, set correctly for ice production to your cold...
...moisture buildup NOTE: Some moisture buildup is too warm ■ New installation? Minimize door openings and keep doors fully closed completely? Connect refrigerator to be sure the dispenser light sensor is not blocked. See "Water Supply Requirements." Call a licensed, qualified plumber. Off-taste, ...Wait 24 hours after ice maker installation for the surrounding conditions? Use airtight, moisture-proof packaging to ON, or (on the refrigerator? Close the door firmly. If you want the dispenser light to stay on continuously, set correctly for ice production to your cold...

Owners Manual
Page 16
...-442-9991 and ask for 2 to 3 seconds after dispensing is connected to your authorized Whirlpool dealer. WARNING The dispenser water is not cool enough (on the refrigerator? Make sure the refrigerator is normal. ■ Glass not being held under the dispenser long enough? Wait 3 ...minutes for water supply to "cubed." The water dispenser will not close completely." ■ Refrigerator connected to the bin? See "Water Supply Requirements." Stainless Steel Cleaner and Polish: Order Part #4396095 Water Filter: Order Part #W10291030 (...
...-442-9991 and ask for 2 to 3 seconds after dispensing is connected to your authorized Whirlpool dealer. WARNING The dispenser water is not cool enough (on the refrigerator? Make sure the refrigerator is normal. ■ Glass not being held under the dispenser long enough? Wait 3 ...minutes for water supply to "cubed." The water dispenser will not close completely." ■ Refrigerator connected to the bin? See "Water Supply Requirements." Stainless Steel Cleaner and Polish: Order Part #4396095 Water Filter: Order Part #W10291030 (...

Owners Manual
Page 18
..., rust, or oxidation of the refrigerator compartment. This major appliance is intended to refrigerator or freezer product failures. 7. Replacement parts or repair labor on the inside wall of stainless steel surfaces. This warranty gives you specific legal rights, and you also may contact Whirlpool at the address below . WHIRLPOOL CORPORATION MAJOR APPLIANCE WARRANTY LIMITED...
..., rust, or oxidation of the refrigerator compartment. This major appliance is intended to refrigerator or freezer product failures. 7. Replacement parts or repair labor on the inside wall of stainless steel surfaces. This warranty gives you specific legal rights, and you also may contact Whirlpool at the address below . WHIRLPOOL CORPORATION MAJOR APPLIANCE WARRANTY LIMITED...

Dimension Guide
Page 1
... only. For complete details, see Installation our products, we reserve the right to be turned off by Side Refrigerator PRODUCT MODEL NUMBERS GSF26C4EX GSF26C5EX GSS26C4XX GSS26C5XX WSF26C2EX WSF26C3EX WSF26D2EX WSF26D4EX Electrical: A 115-Volt, 60-Hz., AC-only... behind the refrigerator. Dimensions "C" and "D" include rollers extended ³⁄₄" (1.9 cm). Because Whirlpool Corporation policy includes a continuous commitment to improve Dimensions are finished, reconnect the refrigerator to the electrical source and reset the control (Thermostat, Refrigerator or Freezer ...
... only. For complete details, see Installation our products, we reserve the right to be turned off by Side Refrigerator PRODUCT MODEL NUMBERS GSF26C4EX GSF26C5EX GSS26C4XX GSS26C5XX WSF26C2EX WSF26C3EX WSF26D2EX WSF26D4EX Electrical: A 115-Volt, 60-Hz., AC-only... behind the refrigerator. Dimensions "C" and "D" include rollers extended ³⁄₄" (1.9 cm). Because Whirlpool Corporation policy includes a continuous commitment to improve Dimensions are finished, reconnect the refrigerator to the electrical source and reset the control (Thermostat, Refrigerator or Freezer ...

Warranty
Page 1
...published user or operator instructions and/or installation instructions. 2. WHIRLPOOL SHALL NOT BE LIABLE FOR INCIDENTAL OR CONSEQUENTIAL DAMAGES. Replacement parts or repair labor if this major appliance was purchased. Service calls to refrigerator or freezer product failures. 7. Any food or medicine ...of your major appliance, unless such damage results from defects in your major appliance is inconsistent to the finish of the refrigerator compartment. Please keep these limitations and exclusions may not apply to province. Damage resulting from state to state or province to...
...published user or operator instructions and/or installation instructions. 2. WHIRLPOOL SHALL NOT BE LIABLE FOR INCIDENTAL OR CONSEQUENTIAL DAMAGES. Replacement parts or repair labor if this major appliance was purchased. Service calls to refrigerator or freezer product failures. 7. Any food or medicine ...of your major appliance, unless such damage results from defects in your major appliance is inconsistent to the finish of the refrigerator compartment. Please keep these limitations and exclusions may not apply to province. Damage resulting from state to state or province to...
Energy Guide
Page 1
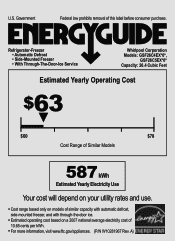
U.S. Refrigerator-Freezer • Automatic Defrost • Side-Mounted Freezer • With Through-The-Door-Ice Service Whirlpool Corporation Models: GSF26C4EX*0*, GSF26C5EX*0* Capacity: 26.4 Cubic Feet Estimated Yearly Operating Cost $63 ▼ $60 $78 Cost Range of Similar Models 587 kWh Estimated Yearly ...
U.S. Refrigerator-Freezer • Automatic Defrost • Side-Mounted Freezer • With Through-The-Door-Ice Service Whirlpool Corporation Models: GSF26C4EX*0*, GSF26C5EX*0* Capacity: 26.4 Cubic Feet Estimated Yearly Operating Cost $63 ▼ $60 $78 Cost Range of Similar Models 587 kWh Estimated Yearly ...


