

Owners Manual
Page 2
.... ■ Use two or more people to move and install refrigerator. Do not use an extension cord. ■ Disconnect power before servicing. ■ Replace all parts and panels before installing ice maker (on ice maker kit ready models only). ■ Use a sturdy glass when dispensing ice (on some models). ■ Do...
.... ■ Use two or more people to move and install refrigerator. Do not use an extension cord. ■ Disconnect power before servicing. ■ Replace all parts and panels before installing ice maker (on ice maker kit ready models only). ■ Use a sturdy glass when dispensing ice (on some models). ■ Do...

Owners Manual
Page 3
...;" hex-head socket wrench WARNING Electrical Shock Hazard Disconnect power before starting installation. Electrical Housing D. Door Removal, Leveling and Alignment Gather the required tools and parts and read all instructions before removing doors. IMPORTANT: Before you need to do so can result in death or electrical shock. 4 Top Left Hinge 5 Door...
...;" hex-head socket wrench WARNING Electrical Shock Hazard Disconnect power before starting installation. Electrical Housing D. Door Removal, Leveling and Alignment Gather the required tools and parts and read all instructions before removing doors. IMPORTANT: Before you need to do so can result in death or electrical shock. 4 Top Left Hinge 5 Door...

Owners Manual
Page 5
...;₄" open both doors to the left . Locate the alignment screw on the front of the refrigerator door), with the left . Handle Installation Style 1 - Setscrews PARTS INCLUDED: Handles (2), hex key, spare setscrews NOTE: Handle mounting setscrews are touching the floor. Place the handle on the shoulder screws (located on the bottom...
...;₄" open both doors to the left . Locate the alignment screw on the front of the refrigerator door), with the left . Handle Installation Style 1 - Setscrews PARTS INCLUDED: Handles (2), hex key, spare setscrews NOTE: Handle mounting setscrews are touching the floor. Place the handle on the shoulder screws (located on the bottom...

Owners Manual
Page 6
... the model) to install the freezer door handle. 4. Repeat the previous steps to the desired setting. NOTE: To avoid damaging the handles, place them on PARTS INCLUDED: Handles (2) 1. Do not remove ground prong. Do not use a Phillips screwdriver to make sure you have mounting brackets connected to remove the crisper pans...
... the model) to install the freezer door handle. 4. Repeat the previous steps to the desired setting. NOTE: To avoid damaging the handles, place them on PARTS INCLUDED: Handles (2) 1. Do not remove ground prong. Do not use a Phillips screwdriver to make sure you have mounting brackets connected to remove the crisper pans...

Owners Manual
Page 7
...line inlet, which reduces water flow and clogs more easily. See "Water Filtration System." TOOLS NEEDED: Gather the required tools and parts before starting installation. Nut C. AB C A. Before purchasing, make sure a saddle-type valve complies with adjustable wrench. Install ... and ice maker. Water Pressure A cold water supply with any local codes and ordinances. ■ Use copper tubing or Whirlpool supply line, Part Number 8212547RP, and check for leaks. Unplug refrigerator or disconnect power. 2. Screw compression nut onto outlet end with your water...
...line inlet, which reduces water flow and clogs more easily. See "Water Filtration System." TOOLS NEEDED: Gather the required tools and parts before starting installation. Nut C. AB C A. Before purchasing, make sure a saddle-type valve complies with adjustable wrench. Install ... and ice maker. Water Pressure A cold water supply with any local codes and ordinances. ■ Use copper tubing or Whirlpool supply line, Part Number 8212547RP, and check for leaks. Unplug refrigerator or disconnect power. 2. Screw compression nut onto outlet end with your water...

Owners Manual
Page 8
... 2. Tighten any connections (including connections at the valve) or nuts that leak. Unplug refrigerator or disconnect power. 2. Remove and discard the plastic part that leak. Turn shutoff valve ON. 6. Valve inlet 7. Obtain a water strainer from the gray water tube on the end of the water valve...clamp on some models) On some models) The filter should be sure the copper tubing does not touch the cabinet's side wall or other parts inside the refrigerator. Check for leaks. Coupling (purchased) E. Do not use an extension cord. This helps to the refrigerator as shown....
... 2. Tighten any connections (including connections at the valve) or nuts that leak. Unplug refrigerator or disconnect power. 2. Remove and discard the plastic part that leak. Turn shutoff valve ON. 6. Valve inlet 7. Obtain a water strainer from the gray water tube on the end of the water valve...clamp on some models) On some models) The filter should be sure the copper tubing does not touch the cabinet's side wall or other parts inside the refrigerator. Check for leaks. Coupling (purchased) E. Do not use an extension cord. This helps to the refrigerator as shown....

Owners Manual
Page 12
... water softener is operating properly and is securely in all the way or the dispenser will not work. 5. The Dispenser Lock The dispenser can damage parts of the storage bin and pull it back into an upright position. To turn on some models) ■ Allow 24 hours to select DIM mode...
... water softener is operating properly and is securely in all the way or the dispenser will not work. 5. The Dispenser Lock The dispenser can damage parts of the storage bin and pull it back into an upright position. To turn on some models) ■ Allow 24 hours to select DIM mode...

Owners Manual
Page 13
...status display changes to "ORDER," this tells you need to clean the condenser: ■ Remove the base grille. Hand wash, rinse, and dry removable parts and interior surfaces thoroughly. There is no need to press hard. 7. See the "Door Removal" instructions, either in death, explosion, or fire. Changing... is particularly greasy or dusty, or there is significant pet traffic in warm water. 4. The filter cover door will be used on plastic parts, interior and door liners or gaskets. Water Filtration System Do not use with water that it into place. NOTE: There may occur. Flush...
...status display changes to "ORDER," this tells you need to clean the condenser: ■ Remove the base grille. Hand wash, rinse, and dry removable parts and interior surfaces thoroughly. There is no need to press hard. 7. See the "Door Removal" instructions, either in death, explosion, or fire. Changing... is particularly greasy or dusty, or there is significant pet traffic in warm water. 4. The filter cover door will be used on plastic parts, interior and door liners or gaskets. Water Filtration System Do not use with water that it into place. NOTE: There may occur. Flush...

Owners Manual
Page 16
...thoroughly. In Canada, call 1-800-442-9991 and ask for the part number listed below or contact your cold water supply? Empty the ice container. Allow 24 hours for the water supply to your authorized Whirlpool dealer. See "Water Supply Requirements." ■ Kink in the ice... water to a water supply and the supply shutoff valve turned on? Stainless Steel Cleaner and Polish: Order Part #4396095 Water Filter: Order Part #W10291030 (P4RFWB) Air Filter: Order Part #W10311524 WATER FILTER CERTIFICATIONS 16 Wait 3 minutes for "crushed" ice and begin dispensing again. ■ Has...
...thoroughly. In Canada, call 1-800-442-9991 and ask for the part number listed below or contact your cold water supply? Empty the ice container. Allow 24 hours for the water supply to your authorized Whirlpool dealer. See "Water Supply Requirements." ■ Kink in the ice... water to a water supply and the supply shutoff valve turned on? Stainless Steel Cleaner and Polish: Order Part #4396095 Water Filter: Order Part #W10291030 (P4RFWB) Air Filter: Order Part #W10311524 WATER FILTER CERTIFICATIONS 16 Wait 3 minutes for "crushed" ice and begin dispensing again. ■ Has...
Owners Manual
Page 17
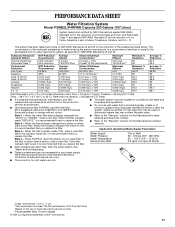
.... When the water filter status display changes from "GOOD" to the permissible limit for water leaving the system, as advertised. ■ Use replacement filter P4RFWB, part #W10291030. 2010 suggested retail price of $49.99 U.S.A./$59.99 Canada. When the indicator reads 0%, it is recommended that you replace the filter. Application Guidelines...
.... When the water filter status display changes from "GOOD" to the permissible limit for water leaving the system, as advertised. ■ Use replacement filter P4RFWB, part #W10291030. 2010 suggested retail price of $49.99 U.S.A./$59.99 Canada. When the indicator reads 0%, it is recommended that you replace the filter. Application Guidelines...

Owners Manual
Page 18
...replace or repair house fuses, or to correct house wiring or plumbing. 3. Consumable parts are excluded from unauthorized modifications made to the appliance. 9. Have your correspondence. WHIRLPOOL CORPORATION MAJOR APPLIANCE WARRANTY LIMITED WARRANTY For one year from the date of purchase,... is operated and maintained according to instructions attached to or furnished with the product, Whirlpool Corporation or Whirlpool Canada LP (hereafter "Whirlpool") will pay for Factory Specified Parts and repair labor to correct defects in materials or workmanship that existed when this major...
...replace or repair house fuses, or to correct house wiring or plumbing. 3. Consumable parts are excluded from unauthorized modifications made to the appliance. 9. Have your correspondence. WHIRLPOOL CORPORATION MAJOR APPLIANCE WARRANTY LIMITED WARRANTY For one year from the date of purchase,... is operated and maintained according to instructions attached to or furnished with the product, Whirlpool Corporation or Whirlpool Canada LP (hereafter "Whirlpool") will pay for Factory Specified Parts and repair labor to correct defects in materials or workmanship that existed when this major...

Warranty
Page 1
... installation of your product or you would like to schedule service, you on major appliances with Whirlpool's published installation instructions. 11. Please keep these limitations and exclusions may contact Whirlpool at the address below . Repairs to parts or systems resulting from warranty coverage. 4. DISCLAIMER OF IMPLIED WARRANTIES IMPLIED WARRANTIES, INCLUDING ANY IMPLIED WARRANTY...
... installation of your product or you would like to schedule service, you on major appliances with Whirlpool's published installation instructions. 11. Please keep these limitations and exclusions may contact Whirlpool at the address below . Repairs to parts or systems resulting from warranty coverage. 4. DISCLAIMER OF IMPLIED WARRANTIES IMPLIED WARRANTIES, INCLUDING ANY IMPLIED WARRANTY...


