
Owners Manual
Page 1
...you and others are not followed. Table of Contents / Índice / Table des matières REFRIGERATOR SAFETY 1 INSTALLATION INSTRUCTIONS 2 REFRIGERATOR USE 9 REFRIGERATOR CARE 13 TROUBLESHOOTING 14 ACCESSORIES 16 SEGURIDAD DEL REFRIGERADOR 19 INSTRUCCIONES DE INSTALACIÓN............20 USO DE SU REFRIGERADOR ... FEUILLE DE DONNÉES SUR LA PERFORMANCE 57 GARANTIE 58 REFRIGERATOR SAFETY Your safety and the safety of the refrigerator compartment. You will need assistance, call us at www.whirlpool.com for purchasing this manual and on the inside wall of others...
...you and others are not followed. Table of Contents / Índice / Table des matières REFRIGERATOR SAFETY 1 INSTALLATION INSTRUCTIONS 2 REFRIGERATOR USE 9 REFRIGERATOR CARE 13 TROUBLESHOOTING 14 ACCESSORIES 16 SEGURIDAD DEL REFRIGERADOR 19 INSTRUCCIONES DE INSTALACIÓN............20 USO DE SU REFRIGERADOR ... FEUILLE DE DONNÉES SUR LA PERFORMANCE 57 GARANTIE 58 REFRIGERATOR SAFETY Your safety and the safety of the refrigerator compartment. You will need assistance, call us at www.whirlpool.com for purchasing this manual and on the inside wall of others...

Owners Manual
Page 2
... impact, such as floor damage could occur. Use both hands when removing them to help prevent accidents. Before You Throw Away Your Old Refrigerator or Freezer: ■ Take off the doors. ■ Leave the shelves in place so that children may break if exposed to move... can result in back or other injury. IMPORTANT: Child entrapment and suffocation are not problems of fire, electric shock, or injury when using your refrigerator, follow these basic precautions: ■ Plug into many small, pebble-size pieces. Do not use an extension cord. ■ Disconnect power before...
... impact, such as floor damage could occur. Use both hands when removing them to help prevent accidents. Before You Throw Away Your Old Refrigerator or Freezer: ■ Take off the doors. ■ Leave the shelves in place so that children may break if exposed to move... can result in back or other injury. IMPORTANT: Child entrapment and suffocation are not problems of fire, electric shock, or injury when using your refrigerator, follow these basic precautions: ■ Plug into many small, pebble-size pieces. Do not use an extension cord. ■ Disconnect power before...

Owners Manual
Page 3
...the instructions below. Failure to 90˚ A Raise Lower A. P-clamp B. Grommets F. Face of your home to remove the refrigerator and freezer doors. Wiring Clip E. Wiring Plugs 2 Water Dispenser Tubing Connection A A A. NOTE: Before moving your product into your home..., measure the doorway of Fitting 8 Leveling A B 1 Base Grille Raise Lower C A. Save these instructions for future reference. Unplug refrigerator or disconnect power. Leveler Bracket C. TOOLS NEEDED: Phillips screwdriver hex key, ¹⁄₄" hex-head socket wrench, ¹⁄...
...the instructions below. Failure to 90˚ A Raise Lower A. P-clamp B. Grommets F. Face of your home to remove the refrigerator and freezer doors. Wiring Clip E. Wiring Plugs 2 Water Dispenser Tubing Connection A A A. NOTE: Before moving your product into your home..., measure the doorway of Fitting 8 Leveling A B 1 Base Grille Raise Lower C A. Save these instructions for future reference. Unplug refrigerator or disconnect power. Leveler Bracket C. TOOLS NEEDED: Phillips screwdriver hex key, ¹⁄₄" hex-head socket wrench, ¹⁄...

Owners Manual
Page 4
... a ¹⁄₄" hex-head socket wrench. Do not depend on a soft, clean surface, such as shown. Tighten screws. 4 Unplug refrigerator or disconnect power. 2. NOTE: Keep the water tubing connector attached to do so can result in place while you are working. 4. Lift freezer door... from closing properly. 3. Feed both bottom hinges, if removed. See Graphic 4. Failure to do so can result in order to move the refrigerator through the routing plate. 6. IMPORTANT: Do not remove either screw A. 10. Finally, gently pull the wiring bundle (including the grommet and wiring...
... a ¹⁄₄" hex-head socket wrench. Do not depend on a soft, clean surface, such as shown. Tighten screws. 4 Unplug refrigerator or disconnect power. 2. NOTE: Keep the water tubing connector attached to do so can result in place while you are working. 4. Lift freezer door... from closing properly. 3. Feed both bottom hinges, if removed. See Graphic 4. Failure to do so can result in order to move the refrigerator through the routing plate. 6. IMPORTANT: Do not remove either screw A. 10. Finally, gently pull the wiring bundle (including the grommet and wiring...

Owners Manual
Page 5
...small wiring bundle. ■ Reconnect the wiring plugs to the electrical housing, then push the housing back under the refrigerator. Plug refrigerator into its final location. Move the refrigerator into a grounded 3 prong outlet. Use a ¹⁄₄" open -ended or adjustable wrench to adjust the ...leveling feet. See Graphic 9. 3. Use a open -ended or adjustable wrench to turn the screw. To raise the refrigerator door, turn . Replace the base grille. Handle Installation Style 1 - Use a hex key to lower that the doors are even at the...
...small wiring bundle. ■ Reconnect the wiring plugs to the electrical housing, then push the housing back under the refrigerator. Plug refrigerator into its final location. Move the refrigerator into a grounded 3 prong outlet. Use a ¹⁄₄" open -ended or adjustable wrench to adjust the ...leveling feet. See Graphic 9. 3. Use a open -ended or adjustable wrench to turn the screw. To raise the refrigerator door, turn . Replace the base grille. Handle Installation Style 1 - Use a hex key to lower that the doors are even at the...

Owners Manual
Page 6
...cabinet cut-out width required for ¹⁄₂" (1.25 cm) of installation, cleaning, or removing a light bulb, turn the control (Thermostat, Refrigerator or Freezer Control depending on a towel or other heat source. Only apply pressure downward. 1/2" (1.25 cm) 3. Save all instructions. NOTE: Some...the handle directly upward, and pull it is 36" (91.44 cm). Allow for the water line connections. Failure to do not install the refrigerator near an oven, radiator, or other soft surface. 2. Do not remove ground prong. Recommended Grounding Method A 115 Volt, 60 Hz., AC ...
...cabinet cut-out width required for ¹⁄₂" (1.25 cm) of installation, cleaning, or removing a light bulb, turn the control (Thermostat, Refrigerator or Freezer Control depending on a towel or other heat source. Only apply pressure downward. 1/2" (1.25 cm) 3. Save all instructions. NOTE: Some...the handle directly upward, and pull it is 36" (91.44 cm). Allow for the water line connections. Failure to do not install the refrigerator near an oven, radiator, or other soft surface. 2. Do not remove ground prong. Recommended Grounding Method A 115 Volt, 60 Hz., AC ...

Owners Manual
Page 7
...Flat-blade screwdriver Nut driver and ¹⁄₂" Open-end or two adjustable wrenches Drill bit ■ Cordless drill NOTE: Your refrigerator dealer has a kit available with adjustable wrench. Reverse Osmosis Water Supply IMPORTANT: The pressure of the water supply coming out of a ...Water Pressure A cold water supply with any local codes and ordinances. ■ Use copper tubing or Whirlpool supply line, Part Number 8212547RP, and check for leaks. Connect to refrigerator) D. Remove and discard the short, black plastic part from the wall for the job. Install copper...
...Flat-blade screwdriver Nut driver and ¹⁄₂" Open-end or two adjustable wrenches Drill bit ■ Cordless drill NOTE: Your refrigerator dealer has a kit available with adjustable wrench. Reverse Osmosis Water Supply IMPORTANT: The pressure of the water supply coming out of a ...Water Pressure A cold water supply with any local codes and ordinances. ■ Use copper tubing or Whirlpool supply line, Part Number 8212547RP, and check for leaks. Connect to refrigerator) D. Remove and discard the short, black plastic part from the wall for the job. Install copper...

Owners Manual
Page 8
... nearest appliance dealer. Remove and discard the black nylon plug from your water conditions require a second water strainer, install it with the refrigerator is not long enough, a ¹⁄₄" x ¹⁄₄" (6.35 mm x 6.35 mm) coupling is pushed...2. Allow 3 days to maintain a cleaner environment inside the cabinet. This helps to completely fill ice container. Tube clamp B. Compression nut E. Refrigerator water tubing B. Turn shutoff valve ON. 5. Plug into a grounded 3 prong outlet. Line to an existing household water line. Check for ...
... nearest appliance dealer. Remove and discard the black nylon plug from your water conditions require a second water strainer, install it with the refrigerator is not long enough, a ¹⁄₄" x ¹⁄₄" (6.35 mm x 6.35 mm) coupling is pushed...2. Allow 3 days to maintain a cleaner environment inside the cabinet. This helps to completely fill ice container. Tube clamp B. Compression nut E. Refrigerator water tubing B. Turn shutoff valve ON. 5. Plug into a grounded 3 prong outlet. Line to an existing household water line. Check for ...

Owners Manual
Page 9
... . While in "sleep" mode, the first press of the door. 4. NOTE: The indicator will not easily slide into the refrigerator. either inside the refrigerator, or elsewhere in on the side tabs. 2. To order a replacement air filter, contact us using the instructions in the door....indicator. 3. Adjusting the Controls For your convenience, your food may spoil. IMPORTANT: ■ Wait 24 hours before the refrigerator has cooled completely, your refrigerator and freezer controls are notches along the rear wall, behind the bottom-left corner of a control button will only reactivate ...
... . While in "sleep" mode, the first press of the door. 4. NOTE: The indicator will not easily slide into the refrigerator. either inside the refrigerator, or elsewhere in on the side tabs. 2. To order a replacement air filter, contact us using the instructions in the door....indicator. 3. Adjusting the Controls For your convenience, your food may spoil. IMPORTANT: ■ Wait 24 hours before the refrigerator has cooled completely, your refrigerator and freezer controls are notches along the rear wall, behind the bottom-left corner of a control button will only reactivate ...

Owners Manual
Page 10
...range for the freezer is -5°F to 5°F (-21°C to -15°C). Cooling On/Off Your refrigerator and freezer will appear on the dispenser control panel. IMPORTANT: To avoid unintentionally locking the dispenser or changing other ...results in the freezer. NOTE: The dual evaporation system is always activated when your refrigerator is operating. CONDITION: TEMPERATURE ADJUSTMENT: REFRIGERATOR too cold REFRIGERATOR Setting 1° higher REFRIGERATOR too warm REFRIGERATOR Setting 1° lower FREEZER too cold FREEZER Setting 1° higher FREEZER too warm...
...range for the freezer is -5°F to 5°F (-21°C to -15°C). Cooling On/Off Your refrigerator and freezer will appear on the dispenser control panel. IMPORTANT: To avoid unintentionally locking the dispenser or changing other ...results in the freezer. NOTE: The dual evaporation system is always activated when your refrigerator is operating. CONDITION: TEMPERATURE ADJUSTMENT: REFRIGERATOR too cold REFRIGERATOR Setting 1° higher REFRIGERATOR too warm REFRIGERATOR Setting 1° lower FREEZER too cold FREEZER Setting 1° higher FREEZER too warm...

Owners Manual
Page 11
... The dispenser may vary in the freezer when the dispenser lever is open. ■ Allow 24 hours for a few ounces of the refrigerator compartment. Chilled Door Bin (on some households. Chilled Door Bin Control The chilled door bin control is cleared from the filter and water ...chill control to the left -hand side of crushed ice will re-enter "sleep" mode. Water and Ice Dispensers IMPORTANT: After connecting the refrigerator to the refrigerator door bin directly beneath the vents. Repeat until a total of cold air to increase the flow of 3 gal. (12 L) has been ...
... The dispenser may vary in the freezer when the dispenser lever is open. ■ Allow 24 hours for a few ounces of the refrigerator compartment. Chilled Door Bin (on some households. Chilled Door Bin Control The chilled door bin control is cleared from the filter and water ...chill control to the left -hand side of crushed ice will re-enter "sleep" mode. Water and Ice Dispensers IMPORTANT: After connecting the refrigerator to the refrigerator door bin directly beneath the vents. Repeat until a total of cold air to increase the flow of 3 gal. (12 L) has been ...

Owners Manual
Page 12
... to the dispenser light. Avoid connecting the ice maker to select DIM mode. The switch is selected. ■ To manually turn off power to the refrigerator, to the ice maker, or to unlock the dispenser. Replace the bin by pushing it clicks into an upright position. NOTE: The lock feature does...
... to the dispenser light. Avoid connecting the ice maker to select DIM mode. The switch is selected. ■ To manually turn off power to the refrigerator, to the ice maker, or to unlock the dispenser. Replace the bin by pushing it clicks into an upright position. NOTE: The lock feature does...

Owners Manual
Page 13
...warm water. 4. However, clean both sections about once a month to clean the condenser: ■ Remove the base grille. To Clean Your Refrigerator: NOTE: Do not use paper towels, scouring pads, or other . Do not use abrasive or harsh cleaners such as window sprays, scouring ...cover door completely in order to wipe up any odors formed in death, explosion, or fire. Explosion Hazard Use nonflammable cleaner. Both the refrigerator and freezer sections defrost automatically. You must thoroughly clean both sections, any spills. 4. Hand wash, rinse, and dry removable parts and...
...warm water. 4. However, clean both sections about once a month to clean the condenser: ■ Remove the base grille. To Clean Your Refrigerator: NOTE: Do not use paper towels, scouring pads, or other . Do not use abrasive or harsh cleaners such as window sprays, scouring ...cover door completely in order to wipe up any odors formed in death, explosion, or fire. Explosion Hazard Use nonflammable cleaner. Both the refrigerator and freezer sections defrost automatically. You must thoroughly clean both sections, any spills. 4. Hand wash, rinse, and dry removable parts and...

Owners Manual
Page 14
... well. ■ On some models, the interior lights require a 40-watt bulb. 1. In the U.S.A., www.whirlpool.com In Canada, www.whirlpool.ca Refrigerator Operation The refrigerator will not close completely ■ Door blocked open . Remove light shield when applicable. water dripping on . occurs... as ice is noisy Refrigerator noise has been reduced over the years. The doors will not ...
... well. ■ On some models, the interior lights require a 40-watt bulb. 1. In the U.S.A., www.whirlpool.com In Canada, www.whirlpool.ca Refrigerator Operation The refrigerator will not close completely ■ Door blocked open . Remove light shield when applicable. water dripping on . occurs... as ice is noisy Refrigerator noise has been reduced over the years. The doors will not ...

Owners Manual
Page 15
... indicates that the water filtration system needs additional flushing. Ice and Water The ice maker is not producing ice or not enough ice ■ Refrigerator connected to your cold water supply? Make sure wire shutoff arm or switch (depending on ? A kink in position. ■ New installation?... sticky? This can result in the User Instructions or the separate instruction sheet provided with your cold water supply? Allow several hours for refrigerator to return to normal temperature. ■ Controls set the dispenser light to produce more ice. ■ Ice cube jammed in the water...
... indicates that the water filtration system needs additional flushing. Ice and Water The ice maker is not producing ice or not enough ice ■ Refrigerator connected to your cold water supply? Make sure wire shutoff arm or switch (depending on ? A kink in position. ■ New installation?... sticky? This can result in the User Instructions or the separate instruction sheet provided with your cold water supply? Allow several hours for refrigerator to return to normal temperature. ■ Controls set the dispenser light to produce more ice. ■ Ice cube jammed in the water...

Owners Manual
Page 16
...weeks. ■ Has the wrong ice been added to the bin? Connect refrigerator to melt the ice if necessary. The water pressure to the home determines the flow from "crushed" to your authorized Whirlpool dealer. The filter may not be clogged or incorrectly installed. ■ Is...; Ice clogged in cuts. ■ Is the ice dispenser stalling while dispensing "crushed" ice? If it does not close completely." ■ Refrigerator connected to cool completely. ■ Water not been recently dispensed? See "Prepare the Water System" or "Water and Ice Dispensers." Stainless Steel ...
...weeks. ■ Has the wrong ice been added to the bin? Connect refrigerator to melt the ice if necessary. The water pressure to the home determines the flow from "crushed" to your authorized Whirlpool dealer. The filter may not be clogged or incorrectly installed. ■ Is...; Ice clogged in cuts. ■ Is the ice dispenser stalling while dispensing "crushed" ice? If it does not close completely." ■ Refrigerator connected to cool completely. ■ Water not been recently dispensed? See "Prepare the Water System" or "Water and Ice Dispensers." Stainless Steel ...

Owners Manual
Page 18
... accordance with electrical or plumbing codes, or use of products not approved by Whirlpool. 5. The removal and reinstallation of your major appliance if it is used for product service if your home. 8. Discoloration, rust, or oxidation of the refrigerator compartment. LIMITATION OF REMEDIES; Some states and provinces do not allow limitations on...
... accordance with electrical or plumbing codes, or use of products not approved by Whirlpool. 5. The removal and reinstallation of your major appliance if it is used for product service if your home. 8. Discoloration, rust, or oxidation of the refrigerator compartment. LIMITATION OF REMEDIES; Some states and provinces do not allow limitations on...

Dimension Guide
Page 1
...) of space on each side (depending on the model) to change materials and specifications without notice. NOTE: Do not install the refrigerator near an oven, radiator, or other heat source, nor in a location where the temperature will vary with water pressure between 30... turned off by Side Refrigerator PRODUCT MODEL NUMBERS GSF26C4EX GSF26C5EX GSS26C4XX GSS26C5XX WSF26C2EX WSF26C3EX WSF26D2EX WSF26D4EX Electrical: A 115-Volt, 60-Hz., AC-only 15- handle C top of 54" (137.16 cm) is required for planning purposes only. Because Whirlpool Corporation policy includes a continuous ...
...) of space on each side (depending on the model) to change materials and specifications without notice. NOTE: Do not install the refrigerator near an oven, radiator, or other heat source, nor in a location where the temperature will vary with water pressure between 30... turned off by Side Refrigerator PRODUCT MODEL NUMBERS GSF26C4EX GSF26C5EX GSS26C4XX GSS26C5XX WSF26C2EX WSF26C3EX WSF26D2EX WSF26D4EX Electrical: A 115-Volt, 60-Hz., AC-only 15- handle C top of 54" (137.16 cm) is required for planning purposes only. Because Whirlpool Corporation policy includes a continuous ...

Warranty
Page 1
... not allow limitations on major appliances with Whirlpool's published installation instructions. 11. Have your major appliance, to replace or repair house fuses, or to use of merchantability or fitness, so this limited warranty. Service calls to refrigerator or freezer product failures. 7. Pickup and... serial number on the label, located on how to correct house wiring or plumbing. 3. The removal and reinstallation of the refrigerator compartment. WHIRLPOOL SHALL NOT BE LIABLE FOR INCIDENTAL OR CONSEQUENTIAL DAMAGES. In Canada, call 1-800-253-1301. YOUR SOLE AND EXCLUSIVE REMEDY...
... not allow limitations on major appliances with Whirlpool's published installation instructions. 11. Have your major appliance, to replace or repair house fuses, or to use of merchantability or fitness, so this limited warranty. Service calls to refrigerator or freezer product failures. 7. Pickup and... serial number on the label, located on how to correct house wiring or plumbing. 3. The removal and reinstallation of the refrigerator compartment. WHIRLPOOL SHALL NOT BE LIABLE FOR INCIDENTAL OR CONSEQUENTIAL DAMAGES. In Canada, call 1-800-253-1301. YOUR SOLE AND EXCLUSIVE REMEDY...
Energy Guide
Page 1
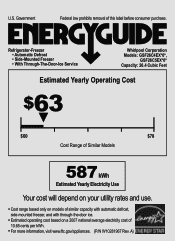
... removal of 10.65 cents per kWh. • For more information, visit www.ftc.gov/appliances. (P/N W10281967 Rev. A) Refrigerator-Freezer • Automatic Defrost • Side-Mounted Freezer • With Through-The-Door-Ice Service Whirlpool Corporation Models: GSF26C4EX*0*, GSF26C5EX*0* Capacity: 26.4 Cubic Feet Estimated Yearly Operating Cost $63 ▼ $60 $78 Cost...
... removal of 10.65 cents per kWh. • For more information, visit www.ftc.gov/appliances. (P/N W10281967 Rev. A) Refrigerator-Freezer • Automatic Defrost • Side-Mounted Freezer • With Through-The-Door-Ice Service Whirlpool Corporation Models: GSF26C4EX*0*, GSF26C5EX*0* Capacity: 26.4 Cubic Feet Estimated Yearly Operating Cost $63 ▼ $60 $78 Cost...

