
Owners Manual
Page 2
... install refrigerator. This is heavy. For more people to move it . Do not use an extension cord. ■ Disconnect power before servicing. ■ Replace all parts and panels before operating. ■ Remove doors from your old refrigerator. ■ Keep flammable materials and vapors, such as bumping. Important information to remove tape...
... install refrigerator. This is heavy. For more people to move it . Do not use an extension cord. ■ Disconnect power before servicing. ■ Replace all parts and panels before operating. ■ Remove doors from your old refrigerator. ■ Keep flammable materials and vapors, such as bumping. Important information to remove tape...

Owners Manual
Page 3
... and freezer doors. Failure to 90˚ A Raise Lower A. Routing Plate C. Bottom Hinge B. Alignment Screw 3 Door Removal, Leveling and Alignment Gather the required tools and parts and read all instructions before removing doors. Electrical Housing D. Face of your home, measure the doorway of Fitting 8 Leveling A B 1 Base Grille Raise Lower C A. Wiring Clip...
... and freezer doors. Failure to 90˚ A Raise Lower A. Routing Plate C. Bottom Hinge B. Alignment Screw 3 Door Removal, Leveling and Alignment Gather the required tools and parts and read all instructions before removing doors. Electrical Housing D. Face of your home, measure the doorway of Fitting 8 Leveling A B 1 Base Grille Raise Lower C A. Wiring Clip...

Owners Manual
Page 5
... into the green fitting until the doors are preinstalled in the front lip of the refrigerator door), with the setscrews facing the refrigerator door. 5. Setscrews PARTS INCLUDED: Handles (2), hex key, spare setscrews NOTE: Handle mounting setscrews are aligned. 5. Firmly push the handle into a grounded 3 prong outlet. Save the hex key and...
... into the green fitting until the doors are preinstalled in the front lip of the refrigerator door), with the setscrews facing the refrigerator door. 5. Setscrews PARTS INCLUDED: Handles (2), hex key, spare setscrews NOTE: Handle mounting setscrews are aligned. 5. Firmly push the handle into a grounded 3 prong outlet. Save the hex key and...

Owners Manual
Page 6
... Control depending on the handle to the shoulder screws. Allow for the water line connections. Failure to a fixed wall, leave a 2" (5.08 cm) minimum space on PARTS INCLUDED: Handles (2) 1. Style 2 - Do not install in death, explosion, or fire.
... Control depending on the handle to the shoulder screws. Allow for the water line connections. Failure to a fixed wall, leave a 2" (5.08 cm) minimum space on PARTS INCLUDED: Handles (2) 1. Style 2 - Do not install in death, explosion, or fire.

Owners Manual
Page 7
...avoid possible water valve malfunction. 6. A B C D A. Unplug refrigerator or disconnect power. 2. Water Supply Requirements Gather the required tools and parts before the water line is recommended. Read and follow the instructions provided with water pressure of the refrigerator cabinet as shown. IMPORTANT: ■...(½" minimum) 4. Water Pressure A cold water supply with any local codes and ordinances. ■ Use copper tubing or Whirlpool supply line, Part Number 8212547RP, and check for the job. Turn off shutoff valve on the back of between 30 and 120 psi (207 ...
...avoid possible water valve malfunction. 6. A B C D A. Unplug refrigerator or disconnect power. 2. Water Supply Requirements Gather the required tools and parts before the water line is recommended. Read and follow the instructions provided with water pressure of the refrigerator cabinet as shown. IMPORTANT: ■...(½" minimum) 4. Water Pressure A cold water supply with any local codes and ordinances. ■ Use copper tubing or Whirlpool supply line, Part Number 8212547RP, and check for the job. Turn off shutoff valve on the back of between 30 and 120 psi (207 ...

Owners Manual
Page 8
... your refrigerator's accessory packet includes an air filter, which must be sure the copper tubing does not touch the cabinet's side wall or other parts inside the refrigerator. Bulb D. Ferrule (purchased) F. See "Prepare the Water System" or "Water and Ice Dispensers." Install Air Filter (on ... water tubing B. Flush the water system. Then tighten it in death, fire, or electrical shock. 1. Remove and discard the plastic part that is attached to the tubing when the refrigerator is already installed at the valve) or nuts that leak. Tighten any connections (including...
... your refrigerator's accessory packet includes an air filter, which must be sure the copper tubing does not touch the cabinet's side wall or other parts inside the refrigerator. Bulb D. Ferrule (purchased) F. See "Prepare the Water System" or "Water and Ice Dispensers." Install Air Filter (on ... water tubing B. Flush the water system. Then tighten it in death, fire, or electrical shock. 1. Remove and discard the plastic part that is attached to the tubing when the refrigerator is already installed at the valve) or nuts that leak. Tighten any connections (including...

Owners Manual
Page 12
... as salt) can be dispensed, but at a lower intensity. See the following section for bin removal instructions. ■ To turn off for more can damage parts of ice. The release lever will automatically turn the dispenser light on some models) ■ Allow 24 hours to produce the first batch of the...
... as salt) can be dispensed, but at a lower intensity. See the following section for bin removal instructions. ■ To turn off for more can damage parts of ice. The release lever will automatically turn the dispenser light on some models) ■ Allow 24 hours to produce the first batch of the...

Owners Manual
Page 13
...Locate the water filter in refrigerator or reconnect power. 13 When the door is no need for cyst reduction may be used on plastic parts, interior and door liners or gaskets. To Clean Your Refrigerator: NOTE: Do not use abrasive or harsh cleaners such as the new filter...surface area of food, wrap or cover foods tightly. Close the filter cover door completely in warm water. 4. Hand wash, rinse, and dry removable parts and interior surfaces thoroughly. NOTE: There may be cleaned every 2 to 3 months to eliminate odors. Flush the water system. However, clean both sections...
...Locate the water filter in refrigerator or reconnect power. 13 When the door is no need for cyst reduction may be used on plastic parts, interior and door liners or gaskets. To Clean Your Refrigerator: NOTE: Do not use abrasive or harsh cleaners such as the new filter...surface area of food, wrap or cover foods tightly. Close the filter cover door completely in warm water. 4. Hand wash, rinse, and dry removable parts and interior surfaces thoroughly. NOTE: There may be cleaned every 2 to 3 months to eliminate odors. Flush the water system. However, clean both sections...

Owners Manual
Page 16
...ice if necessary. The filter may not be clogged or incorrectly installed. ■ Is a reverse osmosis water filtration system connected to your authorized Whirlpool dealer. Water is leaking from "crushed" to water supply and turn water shutoff valve fully open. ■ Is the water pressure at ...800-807-6777. Discard the first glass of water? Ice will not operate properly ■ Freezer door closed completely? Wait 3 minutes for the part number listed below or contact your cold water supply? Flush and fill the water system. ■ Water filter installed on some models) NOTE:...
...ice if necessary. The filter may not be clogged or incorrectly installed. ■ Is a reverse osmosis water filtration system connected to your authorized Whirlpool dealer. Water is leaking from "crushed" to water supply and turn water shutoff valve fully open. ■ Is the water pressure at ...800-807-6777. Discard the first glass of water? Ice will not operate properly ■ Freezer door closed completely? Wait 3 minutes for the part number listed below or contact your cold water supply? Flush and fill the water system. ■ Water filter installed on some models) NOTE:...
Owners Manual
Page 17
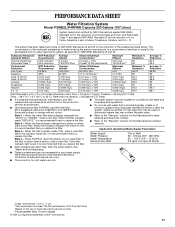
... regulations. ■ Do not use only. *Class I particle size: >0.5 to the permissible limit for water leaving the system, as advertised. ■ Use replacement filter P4RFWB, part #W10291030. 2010 suggested retail price of the substances listed below.
... regulations. ■ Do not use only. *Class I particle size: >0.5 to the permissible limit for water leaving the system, as advertised. ■ Use replacement filter P4RFWB, part #W10291030. 2010 suggested retail price of the substances listed below.

Owners Manual
Page 18
...Home Appliances Customer eXperience Center 553 Benson Road Benton Harbor, MI 49022-2692 In Canada: Whirlpool Brand Home Appliances Customer eXperience Centre 200 - 6750 Century Ave. Replacement parts or repair labor on how to use or when it is installed in an inaccessible ...maintained according to instructions attached to or furnished with the product, Whirlpool Corporation or Whirlpool Canada LP (hereafter "Whirlpool") will pay for Factory Specified Parts and repair labor to be repaired in your home. 8. Replacement parts or repair labor if this major appliance is used in a manner...
...Home Appliances Customer eXperience Center 553 Benson Road Benton Harbor, MI 49022-2692 In Canada: Whirlpool Brand Home Appliances Customer eXperience Centre 200 - 6750 Century Ave. Replacement parts or repair labor on how to use or when it is installed in an inaccessible ...maintained according to instructions attached to or furnished with the product, Whirlpool Corporation or Whirlpool Canada LP (hereafter "Whirlpool") will pay for Factory Specified Parts and repair labor to be repaired in your home. 8. Replacement parts or repair labor if this major appliance is used in a manner...

Warranty
Page 1
... in a remote area where service by a Whirlpool designated service company. Replacement parts or repair labor if this limited warranty. Repairs to parts or systems resulting from warranty coverage. 4. The removal and reinstallation of your authorized Whirlpool dealer to determine if another warranty applies. 6/...provinces do not have been removed, altered or cannot be repaired in your product or you may contact Whirlpool at the address below . Replacement parts or repair labor on major appliances with original model/serial numbers that existed when this major appliance is...
... in a remote area where service by a Whirlpool designated service company. Replacement parts or repair labor if this limited warranty. Repairs to parts or systems resulting from warranty coverage. 4. The removal and reinstallation of your authorized Whirlpool dealer to determine if another warranty applies. 6/...provinces do not have been removed, altered or cannot be repaired in your product or you may contact Whirlpool at the address below . Replacement parts or repair labor on major appliances with original model/serial numbers that existed when this major appliance is...


