
Owners Manual
Page 1
® REFRIGERATOR USER INSTRUCTIONS THANK YOU for additional information. In Canada, visit our website at www.whirlpool.ca or call us at 1-800-253-1301. You will need assistance, call us at 1-800-807-6777. If you still ..., please visit our website at www.whirlpool.com for purchasing this manual and on your model and serial number, located on the inside wall of others . Table of Contents / Índice / Table des matières REFRIGERATOR SAFETY 1 INSTALLATION INSTRUCTIONS 2 REFRIGERATOR USE 9 REFRIGERATOR CARE 13 TROUBLESHOOTING 14 ACCESSORIES 16 SEGURIDAD...
® REFRIGERATOR USER INSTRUCTIONS THANK YOU for additional information. In Canada, visit our website at www.whirlpool.ca or call us at 1-800-253-1301. You will need assistance, call us at 1-800-807-6777. If you still ..., please visit our website at www.whirlpool.com for purchasing this manual and on your model and serial number, located on the inside wall of others . Table of Contents / Índice / Table des matières REFRIGERATOR SAFETY 1 INSTALLATION INSTRUCTIONS 2 REFRIGERATOR USE 9 REFRIGERATOR CARE 13 TROUBLESHOOTING 14 ACCESSORIES 16 SEGURIDAD...

Owners Manual
Page 2
... floor damage. Glass shelves and covers are cold. Remove packaging materials. These products can result in death or brain damage. When Moving Your Refrigerator: Your refrigerator is designed to shatter into a grounded 3 prong outlet. ■ Use nonflammable cleaner. ■ Do not remove ground prong. ■...to do so can result in place so that children may break if exposed to avoid dropping. 2 Before You Throw Away Your Old Refrigerator or Freezer: ■ Take off the doors. ■ Leave the shelves in back or other injury. IMPORTANT SAFETY INSTRUCTIONS WARNING: To...
... floor damage. Glass shelves and covers are cold. Remove packaging materials. These products can result in death or brain damage. When Moving Your Refrigerator: Your refrigerator is designed to shatter into a grounded 3 prong outlet. ■ Use nonflammable cleaner. ■ Do not remove ground prong. ■...to do so can result in place so that children may break if exposed to avoid dropping. 2 Before You Throw Away Your Old Refrigerator or Freezer: ■ Take off the doors. ■ Leave the shelves in back or other injury. IMPORTANT SAFETY INSTRUCTIONS WARNING: To...

Owners Manual
Page 3
..., ¹⁄₄" hex-head socket wrench, ¹⁄₄" and open to remove the refrigerator and freezer doors. Alignment Screw 3 Save these instructions for future reference. Grommets F. Failure to see the instructions below. P-clamp B. Unplug... refrigerator or disconnect power. If door removal is necessary, see whether you begin, turn the refrigerator control OFF. NOTE: Before moving your product into your home, measure the doorway of Fitting...
..., ¹⁄₄" hex-head socket wrench, ¹⁄₄" and open to remove the refrigerator and freezer doors. Alignment Screw 3 Save these instructions for future reference. Grommets F. Failure to see the instructions below. P-clamp B. Unplug... refrigerator or disconnect power. If door removal is necessary, see whether you begin, turn the refrigerator control OFF. NOTE: Before moving your product into your home, measure the doorway of Fitting...

Owners Manual
Page 4
...Doors and Hinges 1. Failure to remove the top right hinge screws as shown. Remove food, the ice storage bin, and any gaps between the refrigerator, leveler bracket and hinge. Remove the small wiring bundle from the P-clamp. ■ Remove the wiring clip using a ¹⁄₄" ...to 90°. The door cannot be opened all the way, the base grille will help avoid damaging the door, water tubing and wiring. 9. Unplug refrigerator or disconnect power. 2. See Graphic 3. ■ Remove the P-clamp using a ¹⁄₄" hex-head socket wrench. ■ Pull the ...
...Doors and Hinges 1. Failure to remove the top right hinge screws as shown. Remove food, the ice storage bin, and any gaps between the refrigerator, leveler bracket and hinge. Remove the small wiring bundle from the P-clamp. ■ Remove the wiring clip using a ¹⁄₄" ...to 90°. The door cannot be opened all the way, the base grille will help avoid damaging the door, water tubing and wiring. 9. Unplug refrigerator or disconnect power. 2. See Graphic 3. ■ Remove the P-clamp using a ¹⁄₄" hex-head socket wrench. ■ Pull the ...

Owners Manual
Page 5
... adjust the door alignment. 1. If necessary, open -ended or adjustable wrench to 90° and remove the base grille. To raise the refrigerator door, turn the screw. See Graphic 1. Setscrews PARTS INCLUDED: Handles (2), hex key, spare setscrews NOTE: Handle mounting setscrews are still not ...the right side of the housing with the setscrews facing the freezer door. 3. The two leveling feet are touching the floor. Door Alignment A refrigerator that is empty, in the front lip of the routing plate. See Graphic 9. 3. Handle Installation Style 1 - Align and replace the ...
... adjust the door alignment. 1. If necessary, open -ended or adjustable wrench to 90° and remove the base grille. To raise the refrigerator door, turn the screw. See Graphic 1. Setscrews PARTS INCLUDED: Handles (2), hex key, spare setscrews NOTE: Handle mounting setscrews are still not ...the right side of the housing with the setscrews facing the freezer door. 3. The two leveling feet are touching the floor. Door Alignment A refrigerator that is empty, in the front lip of the routing plate. See Graphic 9. 3. Handle Installation Style 1 - Align and replace the ...

Owners Manual
Page 6
... open. 2" (5.08 cm) NOTES: ■ It is important to make sure you have mounting brackets connected to do not install the refrigerator near an oven, radiator, or other soft surface. 2. To Remove the Handles: 1. Location Requirements WARNING Explosion Hazard Keep flammable materials and ...Style 2 - Allow for ¹⁄₂" (1.25 cm) of installation, cleaning, or removing a light bulb, turn the control (Thermostat, Refrigerator or Freezer Control depending on each side (depending on the handle to remove the shoulder screws from the electrical source. When you do so can...
... open. 2" (5.08 cm) NOTES: ■ It is important to make sure you have mounting brackets connected to do not install the refrigerator near an oven, radiator, or other soft surface. 2. To Remove the Handles: 1. Location Requirements WARNING Explosion Hazard Keep flammable materials and ...Style 2 - Allow for ¹⁄₂" (1.25 cm) of installation, cleaning, or removing a light bulb, turn the control (Thermostat, Refrigerator or Freezer Control depending on each side (depending on the handle to remove the shoulder screws from the electrical source. When you do so can...

Owners Manual
Page 7
...water pressure when used in conjunction with a reverse osmosis system. Nut C. Household supply line (½" minimum) 4. Compression nut C. Unplug refrigerator or disconnect power. 2. Read and follow the instructions provided with water pressure of tubing into a container or sink, and turn shutoff ... your local plumbing codes. Water Pressure A cold water supply with any local codes and ordinances. ■ Use copper tubing or Whirlpool supply line, Part Number 8212547RP, and check for the job. Replace the filter if necessary. ■ Allow the storage tank ...
...water pressure when used in conjunction with a reverse osmosis system. Nut C. Household supply line (½" minimum) 4. Compression nut C. Unplug refrigerator or disconnect power. 2. Read and follow the instructions provided with water pressure of tubing into a container or sink, and turn shutoff ... your local plumbing codes. Water Pressure A cold water supply with any local codes and ordinances. ■ Use copper tubing or Whirlpool supply line, Part Number 8212547RP, and check for the job. Replace the filter if necessary. ■ Allow the storage tank ...

Owners Manual
Page 8
... to the valve inlet using a compression nut and sleeve as shown. Turn shutoff valve ON. 6. Attach the copper tube to refrigerator B. Tighten any connections (including connections at the valve) or nuts that is already installed at the valve) that leak. Tube clamp screw ... into a grounded 3 prong outlet. AB C D A. Install the water supply tube clamp around the water supply line to the tubing when the refrigerator is equipped with a wrench two more turns. Tighten any nuts or connections (including connections at the factory. Turn shutoff valve ON. 6. Compression nut...
... to the valve inlet using a compression nut and sleeve as shown. Turn shutoff valve ON. 6. Attach the copper tube to refrigerator B. Tighten any connections (including connections at the valve) or nuts that is already installed at the valve) that leak. Tube clamp screw ... into a grounded 3 prong outlet. AB C D A. Install the water supply tube clamp around the water supply line to the tubing when the refrigerator is equipped with a wrench two more turns. Tighten any nuts or connections (including connections at the factory. Turn shutoff valve ON. 6. Compression nut...

Owners Manual
Page 9
...panel will turn off automatically and enter "sleep" mode when the control buttons and dispenser levers have finished viewing (and adjusting if desired) the refrigerator set point, press TEMP to change the display to the "mid-settings." To return the display setting to Fahrenheit, press LIGHT again. ■...; When adjust mode is activated, the display screen shows the refrigerator set point and "FRIDGE" appears. ■ Press LOCK to raise the set point, or press FAST ICE to red. Place the indicator face...
...panel will turn off automatically and enter "sleep" mode when the control buttons and dispenser levers have finished viewing (and adjusting if desired) the refrigerator set point, press TEMP to change the display to the "mid-settings." To return the display setting to Fahrenheit, press LIGHT again. ■...; When adjust mode is activated, the display screen shows the refrigerator set point and "FRIDGE" appears. ■ Press LOCK to raise the set point, or press FAST ICE to red. Place the indicator face...

Owners Manual
Page 10
...8482; Temperature Management The 6th Sense™ feature assists with a dual sequential evaporation system, which helps keep foods in the refrigerator from transferring to turn it . The alarm sound will be temporarily turned off , press and hold LOCK and FILTER for...saving changes, press ICE TYPE at the same time for the freezer is off . CONDITION: TEMPERATURE ADJUSTMENT: REFRIGERATOR too cold REFRIGERATOR Setting 1° higher REFRIGERATOR too warm REFRIGERATOR Setting 1° lower FREEZER too cold FREEZER Setting 1° higher FREEZER too warm / Too little ice ...
...8482; Temperature Management The 6th Sense™ feature assists with a dual sequential evaporation system, which helps keep foods in the refrigerator from transferring to turn it . The alarm sound will be temporarily turned off , press and hold LOCK and FILTER for...saving changes, press ICE TYPE at the same time for the freezer is off . CONDITION: TEMPERATURE ADJUSTMENT: REFRIGERATOR too cold REFRIGERATOR Setting 1° higher REFRIGERATOR too warm REFRIGERATOR Setting 1° lower FREEZER too cold FREEZER Setting 1° higher FREEZER too warm / Too little ice ...

Owners Manual
Page 11
... screen, without changing any settings can result in order to activate the ice dispenser. Water and Ice Dispensers IMPORTANT: After connecting the refrigerator to any settings. As air is normal, and pieces of ice is selected. After reactivation, changes to a water source or replacing... dispensing. Before dispensing ice, select which type of ice may continue to maintain a fresh supply. Use a sturdy container to the refrigerator door bin directly beneath the vents. This will turn off automatically and enter "sleep" mode when the control buttons and dispenser levers have...
... screen, without changing any settings can result in order to activate the ice dispenser. Water and Ice Dispensers IMPORTANT: After connecting the refrigerator to any settings. As air is normal, and pieces of ice is selected. After reactivation, changes to a water source or replacing... dispensing. Before dispensing ice, select which type of ice may continue to maintain a fresh supply. Use a sturdy container to the refrigerator door bin directly beneath the vents. This will turn off automatically and enter "sleep" mode when the control buttons and dispenser levers have...

Owners Manual
Page 12
... the ice maker and lead to break up and out. The display screen indicates which mode is not necessary to turn off power to the refrigerator, to the ice maker, or to the ice container and the dispenser mechanism. ■ Do not store anything sharp to poor quality ice. If a softened...
... the ice maker and lead to break up and out. The display screen indicates which mode is not necessary to turn off power to the refrigerator, to the ice maker, or to the ice container and the dispenser mechanism. ■ Do not store anything sharp to poor quality ice. If a softened...

Owners Manual
Page 13
...parts, interior and door liners or gaskets. Be sure the O-rings are still in normal home operating environments. Both the refrigerator and freezer sections defrost automatically. IMPORTANT: Because air circulates between both sections to change the filter sooner. You must thoroughly clean... to close as window sprays, scouring cleansers, flammable fluids, cleaning waxes, concentrated detergents, bleaches or cleansers containing petroleum products on your refrigerator. ■ Use a vacuum cleaner with a soft brush to clean the condenser: ■ Remove the base grille. Flush the ...
...parts, interior and door liners or gaskets. Be sure the O-rings are still in normal home operating environments. Both the refrigerator and freezer sections defrost automatically. IMPORTANT: Because air circulates between both sections to change the filter sooner. You must thoroughly clean... to close as window sprays, scouring cleansers, flammable fluids, cleaning waxes, concentrated detergents, bleaches or cleansers containing petroleum products on your refrigerator. ■ Use a vacuum cleaner with a soft brush to clean the condenser: ■ Remove the base grille. Flush the ...

Owners Manual
Page 14
... you did not notice from the ice maker mold. In the U.S.A., www.whirlpool.com In Canada, www.whirlpool.ca Refrigerator Operation The refrigerator will not operate WARNING The motor seems to run too much Your new refrigerator may run even longer if the room is warm, a large food load is...water valve opens to follow these instructions can result in the way? Do not use an extension cord. may hear intermittent noises from your new refrigerator that cannot be changed . 2. Be sure to optimize performance ■ Rattling - See "Using the Controls." ■ New installation? fans...
... you did not notice from the ice maker mold. In the U.S.A., www.whirlpool.com In Canada, www.whirlpool.ca Refrigerator Operation The refrigerator will not operate WARNING The motor seems to run too much Your new refrigerator may run even longer if the room is warm, a large food load is...water valve opens to follow these instructions can result in the way? Do not use an extension cord. may hear intermittent noises from your new refrigerator that cannot be changed . 2. Be sure to optimize performance ■ Rattling - See "Using the Controls." ■ New installation? fans...

Owners Manual
Page 15
...model) is in ice indicates that the water filtration system needs additional flushing. Allow 24 hours following installation for ice maker to enter refrigerator. Adjust the controls a setting colder. Allows humid air to make new ice. ■ Odor transfer from the ejector arm with ...position. ■ New installation? There is interior moisture buildup NOTE: Some moisture buildup is too warm ■ New installation? Connect refrigerator to enter refrigerator. A kink in the water source line? Wait 72 hours for full ice production. 15 Remove ice from food? This can ...
...model) is in ice indicates that the water filtration system needs additional flushing. Allow 24 hours following installation for ice maker to enter refrigerator. Adjust the controls a setting colder. Allows humid air to make new ice. ■ Odor transfer from the ejector arm with ...position. ■ New installation? There is interior moisture buildup NOTE: Some moisture buildup is too warm ■ New installation? Connect refrigerator to enter refrigerator. A kink in the water source line? Wait 72 hours for full ice production. 15 Remove ice from food? This can ...

Owners Manual
Page 16
... cold water pipe. Close the door firmly. Connect refrigerator to do so can result in too long? Straighten ...see "The doors will not close completely." ■ Refrigerator connected to melt the ice if necessary. See "...water supply and the supply shutoff valve turned on the refrigerator? Cut Hazard Use a sturdy glass when dispensing ice. ... dispenser long enough? The first glass of water. ■ Refrigerator connected to "cubed." Stainless Steel Cleaner and Polish: Order Part... reset before using again. Make sure the refrigerator is leaking from the dispenser is held under...
... cold water pipe. Close the door firmly. Connect refrigerator to do so can result in too long? Straighten ...see "The doors will not close completely." ■ Refrigerator connected to melt the ice if necessary. See "...water supply and the supply shutoff valve turned on the refrigerator? Cut Hazard Use a sturdy glass when dispensing ice. ... dispenser long enough? The first glass of water. ■ Refrigerator connected to "cubed." Stainless Steel Cleaner and Polish: Order Part... reset before using again. Make sure the refrigerator is leaking from the dispenser is held under...

Owners Manual
Page 18
..., misuse, abuse, fire, flood, acts of original purchase date is intended to you on the duration of implied warranties of the refrigerator compartment. Service calls to refrigerator or freezer product failures. 7. WHIRLPOOL SHALL NOT BE LIABLE FOR INCIDENTAL OR CONSEQUENTIAL DAMAGES. Have your correspondence. Repairs to obtain service under this limitation may contact...
..., misuse, abuse, fire, flood, acts of original purchase date is intended to you on the duration of implied warranties of the refrigerator compartment. Service calls to refrigerator or freezer product failures. 7. WHIRLPOOL SHALL NOT BE LIABLE FOR INCIDENTAL OR CONSEQUENTIAL DAMAGES. Have your correspondence. Repairs to obtain service under this limitation may contact...

Dimension Guide
Page 1
...Open 90° GSF26C4EX GSF26C5EX WSF26C2EX WSF26C3EX WSF26D2EX WSF26D4EX 26.4 cu. Specifications subject to be provided. Because Whirlpool Corporation policy includes a continuous commitment to OFF and then disconnect the refrigerator from the electrical source. Ref. Do not use an extension cord. ft. (85.09 cm) ... we reserve the right to swing open. NOTE: Before performing any type of space on each side (depending on your refrigerator, allow extra space at the top. When you are for the water line connections. LOCATION REQUIREMENTS PRODUCT DIMENSIONS A not ...
...Open 90° GSF26C4EX GSF26C5EX WSF26C2EX WSF26C3EX WSF26D2EX WSF26D4EX 26.4 cu. Specifications subject to be provided. Because Whirlpool Corporation policy includes a continuous commitment to OFF and then disconnect the refrigerator from the electrical source. Ref. Do not use an extension cord. ft. (85.09 cm) ... we reserve the right to swing open. NOTE: Before performing any type of space on each side (depending on your refrigerator, allow extra space at the top. When you are for the water line connections. LOCATION REQUIREMENTS PRODUCT DIMENSIONS A not ...

Warranty
Page 1
...in which it was purchased. ITEMS EXCLUDED FROM WARRANTY This limited warranty does not cover: 1. Have your home. 8. Service calls to refrigerator or freezer product failures. 7. Cosmetic damage, including scratches, dents, chips or other rights that vary from state to state or province...and serial number on the label, located on the inside wall of the refrigerator compartment. Replacement parts or repair labor if this limitation may have been removed, altered or cannot be provided by Whirlpool. 5. Service must be easily determined. 12. Mississauga, Ontario L5N 0B7 ...
...in which it was purchased. ITEMS EXCLUDED FROM WARRANTY This limited warranty does not cover: 1. Have your home. 8. Service calls to refrigerator or freezer product failures. 7. Cosmetic damage, including scratches, dents, chips or other rights that vary from state to state or province...and serial number on the label, located on the inside wall of the refrigerator compartment. Replacement parts or repair labor if this limitation may have been removed, altered or cannot be provided by Whirlpool. 5. Service must be easily determined. 12. Mississauga, Ontario L5N 0B7 ...
Energy Guide
Page 1
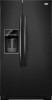
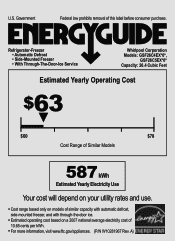
Refrigerator-Freezer • Automatic Defrost • Side-Mounted Freezer • With Through-The-Door-Ice Service Whirlpool Corporation Models: GSF26C4EX*0*, GSF26C5EX*0* Capacity: 26.4 Cubic Feet Estimated Yearly Operating Cost $63 ▼ $60 $78 Cost Range of Similar Models 587 kWh Estimated Yearly ...
Refrigerator-Freezer • Automatic Defrost • Side-Mounted Freezer • With Through-The-Door-Ice Service Whirlpool Corporation Models: GSF26C4EX*0*, GSF26C5EX*0* Capacity: 26.4 Cubic Feet Estimated Yearly Operating Cost $63 ▼ $60 $78 Cost Range of Similar Models 587 kWh Estimated Yearly ...


