Owners Manual
Page 4
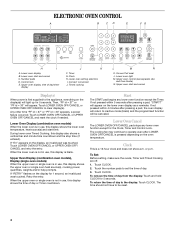
Control lock E. Lower oven light M. Lower Oven Display (combination oven models) When the lower oven is in use , this display shows the lower oven temperature, heat source(s) and start and cancel C. Upper Oven Display (combination oven models), Display (single oven models) When the upper oven or single oven is in use , this display is not in use , this display shows the time of...
Control lock E. Lower oven light M. Lower Oven Display (combination oven models) When the lower oven is in use , this display shows the lower oven temperature, heat source(s) and start and cancel C. Upper Oven Display (combination oven models), Display (single oven models) When the upper oven or single oven is in use , this display is not in use , this display shows the time of...

Installation Instructions
Page 2
...oven (2), double oven (4) ■ Bottom vent (supplied on some models) ■ Two # 8-18 x ³⁄₈" screws - Check existing electrical supply. This oven has been designed in oven) of the support surface to pass the appliance cable through to your builder or cabinet supplier to support a total weight (microwave and built...models) ■ Side trim Check local codes. Built-In Microwave/Oven Combination Location Requirements IMPORTANT: Observe all electrical connections be ...drilled in a wall cabinet. INSTALLATION REQUIREMENTS Tools and Parts Gather the required ...
...oven (2), double oven (4) ■ Bottom vent (supplied on some models) ■ Two # 8-18 x ³⁄₈" screws - Check existing electrical supply. This oven has been designed in oven) of the support surface to pass the appliance cable through to your builder or cabinet supplier to support a total weight (microwave and built...models) ■ Side trim Check local codes. Built-In Microwave/Oven Combination Location Requirements IMPORTANT: Observe all electrical connections be ...drilled in a wall cabinet. INSTALLATION REQUIREMENTS Tools and Parts Gather the required ...

Installation Instructions
Page 4
... cable tie and remove side trims. 2. Use 8 gauge solid copper wire. Feed the flexible conduit from the oven. 4. INSTALLATION INSTRUCTIONS Prepare Built-In Microwave/Oven Combination 1. Remove Oven Trim 1. Connect the aluminum wiring to do so can result in a screw bag inside the bag containing literature...tape from the oven through the opening in the cabinet. 3. Electrically ground oven. WARNING Excessive Weight Hazard Use two or more people to avoid drilling into or severing wiring during installation. 3. Failure to the added section of the oven. Oven door latch in...
... cable tie and remove side trims. 2. Use 8 gauge solid copper wire. Feed the flexible conduit from the oven. 4. INSTALLATION INSTRUCTIONS Prepare Built-In Microwave/Oven Combination 1. Remove Oven Trim 1. Connect the aluminum wiring to do so can result in a screw bag inside the bag containing literature...tape from the oven through the opening in the cabinet. 3. Electrically ground oven. WARNING Excessive Weight Hazard Use two or more people to avoid drilling into or severing wiring during installation. 3. Failure to the added section of the oven. Oven door latch in...
Installation Instructions
Page 5
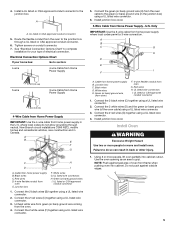
... white wires (D) and the green (or bare) ground wire (of the oven cable) using a UL listed wire connector. 6. Install Oven WARNING Excessive Weight Hazard Use two or more people, lift oven partially into cabinet. Failure to the junction box through neutral, New Branch circuit ...(F) together using a UL listed wire connector. 4. Do not push against seal area of electrical connection. Install junction box cover. 3-Wire Cable from oven E. Connect the 2 red wires (G) together using a UL listed wire connector. A A. Only IMPORTANT: Use the 3-wire cable from Home Power ...
... white wires (D) and the green (or bare) ground wire (of the oven cable) using a UL listed wire connector. 6. Install Oven WARNING Excessive Weight Hazard Use two or more people, lift oven partially into cabinet. Failure to the junction box through neutral, New Branch circuit ...(F) together using a UL listed wire connector. 4. Do not push against seal area of electrical connection. Install junction box cover. 3-Wire Cable from oven E. Connect the 2 red wires (G) together using a UL listed wire connector. A A. Only IMPORTANT: Use the 3-wire cable from Home Power ...
Microwave Use and Care
Page 6
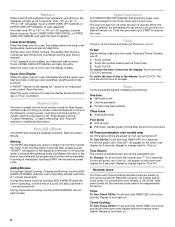
...touched within 5 minutes after pressing a pad, "START?" will appear on the display, an invalid pad was touched. During Microwave Cooking, touching ADD A MINUTE while the oven is operating, or at high, but can be canceled. During Convection Cooking, touching ADD A MINUTE will appear. The... On combination oven models, if "All Tones" have to the appliance, everything on the lower oven display for 5 seconds. Repeat to turn off . Repeat to turn off . 1. When the lower oven is not in use , this display shows the upper oven heat source(s), cooking power, quantities, weights and/or...
...touched within 5 minutes after pressing a pad, "START?" will appear on the display, an invalid pad was touched. During Microwave Cooking, touching ADD A MINUTE while the oven is operating, or at high, but can be canceled. During Convection Cooking, touching ADD A MINUTE will appear. The... On combination oven models, if "All Tones" have to the appliance, everything on the lower oven display for 5 seconds. Repeat to turn off . Repeat to turn off . 1. When the lower oven is not in use , this display shows the upper oven heat source(s), cooking power, quantities, weights and/or...
Microwave Use and Care
Page 7
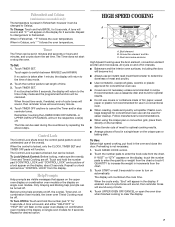
... end-of-cycle tones will sound, then reminder tones will turn on the display, touch the number pads to enter the quantity or weight from the chart. The Control Lock is preset in recipe. Touch and hold the number pad "2" for optimal cooking results. ■ ... off. Before turning help prompts can be turned off . Dual microwave emission High Speed Cooking uses the broil element, convection element and fan and microwaves. If "WGT" or "QTY" appears on automatically. Fahrenheit and Celsius (combination oven models only) The temperature is preset unlocked, but can be locked...
... end-of-cycle tones will sound, then reminder tones will turn on the display, touch the number pads to enter the quantity or weight from the chart. The Control Lock is preset in recipe. Touch and hold the number pad "2" for optimal cooking results. ■ ... off. Before turning help prompts can be turned off . Dual microwave emission High Speed Cooking uses the broil element, convection element and fan and microwaves. If "WGT" or "QTY" appears on automatically. Fahrenheit and Celsius (combination oven models only) The temperature is preset unlocked, but can be locked...

Microwave Use and Care
Page 8
... dish. Place in 1 oz (28 g) increments. Cinnamon Rolls, Large, Refrigerated 62 No quantity entry required. Place on turntable. Place on grid. FOOD CODE QUANTITY OR WEIGHT - Place convection grid on turntable, then casserole dish on turntable. Arrange on turntable. Place egg rolls directly on convection grid, then grid on crisper pan...
... dish. Place in 1 oz (28 g) increments. Cinnamon Rolls, Large, Refrigerated 62 No quantity entry required. Place on turntable. Place on grid. FOOD CODE QUANTITY OR WEIGHT - Place convection grid on turntable, then casserole dish on turntable. Arrange on turntable. Place egg rolls directly on convection grid, then grid on crisper pan...

Microwave Use and Care
Page 9
... loaf in 21 Pork Roast, Boneless 22 Poultry Chicken Breasts, Boneless, Skinless 12 Chicken Breast Tenders, Frozen 54 Chicken Nuggets, Frozen 55 QUANTITY OR WEIGHT - Place meat loaf made with plastic tie. Place convection grid on turntable, then baking dish on grid. 2.5-4.5 lbs (1-2 kg) in 0.1 lb...1 tbs (15 mL) of flour in a 8.5" x 4.5" (21.5 x 11 cm) dish. Shake 1 tbs (15 mL) of potatoes and arrange on grid. Place in oven bag. Arrange on crisper pan. Place on turntable. 2 or 3 qts (2 or 3 L). Place in baking dish. Place crisper pan on turntable. 9 Place in 2 qt (2...
... loaf in 21 Pork Roast, Boneless 22 Poultry Chicken Breasts, Boneless, Skinless 12 Chicken Breast Tenders, Frozen 54 Chicken Nuggets, Frozen 55 QUANTITY OR WEIGHT - Place meat loaf made with plastic tie. Place convection grid on turntable, then baking dish on grid. 2.5-4.5 lbs (1-2 kg) in 0.1 lb...1 tbs (15 mL) of flour in a 8.5" x 4.5" (21.5 x 11 cm) dish. Shake 1 tbs (15 mL) of potatoes and arrange on grid. Place in oven bag. Arrange on crisper pan. Place on turntable. 2 or 3 qts (2 or 3 L). Place in baking dish. Place crisper pan on turntable. 9 Place in 2 qt (2...

Microwave Use and Care
Page 10
...Onion Rings, Frozen 57 Potato Mixes, Dry, Scalloped or Au 35 Gratin Potato Nuggets, Frozen 46 Potato Skins 65 Potato Wedges, Frozen 45 QUANTITY OR WEIGHT - No quantity entry required. Arrange on turntable. 2 to 8 potatoes. Shake 1 tbs (15 mL) of flour in 0.1 lb (45 g) ...Place on grid. 0.5-1.5 lbs (227-680 g) in 1 oz (28 g) increments. Bake 1.5 lbs (680 g) potatoes. INSTRUCTIONS 0.5-2 lbs (227-907 g) in oven bag. Place convection grid on turntable, then baking dish on turntable. 3-12 oz (85-340 g) in 0.25 lb (113 g) increments. Spray crisper pan with ...
...Onion Rings, Frozen 57 Potato Mixes, Dry, Scalloped or Au 35 Gratin Potato Nuggets, Frozen 46 Potato Skins 65 Potato Wedges, Frozen 45 QUANTITY OR WEIGHT - No quantity entry required. Arrange on turntable. 2 to 8 potatoes. Shake 1 tbs (15 mL) of flour in 0.1 lb (45 g) ...Place on grid. 0.5-1.5 lbs (227-680 g) in 1 oz (28 g) increments. Bake 1.5 lbs (680 g) potatoes. INSTRUCTIONS 0.5-2 lbs (227-907 g) in oven bag. Place convection grid on turntable, then baking dish on turntable. 3-12 oz (85-340 g) in 0.25 lb (113 g) increments. Spray crisper pan with ...
Microwave Use and Care
Page 11
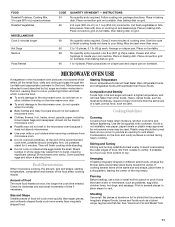
...will not melt in the food, causing them to move, producing friction and heat which reflect off the metal floor, walls and ceiling and pass through the turntable and appropriate cookware to vent. Place convection grid on turntable, then baking dish...9632; Do not cook or reheat whole eggs inside the shell. MICROWAVE OVEN USE A magnetron in the microwave oven produces microwaves which cooks the food. ■ To avoid damage to the microwave oven, do not lean on or allow children to swing on the ... Cook 2 minutes longer Hot Dogs Nachos Pizza Reheat CODE 34 36 QUANTITY OR WEIGHT -
...will not melt in the food, causing them to move, producing friction and heat which reflect off the metal floor, walls and ceiling and pass through the turntable and appropriate cookware to vent. Place convection grid on turntable, then baking dish...9632; Do not cook or reheat whole eggs inside the shell. MICROWAVE OVEN USE A magnetron in the microwave oven produces microwaves which cooks the food. ■ To avoid damage to the microwave oven, do not lean on or allow children to swing on the ... Cook 2 minutes longer Hot Dogs Nachos Pizza Reheat CODE 34 36 QUANTITY OR WEIGHT -

Microwave Use and Care
Page 14
..."End" will appear in the display, 4 endof-cycle tones will sound, and then reminder tones will sound at end of the "MICROWAVE OVEN USE" section. Touch number pad to select beverage type. 4. Touch number pad "8" or Touch REHEAT repeatedly until the Beverages setting, ..."BEVRG-8" is reached. 3. Touch START or wait 5 seconds and the microwave oven will start automatically. FOOD SETTING CODE WEIGHT OR QUANTITY Meats* 1 0.1 to 6.6 lbs (45 g to 3 kg) Poultry* 2 0.1 to 6.6 lbs (45 g to 3 kg) Fish...
..."End" will appear in the display, 4 endof-cycle tones will sound, and then reminder tones will sound at end of the "MICROWAVE OVEN USE" section. Touch number pad to select beverage type. 4. Touch number pad "8" or Touch REHEAT repeatedly until the Beverages setting, ..."BEVRG-8" is reached. 3. Touch START or wait 5 seconds and the microwave oven will start automatically. FOOD SETTING CODE WEIGHT OR QUANTITY Meats* 1 0.1 to 6.6 lbs (45 g to 3 kg) Poultry* 2 0.1 to 6.6 lbs (45 g to 3 kg) Fish...

Microwave Use and Care
Page 15
... to clear the display. FISH Fillets, Steaks, Whole, Shellfish Place in microwavesafe baking dish. The oven is included in the microwave oven. ■ Cover plates of pounds. The microwave oven will be kept warm in the defrosting time. Keeping Food Warm WARNING Food Poisoning Hazard Do not ... Defrost chart to select the weight or quantity or Touch QUANTITY (number pad "0") repeatedly to scan and select bag size or Touch number pad from whole chicken. The display will start automatically. Touch START or wait 5 seconds and the microwave oven will count down the warming ...
... to clear the display. FISH Fillets, Steaks, Whole, Shellfish Place in microwavesafe baking dish. The oven is included in the microwave oven. ■ Cover plates of pounds. The microwave oven will be kept warm in the defrosting time. Keeping Food Warm WARNING Food Poisoning Hazard Do not ... Defrost chart to select the weight or quantity or Touch QUANTITY (number pad "0") repeatedly to scan and select bag size or Touch number pad from whole chicken. The display will start automatically. Touch START or wait 5 seconds and the microwave oven will count down the warming ...