Owners Manual
Page 3
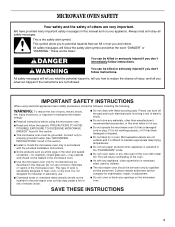
Loose-fitting or hanging garments should be worn while using the oven, follow basic precautions, including the following: ■ Proper Installation - Smother fire or flame or use . Do not let potholder touch hot heating elements. Heating elements may become hot enough to cause...bulky cloth. ■ Use Care When Opening Door - Build-up of pressure may result in desired location while oven is properly installed and grounded by a qualified technician. ■ Never Use the Oven for a good seal. Moist or damp potholders on hot surfaces may cause container to burst and result in ...
Loose-fitting or hanging garments should be worn while using the oven, follow basic precautions, including the following: ■ Proper Installation - Smother fire or flame or use . Do not let potholder touch hot heating elements. Heating elements may become hot enough to cause...bulky cloth. ■ Use Care When Opening Door - Build-up of pressure may result in desired location while oven is properly installed and grounded by a qualified technician. ■ Never Use the Oven for a good seal. Moist or damp potholders on hot surfaces may cause container to burst and result in ...
Owners Manual
Page 15
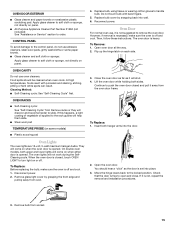
...the hinge latch on panel. Lift the oven door while holding both hanger arms into wall. 6. Open the oven door. If it away from the oven door frame. Food spills should hear a "click" as it is off and cool. On double oven models, both upper and lower lights will...■ Plastic scouring pad Oven Lights The oven lights are 12-volt, 5-watt maximum halogen bulbs. OVEN RACKS ■ Self-Cleaning cycle: See "Self-Cleaning Cycle" first. Disconnect power. 2. Oven Door For normal oven use oven cleaners. The oven door is not, repeat the removal and installation procedures. 3. Move the hinge...
...the hinge latch on panel. Lift the oven door while holding both hanger arms into wall. 6. Open the oven door. If it away from the oven door frame. Food spills should hear a "click" as it is off and cool. On double oven models, both upper and lower lights will...■ Plastic scouring pad Oven Lights The oven lights are 12-volt, 5-watt maximum halogen bulbs. OVEN RACKS ■ Self-Cleaning cycle: See "Self-Cleaning Cycle" first. Disconnect power. 2. Oven Door For normal oven use oven cleaners. The oven door is not, repeat the removal and installation procedures. 3. Move the hinge...
Owners Manual
Page 16
...■ On some models, has a delay start Self-Clean cycle been set ? See "Sabbath Mode" section. ■ On double oven models, is one oven is level in the pan. ■ Is the proper length of time being used ? See "Display(s)" section. Check that batter...the batter evenly distributed in longer cooking times. ■ Are baked items too brown on . ■ On double oven models, has the correct oven been selected? See Installation Instructions. See "Oven Temperature Control" section. See "Display(s)" section. See "Positioning Racks and Bakeware" section. ■ Is there ...
...■ On some models, has a delay start Self-Clean cycle been set ? See "Sabbath Mode" section. ■ On double oven models, is one oven is level in the pan. ■ Is the proper length of time being used ? See "Display(s)" section. Check that batter...the batter evenly distributed in longer cooking times. ■ Are baked items too brown on . ■ On double oven models, has the correct oven been selected? See Installation Instructions. See "Oven Temperature Control" section. See "Display(s)" section. See "Positioning Racks and Bakeware" section. ■ Is there ...
Owners Manual
Page 17
... Accessories Accessories U.S.A. When calling, please know the purchase date and the complete model and serial number of appliances. ■ Installation information. ■ Use and maintenance procedures. ■ Accessory and repair parts sales. ■ Specialized customer assistance (Spanish ...speaking, hearing impaired, limited vision, etc.). ■ Referrals to build every new WHIRLPOOL® appliance. Whirlpool Canada LP designated service technicians are made with : ■ Features and specifications on our full line of your...
... Accessories Accessories U.S.A. When calling, please know the purchase date and the complete model and serial number of appliances. ■ Installation information. ■ Use and maintenance procedures. ■ Accessory and repair parts sales. ■ Specialized customer assistance (Spanish ...speaking, hearing impaired, limited vision, etc.). ■ Referrals to build every new WHIRLPOOL® appliance. Whirlpool Canada LP designated service technicians are made with : ■ Features and specifications on our full line of your...

Owners Manual
Page 18
...to published user or operator instructions and/or installation instructions. 4. This major appliance is operated and maintained according to instructions attached to or furnished with the product, Whirlpool Corporation or Whirlpool Canada LP (hereafter "Whirlpool") will need to be borne by this...Consumable parts are excluded from accident, alteration, misuse, abuse, fire, flood, acts of God, improper installation, installation not in a remote area where service by Whirlpool. 5. This warranty is required to correct house wiring or plumbing. 2. Write down the following information ...
...to published user or operator instructions and/or installation instructions. 4. This major appliance is operated and maintained according to instructions attached to or furnished with the product, Whirlpool Corporation or Whirlpool Canada LP (hereafter "Whirlpool") will need to be borne by this...Consumable parts are excluded from accident, alteration, misuse, abuse, fire, flood, acts of God, improper installation, installation not in a remote area where service by Whirlpool. 5. This warranty is required to correct house wiring or plumbing. 2. Write down the following information ...

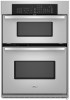
Dimension Guide
Page 1
....6 CM) AND 30" (76.2 CM) ELECTRIC BUILT-IN MICROWAVE/OVEN COMBINATION PRODUCT MODEL SERIES PRODUCT DIMENSIONS GSC309PV RMC275PV RMC305PV Electrical: Oven must be connected to 7.2 kW at 208 volts) require a separate 40-amp circuit. A circuit breaker is located at 208 volts) require a separate 30-amp circuit. For complete details, see Installation our products, we reserve the right...
....6 CM) AND 30" (76.2 CM) ELECTRIC BUILT-IN MICROWAVE/OVEN COMBINATION PRODUCT MODEL SERIES PRODUCT DIMENSIONS GSC309PV RMC275PV RMC305PV Electrical: Oven must be connected to 7.2 kW at 208 volts) require a separate 40-amp circuit. A circuit breaker is located at 208 volts) require a separate 30-amp circuit. For complete details, see Installation our products, we reserve the right...

Installation Instructions
Page 1
..." (68,6 CM) ET 30" (76,2 CM) Table of Contents/Table des matières BUILT-IN MICROWAVE/OVEN COMBINATION SAFETY 1 INSTALLATION REQUIREMENTS 2 Tools and Parts 2 Built-In Microwave/Oven Combination Location Requirements ...........2 Electrical Requirements 3 INSTALLATION INSTRUCTIONS 4 Prepare Built-In Microwave/Oven Combination 4 Remove Oven Door 4 Remove Oven Trim 4 Make Electrical Connection 4 Install Oven 5 Complete Installation 6 SÉCURITÉ DE L'ENSEMBLE FOUR À MICRO-ONDES ET FOUR CONVENTIONNEL ENCASTRÉ...
..." (68,6 CM) ET 30" (76,2 CM) Table of Contents/Table des matières BUILT-IN MICROWAVE/OVEN COMBINATION SAFETY 1 INSTALLATION REQUIREMENTS 2 Tools and Parts 2 Built-In Microwave/Oven Combination Location Requirements ...........2 Electrical Requirements 3 INSTALLATION INSTRUCTIONS 4 Prepare Built-In Microwave/Oven Combination 4 Remove Oven Door 4 Remove Oven Trim 4 Make Electrical Connection 4 Install Oven 5 Complete Installation 6 SÉCURITÉ DE L'ENSEMBLE FOUR À MICRO-ONDES ET FOUR CONVENTIONNEL ENCASTRÉ...

Installation Instructions
Page 2
...drill (for wall cabinet installations) ■ 1" (25 mm) drill bit (for wall cabinet installations) ■ Level Parts needed ■ UL listed or CSA approved conduit connector ■ UL listed wire connectors Parts supplied ■ # 8-14 x 1" screws - Built-In Microwave/Oven Combination Location Requirements ...portion of 238 lbs (108 kg). It is installed in oven) of the oven. ■ Grounded electrical supply is required. IMPORTANT: To avoid damage to your cabinets, check with any tools listed here. single oven (2), double oven (4) ■ Bottom vent (supplied on some...
...drill (for wall cabinet installations) ■ 1" (25 mm) drill bit (for wall cabinet installations) ■ Level Parts needed ■ UL listed or CSA approved conduit connector ■ UL listed wire connectors Parts supplied ■ # 8-14 x 1" screws - Built-In Microwave/Oven Combination Location Requirements ...portion of 238 lbs (108 kg). It is installed in oven) of the oven. ■ Grounded electrical supply is required. IMPORTANT: To avoid damage to your cabinets, check with any tools listed here. single oven (2), double oven (4) ■ Bottom vent (supplied on some...

Installation Instructions
Page 3
...Batterymarch Park Quincy, MA 02269 CSA International 8501 East Pleasant Valley Road Cleveland, OH 44131-5575 Electrical Connection To properly install your oven, you must be connected to 7.2 kW at 208 volts) require a separate 40-amp circuit. cutout depth B. 23" (58.4 cm) recessed... sure that the electrical connection and wire size are not sure the oven is recommended that a qualified electrical installer determine that the ground path and wire gauge are in conformance with a qualified electrical installer if you will be using and follow the instructions provided for serviceability ...
...Batterymarch Park Quincy, MA 02269 CSA International 8501 East Pleasant Valley Road Cleveland, OH 44131-5575 Electrical Connection To properly install your oven, you must be connected to 7.2 kW at 208 volts) require a separate 40-amp circuit. cutout depth B. 23" (58.4 cm) recessed... sure that the electrical connection and wire size are not sure the oven is recommended that a qualified electrical installer determine that the ground path and wire gauge are in conformance with a qualified electrical installer if you will be using and follow the instructions provided for serviceability ...

Installation Instructions
Page 4
... to the added section of the front frame for the oven. Electrically ground oven. Connect the aluminum wiring to remove oven door(s). 1. To avoid floor damage, set aside racks and other injury. 2. Follow the electrical connector manufacturer's recommended procedure. Remove Oven Trim 1. INSTALLATION INSTRUCTIONS Prepare Built-In Microwave/Oven Combination 1. Side trims are in locked position B. Disconnect power. 2. Decide...
... to the added section of the front frame for the oven. Electrically ground oven. Connect the aluminum wiring to remove oven door(s). 1. To avoid floor damage, set aside racks and other injury. 2. Follow the electrical connector manufacturer's recommended procedure. Remove Oven Trim 1. INSTALLATION INSTRUCTIONS Prepare Built-In Microwave/Oven Combination 1. Side trims are in locked position B. Disconnect power. 2. Decide...
Installation Instructions
Page 5
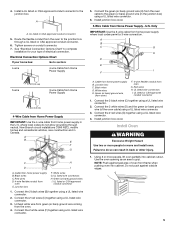
...home power supply where local codes permit a 3-wire connection. Only IMPORTANT: Use the 3-wire cable from the oven to the junction box through neutral, New Branch circuit installations (1996 NEC), mobile homes and recreational vehicles, new construction and in back or other injury. 1. A ...Supply - A A. See "Electrical Connection Options Chart" to complete installation for your home has: Go to move and install oven. White wires E. Green (or bare) ground wire (from oven) F. 4-wire flexible conduit from oven E. UL listed wire connectors I F 3-wire ½" (1.3 cm...
...home power supply where local codes permit a 3-wire connection. Only IMPORTANT: Use the 3-wire cable from the oven to the junction box through neutral, New Branch circuit installations (1996 NEC), mobile homes and recreational vehicles, new construction and in back or other injury. 1. A ...Supply - A A. See "Electrical Connection Options Chart" to complete installation for your home has: Go to move and install oven. White wires E. Green (or bare) ground wire (from oven) F. 4-wire flexible conduit from oven E. UL listed wire connectors I F 3-wire ½" (1.3 cm...

Installation Instructions
Page 6
... models, the oven vent is intact and tight; Vent tab C. # 8-18 x ³⁄₈" screw D. "PF" should stop cooking. 2. When oven has been on . Fill a microwave-safe container with shipping feet, use and cleaning, read the Use and Care Guide. Complete Installation 1. Check that all packaging materials. 4. See "Prepare Built-In Microwave/Oven Combination" section. 15. Oven frame slot...
... models, the oven vent is intact and tight; Vent tab C. # 8-18 x ³⁄₈" screw D. "PF" should stop cooking. 2. When oven has been on . Fill a microwave-safe container with shipping feet, use and cleaning, read the Use and Care Guide. Complete Installation 1. Check that all packaging materials. 4. See "Prepare Built-In Microwave/Oven Combination" section. 15. Oven frame slot...
Warranty
Page 1
...Dealer name Address Phone number Model number Serial number Purchase date 18 Service calls to correct the installation of your major appliance, to be borne by a Whirlpool designated service company. This major appliance is designed to instruct you may find this limited warranty....coverage. 3. Damage resulting from accident, alteration, misuse, abuse, fire, flood, acts of God, improper installation, installation not in -home service is covered by an authorized Whirlpool servicer is used for other damage to better help by checking the "Assistance or Service" section or ...
...Dealer name Address Phone number Model number Serial number Purchase date 18 Service calls to correct the installation of your major appliance, to be borne by a Whirlpool designated service company. This major appliance is designed to instruct you may find this limited warranty....coverage. 3. Damage resulting from accident, alteration, misuse, abuse, fire, flood, acts of God, improper installation, installation not in -home service is covered by an authorized Whirlpool servicer is used for other damage to better help by checking the "Assistance or Service" section or ...
Microwave Use and Care
Page 3
...of electric shock. ■ Do not clean with the provided Installation Instructions. ■ Some products such as described in the microwave oven as they may explode and should be heated in the microwave oven. ■ Use the microwave oven only for examination, repair, or adjustment. ■ Do not... cover or block any other than manufacturer's recommended accessories, in this section. ■ Install or locate the microwave oven only in oven. Pieces can burn off the pad and touch electrical parts involving a risk of electric shock. ■ Do not store...
...of electric shock. ■ Do not clean with the provided Installation Instructions. ■ Some products such as described in the microwave oven as they may explode and should be heated in the microwave oven. ■ Use the microwave oven only for examination, repair, or adjustment. ■ Do not... cover or block any other than manufacturer's recommended accessories, in this section. ■ Install or locate the microwave oven only in oven. Pieces can burn off the pad and touch electrical parts involving a risk of electric shock. ■ Do not store...
Microwave Use and Care
Page 20
See Installation Instructions. See "Control Lock" section. ■ On some models, is the... ■ Is the door completely closed? See "Electronic Oven Control" section. ■ On some models, reset the clock, if needed. See "Sabbath Mode" section. ■ On combination oven models, is sitting securely on motor rotation at 100%... depends on the turntable support. ■ Is the turntable support operating properly? Smoke is coming from past cooking. Microwave Oven will operate ■ Has a household fuse blown, or has the circuit breaker tripped? See "Display(s)" section. ...
See Installation Instructions. See "Control Lock" section. ■ On some models, is the... ■ Is the door completely closed? See "Electronic Oven Control" section. ■ On some models, reset the clock, if needed. See "Sabbath Mode" section. ■ On combination oven models, is sitting securely on motor rotation at 100%... depends on the turntable support. ■ Is the turntable support operating properly? Smoke is coming from past cooking. Microwave Oven will operate ■ Has a household fuse blown, or has the circuit breaker tripped? See "Display(s)" section. ...

Microwave Use and Care
Page 21
..., anywhere in your request. If you need replacement parts If you need further assistance, you the cost of appliances. ■ Installation information. ■ Use and maintenance procedures. ■ Accessory and repair parts sales. ■ Specialized customer assistance (Spanish speaking..., hearing impaired, limited vision, etc.). ■ Referrals to build every new WHIRLPOOL® appliance. It may save you can also look in your telephone directory Yellow Pages. In the U.S.A. Our consultants provide ...
..., anywhere in your request. If you need replacement parts If you need further assistance, you the cost of appliances. ■ Installation information. ■ Use and maintenance procedures. ■ Accessory and repair parts sales. ■ Specialized customer assistance (Spanish speaking..., hearing impaired, limited vision, etc.). ■ Referrals to build every new WHIRLPOOL® appliance. It may save you can also look in your telephone directory Yellow Pages. In the U.S.A. Our consultants provide ...
Microwave Use and Care
Page 22
... major appliance, to instruct you on the product. Damage resulting from accident, alteration, misuse, abuse, fire, flood, acts of God, improper installation, installation not in accordance with the product, Whirlpool Corporation or Whirlpool Canada LP (hereafter "Whirlpool") will need service, first see the "Troubleshooting" section of consumables or cleaning products not approved by an authorized...
... major appliance, to instruct you on the product. Damage resulting from accident, alteration, misuse, abuse, fire, flood, acts of God, improper installation, installation not in accordance with the product, Whirlpool Corporation or Whirlpool Canada LP (hereafter "Whirlpool") will need service, first see the "Troubleshooting" section of consumables or cleaning products not approved by an authorized...


