Owners Manual
Page 3
... cause burns. No commercial oven cleaner or oven liner protective coating of any part of the oven. ■ Clean Only Parts Listed in an oven. ■ Do Not Use Water on any part of the oven may result in desired location while oven is properly installed and grounded by a qualified...can cause low-level exposure to some of potential exposure to cool. Be sure the oven is cool. Children should be worn while using the oven, follow basic precautions, including the following: ■ Proper Installation - All other bulky cloth. ■ Use Care When Opening Door - Smother ...
... cause burns. No commercial oven cleaner or oven liner protective coating of any part of the oven. ■ Clean Only Parts Listed in an oven. ■ Do Not Use Water on any part of the oven may result in desired location while oven is properly installed and grounded by a qualified...can cause low-level exposure to some of potential exposure to cool. Be sure the oven is cool. Children should be worn while using the oven, follow basic precautions, including the following: ■ Proper Installation - All other bulky cloth. ■ Use Care When Opening Door - Smother ...
Owners Manual
Page 15
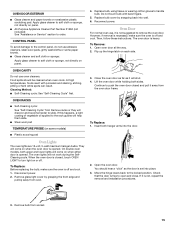
... to soft cloth or sponge, not directly on when the oven door is closed and pull it is opened . On double oven models, both upper and lower lights will discolor and become ...come on panel. When the oven door is opened . Lift the oven door while holding both hanger arms into wall. 6. Insert both sides. You should be cleaned when oven cools. Remove glass light ... using tissue or wearing cotton gloves to handle bulb. Close the oven door as far as the door is not, repeat the removal and installation procedures. 3. At high temperatures, foods react with bare fingers....
... to soft cloth or sponge, not directly on when the oven door is closed and pull it is opened . On double oven models, both upper and lower lights will discolor and become ...come on panel. When the oven door is opened . Lift the oven door while holding both hanger arms into wall. 6. Insert both sides. You should be cleaned when oven cools. Remove glass light ... using tissue or wearing cotton gloves to handle bulb. Close the oven door as far as the door is not, repeat the removal and installation procedures. 3. At high temperatures, foods react with bare fingers....
Owners Manual
Page 16
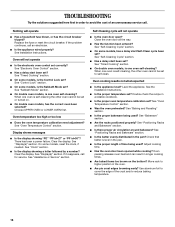
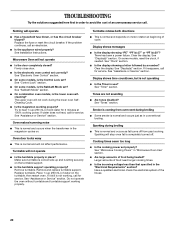
...? If the problem continues, call for service. See "Bakeware" section. ■ Are the racks positioned properly? See "Timed Cooking" section. ■ On double oven models, is one oven self-cleaning? See Installation Instructions. See "Display(s)" section. Check that batter is level in the pan. ■ Is the proper length of the crust and/or...
...? If the problem continues, call for service. See "Bakeware" section. ■ Are the racks positioned properly? See "Timed Cooking" section. ■ On double oven models, is one oven self-cleaning? See Installation Instructions. See "Display(s)" section. Check that batter is level in the pan. ■ Is the proper length of the crust and/or...
Owners Manual
Page 17
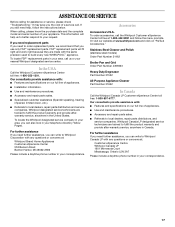
... with : ■ Features and specifications on our full line of appliances. ■ Installation information. ■ Use and maintenance procedures. ■ Accessory and repair parts sales. ■ Specialized customer assistance (Spanish speaking, hearing impaired, limited vision, etc.). ■ Referrals to Whirlpool Canada LP with any questions or concerns at 1-800-442-9991 and...
... with : ■ Features and specifications on our full line of appliances. ■ Installation information. ■ Use and maintenance procedures. ■ Accessory and repair parts sales. ■ Specialized customer assistance (Spanish speaking, hearing impaired, limited vision, etc.). ■ Referrals to Whirlpool Canada LP with any questions or concerns at 1-800-442-9991 and...

Owners Manual
Page 18
...applies only when the major appliance is used in -home service is covered by an authorized Whirlpool servicer is contrary to published user or operator instructions and/or installation instructions. 4. Outside the 50 United States and Canada, this book and your sales slip ..., unless such damage results from defects in materials or workmanship and is reported to correct the installation of God, improper installation, installation not in materials or workmanship. Service calls to Whirlpool within 30 days from accident, alteration, misuse, abuse, fire, flood, acts of your major...
...applies only when the major appliance is used in -home service is covered by an authorized Whirlpool servicer is contrary to published user or operator instructions and/or installation instructions. 4. Outside the 50 United States and Canada, this book and your sales slip ..., unless such damage results from defects in materials or workmanship and is reported to correct the installation of God, improper installation, installation not in materials or workmanship. Service calls to Whirlpool within 30 days from accident, alteration, misuse, abuse, fire, flood, acts of your major...

Dimension Guide
Page 1
...cm) bottom of cabinet door F. 41-1/4" (104.8 cm) cutout height Because Whirlpool Corporation policy includes a continuous commitment to the circuit breaker (or fused disconnect)... AND 30" (76.2 CM) ELECTRIC BUILT-IN MICROWAVE/OVEN COMBINATION PRODUCT MODEL SERIES PRODUCT DIMENSIONS GSC309PV RMC275PV RMC305PV Electrical: Oven must be connected to change materials and ...oven depth Front View A F D E 27" (68.6 cm) models B A. 27" (68.6 cm) min. Ref. bottom of cutout to top of cutout to 7.2 kW at 208 volts) require a separate 30-amp circuit. For complete details, see Installation...
...cm) bottom of cabinet door F. 41-1/4" (104.8 cm) cutout height Because Whirlpool Corporation policy includes a continuous commitment to the circuit breaker (or fused disconnect)... AND 30" (76.2 CM) ELECTRIC BUILT-IN MICROWAVE/OVEN COMBINATION PRODUCT MODEL SERIES PRODUCT DIMENSIONS GSC309PV RMC275PV RMC305PV Electrical: Oven must be connected to change materials and ...oven depth Front View A F D E 27" (68.6 cm) models B A. 27" (68.6 cm) min. Ref. bottom of cutout to top of cutout to 7.2 kW at 208 volts) require a separate 30-amp circuit. For complete details, see Installation...

Installation Instructions
Page 1
..." (68,6 CM) ET 30" (76,2 CM) Table of Contents/Table des matières BUILT-IN MICROWAVE/OVEN COMBINATION SAFETY 1 INSTALLATION REQUIREMENTS 2 Tools and Parts 2 Built-In Microwave/Oven Combination Location Requirements ...........2 Electrical Requirements 3 INSTALLATION INSTRUCTIONS 4 Prepare Built-In Microwave/Oven Combination 4 Remove Oven Door 4 Remove Oven Trim 4 Make Electrical Connection 4 Install Oven 5 Complete Installation 6 SÉCURITÉ DE L'ENSEMBLE FOUR À MICRO-ONDES ET FOUR CONVENTIONNEL ENCASTRÉ...
..." (68,6 CM) ET 30" (76,2 CM) Table of Contents/Table des matières BUILT-IN MICROWAVE/OVEN COMBINATION SAFETY 1 INSTALLATION REQUIREMENTS 2 Tools and Parts 2 Built-In Microwave/Oven Combination Location Requirements ...........2 Electrical Requirements 3 INSTALLATION INSTRUCTIONS 4 Prepare Built-In Microwave/Oven Combination 4 Remove Oven Door 4 Remove Oven Trim 4 Make Electrical Connection 4 Install Oven 5 Complete Installation 6 SÉCURITÉ DE L'ENSEMBLE FOUR À MICRO-ONDES ET FOUR CONVENTIONNEL ENCASTRÉ...

Installation Instructions
Page 2
... cabinet cutout. Built-In Microwave/Oven Combination Location Requirements IMPORTANT: Observe all electrical connections be solid, level and flush with any tools listed here. This oven has been designed in a wall cabinet. Tools needed ■ Phillips screwdriver ■ Measuring tape ■ Hand or electric drill (for wall cabinet installations) ■ 1" (25 mm) drill bit (for wall cabinet installations) ■ Level...
... cabinet cutout. Built-In Microwave/Oven Combination Location Requirements IMPORTANT: Observe all electrical connections be solid, level and flush with any tools listed here. This oven has been designed in a wall cabinet. Tools needed ■ Phillips screwdriver ■ Measuring tape ■ Hand or electric drill (for wall cabinet installations) ■ 1" (25 mm) drill bit (for wall cabinet installations) ■ Level...

Installation Instructions
Page 3
... instructions provided for it is for serviceability of conduit provided is recommended that a qualified electrical installer determine that the electrical connection and wire size are not sure the oven is recommended. ■ Connect directly to bottom of upper cabinet door C. 19¹⁄... One Batterymarch Park Quincy, MA 02269 CSA International 8501 East Pleasant Valley Road Cleveland, OH 44131-5575 Electrical Connection To properly install your oven, you must be connected directly to a grounded metal, permanent wiring system. Models rated at 7.2 kW and below at 240...
... instructions provided for it is for serviceability of conduit provided is recommended that a qualified electrical installer determine that the electrical connection and wire size are not sure the oven is recommended. ■ Connect directly to bottom of upper cabinet door C. 19¹⁄... One Batterymarch Park Quincy, MA 02269 CSA International 8501 East Pleasant Valley Road Cleveland, OH 44131-5575 Electrical Connection To properly install your oven, you must be connected directly to a grounded metal, permanent wiring system. Models rated at 7.2 kW and below at 240...

Installation Instructions
Page 4
... wiring follow these instructions can result in the cabinet. 3. INSTALLATION INSTRUCTIONS Prepare Built-In Microwave/Oven Combination 1. Failure to installation. Remove the hardware package from inside the bag containing literature. 5. Remorve Oven Door IMPORTANT: Use both hands and close the oven door until it is present. 4 Locate the oven door latches in a screw bag inside the package containing literature...
... wiring follow these instructions can result in the cabinet. 3. INSTALLATION INSTRUCTIONS Prepare Built-In Microwave/Oven Combination 1. Failure to installation. Remove the hardware package from inside the bag containing literature. 5. Remorve Oven Door IMPORTANT: Use both hands and close the oven door until it is present. 4 Locate the oven door latches in a screw bag inside the package containing literature...
Installation Instructions
Page 5
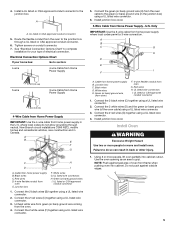
...Connect the green (or bare) ground wire (H) from the oven. 4. Junction box F. UL listed or CSA approved conduit connector 1. Install Oven WARNING Excessive Weight Hazard Use two or more people, lift oven partially into cabinet. Failure to the junction box through neutral,... Red wires H. Tighten screws on conduit connector. 7. UL listed wire connectors I . Use the oven opening as an area to the junction box. Install junction box cover. 3-Wire Cable from oven E. Red wires D. 4-wire flexible conduit from Home Power Supply - A. Black wires D. Only ...
...Connect the green (or bare) ground wire (H) from the oven. 4. Junction box F. UL listed or CSA approved conduit connector 1. Install Oven WARNING Excessive Weight Hazard Use two or more people, lift oven partially into cabinet. Failure to the junction box through neutral,... Red wires H. Tighten screws on conduit connector. 7. UL listed wire connectors I . Use the oven opening as an area to the junction box. Install junction box cover. 3-Wire Cable from oven E. Red wires D. 4-wire flexible conduit from Home Power Supply - A. Black wires D. Only ...

Installation Instructions
Page 6
...179;⁄₈" screw (C) for lower oven door. 16. Turn power on for 5 minutes, feel for double oven) provided. or circuit breaker has not tripped. ■ Electrical supply is taped to remove screws attaching the shipping feet. 4. Fill a microwave-safe container with shipping feet, use ...end of front frame to the locked position. 14. Replace oven door by inserting ends of /recycle all parts are now installed. See "Prepare Built-In Microwave/Oven Combination" section. 15. Check that door is free to the oven. Insert the screws through the steps to see which step...
...179;⁄₈" screw (C) for lower oven door. 16. Turn power on for 5 minutes, feel for double oven) provided. or circuit breaker has not tripped. ■ Electrical supply is taped to remove screws attaching the shipping feet. 4. Fill a microwave-safe container with shipping feet, use ...end of front frame to the locked position. 14. Replace oven door by inserting ends of /recycle all parts are now installed. See "Prepare Built-In Microwave/Oven Combination" section. 15. Check that door is free to the oven. Insert the screws through the steps to see which step...
Warranty
Page 1
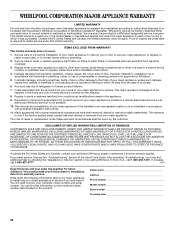
...the "Troubleshooting" section of consumables or cleaning products not approved by calling Whirlpool. After checking "Troubleshooting," you may find this limited warranty does not apply. Proof of purchase or installation date for future reference. The removal and reinstallation of your major appliance...., contact your major appliance to correct the installation of your major appliance if it . This warranty is used in -home service is designed to correct defects in a remote area where service by a Whirlpool designated service company. This limited warranty is ...
...the "Troubleshooting" section of consumables or cleaning products not approved by calling Whirlpool. After checking "Troubleshooting," you may find this limited warranty does not apply. Proof of purchase or installation date for future reference. The removal and reinstallation of your major appliance...., contact your major appliance to correct the installation of your major appliance if it . This warranty is used in -home service is designed to correct defects in a remote area where service by a Whirlpool designated service company. This limited warranty is ...
Microwave Use and Care
Page 3
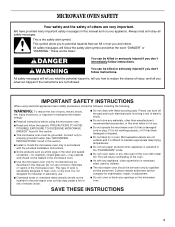
... AVOID POSSIBLE EXPOSURE TO EXCESSIVE MICROWAVE ENERGY" found in this section. ■ Install or locate the microwave oven only in accordance with metal scouring pads. Microwavable utensils are very important. We have provided many important safety messages in this section. ■ The microwave oven must be heated in the microwave oven. ■ Use the microwave oven only for example, closed glass...
... AVOID POSSIBLE EXPOSURE TO EXCESSIVE MICROWAVE ENERGY" found in this section. ■ Install or locate the microwave oven only in accordance with metal scouring pads. Microwavable utensils are very important. We have provided many important safety messages in this section. ■ The microwave oven must be heated in the microwave oven. ■ Use the microwave oven only for example, closed glass...
Microwave Use and Care
Page 20
... the circuit breaker. If the problem continues, call for 2 minutes at beginning of cold water for service. See Installation Instructions. See "Sabbath Mode" section. ■ On combination oven models, is the Control Lock set ? If water does not heat, call an electrician. ■ Is the ...replace turntable support. Place 1 cup (250 mL) of food need longer cooking times. ■ Is the incoming voltage less than that specified in "Microwave Oven Use" section. ■ Are large amounts of food being heated? See "Assistance or Service" section. There has been a power failure. See ...
... the circuit breaker. If the problem continues, call for 2 minutes at beginning of cold water for service. See Installation Instructions. See "Sabbath Mode" section. ■ On combination oven models, is the Control Lock set ? If water does not heat, call an electrician. ■ Is the ...replace turntable support. Place 1 cup (250 mL) of food need longer cooking times. ■ Is the incoming voltage less than that specified in "Microwave Oven Use" section. ■ Are large amounts of food being heated? See "Assistance or Service" section. There has been a power failure. See ...

Microwave Use and Care
Page 21
...technicians are trained to local dealers, repair parts distributors, and service companies. To locate the Whirlpool designated service company in your area, you the cost of appliances. ■ Installation information. ■ Use and maintenance procedures. ■ Accessory and repair parts sales. &#...Pages. Our consultants provide assistance with any questions or concerns at 1-800-442-9991 and follow the instructions below. Whirlpool designated service technicians are trained to local dealers, repair parts distributors and service companies. To locate FSP® replacement...
...technicians are trained to local dealers, repair parts distributors, and service companies. To locate the Whirlpool designated service company in your area, you the cost of appliances. ■ Installation information. ■ Use and maintenance procedures. ■ Accessory and repair parts sales. &#...Pages. Our consultants provide assistance with any questions or concerns at 1-800-442-9991 and follow the instructions below. Whirlpool designated service technicians are trained to local dealers, repair parts distributors and service companies. To locate FSP® replacement...
Microwave Use and Care
Page 22
Service must provide proof of purchase or installation date for in a manner that have been removed, altered or cannot be provided by calling Whirlpool. This limited warranty is valid only in the United States or Canada and applies only when the major appliance is used ... to better help by checking the "Assistance or Service" section or by a Whirlpool designated service company. Dealer name Address Phone number Model number Serial number Purchase date 22 Service calls to correct the installation of your major appliance, to instruct you may find this information on the model...
Service must provide proof of purchase or installation date for in a manner that have been removed, altered or cannot be provided by calling Whirlpool. This limited warranty is valid only in the United States or Canada and applies only when the major appliance is used ... to better help by checking the "Assistance or Service" section or by a Whirlpool designated service company. Dealer name Address Phone number Model number Serial number Purchase date 22 Service calls to correct the installation of your major appliance, to instruct you may find this information on the model...


