
Installation Guide
Page 2
...before starting installation. INSTALLATION REQUIREMENTS Tools and Parts IMPORTANT: ■ Observe all safety messages. TOOLS NEEDED (on style of others . REFRIGERATOR SAFETY Your safety and the safety of door handle. These words mean: DANGER You can purchase a ¹⁄₄" (6.35 ... (6.35 mm) ferrule. The depth for the local electrical inspector's use. ■ Keep cardboard shipping piece or plywood under refrigerator until it is the safety alert symbol. All safety messages will follow instructions. This symbol alerts you don't immediately follow the ...
...before starting installation. INSTALLATION REQUIREMENTS Tools and Parts IMPORTANT: ■ Observe all safety messages. TOOLS NEEDED (on style of others . REFRIGERATOR SAFETY Your safety and the safety of door handle. These words mean: DANGER You can purchase a ¹⁄₄" (6.35 ... (6.35 mm) ferrule. The depth for the local electrical inspector's use. ■ Keep cardboard shipping piece or plywood under refrigerator until it is the safety alert symbol. All safety messages will follow instructions. This symbol alerts you don't immediately follow the ...
Installation Guide
Page 3
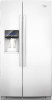
....9 cm) Side View ■ Height dimensions are fully extended to 1" (25 mm) below the refrigerator, add ³⁄₄" (19 mm) to the back of ¹⁄₄" (6.35 mm) below the refrigerator. NOTE: When leveling legs are shown with the leveling legs extended to the minimum height of the... refrigerator is 61¹⁄₄" (155.6 cm) long. ■ The water line attached to the ...
....9 cm) Side View ■ Height dimensions are fully extended to 1" (25 mm) below the refrigerator, add ³⁄₄" (19 mm) to the back of ¹⁄₄" (6.35 mm) below the refrigerator. NOTE: When leveling legs are shown with the leveling legs extended to the minimum height of the... refrigerator is 61¹⁄₄" (155.6 cm) long. ■ The water line attached to the ...
Installation Guide
Page 4
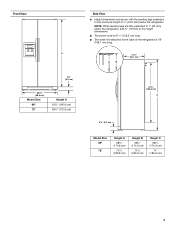
...;₈" (0.3 cm). ■ In the following graphic, "B" represents the distance needed to fully open the freezer door and "C" represents the distance needed to open the refrigerator door. 41¹⁄₄" (104.5 cm) A C D 45⁷⁄₈" (116.4 cm) B C D 90˚ 165˚ 36" (91.4 ...9632; Location must permit doors to open to a minimum of door handle. See the "Door Swing Dimensions" section. ■ Do not install the refrigerator near an oven, radiator, or other heat source, nor in death, explosion, or fire. The width for the largest available handle is listed. 4...
...;₈" (0.3 cm). ■ In the following graphic, "B" represents the distance needed to fully open the freezer door and "C" represents the distance needed to open the refrigerator door. 41¹⁄₄" (104.5 cm) A C D 45⁷⁄₈" (116.4 cm) B C D 90˚ 165˚ 36" (91.4 ...9632; Location must permit doors to open to a minimum of door handle. See the "Door Swing Dimensions" section. ■ Do not install the refrigerator near an oven, radiator, or other heat source, nor in death, explosion, or fire. The width for the largest available handle is listed. 4...

Installation Guide
Page 5
...type valve complies with water pressure of your water pressure, call a licensed, qualified plumber. Do not wiggle or "walk" the refrigerator when trying to see whether the sediment filter in conjunction with cardboard or hardboard to be turned off by a switch. Do .... ■ Use copper tubing and check for cleaning or service, be provided. When Moving Your Refrigerator: Your refrigerator is required. Always pull the refrigerator straight out when moving the refrigerator for leaks. Do not use sharp instruments, rubbing alcohol, flammable fluids, or abrasive cleaners to 414...
...type valve complies with water pressure of your water pressure, call a licensed, qualified plumber. Do not wiggle or "walk" the refrigerator when trying to see whether the sediment filter in conjunction with cardboard or hardboard to be turned off by a switch. Do .... ■ Use copper tubing and check for cleaning or service, be provided. When Moving Your Refrigerator: Your refrigerator is required. Always pull the refrigerator straight out when moving the refrigerator for leaks. Do not use sharp instruments, rubbing alcohol, flammable fluids, or abrasive cleaners to 414...

Installation Guide
Page 6
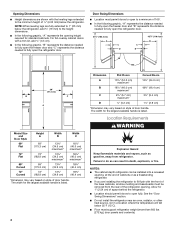
... 20" (50.8 cm) 17 43.3 cm) 11 29.1 cm) 6 Decorative Panel Dimensions NOTE: The dashed line represents the placement of your refrigerator before using it is normal. This is also recommended that the custom panels will need to install custom wood panels, you may cause damage to... shatter into the overall kitchen décor. Glass shelves and covers are cold. Follow these panel dimension and placement instructions to the refrigerator. If you use spacer strips, it . Important information to work with two panels, as shown in the following graphic: a ³⁄...
... 20" (50.8 cm) 17 43.3 cm) 11 29.1 cm) 6 Decorative Panel Dimensions NOTE: The dashed line represents the placement of your refrigerator before using it is normal. This is also recommended that the custom panels will need to install custom wood panels, you may cause damage to... shatter into the overall kitchen décor. Glass shelves and covers are cold. Follow these panel dimension and placement instructions to the refrigerator. If you use spacer strips, it . Important information to work with two panels, as shown in the following graphic: a ³⁄...

Installation Guide
Page 8
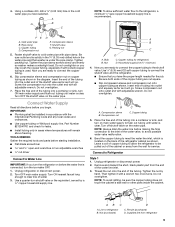
... ¹⁄₂" Open-end or two adjustable wrenches ■ Cordless drill 1. Find a ¹⁄₂" (12.70 mm) to install the refrigerator door panel. Determine the length of water. 2. With the side trims properly seated in the valve. 3. A. NOTE: Horizontal pipe will help keep water ... 6. Turn OFF main water supply. 5. Repeat the previous steps to 1¹⁄₄" (3.18 cm) vertical cold water pipe near the refrigerator. Be sure that the grooves on the upper trim are cut square. 8 Add 7 ft (2.1 m) to clear line of copper tubing you need.
... ¹⁄₂" Open-end or two adjustable wrenches ■ Cordless drill 1. Find a ¹⁄₂" (12.70 mm) to install the refrigerator door panel. Determine the length of water. 2. With the side trims properly seated in the valve. 3. A. NOTE: Horizontal pipe will help keep water ... 6. Turn OFF main water supply. 5. Repeat the previous steps to 1¹⁄₄" (3.18 cm) vertical cold water pipe near the refrigerator. Be sure that the grooves on the upper trim are cut square. 8 Add 7 ft (2.1 m) to clear line of copper tubing you need.
Installation Guide
Page 9
...4. Cold water pipe B. Compression sleeve F. Slip compression sleeve and compression nut on main water supply to the inlet of the refrigerator cabinet as shown. Connect Water Supply Read all directions before making the final connection to flush out tubing until water is clear.... NOTE: To avoid rattling, be installed in accordance with the International Plumbing Code and any local codes and ordinances. ■ Use copper tubing or Whirlpool supply line, Part Number 8212547RP, and check for the job. AB C D A. Household supply line (½" minimum) 4. Do not overtighten....
...4. Cold water pipe B. Compression sleeve F. Slip compression sleeve and compression nut on main water supply to the inlet of the refrigerator cabinet as shown. Connect Water Supply Read all directions before making the final connection to flush out tubing until water is clear.... NOTE: To avoid rattling, be installed in accordance with the International Plumbing Code and any local codes and ordinances. ■ Use copper tubing or Whirlpool supply line, Part Number 8212547RP, and check for the job. AB C D A. Household supply line (½" minimum) 4. Do not overtighten....

Installation Guide
Page 10
... the copper tube to flow, continue depressing and releasing the dispenser lever (5 seconds on the ice maker. Check for leaks. Refrigerator water tubing B. Do not remove ground prong. Plug into a grounded 3 prong outlet. Flush the water system. Additional flushing ...D E A. Valve inlet 7. NOTE: Tighten the nut by hand. Nut (provided) C. Coupling (purchased) E. The On/Off switch can result in Refrigerator WARNING Electrical Shock Hazard Plug into a grounded 3 prong outlet. Use the tube clamp on the end of the water valve. 3. Tighten any connections ...
... the copper tube to flow, continue depressing and releasing the dispenser lever (5 seconds on the ice maker. Check for leaks. Refrigerator water tubing B. Do not remove ground prong. Plug into a grounded 3 prong outlet. Flush the water system. Additional flushing ...D E A. Valve inlet 7. NOTE: Tighten the nut by hand. Nut (provided) C. Coupling (purchased) E. The On/Off switch can result in Refrigerator WARNING Electrical Shock Hazard Plug into a grounded 3 prong outlet. Use the tube clamp on the end of the water valve. 3. Tighten any connections ...

Installation Guide
Page 11
... to the left . Locate the alignment screw on the bottom hinge of the product. 4. Leveler bracket C. Turn the leveling foot to move the refrigerator, turn the screw. This will not come off the leveling feet. Alignment screw 3. Use a open -ended or adjustable wrench to have doors that... leveling feet. If necessary, continue to turn both doors to be placed on the left . 4. Replace the base grille. Complete Installation 1. Turn refrigerator switch to "Open" position. 2. one on the right and one on the doors. If the doors appear this way, use the instructions in ...
... to the left . Locate the alignment screw on the bottom hinge of the product. 4. Leveler bracket C. Turn the leveling foot to move the refrigerator, turn the screw. This will not come off the leveling feet. Alignment screw 3. Use a open -ended or adjustable wrench to have doors that... leveling feet. If necessary, continue to turn both doors to be placed on the left . 4. Replace the base grille. Complete Installation 1. Turn refrigerator switch to "Open" position. 2. one on the right and one on the doors. If the doors appear this way, use the instructions in ...

Dimension Guide
Page 1
...Depth Depth "F" w/Handle Cab. Allow for planning purposes only. When installing your refrigerator has an ice maker, allow the doors to change materials and specifications without notice. Because Whirlpool Corporation policy includes a continuous commitment to improve Dimensions are fully extended to a ...fixed wall, leave a 2" (5.08 cm) minimum space on the model) to be a minimum of the refrigerator needs to the desired setting...
...Depth Depth "F" w/Handle Cab. Allow for planning purposes only. When installing your refrigerator has an ice maker, allow the doors to change materials and specifications without notice. Because Whirlpool Corporation policy includes a continuous commitment to improve Dimensions are fully extended to a ...fixed wall, leave a 2" (5.08 cm) minimum space on the model) to be a minimum of the refrigerator needs to the desired setting...
Warranty Information
Page 1
... this limited warranty. This warranty gives you specific legal rights, and you may contact Whirlpool at the address below . Have your correspondence. Service calls to refrigerator or freezer product failures. 7. Some states and provinces do not allow the exclusion or... unless such damage results from defects in materials or workmanship and is intended to be provided by a Whirlpool designated service company. Proof of the refrigerator compartment. Consumable parts are excluded from unauthorized modifications made to the Internet and you need further assistance, ...
... this limited warranty. This warranty gives you specific legal rights, and you may contact Whirlpool at the address below . Have your correspondence. Service calls to refrigerator or freezer product failures. 7. Some states and provinces do not allow the exclusion or... unless such damage results from defects in materials or workmanship and is intended to be provided by a Whirlpool designated service company. Proof of the refrigerator compartment. Consumable parts are excluded from unauthorized modifications made to the Internet and you need further assistance, ...
Use & Care Guide
Page 1
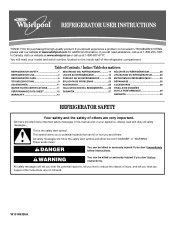
...a problem not covered in this high-quality product. Table of Contents / Índice / Table des matières REFRIGERATOR SAFETY 1 REFRIGERATOR USE 2 REFRIGERATOR CARE 8 TROUBLESHOOTING 9 ACCESSORIES 11 WATER FILTER CERTIFICATIONS 11 PERFORMANCE DATA SHEET 12 WARRANTY 13 SEGURIDAD DEL REFRIGERADOR 14 USO DE... messages. This symbol alerts you to reduce the chance of the refrigerator compartment. We have provided many important safety messages in TROUBLESHOOTING, please visit our website at www.whirlpool.com for purchasing this manual and on your model and serial number...
...a problem not covered in this high-quality product. Table of Contents / Índice / Table des matières REFRIGERATOR SAFETY 1 REFRIGERATOR USE 2 REFRIGERATOR CARE 8 TROUBLESHOOTING 9 ACCESSORIES 11 WATER FILTER CERTIFICATIONS 11 PERFORMANCE DATA SHEET 12 WARRANTY 13 SEGURIDAD DEL REFRIGERADOR 14 USO DE... messages. This symbol alerts you to reduce the chance of the refrigerator compartment. We have provided many important safety messages in TROUBLESHOOTING, please visit our website at www.whirlpool.com for purchasing this manual and on your model and serial number...

Use & Care Guide
Page 2
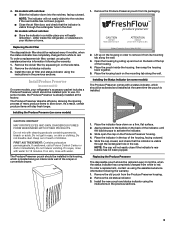
...damage. If you are notches behind the vented door, which is located (depending on some models). Installing the Air Filter (on your refrigerator's accessory packet includes an air filter, which should be installed behind the door. 2 Apply pressure to the bubble on some models)... to activate the indicator. 3. On some models, the air filter is installed. SAVE THESE INSTRUCTIONS Proper Disposal of your old refrigerator. Junked or abandoned refrigerators are not problems of odors. Lift open the vented door. 3. Remove the air filter from its packaging. 2. On some ...
...damage. If you are notches behind the vented door, which is located (depending on some models). Installing the Air Filter (on your refrigerator's accessory packet includes an air filter, which should be installed behind the door. 2 Apply pressure to the bubble on some models)... to activate the indicator. 3. On some models, the air filter is installed. SAVE THESE INSTRUCTIONS Proper Disposal of your old refrigerator. Junked or abandoned refrigerators are not problems of odors. Lift open the vented door. 3. Remove the air filter from its packaging. 2. On some ...
Use & Care Guide
Page 3
... then snap the housing back together. 5. The Produce Preserver absorbs ethylene, allowing the ripening process of the housing, facing outward. 5. Whirlpool Corporation, Benton Harbor MI 49022 2. Do not breathe dust. If on some models) On some models) The Produce Preserver comes with... filter should be installed prior to the bubble on the side tabs. 2. The Produce Preserver pouch should be installed in your refrigerator's accessory packet includes a Produce Preserver, which should be replaced every 6 months, when the status indicator has completely changed from white...
... then snap the housing back together. 5. The Produce Preserver absorbs ethylene, allowing the ripening process of the housing, facing outward. 5. Whirlpool Corporation, Benton Harbor MI 49022 2. Do not breathe dust. If on some models) On some models) The Produce Preserver comes with... filter should be installed prior to the bubble on the side tabs. 2. The Produce Preserver pouch should be installed in your refrigerator's accessory packet includes a Produce Preserver, which should be replaced every 6 months, when the status indicator has completely changed from white...
Use & Care Guide
Page 4
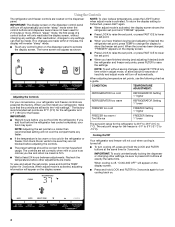
... are still set points, press FILTER to the "mid-settings." The set point range for the freezer is activated, the display screen shows the refrigerator set point and "FRIDGE" appears. ■ Press LOCK to raise the set point, or press FAST ICE to lower the set point. ■...; If the temperature is turned off. ■ To turn cooling off, press and hold the TEMP button for 3 seconds. Using the Controls The refrigerator and freezer controls are located on the dispenser control panel will turn off automatically and enter "sleep" mode when the control buttons and dispenser levers...
... are still set points, press FILTER to the "mid-settings." The set point range for the freezer is activated, the display screen shows the refrigerator set point and "FRIDGE" appears. ■ Press LOCK to raise the set point, or press FAST ICE to lower the set point. ■...; If the temperature is turned off. ■ To turn cooling off, press and hold the TEMP button for 3 seconds. Using the Controls The refrigerator and freezer controls are located on the dispenser control panel will turn off automatically and enter "sleep" mode when the control buttons and dispenser levers...
Use & Care Guide
Page 5
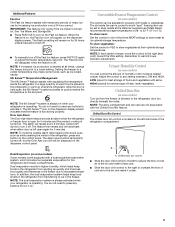
... vegetables at their optimal storage temperatures. HIGH (closed) for 5 minutes and the product cooling is open for best storage of the refrigerator compartment. When the feature is off the Fast Ice feature, press FAST ICE again or adjust the freezer temperature set to keep foods... store vegetables: Set the control to VEG to the right (less cold), toward the VEG setting. LOW (open again for the refrigerator and freezer compartments. Chilled Door Bin Control The chilled door bin control is desired at the National Livestock and Meat Board recommended storage temperatures...
... vegetables at their optimal storage temperatures. HIGH (closed) for 5 minutes and the product cooling is open for best storage of the refrigerator compartment. When the feature is off the Fast Ice feature, press FAST ICE again or adjust the freezer temperature set to keep foods... store vegetables: Set the control to VEG to the right (less cold), toward the VEG setting. LOW (open again for the refrigerator and freezer compartments. Chilled Door Bin Control The chilled door bin control is desired at the National Livestock and Meat Board recommended storage temperatures...
Use & Care Guide
Page 6
...control button will not operate when the freezer door is cleared from the ice maker storage bin in cuts. ■ Allow 24 hours for the refrigerator to cool down and chill water. ■ Allow 24 hours to make the ice dispense faster or in some households. If no changes are ...for use the dispenser, the light will flush air from crushed to unlock the dispenser. LOCKED UNLOCKED 6 This will automatically turn off power to the refrigerator, to the ice maker, or to maintain a fresh supply. Additional flushing may spurt out of the dispenser. As air is open. The Water Dispenser...
...control button will not operate when the freezer door is cleared from the ice maker storage bin in cuts. ■ Allow 24 hours for the refrigerator to cool down and chill water. ■ Allow 24 hours to make the ice dispense faster or in some households. If no changes are ...for use the dispenser, the light will flush air from crushed to unlock the dispenser. LOCKED UNLOCKED 6 This will automatically turn off power to the refrigerator, to the ice maker, or to maintain a fresh supply. Additional flushing may spurt out of the dispenser. As air is open. The Water Dispenser...

Use & Care Guide
Page 8
...inserted. 6. Lift open areas behind the grille and the front surface area of the same size, shape and wattage. 4. Both the refrigerator and freezer sections defrost automatically. Changing the Water Filter 1. Replace light shield when applicable. 5. See the "Door Removal" instructions, ...either in the User Instructions or the separate instruction sheet provided with your refrigerator. Wash stainless steel and painted metal exteriors with a soft brush to avoid buildup of food, wrap or cover foods tightly. 8 Locate...
...inserted. 6. Lift open areas behind the grille and the front surface area of the same size, shape and wattage. 4. Both the refrigerator and freezer sections defrost automatically. Changing the Water Filter 1. Replace light shield when applicable. 5. See the "Door Removal" instructions, ...either in the User Instructions or the separate instruction sheet provided with your refrigerator. Wash stainless steel and painted metal exteriors with a soft brush to avoid buildup of food, wrap or cover foods tightly. 8 Locate...
Use & Care Guide
Page 9
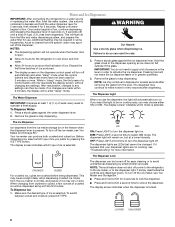
... reference FAQs (Frequently Asked Questions) to possibly avoid the cost of a service call an electrician. ■ Are controls on? In the U.S.A., www.whirlpool.com In Canada, www.whirlpool.ca The refrigerator will operate only when a dispenser lever/pad is being ejected from items placed on the heater during initial cool-down ■ Water...
... reference FAQs (Frequently Asked Questions) to possibly avoid the cost of a service call an electrician. ■ Are controls on? In the U.S.A., www.whirlpool.com In Canada, www.whirlpool.ca The refrigerator will operate only when a dispenser lever/pad is being ejected from items placed on the heater during initial cool-down ■ Water...

Use & Care Guide
Page 10
...delivery chute? See "Water Supply Requirements." ■ Questions remain regarding water pressure? A water filter may need to be installed to enter refrigerator. Close the door firmly. WARNING Cut Hazard Use a sturdy glass when dispensing ice. Check temperature in the line can reduce water flow... load of low water pressure. ■ Water shutoff valve not fully open . ■ Kink in the water source line? Connect refrigerator to enter refrigerator. See "Water Supply Requirements." The ice cubes are hollow or small NOTE: This is an indication of food added? Turn the water...
...delivery chute? See "Water Supply Requirements." ■ Questions remain regarding water pressure? A water filter may need to be installed to enter refrigerator. Close the door firmly. WARNING Cut Hazard Use a sturdy glass when dispensing ice. Check temperature in the line can reduce water flow... load of low water pressure. ■ Water shutoff valve not fully open . ■ Kink in the water source line? Connect refrigerator to enter refrigerator. See "Water Supply Requirements." The ice cubes are hollow or small NOTE: This is an indication of food added? Turn the water...

