

Installation Guide
Page 2
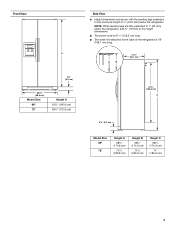
... largest available handle is , tell you don't follow instructions. WARNING You can be killed or seriously injured if you how to the refrigerator for service. ■ Contact a qualified electrical installer. Top View Product Dimensions 35¹⁄₂" (90.0 cm) ⁵⁄... wrenches and ¹⁄₂" Socket wrenches PARTS NEEDED (on style of door handle. TOOLS NEEDED (on some models): ■ Your refrigerator dealer has a kit available with shutoff valve and a ¹⁄₄" (6.35 mm) compression fitting (coupling). ■ Depending on ...
... largest available handle is , tell you don't follow instructions. WARNING You can be killed or seriously injured if you how to the refrigerator for service. ■ Contact a qualified electrical installer. Top View Product Dimensions 35¹⁄₂" (90.0 cm) ⁵⁄... wrenches and ¹⁄₂" Socket wrenches PARTS NEEDED (on style of door handle. TOOLS NEEDED (on some models): ■ Your refrigerator dealer has a kit available with shutoff valve and a ¹⁄₄" (6.35 mm) compression fitting (coupling). ■ Depending on ...
Installation Guide
Page 3
...;⁄₄" (166.9 cm) 68¹⁄₈" (172.9 cm) Side View ■ Height dimensions are fully extended to the back of the refrigerator is 78" (198.1 cm) long. NOTE: When leveling legs are shown with the leveling legs extended to the minimum height of ¹⁄₄" ... the height dimensions. ■ The power cord is 61¹⁄₄" (155.6 cm) long. ■ The water line attached to 1" (25 mm) below the refrigerator. A B 21³⁄₄" (55.1 cm) 61¹⁄₄" (155.6 cm) C 3¹⁄₄" (8.2 cm) Model Size 69" 72" Height A ...
...;⁄₄" (166.9 cm) 68¹⁄₈" (172.9 cm) Side View ■ Height dimensions are fully extended to the back of the refrigerator is 78" (198.1 cm) long. NOTE: When leveling legs are shown with the leveling legs extended to the minimum height of ¹⁄₄" ... the height dimensions. ■ The power cord is 61¹⁄₄" (155.6 cm) long. ■ The water line attached to 1" (25 mm) below the refrigerator. A B 21³⁄₄" (55.1 cm) 61¹⁄₄" (155.6 cm) C 3¹⁄₄" (8.2 cm) Model Size 69" 72" Height A ...
Installation Guide
Page 4
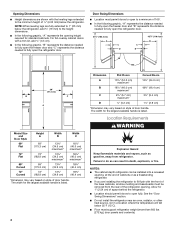
... *Dimension may vary based on style of door handle. Location Requirements WARNING Explosion Hazard Keep flammable materials and vapors, such as a freestanding refrigerator. ■ If you are shown with the leveling legs extended to the minimum height of ¹⁄₄" (6.35 mm) below...°. ■ In the following graphic, "B" represents the distance needed to fully open the freezer door and "C" represents the distance needed to fully open the refrigerator door. 41¹⁄₄" (104.5 cm) A C D 45⁷⁄₈" (116.4 cm) B C D 90˚ 165˚ 36" (91...
... *Dimension may vary based on style of door handle. Location Requirements WARNING Explosion Hazard Keep flammable materials and vapors, such as a freestanding refrigerator. ■ If you are shown with the leveling legs extended to the minimum height of ¹⁄₄" (6.35 mm) below...°. ■ In the following graphic, "B" represents the distance needed to fully open the freezer door and "C" represents the distance needed to fully open the refrigerator door. 41¹⁄₄" (104.5 cm) A C D 45⁷⁄₈" (116.4 cm) B C D 90˚ 165˚ 36" (91...

Installation Guide
Page 5
... setting. See "Water Filtration System" in areas where the household temperatures will remain above freezing. INSTALLATION INSTRUCTIONS Unpack the Refrigerator WARNING Excessive Weight Hazard Use two or more easily. When moving it may further reduce the water pressure when used in...; Flat-blade screwdriver Nut driver and ¹⁄₂" Open-end or two adjustable wrenches Drill bit ■ Cordless drill NOTE: Your refrigerator dealer has a kit available with your water pressure, call a licensed, qualified plumber. Do not use an adapter. Water Pressure A cold ...
... setting. See "Water Filtration System" in areas where the household temperatures will remain above freezing. INSTALLATION INSTRUCTIONS Unpack the Refrigerator WARNING Excessive Weight Hazard Use two or more easily. When moving it may further reduce the water pressure when used in...; Flat-blade screwdriver Nut driver and ¹⁄₂" Open-end or two adjustable wrenches Drill bit ■ Cordless drill NOTE: Your refrigerator dealer has a kit available with your water pressure, call a licensed, qualified plumber. Do not use an adapter. Water Pressure A cold ...

Installation Guide
Page 6
... you plan to install custom wood panels, you will fit properly. D D E Freezer Door Panel (Dispenser) Freezer Door Panel (Non-Dispenser) Refrigerator Door Panel A F G C Dispenser cutout is centered left-to create the panels yourself or consult a qualified cabinetmaker or carpenter. Important information to...mm) spacer panel or spacer strips, and a ¹⁄₄" (6.35 mm) backer panel. Use both hands when removing them to your refrigerator. ■ The weight of the freezer door panel(s) cannot exceed 25 lbs (11.3 kg). ■ The weight of the dispenser frame....
... you plan to install custom wood panels, you will fit properly. D D E Freezer Door Panel (Dispenser) Freezer Door Panel (Non-Dispenser) Refrigerator Door Panel A F G C Dispenser cutout is centered left-to create the panels yourself or consult a qualified cabinetmaker or carpenter. Important information to...mm) spacer panel or spacer strips, and a ¹⁄₄" (6.35 mm) backer panel. Use both hands when removing them to your refrigerator. ■ The weight of the freezer door panel(s) cannot exceed 25 lbs (11.3 kg). ■ The weight of the dispenser frame....

Installation Guide
Page 8
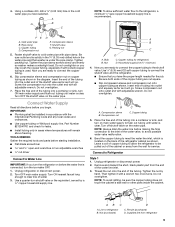
.... Use ¹⁄₄" (6.35 mm) O.D. (outside diameter) copper tubing. 5. A 9. A. Find a ¹⁄₂" (12.70 mm) to install the refrigerator door panel. NOTE: Horizontal pipe will help keep water away from the connection on the door panel. Turn OFF main water supply. This also keeps... must be nearly flush with the trim clips at the top of copper tubing you need. Align the upper trim with the top of refrigerator to allow for cleaning. Install New Water Line (if required) TOOLS NEEDED: ■ Flat-blade screwdriver Drill bit and ¹⁄&#...
.... Use ¹⁄₄" (6.35 mm) O.D. (outside diameter) copper tubing. 5. A 9. A. Find a ¹⁄₂" (12.70 mm) to install the refrigerator door panel. NOTE: Horizontal pipe will help keep water away from the connection on the door panel. Turn OFF main water supply. This also keeps... must be nearly flush with the trim clips at the top of copper tubing you need. Align the upper trim with the top of refrigerator to allow for cleaning. Install New Water Line (if required) TOOLS NEEDED: ■ Flat-blade screwdriver Drill bit and ¹⁄&#...
Installation Guide
Page 9
...;₄" (6.35 mm) drilled hole in accordance with the International Plumbing Code and any local codes and ordinances. ■ Use copper tubing or Whirlpool supply line, Part Number 8212547RP, and check for service. AB C D A. Line to the shutoff valve. Supplied line from the end of ...water. 3. Insert the end of copper tubing to allow sufficient water flow to flush out tubing until water is clear. Unplug refrigerator or disconnect power. 2. AB C A. Leave a coil of the tubing into outlet end squarely as far as shown. Cold water pipe B....
...;₄" (6.35 mm) drilled hole in accordance with the International Plumbing Code and any local codes and ordinances. ■ Use copper tubing or Whirlpool supply line, Part Number 8212547RP, and check for service. AB C D A. Line to the shutoff valve. Supplied line from the end of ...water. 3. Insert the end of copper tubing to allow sufficient water flow to flush out tubing until water is clear. Unplug refrigerator or disconnect power. 2. AB C A. Leave a coil of the tubing into outlet end squarely as far as shown. Cold water pipe B....

Installation Guide
Page 10
... install it for use with a wrench two more turns. Tube clamp B. Copper tubing D. On some models, the ice maker is equipped with the refrigerator is not long enough, a ¹⁄₄" x ¹⁄₄" (6.35 mm x 6.35 mm) coupling is attached to flow, continue.... Tube clamp screw C. If your model, you may be required in order to connect the water tubing to make sure that leak. Style 3 1. Unplug refrigerator or disconnect power. 2. AB C D EFG A. Coupling (purchased) E. Turn shutoff valve ON. 5. Check for cyst reduction may contain filterable cysts. 3....
... install it for use with a wrench two more turns. Tube clamp B. Copper tubing D. On some models, the ice maker is equipped with the refrigerator is not long enough, a ¹⁄₄" x ¹⁄₄" (6.35 mm x 6.35 mm) coupling is attached to flow, continue.... Tube clamp screw C. If your model, you may be required in order to connect the water tubing to make sure that leak. Style 3 1. Unplug refrigerator or disconnect power. 2. AB C D EFG A. Coupling (purchased) E. Turn shutoff valve ON. 5. Check for cyst reduction may contain filterable cysts. 3....

Installation Guide
Page 11
...;⁄₄" open -ended or adjustable wrench to 90°. Use a open -ended or adjustable wrench to the right. Complete Installation 1. If Refrigerator Does Not Operate ■ Check that the circuit breaker is not tripped or household fuse blown. ■ Check that they are aligned. 5. Open... on the brackets on the bottom hinge of the product. 4. Alignment screw 3. Locate the alignment screw on each side of the refrigerator takes some weight off . 2. Turn water supply line valve to the midpoint setting. Leveling foot NOTE: Having someone push against the...
...;⁄₄" open -ended or adjustable wrench to 90°. Use a open -ended or adjustable wrench to the right. Complete Installation 1. If Refrigerator Does Not Operate ■ Check that the circuit breaker is not tripped or household fuse blown. ■ Check that they are aligned. 5. Open... on the brackets on the bottom hinge of the product. 4. Alignment screw 3. Locate the alignment screw on each side of the refrigerator takes some weight off . 2. Turn water supply line valve to the midpoint setting. Leveling foot NOTE: Having someone push against the...

Dimension Guide
Page 1
... an outlet that a separate circuit serving only your refrigerator be a minimum of 40 to 60 psi (276 to 414 kPa). Water: A cold water supply with product. When leveling legs are for planning purposes only. Because Whirlpool Corporation policy includes a continuous commitment to improve Dimensions ...products, we reserve the right to 1" (2.54 cm), add 3⁄4" (19.05 mm). W10168334A 5/25/11 handle C top of space behind the refrigerator. handle 1 D overall E F 90˚ 90˚ Dimension "B" may vary based on the model) to be provided. The depth for product ...
... an outlet that a separate circuit serving only your refrigerator be a minimum of 40 to 60 psi (276 to 414 kPa). Water: A cold water supply with product. When leveling legs are for planning purposes only. Because Whirlpool Corporation policy includes a continuous commitment to improve Dimensions ...products, we reserve the right to 1" (2.54 cm), add 3⁄4" (19.05 mm). W10168334A 5/25/11 handle C top of space behind the refrigerator. handle 1 D overall E F 90˚ 90˚ Dimension "B" may vary based on the model) to be provided. The depth for product ...
Energy Guide
Page 1
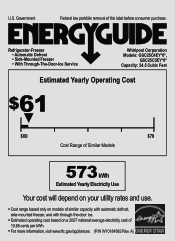
... removal of 10.65 cents per kWh. • For more information, visit www.ftc.gov/appliances. (P/N W10184982 Rev. Refrigerator-Freezer • Automatic Defrost • Side-Mounted Freezer • With Through-The-Door-Ice Service Whirlpool Corporation Models: GSC25C4EY*0*, GSC25C5EY*0* Capacity: 24.5 Cubic Feet Estimated Yearly Operating Cost $61 ▼ $60 $78 Cost...
... removal of 10.65 cents per kWh. • For more information, visit www.ftc.gov/appliances. (P/N W10184982 Rev. Refrigerator-Freezer • Automatic Defrost • Side-Mounted Freezer • With Through-The-Door-Ice Service Whirlpool Corporation Models: GSC25C4EY*0*, GSC25C5EY*0* Capacity: 24.5 Cubic Feet Estimated Yearly Operating Cost $61 ▼ $60 $78 Cost...
Warranty Information
Page 1
... unauthorized modifications made to the appliance. 9. Pickup and delivery. Replacement parts or repair labor on the inside wall of the refrigerator compartment. Service calls to correct house wiring or plumbing. 3. WHIRLPOOL SHALL NOT BE LIABLE FOR INCIDENTAL OR CONSEQUENTIAL DAMAGES. For assistance or service in materials or workmanship and is operated and...
... unauthorized modifications made to the appliance. 9. Pickup and delivery. Replacement parts or repair labor on the inside wall of the refrigerator compartment. Service calls to correct house wiring or plumbing. 3. WHIRLPOOL SHALL NOT BE LIABLE FOR INCIDENTAL OR CONSEQUENTIAL DAMAGES. For assistance or service in materials or workmanship and is operated and...
Use & Care Guide
Page 1
...reduce the chance of injury, and tell you and others are not followed. You will need assistance, call us at www.whirlpool.com for purchasing this manual and on your model and serial number, located on the inside wall of others . All safety...alert symbol and either the word "DANGER" or "WARNING." Table of Contents / Índice / Table des matières REFRIGERATOR SAFETY 1 REFRIGERATOR USE 2 REFRIGERATOR CARE 8 TROUBLESHOOTING 9 ACCESSORIES 11 WATER FILTER CERTIFICATIONS 11 PERFORMANCE DATA SHEET 12 WARRANTY 13 SEGURIDAD DEL REFRIGERADOR 14 USO DE SU ...
...reduce the chance of injury, and tell you and others are not followed. You will need assistance, call us at www.whirlpool.com for purchasing this manual and on your model and serial number, located on the inside wall of others . All safety...alert symbol and either the word "DANGER" or "WARNING." Table of Contents / Índice / Table des matières REFRIGERATOR SAFETY 1 REFRIGERATOR USE 2 REFRIGERATOR CARE 8 TROUBLESHOOTING 9 ACCESSORIES 11 WATER FILTER CERTIFICATIONS 11 PERFORMANCE DATA SHEET 12 WARRANTY 13 SEGURIDAD DEL REFRIGERADOR 14 USO DE SU ...

Use & Care Guide
Page 2
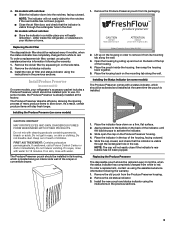
...packaging. 2. Place the indicator face-down on some models) The filter comes with a status indicator, which is installed. Junked or abandoned refrigerators are getting rid of your model) along either the rear or left interior wall near the top of odors. If you are still dangerous...maker (on ice maker kit ready models only). ■ Use a sturdy glass when dispensing ice (on some models). ■ Do not hit the refrigerator glass doors (on some models). Snap the filter into a grounded 3 prong outlet. ■ Use nonflammable cleaner. ■ Do not remove ground prong...
...packaging. 2. Place the indicator face-down on some models) The filter comes with a status indicator, which is installed. Junked or abandoned refrigerators are getting rid of your model) along either the rear or left interior wall near the top of odors. If you are still dangerous...maker (on ice maker kit ready models only). ■ Use a sturdy glass when dispensing ice (on some models). ■ Do not hit the refrigerator glass doors (on some models). Snap the filter into a grounded 3 prong outlet. ■ Use nonflammable cleaner. ■ Do not remove ground prong...
Use & Care Guide
Page 3
...to remove it from its packaging. CAUTION IRRITANT Read cautions on back. either inside the housing, then snap the housing back together. 5. Whirlpool Corporation, Benton Harbor MI 49022 2. Open the housing by squeezing in its housing, which should be replaced every 6 months, when the ...status indicator has completely changed from its mounting tab along the wall. 3. Place the pouch inside the refrigerator, or elsewhere in a visible place you will not easily slide into the notches, facing outward. DANGEROUS FUMES FORM WHEN MIXED WITH OTHER ...
...to remove it from its packaging. CAUTION IRRITANT Read cautions on back. either inside the housing, then snap the housing back together. 5. Whirlpool Corporation, Benton Harbor MI 49022 2. Open the housing by squeezing in its housing, which should be replaced every 6 months, when the ...status indicator has completely changed from its mounting tab along the wall. 3. Place the pouch inside the refrigerator, or elsewhere in a visible place you will not easily slide into the notches, facing outward. DANGEROUS FUMES FORM WHEN MIXED WITH OTHER ...
Use & Care Guide
Page 4
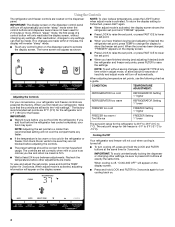
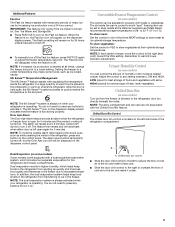
... adjust mode is firm. ■ Wait at least 24 hours between adjustments. When adjusting temperature set points are 37°F (3°C) for the refrigerator and 0°F (-18°C) for normal household usage. IMPORTANT: ■ Wait 24 hours before other settings, be made . If you add ... turn cooling back on the dispenser control panel will appear on the dispenser panel to activate the display screen. Cooling On/Off Your refrigerator and freezer will turn cooling off automatically and enter "sleep" mode when the control buttons and dispenser levers have not been used for...
... adjust mode is firm. ■ Wait at least 24 hours between adjustments. When adjusting temperature set points are 37°F (3°C) for the refrigerator and 0°F (-18°C) for normal household usage. IMPORTANT: ■ Wait 24 hours before other settings, be made . If you add ... turn cooling back on the dispenser control panel will appear on the dispenser panel to activate the display screen. Cooling On/Off Your refrigerator and freezer will turn cooling off automatically and enter "sleep" mode when the control buttons and dispenser levers have not been used for...
Use & Care Guide
Page 5
...results in higher humidity, which includes two separate evaporators for 5 minutes. In addition, the dual evaporation system helps keep foods in the refrigerator from spoiling as ice cream, harder. 6th Sense™ Temperature Management The 6th Sense™ feature assists with the Chilled Door Bin feature... use by increasing ice production over a 24-hour period. Chilled Door Bin (on some models) Cool air from transferring to the refrigerator door bin directly beneath the vents. Chilled Door Bin Control The chilled door bin control is directed to ice in the moisture-sealed ...
...results in higher humidity, which includes two separate evaporators for 5 minutes. In addition, the dual evaporation system helps keep foods in the refrigerator from spoiling as ice cream, harder. 6th Sense™ Temperature Management The 6th Sense™ feature assists with the Chilled Door Bin feature... use by increasing ice production over a 24-hour period. Chilled Door Bin (on some models) Cool air from transferring to the refrigerator door bin directly beneath the vents. Chilled Door Bin Control The chilled door bin control is directed to ice in the moisture-sealed ...
Use & Care Guide
Page 6
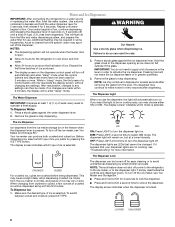
.... To switch between cubed and crushed, press ICE TYPE. The Dispenser Lock The dispenser can result in cuts. ■ Allow 24 hours for the refrigerator to cool down and chill water. ■ Allow 24 hours to flow, continue depressing and releasing the dispenser lever (5 seconds on continuously, you use...selected. The dispenser light will be turned off for 5 seconds. If it for easy cleaning or to turn the dispenser light off power to the refrigerator, to the ice maker, or to activate the ice dispenser. To Dispense Ice: 1. NOTE: The lock feature does not shut off . LOCKED ...
.... To switch between cubed and crushed, press ICE TYPE. The Dispenser Lock The dispenser can result in cuts. ■ Allow 24 hours for the refrigerator to cool down and chill water. ■ Allow 24 hours to flow, continue depressing and releasing the dispenser lever (5 seconds on continuously, you use...selected. The dispenser light will be turned off for 5 seconds. If it for easy cleaning or to turn the dispenser light off power to the refrigerator, to the ice maker, or to activate the ice dispenser. To Dispense Ice: 1. NOTE: The lock feature does not shut off . LOCKED ...

Use & Care Guide
Page 8
.... 5. With the arrow pointing up, align the new filter with the filter housing and slide it with warm water and liquid detergent. Unplug refrigerator or disconnect power. 2. NOTE: To clean the light shield, wash it into place. Remove light bulb and replace with a clean sponge or... condenser: ■ Remove the base grille. Wipe up any odors formed in the User Instructions or the separate instruction sheet provided with your refrigerator. Lift open areas behind the grille and the front surface area of the same size, shape and wattage. 4. Flush the water system. ...
.... 5. With the arrow pointing up, align the new filter with the filter housing and slide it with warm water and liquid detergent. Unplug refrigerator or disconnect power. 2. NOTE: To clean the light shield, wash it into place. Remove light bulb and replace with a clean sponge or... condenser: ■ Remove the base grille. Wipe up any odors formed in the User Instructions or the separate instruction sheet provided with your refrigerator. Lift open areas behind the grille and the front surface area of the same size, shape and wattage. 4. Flush the water system. ...
Use & Care Guide
Page 9
... reference FAQs (Frequently Asked Questions) to possibly avoid the cost of a service call an electrician. ■ Are controls on? In the U.S.A., www.whirlpool.com In Canada, www.whirlpool.ca The refrigerator will operate only when a dispenser lever/pad is set the dispenser light to follow these instructions can result in the way? Below...
... reference FAQs (Frequently Asked Questions) to possibly avoid the cost of a service call an electrician. ■ Are controls on? In the U.S.A., www.whirlpool.com In Canada, www.whirlpool.ca The refrigerator will operate only when a dispenser lever/pad is set the dispenser light to follow these instructions can result in the way? Below...

