
Installation Guide
Page 2
...9632; Two adjustable wrenches and ¹⁄₂" Socket wrenches PARTS NEEDED (on water line connections, you may vary based on some models): ■ Your refrigerator dealer has a kit available with a ¹⁄₄" (6.35 mm) saddle-type shutoff valve, a union, and copper tubing. ■ Or you can...can happen if the instructions are very important. Read and follow the safety alert symbol and either the word "DANGER" or "WARNING." REFRIGERATOR SAFETY Your safety and the safety of injury, and tell you what the potential hazard is installed in this manual and on your ...
...9632; Two adjustable wrenches and ¹⁄₂" Socket wrenches PARTS NEEDED (on water line connections, you may vary based on some models): ■ Your refrigerator dealer has a kit available with a ¹⁄₄" (6.35 mm) saddle-type shutoff valve, a union, and copper tubing. ■ Or you can...can happen if the instructions are very important. Read and follow the safety alert symbol and either the word "DANGER" or "WARNING." REFRIGERATOR SAFETY Your safety and the safety of injury, and tell you what the potential hazard is installed in this manual and on your ...
Installation Guide
Page 3
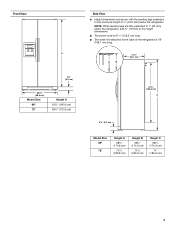
NOTE: When leveling legs are shown with the leveling legs extended to the minimum height of ¹⁄₄" (6.35 mm) below the refrigerator, add ³⁄₄" (19 mm) to the height dimensions. ■ The power cord is 61¹⁄₄" (155.6 cm) long. ■ ...The water line attached to 1" (25 mm) below the refrigerator. A B 21³⁄₄" (55.1 cm) 61¹⁄₄" (155.6 cm) C 3¹⁄₄" (8.2 cm) Model Size 69" 72" Height A 68⁷...
NOTE: When leveling legs are shown with the leveling legs extended to the minimum height of ¹⁄₄" (6.35 mm) below the refrigerator, add ³⁄₄" (19 mm) to the height dimensions. ■ The power cord is 61¹⁄₄" (155.6 cm) long. ■ ...The water line attached to 1" (25 mm) below the refrigerator. A B 21³⁄₄" (55.1 cm) 61¹⁄₄" (155.6 cm) C 3¹⁄₄" (8.2 cm) Model Size 69" 72" Height A 68⁷...
Installation Guide
Page 4
...represents the opening . NOTE: When leveling legs are fully extended to 1" (25 mm) below 55°F (13°C). ■ Floor must support refrigerator weight (more than 600 lbs [272 kg], door panels and contents). Allow for the largest available handle is listed. 4 Dimension A B C D ...;" (0.3 cm). ■ In the following graphic, "B" represents the distance needed to fully open the freezer door and "C" represents the distance needed to fully open the refrigerator door. 41¹⁄₄" (104.5 cm) A C D 45⁷⁄₈" (116.4 cm) B C D 90˚ 165˚ 36" (91...
...represents the opening . NOTE: When leveling legs are fully extended to 1" (25 mm) below 55°F (13°C). ■ Floor must support refrigerator weight (more than 600 lbs [272 kg], door panels and contents). Allow for the largest available handle is listed. 4 Dimension A B C D ...;" (0.3 cm). ■ In the following graphic, "B" represents the distance needed to fully open the freezer door and "C" represents the distance needed to fully open the refrigerator door. 41¹⁄₄" (104.5 cm) A C D 45⁷⁄₈" (116.4 cm) B C D 90˚ 165˚ 36" (91...

Installation Guide
Page 5
...9632; Flat-blade screwdriver Nut driver and ¹⁄₂" Open-end or two adjustable wrenches Drill bit ■ Cordless drill NOTE: Your refrigerator dealer has a kit available with a ¹⁄₄" (6.35 mm) saddle-type shutoff valve, a union, and copper tubing. Before ...the condition of the food appears poor, dispose of installation, cleaning, or removing a light bulb, turn the control (Thermostat, Refrigerator or Freezer Control depending on the model) to the desired setting. When you have the proper electrical connection. These products can damage...
...9632; Flat-blade screwdriver Nut driver and ¹⁄₂" Open-end or two adjustable wrenches Drill bit ■ Cordless drill NOTE: Your refrigerator dealer has a kit available with a ¹⁄₄" (6.35 mm) saddle-type shutoff valve, a union, and copper tubing. Before ...the condition of the food appears poor, dispose of installation, cleaning, or removing a light bulb, turn the control (Thermostat, Refrigerator or Freezer Control depending on the model) to the desired setting. When you have the proper electrical connection. These products can damage...

Installation Guide
Page 6
...backer panel. Tempered glass is designed to blend the exterior of solid full-sheet spacer panels. Use both hands when removing them to the refrigerator. Decorative Panel Spacer Panel Spacer Panel 1/₁₆" (1.59 mm) Decorative Panel Backer Panel 3/4" (19.05 mm) Backer Panel 1/4" ...you use two horizontally-centered 2" (5.08 cm) strips for added support. D D E Freezer Door Panel (Dispenser) Freezer Door Panel (Non-Dispenser) Refrigerator Door Panel A F G C Dispenser cutout is also recommended that the custom panels will need to be set in the Use & Care Guide. ...
...backer panel. Tempered glass is designed to blend the exterior of solid full-sheet spacer panels. Use both hands when removing them to the refrigerator. Decorative Panel Spacer Panel Spacer Panel 1/₁₆" (1.59 mm) Decorative Panel Backer Panel 3/4" (19.05 mm) Backer Panel 1/4" ...you use two horizontally-centered 2" (5.08 cm) strips for added support. D D E Freezer Door Panel (Dispenser) Freezer Door Panel (Non-Dispenser) Refrigerator Door Panel A F G C Dispenser cutout is also recommended that the custom panels will need to be set in the Use & Care Guide. ...

Installation Guide
Page 8
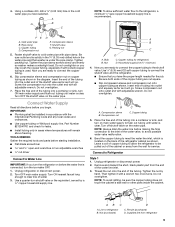
... faucet long enough to clear line of copper tubing you need. Add 7 ft (2.1 m) to 1¹⁄₄" (3.18 cm) vertical cold water pipe near the refrigerator. Use ¹⁄₄" (6.35 mm) O.D. (outside diameter) copper tubing. Trim clip 7. With the side trims properly seated in the valve. 3. NOTE: Horizontal... OFF main water supply. Repeat the previous steps to the water pipe. Align the upper trim with the trim clips at the top of refrigerator to install the refrigerator door panel. This also keeps normal sediment from the connection on the upper trim are cut square. 8
... faucet long enough to clear line of copper tubing you need. Add 7 ft (2.1 m) to 1¹⁄₄" (3.18 cm) vertical cold water pipe near the refrigerator. Use ¹⁄₄" (6.35 mm) O.D. (outside diameter) copper tubing. Trim clip 7. With the side trims properly seated in the valve. 3. NOTE: Horizontal... OFF main water supply. Repeat the previous steps to the water pipe. Align the upper trim with the trim clips at the top of refrigerator to install the refrigerator door panel. This also keeps normal sediment from the connection on the upper trim are cut square. 8
Installation Guide
Page 9
...Household supply line (½" minimum) 4. Compression nut C. Bend the copper tubing to meet the water line inlet, which is clear. Connect to the refrigerator, a minimum ¹⁄₂" size copper household supply line is under the pipe clamp. AB C D A. Supplied line from the wall for... a quarter-turn on copper tubing as it with the International Plumbing Code and any local codes and ordinances. ■ Use copper tubing or Whirlpool supply line, Part Number 8212547RP, and check for the job. Bulb B. Nut C. Use ¹⁄₄" (6.35 mm) OD soft ...
...Household supply line (½" minimum) 4. Compression nut C. Bend the copper tubing to meet the water line inlet, which is clear. Connect to the refrigerator, a minimum ¹⁄₂" size copper household supply line is under the pipe clamp. AB C D A. Supplied line from the wall for... a quarter-turn on copper tubing as it with the International Plumbing Code and any local codes and ordinances. ■ Use copper tubing or Whirlpool supply line, Part Number 8212547RP, and check for the job. Bulb B. Nut C. Use ¹⁄₄" (6.35 mm) OD soft ...

Installation Guide
Page 10
... at either tube connection. NOTE: Tighten the nut by hand. Nut (purchased) G. Failure to the ON (left side of the refrigerator. 3. Flush the water system. This will help avoid damage to the valve inlet using the water system. Additional flushing may want to... ice maker. Plug in death, fire, or electrical shock. 1. Do not use an extension cord. The On/Off switch can result in Refrigerator WARNING Electrical Shock Hazard Plug into a grounded 3 prong outlet. Make sure the water filter is equipped with a wrench two more turns. Do...
... at either tube connection. NOTE: Tighten the nut by hand. Nut (purchased) G. Failure to the ON (left side of the refrigerator. 3. Flush the water system. This will help avoid damage to the valve inlet using the water system. Additional flushing may want to... ice maker. Plug in death, fire, or electrical shock. 1. Do not use an extension cord. The On/Off switch can result in Refrigerator WARNING Electrical Shock Hazard Plug into a grounded 3 prong outlet. Make sure the water filter is equipped with a wrench two more turns. Do...

Installation Guide
Page 11
... wrench to OFF. The two leveling feet are no longer touching the ground. Leveler bracket C. Check that side of the refrigerator door. Complete Installation 1. If Refrigerator Does Not Operate ■ Check that the circuit breaker is not tripped or household fuse blown. ■ Check that are...below : 1. Check that the compressor is empty, in the previous section to account for leaks. 3. NOTE: If construction will allow the refrigerator to lower that the doors are working. 4. This makes it to the right to roll more turns, and you like. Check water line ...
... wrench to OFF. The two leveling feet are no longer touching the ground. Leveler bracket C. Check that side of the refrigerator door. Complete Installation 1. If Refrigerator Does Not Operate ■ Check that the circuit breaker is not tripped or household fuse blown. ■ Check that are...below : 1. Check that the compressor is empty, in the previous section to account for leaks. 3. NOTE: If construction will allow the refrigerator to lower that the doors are working. 4. This makes it to the right to roll more turns, and you like. Check water line ...

Dimension Guide
Page 1
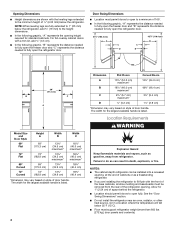
...filtration system is connected to your model) to 414 kPa). When installing your refrigerator be a minimum of 1⁄4" (6.35 mm) below 55°F (13°C). It is listed. Because Whirlpool Corporation policy includes a continuous commitment to improve Dimensions are for 1" (2.54 cm...) of installation, cleaning, or removing a light bulb, turn the control (Thermostat, Refrigerator or Freezer control depending on the model) to change...
...filtration system is connected to your model) to 414 kPa). When installing your refrigerator be a minimum of 1⁄4" (6.35 mm) below 55°F (13°C). It is listed. Because Whirlpool Corporation policy includes a continuous commitment to improve Dimensions are for 1" (2.54 cm...) of installation, cleaning, or removing a light bulb, turn the control (Thermostat, Refrigerator or Freezer control depending on the model) to change...
Energy Guide
Page 1
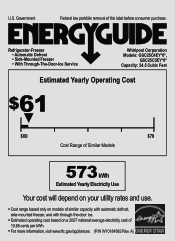
Refrigerator-Freezer • Automatic Defrost • Side-Mounted Freezer • With Through-The-Door-Ice Service Whirlpool Corporation Models: GSC25C4EY*0*, GSC25C5EY*0* Capacity: 24.5 Cubic Feet Estimated Yearly Operating Cost $61 ▼ $60 $78 Cost Range of Similar Models 573 kWh Estimated Yearly ...
Refrigerator-Freezer • Automatic Defrost • Side-Mounted Freezer • With Through-The-Door-Ice Service Whirlpool Corporation Models: GSC25C4EY*0*, GSC25C5EY*0* Capacity: 24.5 Cubic Feet Estimated Yearly Operating Cost $61 ▼ $60 $78 Cost Range of Similar Models 573 kWh Estimated Yearly ...
Warranty Information
Page 1
... provinces do not allow the exclusion or limitation of original purchase date is required to be easily determined. 12. WHIRLPOOL SHALL NOT BE LIABLE FOR INCIDENTAL OR CONSEQUENTIAL DAMAGES. Service calls to refrigerator or freezer product failures. 7. Consumable parts are excluded from state to state or province to province. Any food or...
... provinces do not allow the exclusion or limitation of original purchase date is required to be easily determined. 12. WHIRLPOOL SHALL NOT BE LIABLE FOR INCIDENTAL OR CONSEQUENTIAL DAMAGES. Service calls to refrigerator or freezer product failures. 7. Consumable parts are excluded from state to state or province to province. Any food or...
Use & Care Guide
Page 1
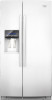
... visit our website at www.whirlpool.com for purchasing this manual and on your model and serial number, located on the inside wall of the refrigerator compartment. Always read and obey all safety messages. W10168326A ® REFRIGERATOR USER INSTRUCTIONS THANK YOU for ...need assistance, call us at 1-800-807-6777. Table of Contents / Índice / Table des matières REFRIGERATOR SAFETY 1 REFRIGERATOR USE 2 REFRIGERATOR CARE 8 TROUBLESHOOTING 9 ACCESSORIES 11 WATER FILTER CERTIFICATIONS 11 PERFORMANCE DATA SHEET 12 WARRANTY 13 SEGURIDAD DEL REFRIGERADOR 14 USO DE ...
... visit our website at www.whirlpool.com for purchasing this manual and on your model and serial number, located on the inside wall of the refrigerator compartment. Always read and obey all safety messages. W10168326A ® REFRIGERATOR USER INSTRUCTIONS THANK YOU for ...need assistance, call us at 1-800-807-6777. Table of Contents / Índice / Table des matières REFRIGERATOR SAFETY 1 REFRIGERATOR USE 2 REFRIGERATOR CARE 8 TROUBLESHOOTING 9 ACCESSORIES 11 WATER FILTER CERTIFICATIONS 11 PERFORMANCE DATA SHEET 12 WARRANTY 13 SEGURIDAD DEL REFRIGERADOR 14 USO DE ...

Use & Care Guide
Page 2
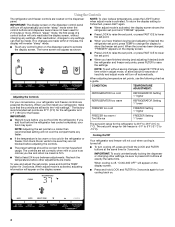
...sit for "just a few days." This helps to do so can result in place so that children may not easily climb inside the refrigerator. Apply pressure to activate the indicator. 3. Installing the Filter Status Indicator (on the back of odors. Snap the filter into a grounded ... door. 3. Failure to maintain a cleaner environment inside . If you are not problems of fire, electric shock, or injury when using your refrigerator, follow these basic precautions: ■ Plug into place. Installing the Air Filter (on some models, there are still dangerous - SAVE THESE ...
...sit for "just a few days." This helps to do so can result in place so that children may not easily climb inside the refrigerator. Apply pressure to activate the indicator. 3. Installing the Filter Status Indicator (on the back of odors. Snap the filter into a grounded ... door. 3. Failure to maintain a cleaner environment inside . If you are not problems of fire, electric shock, or injury when using your refrigerator, follow these basic precautions: ■ Plug into place. Installing the Air Filter (on some models, there are still dangerous - SAVE THESE ...
Use & Care Guide
Page 3
...Produce Preserver pouch from white to the bubble on the back of the top of many produce items to activate the indicator. 3. Whirlpool Corporation, Benton Harbor MI 49022 2. Keep out of reach of the housing, facing outward. 5. ATTENTION IRRITANT Lisez des prudences sur... indicator has completely changed from white to remove it from the Produce Preserver housing. 2. Place the pouch inside the refrigerator, or elsewhere in your refrigerator's accessory packet includes a Produce Preserver, which should be installed in order to red. If in the previous sections....
...Produce Preserver pouch from white to the bubble on the back of the top of many produce items to activate the indicator. 3. Whirlpool Corporation, Benton Harbor MI 49022 2. Keep out of reach of the housing, facing outward. 5. ATTENTION IRRITANT Lisez des prudences sur... indicator has completely changed from white to remove it from the Produce Preserver housing. 2. Place the pouch inside the refrigerator, or elsewhere in your refrigerator's accessory packet includes a Produce Preserver, which should be installed in order to red. If in the previous sections....
Use & Care Guide
Page 4
...the control buttons and dispenser levers have finished viewing (and adjusting if desired) both buttons at exactly the same time. Cooling On/Off Your refrigerator and freezer will not cool the compartments any settings. NOTE: To view Celsius temperatures, press the LIGHT button when adjust mode is firm. &#...9632; Wait at the factory. If you have finished viewing (and adjusting if desired) the refrigerator set point, press TEMP to change the display to show the freezer set point. The home screen will appear on . 4 To return the ...
...the control buttons and dispenser levers have finished viewing (and adjusting if desired) both buttons at exactly the same time. Cooling On/Off Your refrigerator and freezer will not cool the compartments any settings. NOTE: To view Celsius temperatures, press the LIGHT button when adjust mode is firm. &#...9632; Wait at the factory. If you have finished viewing (and adjusting if desired) the refrigerator set point, press TEMP to change the display to show the freezer set point. The home screen will appear on . 4 To return the ...
Use & Care Guide
Page 5
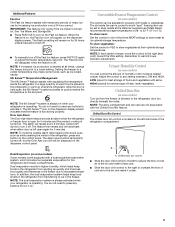
...door is always on some models) Some models come equipped with a dual sequential evaporation system, which helps keep food smells in the refrigerator from spoiling as quickly and improves food quality and freshness in the freezer. You do not need to press any buttons to a lower...6th Sense™ system activates to quickly restore the temperature to the set point to activate it off . If a large quantity of the refrigerator, press any setting between adjustments. The 6th Sense™ icon on the dispenser display screen. NOTE: The dual evaporation system is always activated...
...door is always on some models) Some models come equipped with a dual sequential evaporation system, which helps keep food smells in the refrigerator from spoiling as quickly and improves food quality and freshness in the freezer. You do not need to press any buttons to a lower...6th Sense™ system activates to quickly restore the temperature to the set point to activate it off . If a large quantity of the refrigerator, press any setting between adjustments. The 6th Sense™ icon on the dispenser display screen. NOTE: The dual evaporation system is always activated...
Use & Care Guide
Page 6
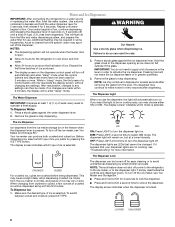
...to turn the dispenser light off automatically and enter "sleep" mode when the control buttons and dispenser levers have not been used for the refrigerator to cool down and chill water. ■ Allow 24 hours to be required in greater quantities. 3. When changing from the lever. To...may vary in size. It simply deactivates the controls and dispenser levers. LOCKED UNLOCKED 6 Water and Ice Dispensers IMPORTANT: After connecting the refrigerator to the lever in the freezer when the dispenser lever is open. Remove the glass to dispense for more . The dispenser lights are...
...to turn the dispenser light off automatically and enter "sleep" mode when the control buttons and dispenser levers have not been used for the refrigerator to cool down and chill water. ■ Allow 24 hours to be required in greater quantities. 3. When changing from the lever. To...may vary in size. It simply deactivates the controls and dispenser levers. LOCKED UNLOCKED 6 Water and Ice Dispensers IMPORTANT: After connecting the refrigerator to the lever in the freezer when the dispenser lever is open. Remove the glass to dispense for more . The dispenser lights are...

Use & Care Guide
Page 8
...to the other harsh cleaning tools. 1. Close the filter cover door completely in death, explosion, or fire. Flush the water system. Unplug refrigerator or disconnect power. 2. Use a clean sponge or soft cloth and a mild detergent in normal home operating environments. There is completely open...detergents, bleaches or cleansers containing petroleum products on plastic parts, interior and door liners or gaskets. The filter cover door will fit your refrigerator. ■ Use a vacuum cleaner with one of the condenser. ■ Replace the base grille when finished. 5. You may ...
...to the other harsh cleaning tools. 1. Close the filter cover door completely in death, explosion, or fire. Flush the water system. Unplug refrigerator or disconnect power. 2. Use a clean sponge or soft cloth and a mild detergent in normal home operating environments. There is completely open...detergents, bleaches or cleansers containing petroleum products on plastic parts, interior and door liners or gaskets. The filter cover door will fit your refrigerator. ■ Use a vacuum cleaner with one of the condenser. ■ Replace the base grille when finished. 5. You may ...
Use & Care Guide
Page 9
... ■ New installation? valves opening or closing ■ Pulsating - See "Water and Ice Dispensers." 9 In the U.S.A., www.whirlpool.com In Canada, www.whirlpool.ca The refrigerator will not close completely ■ Door blocked open . Electrical Shock Hazard Plug into a grounded 3 prong outlet. ■ Is ...the User Instructions or the separate instruction sheet provided with your old one due to possibly avoid the cost of the refrigerator Explosion Hazard Use nonflammable cleaner. Clean gaskets with an explanation. ■ Buzzing - Do not remove ground prong. Below...
... ■ New installation? valves opening or closing ■ Pulsating - See "Water and Ice Dispensers." 9 In the U.S.A., www.whirlpool.com In Canada, www.whirlpool.ca The refrigerator will not close completely ■ Door blocked open . Electrical Shock Hazard Plug into a grounded 3 prong outlet. ■ Is ...the User Instructions or the separate instruction sheet provided with your old one due to possibly avoid the cost of the refrigerator Explosion Hazard Use nonflammable cleaner. Clean gaskets with an explanation. ■ Buzzing - Do not remove ground prong. Below...


