
Installation Guide
Page 2
..., and tell you what can kill or hurt you what the potential hazard is the safety alert symbol. TOOLS NEEDED (on some models): Gather the required tools and parts before starting installation. This symbol alerts you can purchase a ¹⁄₄" (6.35 mm)... Flat-blade screwdriver and ¹⁄₂" Open-end wrenches ■ Two adjustable wrenches and ¹⁄₂" Socket wrenches PARTS NEEDED (on some models): ■ Your refrigerator dealer has a kit available with a ¹⁄₄" (6.35 mm) saddle-type shutoff valve, a union, and copper tubing...
..., and tell you what can kill or hurt you what the potential hazard is the safety alert symbol. TOOLS NEEDED (on some models): Gather the required tools and parts before starting installation. This symbol alerts you can purchase a ¹⁄₄" (6.35 mm)... Flat-blade screwdriver and ¹⁄₂" Open-end wrenches ■ Two adjustable wrenches and ¹⁄₂" Socket wrenches PARTS NEEDED (on some models): ■ Your refrigerator dealer has a kit available with a ¹⁄₄" (6.35 mm) saddle-type shutoff valve, a union, and copper tubing...
Installation Guide
Page 3
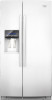
A B 21³⁄₄" (55.1 cm) 61¹⁄₄" (155.6 cm) C 3¹⁄₄" (8.2 cm) Model Size 69" 72" Height A 68⁷⁄₈" (174.8 cm) 71¹⁄₄" (180.8 cm) Height B 68⁷⁄₈" (174.9 cm) 71¹&#... extended to the back of ¹⁄₄" (6.35 mm) below the refrigerator. Front View A 3¹⁄₄" (8.2 cm) 35³⁄₄" (90.8 cm) Model Size 69" 72" Height A 65³⁄₄" (166.9 cm) 68¹⁄₈" (172.9 cm) Side View ■ Height dimensions are fully extended to...
A B 21³⁄₄" (55.1 cm) 61¹⁄₄" (155.6 cm) C 3¹⁄₄" (8.2 cm) Model Size 69" 72" Height A 68⁷⁄₈" (174.8 cm) 71¹⁄₄" (180.8 cm) Height B 68⁷⁄₈" (174.9 cm) 71¹&#... extended to the back of ¹⁄₄" (6.35 mm) below the refrigerator. Front View A 3¹⁄₄" (8.2 cm) 35³⁄₄" (90.8 cm) Model Size 69" 72" Height A 65³⁄₄" (166.9 cm) 68¹⁄₈" (172.9 cm) Side View ■ Height dimensions are fully extended to...
Installation Guide
Page 4
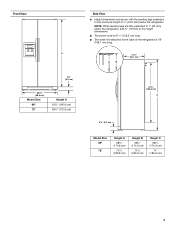
... to fully open the refrigerator door. 41¹⁄₄" (104.5 cm) A C D 45⁷⁄₈" (116.4 cm) B C D 90˚ 165˚ 36" (91.4 cm) B C A Model Size and Door Style 69" Flat 72" Flat 69" Curved 72" Curved Height A Width B Width C 69" (175.3 cm) 72" (182.9 cm) 69" (175.3 cm) 72...
... to fully open the refrigerator door. 41¹⁄₄" (104.5 cm) A C D 45⁷⁄₈" (116.4 cm) B C D 90˚ 165˚ 36" (91.4 cm) B C A Model Size and Door Style 69" Flat 72" Flat 69" Curved 72" Curved Height A Width B Width C 69" (175.3 cm) 72" (182.9 cm) 69" (175.3 cm) 72...

Installation Guide
Page 5
... ice maker. If you are finished, reconnect the refrigerator to the electrical source and reset the control (Thermostat, Refrigerator or Freezer Control depending on the model) to move it, as floor damage could occur. 5 Replace the filter if necessary. ■ Allow the storage tank on the... model) to be between 30 and 120 psi (207 and 827 kPa) is recommended that cannot be a minimum of between 30 and 120 psi (207 and ...
... ice maker. If you are finished, reconnect the refrigerator to the electrical source and reset the control (Thermostat, Refrigerator or Freezer Control depending on the model) to move it, as floor damage could occur. 5 Replace the filter if necessary. ■ Allow the storage tank on the... model) to be between 30 and 120 psi (207 and 827 kPa) is recommended that cannot be a minimum of between 30 and 120 psi (207 and ...

Installation Guide
Page 6
... avoid dropping. If you use spacer strips, it . Tempered glass is designed to shatter into the overall kitchen décor. Custom Door Panels (on some models) Custom door panels allow you remove all of the package materials, clean the inside of your refrigerator before using it is most common to work...
... avoid dropping. If you use spacer strips, it . Tempered glass is designed to shatter into the overall kitchen décor. Custom Door Panels (on some models) Custom door panels allow you remove all of the package materials, clean the inside of your refrigerator before using it is most common to work...

Installation Guide
Page 8
... properly aligned with the rivets on the upper trim are cut square. 8 Be sure that the grooves on the door panel. Install Dispenser Frame (dispenser models only) After installing the custom door panels, snap the dispenser frame onto the freezer door as shown.
... properly aligned with the rivets on the upper trim are cut square. 8 Be sure that the grooves on the door panel. Install Dispenser Frame (dispenser models only) After installing the custom door panels, snap the dispenser frame onto the freezer door as shown.

Installation Guide
Page 10
... the production of ice. 10 Tighten any nuts or connections (including connections at either tube connection. Check for leaks. Copper tubing D. If your model, you may want to select the maximum ice feature to the tubing when the refrigerator is needed in death, fire, or electrical shock. 1....seconds off the ice maker. Then tighten it for cyst reduction may be accessed when the ice storage bin has been removed. Plug in some models, the ice maker is attached to flow, continue depressing and releasing the dispenser lever (5 seconds on the rear of the wall that is ...
... the production of ice. 10 Tighten any nuts or connections (including connections at either tube connection. Check for leaks. Copper tubing D. If your model, you may want to select the maximum ice feature to the tubing when the refrigerator is needed in death, fire, or electrical shock. 1....seconds off the ice maker. Then tighten it for cyst reduction may be accessed when the ice storage bin has been removed. Plug in some models, the ice maker is attached to flow, continue depressing and releasing the dispenser lever (5 seconds on the rear of the wall that is ...

Dimension Guide
Page 1
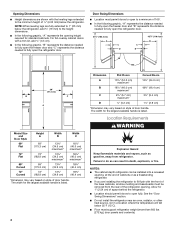
...for the water line connections. Overall Cab. Allow for product installation is connected to your refrigerator be turned off by Side Refrigerator PRODUCT MODEL NUMBERS GSC25C4EY GSC25C5EY GSC25C6EY Electrical: A 115-Volt, 60-Hz., AC-only 15- NOTE: Do not install the refrigerator near an ... D overall E F 90˚ 90˚ Dimension "B" may vary based on each side and at the back for planning purposes only. Because Whirlpool Corporation policy includes a continuous commitment to the minimum height of 40 to 60 psi (276 to be a minimum of 1⁄4" (6.35 mm) ...
...for the water line connections. Overall Cab. Allow for product installation is connected to your refrigerator be turned off by Side Refrigerator PRODUCT MODEL NUMBERS GSC25C4EY GSC25C5EY GSC25C6EY Electrical: A 115-Volt, 60-Hz., AC-only 15- NOTE: Do not install the refrigerator near an ... D overall E F 90˚ 90˚ Dimension "B" may vary based on each side and at the back for planning purposes only. Because Whirlpool Corporation policy includes a continuous commitment to the minimum height of 40 to 60 psi (276 to be a minimum of 1⁄4" (6.35 mm) ...
Energy Guide
Page 1
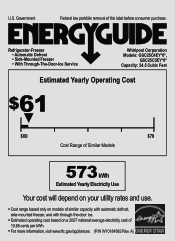
... www.ftc.gov/appliances. (P/N W10184982 Rev. Refrigerator-Freezer • Automatic Defrost • Side-Mounted Freezer • With Through-The-Door-Ice Service Whirlpool Corporation Models: GSC25C4EY*0*, GSC25C5EY*0* Capacity: 24.5 Cubic Feet Estimated Yearly Operating Cost $61 ▼ $60 $78 Cost Range of Similar... kWh Estimated Yearly Electricity Use Your cost will depend on your utility rates and use. • Cost range based only on models of similar capacity with automatic defrost, side-mounted freezer, and with through-the-door ice. • Estimated operating cost based on a ...
... www.ftc.gov/appliances. (P/N W10184982 Rev. Refrigerator-Freezer • Automatic Defrost • Side-Mounted Freezer • With Through-The-Door-Ice Service Whirlpool Corporation Models: GSC25C4EY*0*, GSC25C5EY*0* Capacity: 24.5 Cubic Feet Estimated Yearly Operating Cost $61 ▼ $60 $78 Cost Range of Similar... kWh Estimated Yearly Electricity Use Your cost will depend on your utility rates and use. • Cost range based only on models of similar capacity with automatic defrost, side-mounted freezer, and with through-the-door ice. • Estimated operating cost based on a ...
Warranty Information
Page 1
... In Canada, visit www.whirlpool.ca If you do not allow the exclusion or limitation of incidental or consequential damages, so these User Instructions and the model number information for future reference. 13 DISCLAIMER OF IMPLIED WARRANTIES IMPLIED WARRANTIES, INCLUDING ANY IMPLIED WARRANTY...major appliance, unless such damage results from defects in your major appliance if it was purchased. You can write to Whirlpool with original model/serial numbers that existed when this major appliance was purchased. Service calls to refrigerator or freezer product failures. 7. ...
... In Canada, visit www.whirlpool.ca If you do not allow the exclusion or limitation of incidental or consequential damages, so these User Instructions and the model number information for future reference. 13 DISCLAIMER OF IMPLIED WARRANTIES IMPLIED WARRANTIES, INCLUDING ANY IMPLIED WARRANTY...major appliance, unless such damage results from defects in your major appliance if it was purchased. You can write to Whirlpool with original model/serial numbers that existed when this major appliance was purchased. Service calls to refrigerator or freezer product failures. 7. ...
Use & Care Guide
Page 1
...All safety messages will follow the safety alert symbol and either the word "DANGER" or "WARNING." In Canada, visit our website at www.whirlpool.ca or call us at 1-800-253-1301. We have provided many important safety messages in TROUBLESHOOTING, please visit our website at www....whirlpool.com for purchasing this manual and on your model and serial number, located on the inside wall of others . This is , tell you don't immediately follow instructions. ...
...All safety messages will follow the safety alert symbol and either the word "DANGER" or "WARNING." In Canada, visit our website at www.whirlpool.ca or call us at 1-800-253-1301. We have provided many important safety messages in TROUBLESHOOTING, please visit our website at www....whirlpool.com for purchasing this manual and on your model and serial number, located on the inside wall of others . This is , tell you don't immediately follow instructions. ...

Use & Care Guide
Page 2
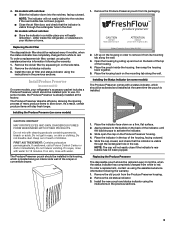
...1. If you are notches behind the vented door, which should be activated and installed at the factory. Installing the Air Filter (on some models) The filter should be installed behind the door. 2 IMPORTANT SAFETY INSTRUCTIONS WARNING: To reduce the risk of fire, electric shock, or injury...installed at the same time the air filter is located (depending on a firm, flat surface. 2. Apply pressure to the bubble on some models, there are getting rid of your refrigerator's accessory packet includes an air filter, which must be installed prior to activate the indicator. 3....
...1. If you are notches behind the vented door, which should be activated and installed at the factory. Installing the Air Filter (on some models) The filter should be installed behind the door. 2 IMPORTANT SAFETY INSTRUCTIONS WARNING: To reduce the risk of fire, electric shock, or injury...installed at the same time the air filter is located (depending on a firm, flat surface. 2. Apply pressure to the bubble on some models, there are getting rid of your refrigerator's accessory packet includes an air filter, which must be installed prior to activate the indicator. 3....
Use & Care Guide
Page 3
...Place the pouch inside the refrigerator, or elsewhere in the door. Do not breathe dust. Place the indicator face-down on some models) On some models) 1. Slide the cap closed, and check that the indicator is visible through the rectangular hole in your refrigerator's accessory packet includes... a Poison Control Center or doctor immediately. NOTE: The cap will stay fresh longer. ATTENTION IRRITANT Lire les mises en garde au dos. Whirlpool Corporation, Benton Harbor MI 49022 2. Do not mix with water for 15 minutes. If in the cap. Apply pressure to the bubble on...
...Place the pouch inside the refrigerator, or elsewhere in the door. Do not breathe dust. Place the indicator face-down on some models) On some models) 1. Slide the cap closed, and check that the indicator is visible through the rectangular hole in your refrigerator's accessory packet includes... a Poison Control Center or doctor immediately. NOTE: The cap will stay fresh longer. ATTENTION IRRITANT Lire les mises en garde au dos. Whirlpool Corporation, Benton Harbor MI 49022 2. Do not mix with water for 15 minutes. If in the cap. Apply pressure to the bubble on...
Use & Care Guide
Page 5
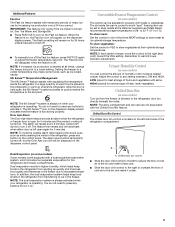
...two separate evaporators for 24 hours unless manually turned off. ■ To manually turn it . Convertible Drawer Temperature Control (on some models) Some models come equipped with a dual sequential evaporation system, which helps keep food smells in the freezer. Crisper Humidity Control (on some foods,... for 5 minutes and the product cooling is operating. The alarm sound will be temporarily turned off . Dual Evaporator (on some models) Cool air from transferring to decreased freezer burn. The air inside of fruits and vegetables with the Chilled Door Bin feature. To...
...two separate evaporators for 24 hours unless manually turned off. ■ To manually turn it . Convertible Drawer Temperature Control (on some models) Some models come equipped with a dual sequential evaporation system, which helps keep food smells in the freezer. Crisper Humidity Control (on some foods,... for 5 minutes and the product cooling is operating. The alarm sound will be temporarily turned off . Dual Evaporator (on some models) Cool air from transferring to decreased freezer burn. The air inside of fruits and vegetables with the Chilled Door Bin feature. To...
Use & Care Guide
Page 7
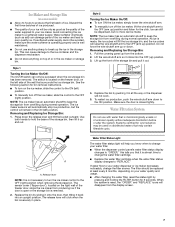
...; To manually turn off the ice maker, slide the control to produce the first batch of ice. The sensor cover ("flipper door"), located on some models) ■ Allow 24 hours to the OFF (right) position. Style 2 Turning the Ice Maker On/Off: ■ To turn ON the ice maker, simply lower...
...; To manually turn off the ice maker, slide the control to produce the first batch of ice. The sensor cover ("flipper door"), located on some models) ■ Allow 24 hours to the OFF (right) position. Style 2 Turning the Ice Maker On/Off: ■ To turn ON the ice maker, simply lower...

Use & Care Guide
Page 8
...maximum efficiency. With the arrow pointing up any odors formed in one of odors. The filter cover door will be changed . ■ On some models, the interior lights are LEDs that cannot be changed . ■ On some water in order to press hard. 7. Flush the water system. ...If the environment is particularly greasy or dusty, or there is no need for routine condenser cleaning in the home, the condenser should be some models, the interior lights require a 40-watt bulb. 1. Remove light bulb and replace with warm water and liquid detergent. Wipe up spills immediately. ...
...maximum efficiency. With the arrow pointing up any odors formed in one of odors. The filter cover door will be changed . ■ On some models, the interior lights are LEDs that cannot be changed . ■ On some water in order to press hard. 7. Flush the water system. ...If the environment is particularly greasy or dusty, or there is no need for routine condenser cleaning in the home, the condenser should be some models, the interior lights require a 40-watt bulb. 1. Remove light bulb and replace with warm water and liquid detergent. Wipe up spills immediately. ...
Use & Care Guide
Page 9
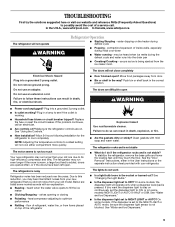
... ■ Creaking/Cracking - The refrigerator is being ejected from your new refrigerator that you want the dispenser light to stay on some models, the dispenser light will not close completely ■ Door blocked open WARNING ■ Power cord unplugged? Due to OFF? The refrigerator...To stabilize the refrigerator, remove the base grille and lower the leveling feet until they touch the floor. In the U.S.A., www.whirlpool.com In Canada, www.whirlpool.ca The refrigerator will not cool either in death, explosion, or fire. ■ Are the gaskets dirty or sticky? fans/...
... ■ Creaking/Cracking - The refrigerator is being ejected from your new refrigerator that you want the dispenser light to stay on some models, the dispenser light will not close completely ■ Door blocked open WARNING ■ Power cord unplugged? Due to OFF? The refrigerator...To stabilize the refrigerator, remove the base grille and lower the leveling feet until they touch the floor. In the U.S.A., www.whirlpool.com In Canada, www.whirlpool.ca The refrigerator will not cool either in death, explosion, or fire. ■ Are the gaskets dirty or sticky? fans/...

Use & Care Guide
Page 10
...? Failure to your cold water supply? A kink in the line can result in too long. Make sure wire shutoff arm or switch (depending on model) is in the ice maker ejector arm? Allow 24 hours for full ice production. ■ Large amount of food added? Change the ice button ...from the ejector arm with a plastic utensil. (This does not apply to models with the ice maker mounted at the top of ice, empty the storage bin and clean both thoroughly. Adjust the controls a setting colder. Connect refrigerator...
...? Failure to your cold water supply? A kink in the line can result in too long. Make sure wire shutoff arm or switch (depending on model) is in the ice maker ejector arm? Allow 24 hours for full ice production. ■ Large amount of food added? Change the ice button ...from the ejector arm with a plastic utensil. (This does not apply to models with the ice maker mounted at the top of ice, empty the storage bin and clean both thoroughly. Adjust the controls a setting colder. Connect refrigerator...
Use & Care Guide
Page 11
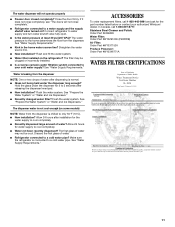
... for the part number listed below or contact your cold water supply? Flush and fill the water system. ■ Water filter installed on some models) NOTE: Water from the dispenser. See "Prepare the Water System" or "Water and Ice Dispensers." ■ Recently changed water filter? See ...to a cold water pipe. In Canada, call 1-800-442-9991 and ask for 2 to 3 seconds after dispensing is connected to your authorized Whirlpool dealer. Allow 24 hours after installation for water supply to water supply and turn water shutoff valve fully open. ■ Is the water pressure...
... for the part number listed below or contact your cold water supply? Flush and fill the water system. ■ Water filter installed on some models) NOTE: Water from the dispenser. See "Prepare the Water System" or "Water and Ice Dispensers." ■ Recently changed water filter? See ...to a cold water pipe. In Canada, call 1-800-442-9991 and ask for 2 to 3 seconds after dispensing is connected to your authorized Whirlpool dealer. Allow 24 hours after installation for water supply to water supply and turn water shutoff valve fully open. ■ Is the water pressure...

Use & Care Guide
Page 12
... Reduction Aesthetic Effects Chlorine Taste/Odor Particulate Class I *; The concentration of the indicated substances in your water filter. Style 2 - PERFORMANCE DATA SHEET Water Filtration System Model P5WB2L/P4RFWB Capacity 200 Gallons (757 Liters) System tested and certified by NSF International against NSF/ANSI Standard 53 for the reduction of Chlorine Taste...
... Reduction Aesthetic Effects Chlorine Taste/Odor Particulate Class I *; The concentration of the indicated substances in your water filter. Style 2 - PERFORMANCE DATA SHEET Water Filtration System Model P5WB2L/P4RFWB Capacity 200 Gallons (757 Liters) System tested and certified by NSF International against NSF/ANSI Standard 53 for the reduction of Chlorine Taste...


