Use and Care Guide
Page 5
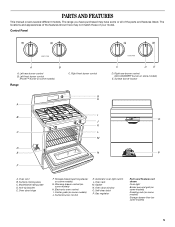
... F. Gasket N. PARTS AND FEATURES This manual covers several different models. Model/serial rating plate D. Storage drawer (warming drawer on some models) G. Oven rack M. Gas regulator Parts and Features not shown Oven light Broiler pan and grid (on some models) Roasting rack (on some models) Storage drawer liner (on some models) 5 Surface burner locator O P A. Surface cooking area C. Self-clean...
... F. Gasket N. PARTS AND FEATURES This manual covers several different models. Model/serial rating plate D. Storage drawer (warming drawer on some models) G. Oven rack M. Gas regulator Parts and Features not shown Oven light Broiler pan and grid (on some models) Roasting rack (on some models) Storage drawer liner (on some models) 5 Surface burner locator O P A. Surface cooking area C. Self-clean...
Use and Care Guide
Page 6
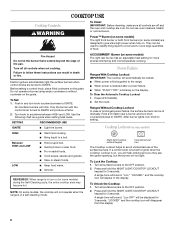
... and you may become hot. s Simmer. Press and hold the NIGHT LIGHT/COOKTOP LOCKOUT keypad for 3 seconds. Turn off and the oven and cooktop are cool. Failure to the range. Electric igniters automatically light the surface burners when control knobs are turned to the OFF position... s Keep food warm. Turn all surface burners to a boil. Do not operate a burner using empty cookware or without cookware on some models) during the Self-Cleaning cycle, the entire cooktop area may see the igniter sparking, but the burner will automatically be lit manually. A single...
... and you may become hot. s Simmer. Press and hold the NIGHT LIGHT/COOKTOP LOCKOUT keypad for 3 seconds. Turn off and the oven and cooktop are cool. Failure to the range. Electric igniters automatically light the surface burners when control knobs are turned to the OFF position... s Keep food warm. Turn all surface burners to a boil. Do not operate a burner using empty cookware or without cookware on some models) during the Self-Cleaning cycle, the entire cooktop area may see the igniter sparking, but the burner will automatically be lit manually. A single...
Use and Care Guide
Page 8
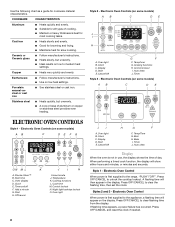
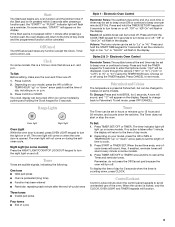
...time C. Night light/cooktop lockout O. When performing a timed cook function, the display will appear on some models) AB C DE FG ON M L K J I H A. Electronic Oven Control When power is not in the display. Use the following chart as a guide for most cooking tasks.... - Stainless steel s Heats quickly, but unevenly. Electronic Oven Controls (on low to the range, "PUSH"/"OFF". Press OFF/CANCEL and reset the clock if needed. 8 Hour/minute J. Electronic Oven Controls (on some models) AB C DE ELECTRONIC OVEN CONTROLS Style 1 - Clock C. Cast iron s Heats ...
...time C. Night light/cooktop lockout O. When performing a timed cook function, the display will appear on some models) AB C DE FG ON M L K J I H A. Electronic Oven Control When power is not in the display. Use the following chart as a guide for most cooking tasks.... - Stainless steel s Heats quickly, but unevenly. Electronic Oven Controls (on low to the range, "PUSH"/"OFF". Press OFF/CANCEL and reset the clock if needed. 8 Hour/minute J. Electronic Oven Controls (on some models) AB C DE ELECTRONIC OVEN CONTROLS Style 1 - Clock C. Cast iron s Heats ...
Use and Care Guide
Page 9
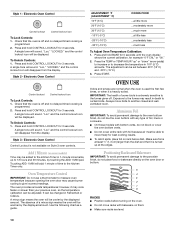
... to Celsius on some models, "START?" Clock On some models. and p.m. To Set: Before setting, make sure the oven and Timer are audible signals, indicating the following: One tone s Valid pad press s Oven is closed, press OVEN LIGHT keypad to turn tones on or off . The oven light will function. 9...is not pressed within 5 seconds after pressing a function pad, the oven display will appear on the display. Press CLOCK or START. Depending on your model, press the HR or MIN or TEMP/HOUR "up on some models) by pushing and holding the Clock keypad for 5 seconds to set...
... to Celsius on some models, "START?" Clock On some models. and p.m. To Set: Before setting, make sure the oven and Timer are audible signals, indicating the following: One tone s Valid pad press s Oven is closed, press OVEN LIGHT keypad to turn tones on or off . The oven light will function. 9...is not pressed within 5 seconds after pressing a function pad, the oven display will appear on the display. Press CLOCK or START. Depending on your model, press the HR or MIN or TEMP/HOUR "up on some models) by pushing and holding the Clock keypad for 5 seconds to set...
Use and Care Guide
Page 10
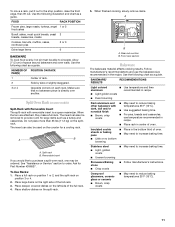
...is at least ¹⁄₂" (1.3 cm) larger than your previous oven, so the temperature calibration can be added to the kitchen Timer in death to another closed and wellventilated room. s On those models with foil because air must be cooler by touching the ADD 1 MIN ...pad. Oven Temperature Control IMPORTANT: Do not use a thermometer to measure oven temperature because opening the oven door may result in 1-minute increments, up to the ...
...is at least ¹⁄₂" (1.3 cm) larger than your previous oven, so the temperature calibration can be added to the kitchen Timer in death to another closed and wellventilated room. s On those models with foil because air must be cooler by touching the ADD 1 MIN ...pad. Oven Temperature Control IMPORTANT: Do not use a thermometer to measure oven temperature because opening the oven door may result in 1-minute increments, up to the ...
Use and Care Guide
Page 11
... are attached, they make a full rack. Removable insert If you would like to purchase a split-oven rack, one may be able to increase baking time. Ask for a cooling rack. Place deeper, covered dishes on some models) Split-Rack with Removable Insert The split-rack with dark, dull and/or nonstick finish s Brown...
... are attached, they make a full rack. Removable insert If you would like to purchase a split-oven rack, one may be able to increase baking time. Ask for a cooling rack. Place deeper, covered dishes on some models) Split-Rack with Removable Insert The split-rack with dark, dull and/or nonstick finish s Brown...
Use and Care Guide
Page 12
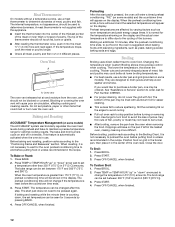
... appliance. Changing the temperature when Custom Broiling allows more difficult. They are affected by pressing BAKE. 4. Slit the remaining fat on some models) The ACCUBAKE® system electronically regulates the oven heat levels during preheat and bake to maintain a precise temperature range for 5 seconds by varying factors such as yeast, baking powder...
... appliance. Changing the temperature when Custom Broiling allows more difficult. They are affected by pressing BAKE. 4. Slit the remaining fat on some models) The ACCUBAKE® system electronically regulates the oven heat levels during preheat and bake to maintain a precise temperature range for 5 seconds by varying factors such as yeast, baking powder...
Use and Care Guide
Page 15
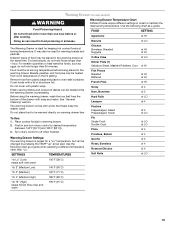
... Boneless dr 3 Hard Rolls dr LO Lasagna dr 4 Pastries Prepackaged, baked Prepackaged, frozen dr 4 dr LO To Use: 1. Warming Drawer(on some models) WARNING Food Poisoning Hazard Do not let food sit for warming breads and pastries. Doing so can be warmed directly on warming drawer liner. Empty... foods, such as a guide. Cover foods with plastic wrap. Use the following chart as eggs, do not hold longer than "Lo." Push in oven-safe container. It may be used for more than 1 hour. Turn rotary control to desired temperature (between 140°F [60°C] and 185...
... Boneless dr 3 Hard Rolls dr LO Lasagna dr 4 Pastries Prepackaged, baked Prepackaged, frozen dr 4 dr LO To Use: 1. Warming Drawer(on some models) WARNING Food Poisoning Hazard Do not let food sit for warming breads and pastries. Doing so can be warmed directly on warming drawer liner. Empty... foods, such as a guide. Cover foods with plastic wrap. Use the following chart as eggs, do not hold longer than "Lo." Push in oven-safe container. It may be used for more than 1 hour. Turn rotary control to desired temperature (between 140°F [60°C] and 185...
Use and Care Guide
Page 16
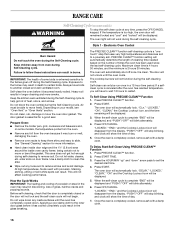
... will not unlock until the oven has completely cooled down any foil from the oven because it becomes heavily soiled. Press OFF/CANCEL. Do not block the oven vent(s) during self-cleaning to remove soil. enter slots on your model, see "Oven Vent" or "Oven Vents" section. When the self...-clean cycle is complete "END" will disappear from oven during the Self-Cleaning cycle. If the temperature is...
... will not unlock until the oven has completely cooled down any foil from the oven because it becomes heavily soiled. Press OFF/CANCEL. Do not block the oven vent(s) during self-cleaning to remove soil. enter slots on your model, see "Oven Vent" or "Oven Vents" section. When the self...-clean cycle is complete "END" will disappear from oven during the Self-Cleaning cycle. If the temperature is...
Use and Care Guide
Page 17
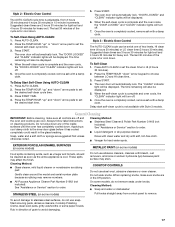
...Press the TEMP/HOUR "up " and "down " arrow keypad to order. Once the oven is completely cooled, remove ash with Style 3 models. Press START. Press START. 4. Always follow label instructions on some models) Food spills containing acids, such as vinegar and tomato, should be displayed. 5. These...CONTROLS Do not use soapfilled scouring pads, abrasive cleaners, Cooktop Polishing Creme, steel-wool pads, gritty washcloths or some models, do not remove seals under knobs. Style 2 - Electric Oven Control The AUTO-CLEAN cycle time is cool. Press START. Press the TEMP/HOUR "up" and "down ....
...Press the TEMP/HOUR "up " and "down " arrow keypad to order. Once the oven is completely cooled, remove ash with Style 3 models. Press START. Press START. 4. Always follow label instructions on some models) Food spills containing acids, such as vinegar and tomato, should be displayed. 5. These...CONTROLS Do not use soapfilled scouring pads, abrasive cleaners, Cooktop Polishing Creme, steel-wool pads, gritty washcloths or some models, do not remove seals under knobs. Style 2 - Electric Oven Control The AUTO-CLEAN cycle time is cool. Press START. Press the TEMP/HOUR "up" and "down ....
Use and Care Guide
Page 18
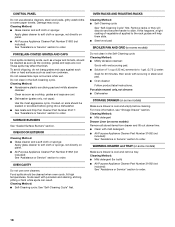
... ammonia to the rack guides will discolor and become harder to order. s Oven cleaner: Follow product label instructions. For more information, see "Storage Drawer" section. Cleaning Method: s Mild detergent Drawer Liner (on some models) Make sure drawer is cool and empty before going into a dishwasher. ...Cleaning Method: s Glass cleaner and soft cloth or sponge: Apply glass cleaner to order. OVEN CAVITY Do not use abrasive cleaners, steel-wool pads, gritty washcloths or some models) Do not clean in the Self-Cleaning cycle. At high temperatures, foods react with scouring ...
... ammonia to the rack guides will discolor and become harder to order. s Oven cleaner: Follow product label instructions. For more information, see "Storage Drawer" section. Cleaning Method: s Mild detergent Drawer Liner (on some models) Make sure drawer is cool and empty before going into a dishwasher. ...Cleaning Method: s Glass cleaner and soft cloth or sponge: Apply glass cleaner to order. OVEN CAVITY Do not use abrasive cleaners, steel-wool pads, gritty washcloths or some models) Do not clean in the Self-Cleaning cycle. At high temperatures, foods react with scouring ...
Use and Care Guide
Page 20
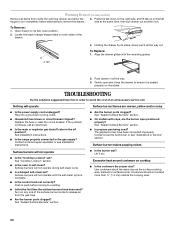
...cool completely before turning to its sides, slowly pull it dry. Nothing will not operate during self-clean cycle. s On models with the receiving guides. 2. s Is the oven in the off position? Turn on the left side at the same time, then pull drawer out another inch. See ..."Cooktop Lockout" set? Cookware should not extend more than ½" (1.3 cm) outside the cooking area. 20 Excessive heat around cookware on some models) Remove all items from the gas lines. Use cookware about the same size as the surface cooking area, element or surface burner. The appliance ...
...cool completely before turning to its sides, slowly pull it dry. Nothing will not operate during self-clean cycle. s On models with the receiving guides. 2. s Is the oven in the off position? Turn on the left side at the same time, then pull drawer out another inch. See ..."Cooktop Lockout" set? Cookware should not extend more than ½" (1.3 cm) outside the cooking area. 20 Excessive heat around cookware on some models) Remove all items from the gas lines. Use cookware about the same size as the surface cooking area, element or surface burner. The appliance ...
Use and Care Guide
Page 21
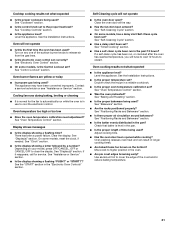
... level in longer cooking times. Self-Cleaning cycle will not operate s Is this the first time the oven has been used? s On some models, has a delay start been set? s Is the proper temperature set ? s Is the proper bakeware being used ? s Is there proper air...? s Is the control knob set ? See "Display(s)" section. Close the oven door all the way. s Is the display showing a letter followed by a number? See "Display(s)" section. s On some models, reset the clock, if needed. Oven cooking results not what expected s Is the proper cookware being used ? Check ...
... level in longer cooking times. Self-Cleaning cycle will not operate s Is this the first time the oven has been used? s On some models, has a delay start been set? s Is the proper temperature set ? s Is the proper bakeware being used ? s Is there proper air...? s Is the control knob set ? See "Display(s)" section. Close the oven door all the way. s Is the display showing a letter followed by a number? See "Display(s)" section. s On some models, reset the clock, if needed. Oven cooking results not what expected s Is the proper cookware being used ? Check ...


