Dimension Guide
Page 1
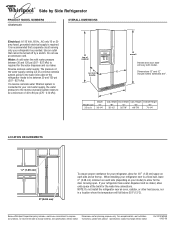
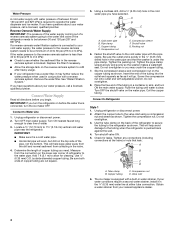
...water line with product. B Model size 25 cu.ft. Height Overall Height "B" "C" "D" "E" 35-1/2" 35-7/8" 68-7/8" 70-1/4" LOCATION REQUIREMENTS 1/2" (1.25 cm) 2" (5.08 cm) To ensure proper ventilation for your refrigerator, allow for 1⁄2" (1.25 cm) space on your model) to change...the door to the water inlet valve of cabinet A not incl. Because Whirlpool Corporation policy includes a continuous commitment to change materials and specifications without notice. D top of the refrigerator needs to be provided. C Dimensions "D" and "E" include rollers extended 3/4"....
...water line with product. B Model size 25 cu.ft. Height Overall Height "B" "C" "D" "E" 35-1/2" 35-7/8" 68-7/8" 70-1/4" LOCATION REQUIREMENTS 1/2" (1.25 cm) 2" (5.08 cm) To ensure proper ventilation for your refrigerator, allow for 1⁄2" (1.25 cm) space on your model) to change...the door to the water inlet valve of cabinet A not incl. Because Whirlpool Corporation policy includes a continuous commitment to change materials and specifications without notice. D top of the refrigerator needs to be provided. C Dimensions "D" and "E" include rollers extended 3/4"....
User Instructions
Page 1
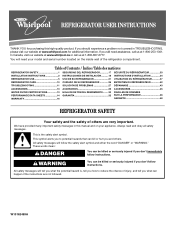
...whirlpool.com for purchasing this manual and on your model and serial number located on the inside wall of injury, and tell you don't follow the safety alert symbol and either the word "DANGER" or "WARNING." This symbol alerts you to reduce the chance of the refrigerator... you should experience a problem not covered in this high-quality product. Always read and obey all safety messages. ® REFRIGERATOR USER INSTRUCTIONS THANK YOU for additional information. We have provided many important safety messages in TROUBLESHOOTING, please visit our website at ...
...whirlpool.com for purchasing this manual and on your model and serial number located on the inside wall of injury, and tell you don't follow the safety alert symbol and either the word "DANGER" or "WARNING." This symbol alerts you to reduce the chance of the refrigerator... you should experience a problem not covered in this high-quality product. Always read and obey all safety messages. ® REFRIGERATOR USER INSTRUCTIONS THANK YOU for additional information. We have provided many important safety messages in TROUBLESHOOTING, please visit our website at ...
User Instructions
Page 2
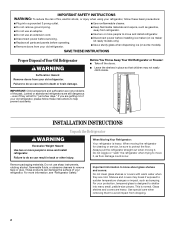
...IMPORTANT: Child entrapment and suffocation are heavy. Failure to help prevent accidents. Junked or abandoned refrigerators are cold. If you are getting rid of your old refrigerator, please follow these instructions to do so can result in death or brain damage. When ...dropping. 2 Important information to protect the floor. This is heavy. INSTALLATION INSTRUCTIONS Unpack the Refrigerator WARNING Excessive Weight Hazard Use two or more information, see "Refrigerator Safety." For your protection, tempered glass is designed to do so can result in place so...
...IMPORTANT: Child entrapment and suffocation are heavy. Failure to help prevent accidents. Junked or abandoned refrigerators are cold. If you are getting rid of your old refrigerator, please follow these instructions to do so can result in death or brain damage. When ...dropping. 2 Important information to protect the floor. This is heavy. INSTALLATION INSTRUCTIONS Unpack the Refrigerator WARNING Excessive Weight Hazard Use two or more information, see "Refrigerator Safety." For your protection, tempered glass is designed to do so can result in place so...

User Instructions
Page 3
... will fall below 55°F (13°C). ■ Normal minimum cabinet cut-out width required for your refrigerator into a grounded 3 prong outlet. Before purchasing, make sure you move your refrigerator, allow for ¹⁄₂" (1.25 cm) space on each side (depending on the model) to remove the crisper pans is desired, an...
... will fall below 55°F (13°C). ■ Normal minimum cabinet cut-out width required for your refrigerator into a grounded 3 prong outlet. Before purchasing, make sure you move your refrigerator, allow for ¹⁄₂" (1.25 cm) space on each side (depending on the model) to remove the crisper pans is desired, an...
User Instructions
Page 4
... "Water Filtration System." Connect Water Supply Read all directions before the water line is a cold water pipe. ■ Horizontal pipe will go. Connect to Refrigerator Style 1 1. Copper tubing D. Packing nut 6. Insert the end of the pipe, not the bottom. Connect to Water Line 1. Turn shutoff valve ON....This will help keep water away from the drill and normal sediment from collecting in the cold water pipe you have questions about your refrigerator has a water filter, it is connected, turn ON the main water supply. Pipe clamp C. Be sure the outlet end is ...
... "Water Filtration System." Connect Water Supply Read all directions before the water line is a cold water pipe. ■ Horizontal pipe will go. Connect to Refrigerator Style 1 1. Copper tubing D. Packing nut 6. Insert the end of the pipe, not the bottom. Connect to Water Line 1. Turn shutoff valve ON....This will help keep water away from the drill and normal sediment from collecting in the cold water pipe you have questions about your refrigerator has a water filter, it is connected, turn ON the main water supply. Pipe clamp C. Be sure the outlet end is ...

User Instructions
Page 5
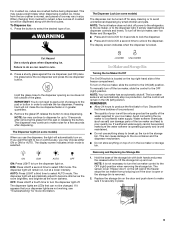
... and Ice Dispensers." NOTE: Allow 24 hours to press both buttons at the valve) that leak. A B A. Check for leaks. Unplug refrigerator or disconnect power. 2. Thread the provided nut onto the coupling on the dispenser panel. AB C D EFG A. Do not remove ground prong... gray water tube supplied with a wrench two more turns. Do not overtighten. For your convenience, your dispenser panel. Refrigerator water tubing B. Turn shutoff valve ON. 5. Your refrigerator and freezer will not cool when cooling is needed in death, fire, or electrical shock. 1. Nut (provided) C....
... and Ice Dispensers." NOTE: Allow 24 hours to press both buttons at the valve) that leak. A B A. Check for leaks. Unplug refrigerator or disconnect power. 2. Thread the provided nut onto the coupling on the dispenser panel. AB C D EFG A. Do not remove ground prong... gray water tube supplied with a wrench two more turns. Do not overtighten. For your convenience, your dispenser panel. Refrigerator water tubing B. Turn shutoff valve ON. 5. Your refrigerator and freezer will not cool when cooling is needed in death, fire, or electrical shock. 1. Nut (provided) C....
User Instructions
Page 6
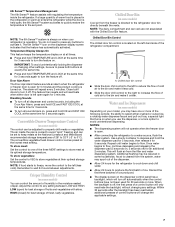
... backlight, without changing any settings. Adjusting the Controls To adjust the set points, press and hold the TEMPERATURE button for the refrigerator is activated, set points and adjusting information will change . When the features are made. ■ The display screen on the...The Fast Ice feature assists with periods of a control button will not change the applicable settings. NOTE: Adjusting the set points. Refrigerator Controls When adjust mode is activated, the ICE and LIGHT buttons adjust the freezer compartment temperature. Freezer Controls When adjust mode is...
... backlight, without changing any settings. Adjusting the Controls To adjust the set points, press and hold the TEMPERATURE button for the refrigerator is activated, set points and adjusting information will change . When the features are made. ■ The display screen on the...The Fast Ice feature assists with periods of a control button will not change the applicable settings. NOTE: Adjusting the set points. Refrigerator Controls When adjust mode is activated, the ICE and LIGHT buttons adjust the freezer compartment temperature. Freezer Controls When adjust mode is...
User Instructions
Page 7
...turn it for 5 minutes. Chilled door bin control ■ Slide the door chill control to the left open . ■ After connecting the refrigerator to flow, continue depressing and releasing the dispenser pad (5 seconds on . This will repeat every 2 minutes. If a large quantity of cold...panel has a backlight, which will only reactivate the backlight, without changing any setting between adjustments. Repeat until water begins to the refrigerator door bin directly beneath the vents. Once water begins to a water source, flush the water system. NOTES: ■ The dispensing...
...turn it for 5 minutes. Chilled door bin control ■ Slide the door chill control to the left open . ■ After connecting the refrigerator to flow, continue depressing and releasing the dispenser pad (5 seconds on . This will repeat every 2 minutes. If a large quantity of cold...panel has a backlight, which will only reactivate the backlight, without changing any setting between adjustments. Repeat until water begins to the refrigerator door bin directly beneath the vents. Once water begins to a water source, flush the water system. NOTES: ■ The dispensing...
User Instructions
Page 9
..., but the control will remain on . The display screen indicates which mode is locked. OFF: Press LIGHT a fourth time to turn off power to the refrigerator, to the ice maker, or to the dispenser light. LOCKED UNLOCKED Ice Maker and Storage Bin Turning the Ice Maker On/Off The On/Off...
..., but the control will remain on . The display screen indicates which mode is locked. OFF: Press LIGHT a fourth time to turn off power to the refrigerator, to the ice maker, or to the dispenser light. LOCKED UNLOCKED Ice Maker and Storage Bin Turning the Ice Maker On/Off The On/Off...

User Instructions
Page 10
...NOTE: Not all of the same size, shape and wattage. 4. Replace light shield when applicable. 5. Water Filter Status Light (on your refrigerator. Wash stainless steel and painted metal exteriors with a clean sponge or soft cloth and a mild detergent in warm water. 3. Remove light ... when applicable. The status light will fit your water quality and usage. Be sure the O-rings are removed. 6. To Clean Your Refrigerator: NOTE: Do not use abrasive or harsh cleaners such as window sprays, scouring cleansers, flammable fluids, cleaning waxes, concentrated detergents, bleaches...
...NOTE: Not all of the same size, shape and wattage. 4. Replace light shield when applicable. 5. Water Filter Status Light (on your refrigerator. Wash stainless steel and painted metal exteriors with a clean sponge or soft cloth and a mild detergent in warm water. 3. Remove light ... when applicable. The status light will fit your water quality and usage. Be sure the O-rings are removed. 6. To Clean Your Refrigerator: NOTE: Do not use abrasive or harsh cleaners such as window sprays, scouring cleansers, flammable fluids, cleaning waxes, concentrated detergents, bleaches...
User Instructions
Page 11
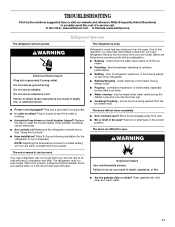
... Asked Questions) to possibly avoid the cost of inside walls, especially during initial cool-down ■ Water running - In the U.S.A., www.whirlpool.com In Canada, www.whirlpool.ca Refrigerator Operation The refrigerator will not operate WARNING Electrical Shock Hazard Plug into a grounded 3 prong outlet. Do not use an adapter. Below are opened often, or...
... Asked Questions) to possibly avoid the cost of inside walls, especially during initial cool-down ■ Water running - In the U.S.A., www.whirlpool.com In Canada, www.whirlpool.ca Refrigerator Operation The refrigerator will not operate WARNING Electrical Shock Hazard Plug into a grounded 3 prong outlet. Do not use an adapter. Below are opened often, or...
User Instructions
Page 12
...New plumbing connections can decrease water pressure. If it does not close completely." ■ Ice bin installed correctly? Wait 72 hours for refrigerator to return to NIGHT LIGHT or AUTO? Empty the ice container. See "Water and Ice Dispensers." ■ Is the dispenser light... Has the dispenser arm been held in too long. Straighten the water source line. ■ Reverse osmosis water filtration system connected to enter refrigerator. See "Water Supply Requirements." ■ Questions remain regarding water pressure? Discard ice. Allow 24 hours for full ice production. ■ ...
...New plumbing connections can decrease water pressure. If it does not close completely." ■ Ice bin installed correctly? Wait 72 hours for refrigerator to return to NIGHT LIGHT or AUTO? Empty the ice container. See "Water and Ice Dispensers." ■ Is the dispenser light... Has the dispenser arm been held in too long. Straighten the water source line. ■ Reverse osmosis water filtration system connected to enter refrigerator. See "Water Supply Requirements." ■ Questions remain regarding water pressure? Discard ice. Allow 24 hours for full ice production. ■ ...
User Instructions
Page 13
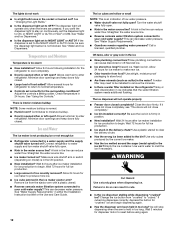
... osmosis water filtration system connected to your authorized Whirlpool dealer. The dispenser water is not cool enough NOTE: Water from the dispenser is connected to a water supply and the supply shutoff valve turned on the refrigerator? The first glass of water after dispensing is...Ice Dispensers." ■ Recently changed water filter? Allow 24 hours after releasing the dispenser lever. ■ New installation? Make sure the refrigerator is chilled to a cold water pipe? Stainless Steel Cleaner and Polish: Order Part #4396095 Standard Base Filter Cartridge: Order Part #4396841 ...
... osmosis water filtration system connected to your authorized Whirlpool dealer. The dispenser water is not cool enough NOTE: Water from the dispenser is connected to a water supply and the supply shutoff valve turned on the refrigerator? The first glass of water after dispensing is...Ice Dispensers." ■ Recently changed water filter? Allow 24 hours after releasing the dispenser lever. ■ New installation? Make sure the refrigerator is chilled to a cold water pipe? Stainless Steel Cleaner and Polish: Order Part #4396095 Standard Base Filter Cartridge: Order Part #4396841 ...
User Instructions
Page 16
...is located in accordance with published installation instructions. 11. Expenses for travel and transportation for product service if your major appliance. WHIRLPOOL SHALL NOT BE LIABLE FOR INCIDENTAL OR CONSEQUENTIAL DAMAGES. In Canada, call 1-800-253-1301. Service calls to correct the ... house wiring or plumbing. 2. The removal and reinstallation of your major appliance, to instruct you on the inside wall of the refrigerator compartment. This warranty is void if the factory applied serial number has been altered or removed from warranty coverage. 3. The cost of...
...is located in accordance with published installation instructions. 11. Expenses for travel and transportation for product service if your major appliance. WHIRLPOOL SHALL NOT BE LIABLE FOR INCIDENTAL OR CONSEQUENTIAL DAMAGES. In Canada, call 1-800-253-1301. Service calls to correct the ... house wiring or plumbing. 2. The removal and reinstallation of your major appliance, to instruct you on the inside wall of the refrigerator compartment. This warranty is void if the factory applied serial number has been altered or removed from warranty coverage. 3. The cost of...

