Dimension Guide
Page 1
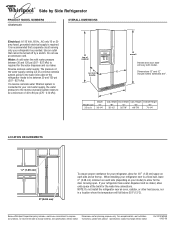
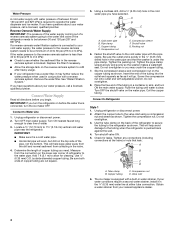
... amp fused, grounded electrical supply is recommended that a separate circuit serving only your refrigerator be provided. If a reverse osmosis water filtration system is required for the water line connections. B Model size 25 cu.ft. Depth "A" 33-1/4" Cab. Ref. Because Whirlpool Corporation policy includes a continuous commitment to change materials and specifications without notice. For...
... amp fused, grounded electrical supply is recommended that a separate circuit serving only your refrigerator be provided. If a reverse osmosis water filtration system is required for the water line connections. B Model size 25 cu.ft. Depth "A" 33-1/4" Cab. Ref. Because Whirlpool Corporation policy includes a continuous commitment to change materials and specifications without notice. For...
User Instructions
Page 1
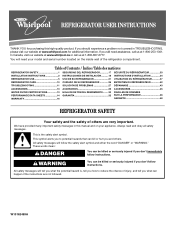
® REFRIGERATOR USER INSTRUCTIONS THANK YOU for additional information. In Canada, visit our website at www.whirlpool.ca or call us at www.whirlpool.com for purchasing this manual and on the inside wall of others . We have provided many ...and serial number located on your appliance. Table of Contents / Índice / Table des matières REFRIGERATOR SAFETY 1 INSTALLATION INSTRUCTIONS 2 REFRIGERATOR USE 5 REFRIGERATOR CARE 10 TROUBLESHOOTING 11 ACCESSORIES 13 WATER FILTER CERTIFICATIONS 13 PERFORMANCE DATA SHEETS 14 WARRANTY 16 SEGURIDAD DEL REFRIGERADOR 17...
® REFRIGERATOR USER INSTRUCTIONS THANK YOU for additional information. In Canada, visit our website at www.whirlpool.ca or call us at www.whirlpool.com for purchasing this manual and on the inside wall of others . We have provided many ...and serial number located on your appliance. Table of Contents / Índice / Table des matières REFRIGERATOR SAFETY 1 INSTALLATION INSTRUCTIONS 2 REFRIGERATOR USE 5 REFRIGERATOR CARE 10 TROUBLESHOOTING 11 ACCESSORIES 13 WATER FILTER CERTIFICATIONS 13 PERFORMANCE DATA SHEETS 14 WARRANTY 16 SEGURIDAD DEL REFRIGERADOR 17...
User Instructions
Page 2
... sure to protect the floor. This is heavy. IMPORTANT: Child entrapment and suffocation are cold. Junked or abandoned refrigerators are heavy. When Moving Your Refrigerator: Your refrigerator is normal. Remove packaging materials. Use special care when removing them to do so can result in back or ... flammable fluids, or abrasive cleaners to sudden temperature changes or impact, such as floor damage could occur. Before You Throw Away Your Old Refrigerator or Freezer: ■ Take off the doors. ■ Leave the shelves in death or brain damage. When moving it , as bumping...
... sure to protect the floor. This is heavy. IMPORTANT: Child entrapment and suffocation are cold. Junked or abandoned refrigerators are heavy. When Moving Your Refrigerator: Your refrigerator is normal. Remove packaging materials. Use special care when removing them to do so can result in back or ... flammable fluids, or abrasive cleaners to sudden temperature changes or impact, such as floor damage could occur. Before You Throw Away Your Old Refrigerator or Freezer: ■ Take off the doors. ■ Leave the shelves in death or brain damage. When moving it , as bumping...

User Instructions
Page 3
...the product is placed against an extended wall and the ability to OFF and then disconnect the refrigerator from refrigerator. Use an outlet that a separate circuit serving only your refrigerator, allow for the door to follow the instructions provided with any type of 54" (137...end or two adjustable wrenches Drill bit ■ Cordless drill NOTE: Your refrigerator dealer has a kit available with your refrigerator into a grounded 3 prong outlet. To ensure proper ventilation for the water line connections. 1/2" (1.25 cm) 2" (5.08 cm) NOTES: ■ It is recommended that cannot...
...the product is placed against an extended wall and the ability to OFF and then disconnect the refrigerator from refrigerator. Use an outlet that a separate circuit serving only your refrigerator, allow for the door to follow the instructions provided with any type of 54" (137...end or two adjustable wrenches Drill bit ■ Cordless drill NOTE: Your refrigerator dealer has a kit available with your refrigerator into a grounded 3 prong outlet. To ensure proper ventilation for the water line connections. 1/2" (1.25 cm) 2" (5.08 cm) NOTES: ■ It is recommended that cannot...
User Instructions
Page 4
... overtighten. 8. Flush the tubing until water is connected to 414 kPa). Compression nut D. Locate a ¹⁄₂" (12.70 mm) to Refrigerator Style 1 1. IMPORTANT: ■ Make sure it in a container or sink, and turn the ice maker OFF. Coil the copper tubing. Copper ...the storage tank on the reverse osmosis system to allow for leaks. Connect Water Supply Read all directions before the water line is blocked. Unplug refrigerator or disconnect power. 2. Add 7 ft (2.1 m) to refill after heavy usage. ■ If your water pressure, call a licensed, ...
... overtighten. 8. Flush the tubing until water is connected to 414 kPa). Compression nut D. Locate a ¹⁄₂" (12.70 mm) to Refrigerator Style 1 1. IMPORTANT: ■ Make sure it in a container or sink, and turn the ice maker OFF. Coil the copper tubing. Copper ...the storage tank on the reverse osmosis system to allow for leaks. Connect Water Supply Read all directions before the water line is blocked. Unplug refrigerator or disconnect power. 2. Add 7 ft (2.1 m) to refill after heavy usage. ■ If your water pressure, call a licensed, ...

User Instructions
Page 5
... sure to turn cooling off . To view set points are preset at the valve) that the controls are located on the rear of the refrigerator. 3. Style 2 1. Nut (purchased) G. Thread the provided nut onto the water valve as shown. Do not overtighten. Do not remove ... Bulb D. Plug into a grounded 3 prong outlet. Check for leaks. The factory recommended set points, press the TEMPERATURE button on the rear of the refrigerator. 3. Style 3 1. Remove and discard the black nylon plug from the gray water tube on your dispenser panel. Do not use an adapter. Nut (...
... sure to turn cooling off . To view set points are preset at the valve) that the controls are located on the rear of the refrigerator. 3. Style 2 1. Nut (purchased) G. Thread the provided nut onto the water valve as shown. Do not overtighten. Do not remove ... Bulb D. Plug into a grounded 3 prong outlet. Check for leaks. The factory recommended set points, press the TEMPERATURE button on the rear of the refrigerator. 3. Style 3 1. Remove and discard the black nylon plug from the gray water tube on your dispenser panel. Do not use an adapter. Nut (...
User Instructions
Page 6
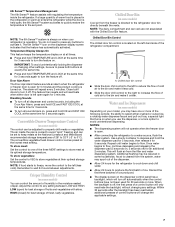
... control panel has a backlight, which will turn off , the first press of a control button will appear on the dispenser display. Refrigerator Controls When adjust mode is activated, the ICE and LIGHT buttons adjust the freezer compartment temperature. The set point range for 30 seconds ... time to a colder temperature may spoil. Freezer Controls When adjust mode is activated, the LOCK and FAST ICE/COOL buttons adjust the refrigerator compartment temperature. The Fast Ice setting will turn on the display screen. NOTE: To view Celsius temperatures, press the FILTER button when ...
... control panel has a backlight, which will turn off , the first press of a control button will appear on the dispenser display. Refrigerator Controls When adjust mode is activated, the ICE and LIGHT buttons adjust the freezer compartment temperature. The set point range for 30 seconds ... time to a colder temperature may spoil. Freezer Controls When adjust mode is activated, the LOCK and FAST ICE/COOL buttons adjust the refrigerator compartment temperature. The Fast Ice setting will turn on the display screen. NOTE: To view Celsius temperatures, press the FILTER button when ...
User Instructions
Page 7
... when you may spurt out of the dispenser. ■ Allow 24 hours for 5 minutes and the product cooling is directed to the refrigerator door bin directly beneath the vents. Discard the first three batches of a control button will change the applicable settings. 7 When the backlight...leafy vegetables. The convertible vegetable/meat drawer control comes preset at the lowest meat setting. LOW (open . ■ After connecting the refrigerator to press any setting between adjustments. NOTE: The dairy compartment and can be required in some models) You can control the amount of...
... when you may spurt out of the dispenser. ■ Allow 24 hours for 5 minutes and the product cooling is directed to the refrigerator door bin directly beneath the vents. Discard the first three batches of a control button will change the applicable settings. 7 When the backlight...leafy vegetables. The convertible vegetable/meat drawer control comes preset at the lowest meat setting. LOW (open . ■ After connecting the refrigerator to press any setting between adjustments. NOTE: The dairy compartment and can be required in some models) You can control the amount of...
User Instructions
Page 9
... door is open or the storage bin is securely in the ice maker or storage bin. To turn the dispenser light off power to the refrigerator, to the ice maker, or to select the desired type of or in place. 9
... door is open or the storage bin is securely in the ice maker or storage bin. To turn the dispenser light off power to the refrigerator, to the ice maker, or to select the desired type of or in place. 9

User Instructions
Page 10
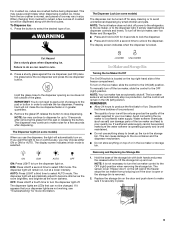
... depending on some models) The water filter status light will change the filter sooner. Push the filter into place. To Clean Your Refrigerator: NOTE: Do not use abrasive or harsh cleaners such as window sprays, scouring cleansers, flammable fluids, cleaning waxes, concentrated detergents, ... Water Filter 1. To avoid odor transfer and drying out of the condenser. ■ Replace the base grille when finished. 5. Unplug refrigerator or disconnect power. 2. After changing the water filter, reset the status light by pressing and holding the FILTER button for routine condenser ...
... depending on some models) The water filter status light will change the filter sooner. Push the filter into place. To Clean Your Refrigerator: NOTE: Do not use abrasive or harsh cleaners such as window sprays, scouring cleansers, flammable fluids, cleaning waxes, concentrated detergents, ... Water Filter 1. To avoid odor transfer and drying out of the condenser. ■ Replace the base grille when finished. 5. Unplug refrigerator or disconnect power. 2. After changing the water filter, reset the status light by pressing and holding the FILTER button for routine condenser ...
User Instructions
Page 11
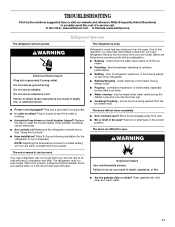
In the U.S.A., www.whirlpool.com In Canada, www.whirlpool.ca Refrigerator Operation The refrigerator will not operate WARNING Electrical Shock Hazard Plug into the drain pan ■ Creaking/Cracking - The refrigerator is added, doors are difficult to open ? may run longer than your old one due to its ...■ Door blocked open WARNING The motor seems to run even longer if the room is warm, a large food load is noisy Refrigerator noise has been reduced over the years. heard when the water valve opens to optimize performance ■ Rattling - Clean gaskets with an...
In the U.S.A., www.whirlpool.com In Canada, www.whirlpool.ca Refrigerator Operation The refrigerator will not operate WARNING Electrical Shock Hazard Plug into the drain pan ■ Creaking/Cracking - The refrigerator is added, doors are difficult to open ? may run longer than your old one due to its ...■ Door blocked open WARNING The motor seems to run even longer if the room is warm, a large food load is noisy Refrigerator noise has been reduced over the years. heard when the water valve opens to optimize performance ■ Rattling - Clean gaskets with an...
User Instructions
Page 12
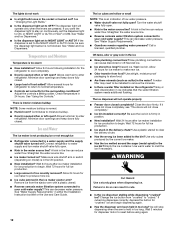
...; Door(s) opened often or left open . ■ Kink in the delivery chute? Wait 24 hours after ice maker installation for the refrigerator to be sure the dispenser light sensor is an indication of ice recently removed? Failure to produce more ice. ■ Ice cube jammed... is in the line can decrease water pressure. Temperature and Moisture Temperature is normal. ■ Humid room? See "Using the Controls." Connect refrigerator to your cold water supply? A kink in the ON position. ■ New installation? Wait 24 hours after ice maker installation for "crushed...
...; Door(s) opened often or left open . ■ Kink in the delivery chute? Wait 24 hours after ice maker installation for the refrigerator to be sure the dispenser light sensor is an indication of ice recently removed? Failure to produce more ice. ■ Ice cube jammed... is in the line can decrease water pressure. Temperature and Moisture Temperature is normal. ■ Humid room? See "Using the Controls." Connect refrigerator to your cold water supply? A kink in the ON position. ■ New installation? Wait 24 hours after ice maker installation for "crushed...
User Instructions
Page 13
... the first glass of water after dispensing is leaking from the dispenser NOTE: One or two drops of water. ■ Refrigerator connected to your authorized Whirlpool dealer. WATER FILTER CERTIFICATIONS ACCESSORIES To order replacement filters, call 1-800-807-6777. In Canada, call 1-800-442-9991 ... to cool completely. ■ Recently dispensed large amount of water may be cool. The water dispenser will not close completely." ■ Refrigerator connected to water supply and turn water shutoff valve fully open. ■ Is the water pressure at least 30 psi (207 kPa)? ...
... the first glass of water after dispensing is leaking from the dispenser NOTE: One or two drops of water. ■ Refrigerator connected to your authorized Whirlpool dealer. WATER FILTER CERTIFICATIONS ACCESSORIES To order replacement filters, call 1-800-807-6777. In Canada, call 1-800-442-9991 ... to cool completely. ■ Recently dispensed large amount of water may be cool. The water dispenser will not close completely." ■ Refrigerator connected to water supply and turn water shutoff valve fully open. ■ Is the water pressure at least 30 psi (207 kPa)? ...
User Instructions
Page 16
Service calls to correct the installation of your major appliance, to instruct you may contact Whirlpool at the address below . Service calls to refrigerator or freezer product failures. 7. DISCLAIMER OF IMPLIED WARRANTIES; LIMITATION OF REMEDIES CUSTOMER'S SOLE AND EXCLUSIVE REMEDY UNDER THIS LIMITED ... or removed from your home of your product or you would like to schedule service, you on the inside wall of the refrigerator compartment. Please keep this User Instructions and model number information for other damage to the finish of your major appliance is located...
Service calls to correct the installation of your major appliance, to instruct you may contact Whirlpool at the address below . Service calls to refrigerator or freezer product failures. 7. DISCLAIMER OF IMPLIED WARRANTIES; LIMITATION OF REMEDIES CUSTOMER'S SOLE AND EXCLUSIVE REMEDY UNDER THIS LIMITED ... or removed from your home of your product or you would like to schedule service, you on the inside wall of the refrigerator compartment. Please keep this User Instructions and model number information for other damage to the finish of your major appliance is located...

