
Dimension Guide
Page 1
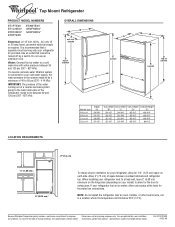
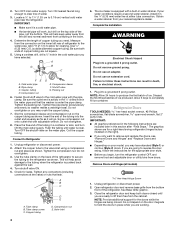
... system needs to be a minimum of space between 30 and 120 psi (207 - 827 kPa). Because Whirlpool Corporation policy includes a continuous commitment to a cold water line with product. Ref. ft. 19 cu. ft. Depth "A" 29-3/8" 31-1/2" 29-3/8" 31-1/2" Cab. Allow 3" (7.5 cm) of 40 ... 65-1/2" Overall Height "E" 66-1/4" 66-1/2" 66-1/4" 66-1/2 LOCATION REQUIREMENTS 1/2" (1.25 cm) 2" (5.08 cm) To ensure proper ventilation for your refrigerator, allow for the water line connections. IMPORTANT: The pressure of the water coming out of a reverse osmosis system going to the water inlet valve ...
... system needs to be a minimum of space between 30 and 120 psi (207 - 827 kPa). Because Whirlpool Corporation policy includes a continuous commitment to a cold water line with product. Ref. ft. 19 cu. ft. Depth "A" 29-3/8" 31-1/2" 29-3/8" 31-1/2" Cab. Allow 3" (7.5 cm) of 40 ... 65-1/2" Overall Height "E" 66-1/4" 66-1/2" 66-1/4" 66-1/2 LOCATION REQUIREMENTS 1/2" (1.25 cm) 2" (5.08 cm) To ensure proper ventilation for your refrigerator, allow for the water line connections. IMPORTANT: The pressure of the water coming out of a reverse osmosis system going to the water inlet valve ...
User Instructions
Page 1
... are very important. In Canada, visit our website at www.whirlpool.ca or call us at 1-800-807-6777. Table of Contents / Table des matières REFRIGERATOR SAFETY 1 INSTALLATION INSTRUCTIONS 2 REFRIGERATOR USE 7 REFRIGERATOR CARE 8 TROUBLESHOOTING 9 ACCESSORIES 10 WARRANTY 11 SÉCURITÉ...RÉFRIGÉRATEUR 19 ENTRETIEN DU RÉFRIGÉRATEUR 20 DÉPANNAGE 21 ACCESSOIRES 22 GARANTIE 23 REFRIGERATOR SAFETY Your safety and the safety of the refrigerator compartment. You will need assistance, call us at www.whirlpool.com for purchasing this ...
... are very important. In Canada, visit our website at www.whirlpool.ca or call us at 1-800-807-6777. Table of Contents / Table des matières REFRIGERATOR SAFETY 1 INSTALLATION INSTRUCTIONS 2 REFRIGERATOR USE 7 REFRIGERATOR CARE 8 TROUBLESHOOTING 9 ACCESSORIES 10 WARRANTY 11 SÉCURITÉ...RÉFRIGÉRATEUR 19 ENTRETIEN DU RÉFRIGÉRATEUR 20 DÉPANNAGE 21 ACCESSOIRES 22 GARANTIE 23 REFRIGERATOR SAFETY Your safety and the safety of the refrigerator compartment. You will need assistance, call us at www.whirlpool.com for purchasing this ...
User Instructions
Page 2
... Use two or more people to move it, as gasoline, away from the freezer and cause icicles to form. Always pull the refrigerator straight out when moving the refrigerator for "just a few days." These products can result in death or brain damage. even if they are still dangerous - Remove ...the package materials, clean the inside . If the insert is normal. IMPORTANT: Do not remove the white foam air return insert from your refrigerator. Important information to know about glass shelves and covers: Do not clean glass shelves or covers with warm water when they will sit for cleaning...
... Use two or more people to move it, as gasoline, away from the freezer and cause icicles to form. Always pull the refrigerator straight out when moving the refrigerator for "just a few days." These products can result in death or brain damage. even if they are still dangerous - Remove ...the package materials, clean the inside . If the insert is normal. IMPORTANT: Do not remove the white foam air return insert from your refrigerator. Important information to know about glass shelves and covers: Do not clean glass shelves or covers with warm water when they will sit for cleaning...
User Instructions
Page 3
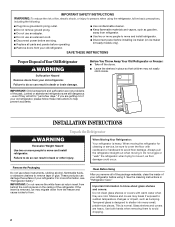
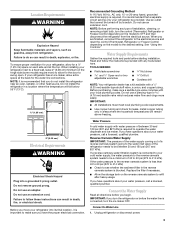
...water supply with a ¹⁄₄" (6.35 mm) saddle-type shutoff valve, a union, and copper tubing. If you have questions about your refrigerator, allow for a ½" (1.25 cm) space on the model) to be provided. To ensure proper ventilation for your water pressure, call a ...your cold water supply, the water pressure to the reverse osmosis system needs to operate the water dispenser and ice maker. Unplug refrigerator or disconnect power. 3 Location Requirements WARNING Explosion Hazard Keep flammable materials and vapors, such as gasoline, away from the electrical ...
...water supply with a ¹⁄₄" (6.35 mm) saddle-type shutoff valve, a union, and copper tubing. If you have questions about your refrigerator, allow for a ½" (1.25 cm) space on the model) to be provided. To ensure proper ventilation for your water pressure, call a ...your cold water supply, the water pressure to the reverse osmosis system needs to operate the water dispenser and ice maker. Unplug refrigerator or disconnect power. 3 Location Requirements WARNING Explosion Hazard Keep flammable materials and vapors, such as gasoline, away from the electrical ...
User Instructions
Page 4
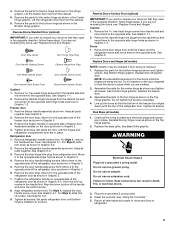
...keep water away from the drill and normal sediment from the cabinet. 2. Turn OFF main water supply. This will help keep both ends of the refrigerator. Measure from doors. Add 7 ft (2.1 m) to the water pipe. Compression sleeve F. Shutoff valve G. Do not overtighten. 8. Tighten the ...Pipe clamp C. Copper tubing D. Compression nut E. Packing nut 6. Fasten the shutoff valve to 3.18 cm) vertical cold water pipe near the refrigerator. Be sure the outlet end is under the pipe clamp. Tighten the pipe clamp screws slowly and evenly so washer makes a watertight seal. Do...
...keep water away from the drill and normal sediment from the cabinet. 2. Turn OFF main water supply. This will help keep both ends of the refrigerator. Measure from doors. Add 7 ft (2.1 m) to the water pipe. Compression sleeve F. Shutoff valve G. Do not overtighten. 8. Tighten the ...Pipe clamp C. Copper tubing D. Compression nut E. Packing nut 6. Fasten the shutoff valve to 3.18 cm) vertical cold water pipe near the refrigerator. Be sure the outlet end is under the pipe clamp. Tighten the pipe clamp screws slowly and evenly so washer makes a watertight seal. Do...
User Instructions
Page 5
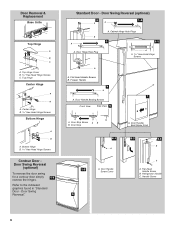
... is installed on product. Set aside the door until bottom hinge is reversed. 1. For Style 1, remove the handle screw cover. Remove the refrigerator handle assembly as shown. Remove the door hinge hole plug from the cabinet. 6. Remove the door stop . See Graphic 6-1. Cabinet 1. Remove...Screw Front Round-Head Handle Screw Cabinet 1. See Graphic 6-1. Remove the door handle sealing screws. Move them to the opposite side of the refrigerator door as shown in Graphic 1-2. Move it to the opposite side. Tighten all models) 1. Doors 1. See Bottom Hinge graphic. NOTE: ...
... is installed on product. Set aside the door until bottom hinge is reversed. 1. For Style 1, remove the handle screw cover. Remove the refrigerator handle assembly as shown. Remove the door hinge hole plug from the cabinet. 6. Remove the door stop . See Graphic 6-1. Cabinet 1. Remove...Screw Front Round-Head Handle Screw Cabinet 1. See Graphic 6-1. Remove the door handle sealing screws. Move them to the opposite side of the refrigerator door as shown in Graphic 1-2. Move it to the opposite side. Tighten all models) 1. Doors 1. See Bottom Hinge graphic. NOTE: ...
User Instructions
Page 6
Door Swing Reversal." Door Swing Reversal (optional) 2 1-2 A A B A A. Flat-Head Handle Screws B. Door Stop Screw A B B. Door Handle Seal Screw Front 6-1 A 1-2 A. Refrigerator Handle C. Top Hinge Cover B Hex-Head Hinge Screws C. Freezer Handle 4 A 7 A. Standard Door - Top Hinge Center Hinge A B A. Refer to the indicated graphics found in "Standard Door - ...
Door Swing Reversal." Door Swing Reversal (optional) 2 1-2 A A B A A. Flat-Head Handle Screws B. Door Stop Screw A B B. Door Handle Seal Screw Front 6-1 A 1-2 A. Refrigerator Handle C. Top Hinge Cover B Hex-Head Hinge Screws C. Freezer Handle 4 A 7 A. Standard Door - Top Hinge Center Hinge A B A. Refer to the indicated graphics found in "Standard Door - ...
User Instructions
Page 7
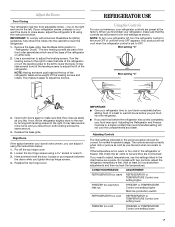
... the Base Grille graphic in the previous section should turn the leveling screw to the left . NOTE: To turn your refrigerator off, turn the refrigerator control to lower the refrigerator. 1. Open both doors again to make sure that they are preset at the factory. Loosen the top hinge screws using...can adjust it easier to close as easily as shown. When you like and when ice cream is too warm or too cold in the refrigerator or freezer, first check the air vents to adjust the leveling screws. Replace the base grille. This makes it using a socket or wrench....
... the Base Grille graphic in the previous section should turn the leveling screw to the left . NOTE: To turn your refrigerator off, turn the refrigerator control to lower the refrigerator. 1. Open both doors again to make sure that they are preset at the factory. Loosen the top hinge screws using...can adjust it easier to close as easily as shown. When you like and when ice cream is too warm or too cold in the refrigerator or freezer, first check the air vents to adjust the leveling screws. Replace the base grille. This makes it using a socket or wrench....

User Instructions
Page 8
... should produce approximately 8 to 12 batches of ice. See "Using the Control(s)." Avoid connecting the ice maker to avoid water spots. REFRIGERATOR CARE Cleaning WARNING Explosion Hazard Use nonflammable cleaner. To help avoid corrosion of the water supplied to your ice maker. Do not use ... quality of your stainless steel, keep your ice will raise the wire shutoff arm to the other harsh cleaning tools. 1. Both the refrigerator and freezer sections defrost automatically. Hand wash, rinse, and dry removable parts and interior surfaces thoroughly. Plug in warm water. HIGH (...
... should produce approximately 8 to 12 batches of ice. See "Using the Control(s)." Avoid connecting the ice maker to avoid water spots. REFRIGERATOR CARE Cleaning WARNING Explosion Hazard Use nonflammable cleaner. To help avoid corrosion of the water supplied to your ice maker. Do not use ... quality of your stainless steel, keep your ice will raise the wire shutoff arm to the other harsh cleaning tools. 1. Both the refrigerator and freezer sections defrost automatically. Hand wash, rinse, and dry removable parts and interior surfaces thoroughly. Plug in warm water. HIGH (...
User Instructions
Page 9
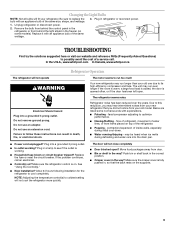
... the room is warm, a large food load is added, the door is on ? Plug in the way? In the U.S.A., www.whirlpool.com In Canada, www.whirlpool.ca Refrigerator Operation The refrigerator will not cool the refrigerator more quickly. Electrical Shock Hazard Plug into a grounded 3 prong outlet. ■ Is outlet working . ■ Household fuse blown or...
... the room is warm, a large food load is added, the door is on ? Plug in the way? In the U.S.A., www.whirlpool.com In Canada, www.whirlpool.ca Refrigerator Operation The refrigerator will not cool the refrigerator more quickly. Electrical Shock Hazard Plug into a grounded 3 prong outlet. ■ Is outlet working . ■ Household fuse blown or...
User Instructions
Page 10
... for the part number listed below or contact your cold water supply? Check temperature in the water source line? Wait 72 hours for the refrigerator to your authorized Whirlpool dealer. See "Water Supply Requirements." Off-taste, odor or gray color in the line can reduce water flow. Discard ice. See "Using the...
... for the part number listed below or contact your cold water supply? Check temperature in the water source line? Wait 72 hours for the refrigerator to your authorized Whirlpool dealer. See "Water Supply Requirements." Off-taste, odor or gray color in the line can reduce water flow. Discard ice. See "Using the...
User Instructions
Page 11
... additional product information, in accordance with Whirlpool's published installation instructions. 11. You can find your model number and serial number on the label, located on how to use or when it was purchased. Service calls to refrigerator or freezer product failures. 7. Cosmetic ...from warranty coverage. 4. Discoloration, rust, or oxidation of the refrigerator compartment. This warranty gives you specific legal rights, and you on the inside wall of stainless steel surfaces. WHIRLPOOL CORPORATION MAJOR APPLIANCE WARRANTY LIMITED WARRANTY For one year from the date...
... additional product information, in accordance with Whirlpool's published installation instructions. 11. You can find your model number and serial number on the label, located on how to use or when it was purchased. Service calls to refrigerator or freezer product failures. 7. Cosmetic ...from warranty coverage. 4. Discoloration, rust, or oxidation of the refrigerator compartment. This warranty gives you specific legal rights, and you on the inside wall of stainless steel surfaces. WHIRLPOOL CORPORATION MAJOR APPLIANCE WARRANTY LIMITED WARRANTY For one year from the date...
Parts Diagram
Page 1
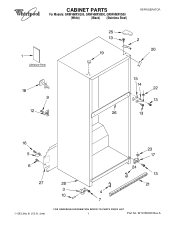
CABINET PARTS For Models: GR9FHMXVQ00, GR9FHMXVB00, GR9FHMXVS00 (White) (Black) (Stainless Steel) REFRIGERATOR 1−08 Litho In U.S.A. (rrm) 1 Part No. W10180450 Rev.A
CABINET PARTS For Models: GR9FHMXVQ00, GR9FHMXVB00, GR9FHMXVS00 (White) (Black) (Stainless Steel) REFRIGERATOR 1−08 Litho In U.S.A. (rrm) 1 Part No. W10180450 Rev.A
Parts Diagram
Page 10
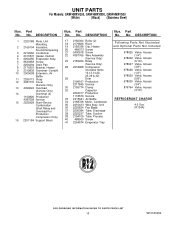
Part No. No. DESCRIPTION 17 2150304 Roller (2) 18 2179826 Rivet 19 2182338 Clip, Heater 20 489373 Screw 21 3400518 Screw 22 4387765 Wire Assembly (Service Only) 23 2183454 Relay (Service...Valve, Access (1/4") 978026 Valve, Access (5/16") 978027 Valve, Access (3/8") 978028 Valve, Access (1/2") 978029 Valve, Access (5/8") 978030 Valve, Access (3/4") 876764 Valve, Access (3/16") REFRIGERANT CHARGE 4.0 Ozs. (R134A) 10 W10180450 UNIT PARTS For Models: GR9FHMXVQ00, GR9FHMXVB00, GR9FHMXVS00 (White) (Black) (Stainless Steel) Illus. DESCRIPTION 1 2320188 Plate, Unit Mounting 2...
Part No. No. DESCRIPTION 17 2150304 Roller (2) 18 2179826 Rivet 19 2182338 Clip, Heater 20 489373 Screw 21 3400518 Screw 22 4387765 Wire Assembly (Service Only) 23 2183454 Relay (Service...Valve, Access (1/4") 978026 Valve, Access (5/16") 978027 Valve, Access (3/8") 978028 Valve, Access (1/2") 978029 Valve, Access (5/8") 978030 Valve, Access (3/4") 876764 Valve, Access (3/16") REFRIGERANT CHARGE 4.0 Ozs. (R134A) 10 W10180450 UNIT PARTS For Models: GR9FHMXVQ00, GR9FHMXVB00, GR9FHMXVS00 (White) (Black) (Stainless Steel) Illus. DESCRIPTION 1 2320188 Plate, Unit Mounting 2...

