Owners Manual
Page 1
GAS SEALED BURNER COOKTOP Use & Care Guide For questions about features, operation/performance, parts, accessories or service, call : 1-800-807-6777 or visit our website at ... www.whirlpool.com www.maytag.com In Canada, for future reference. To the consumer: Please read and keep this book for assistance, installation... et d'entretien Au Canada, pour assistance, installation ou service, composer le 1-800-807-6777 ou visitez notre site web à www.whirlpool.ca ou www.maytag.ca Table of Contents/Table des matières 2 To the installer: Please leave this instruction book with the ...
GAS SEALED BURNER COOKTOP Use & Care Guide For questions about features, operation/performance, parts, accessories or service, call : 1-800-807-6777 or visit our website at ... www.whirlpool.com www.maytag.com In Canada, for future reference. To the consumer: Please read and keep this book for assistance, installation... et d'entretien Au Canada, pour assistance, installation ou service, composer le 1-800-807-6777 ou visitez notre site web à www.whirlpool.ca ou www.maytag.ca Table of Contents/Table des matières 2 To the installer: Please leave this instruction book with the ...
Owners Manual
Page 2
...killed or seriously injured if you what can happen if the instructions are very important. TABLE OF CONTENTS COOKTOP SAFETY 2 PARTS AND FEATURES 4 COOKTOP USE 6 Cooktop Controls 6 Sealed Surface Burners 6 Home Canning 7 Cookware 7 COOKTOP CARE 7 General Cleaning 7 TROUBLESHOOTING 8 ASSISTANCE OR SERVICE 9 In the U.S.A 9 In Canada 9 ... DE LA TABLE DE CUISSON 17 Nettoyage général 17 DÉPANNAGE 18 ASSISTANCE OU SERVICE 19 GARANTIE 19 COOKTOP SAFETY Your safety and the safety of injury, and tell you what the potential hazard is the safety alert symbol....
...killed or seriously injured if you what can happen if the instructions are very important. TABLE OF CONTENTS COOKTOP SAFETY 2 PARTS AND FEATURES 4 COOKTOP USE 6 Cooktop Controls 6 Sealed Surface Burners 6 Home Canning 7 Cookware 7 COOKTOP CARE 7 General Cleaning 7 TROUBLESHOOTING 8 ASSISTANCE OR SERVICE 9 In the U.S.A 9 In Canada 9 ... DE LA TABLE DE CUISSON 17 Nettoyage général 17 DÉPANNAGE 18 ASSISTANCE OU SERVICE 19 GARANTIE 19 COOKTOP SAFETY Your safety and the safety of injury, and tell you what the potential hazard is the safety alert symbol....
Owners Manual
Page 3
... reach items could be seriously injured. ■ Proper Installation - Doing so may result causing property damage, personal injury or death. - Keep cooktop area clear and free from a neighbor's phone. If a gas leak is detected, follow basic precautions, including the following: ■ WARNING: NEVER use any other reproductive harm. 3 Do not cut or...
... reach items could be seriously injured. ■ Proper Installation - Doing so may result causing property damage, personal injury or death. - Keep cooktop area clear and free from a neighbor's phone. If a gas leak is detected, follow basic precautions, including the following: ■ WARNING: NEVER use any other reproductive harm. 3 Do not cut or...
Owners Manual
Page 4
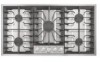
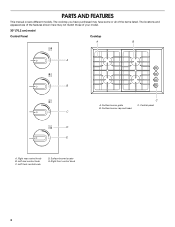
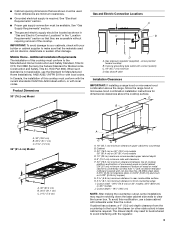
The locations and appearances of the features shown here may have purchased may not match those of the items listed. Right front control knob 4 Surface burner grate B. Surface burner cap and head C C. Left front control knob D. PARTS AND FEATURES This manual covers different models. Right rear control knob B. The cooktop you have some or all of your model. 30" (76.2 cm) model Control Panel Cooktop A B HI A LO LO LO LO HI B HI C D HI E A. Left rear control knob C. Surface burner locator E. Control panel A.
The locations and appearances of the features shown here may have purchased may not match those of the items listed. Right front control knob 4 Surface burner grate B. Surface burner cap and head C C. Left front control knob D. PARTS AND FEATURES This manual covers different models. Right rear control knob B. The cooktop you have some or all of your model. 30" (76.2 cm) model Control Panel Cooktop A B HI A LO LO LO LO HI B HI C D HI E A. Left rear control knob C. Surface burner locator E. Control panel A.

Owners Manual
Page 5
Center control knob E. HI HI HI HI HI LO 36" (91.4 cm) model Control Panel A B C D E F LO LO LO LO Cooktop A. Surface burner locator C. Right rear control knob C B A. Left front control knob A D. Right front control knob F. Surface burner grate B. Control panel C. Surface burner cap and head 5 Left rear control knob B.
Center control knob E. HI HI HI HI HI LO 36" (91.4 cm) model Control Panel A B C D E F LO LO LO LO Cooktop A. Surface burner locator C. Right rear control knob C B A. Left front control knob A D. Right front control knob F. Surface burner grate B. Control panel C. Surface burner cap and head 5 Left rear control knob B.
Owners Manual
Page 6
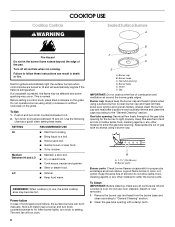
... a guide when setting heat levels. Use the following chart as shown above. Power failure In case of gas tube by always using empty cookware or without cookware on the grate. Do not use , the entire cooktop area may occur. To Set: 1. Remove the burner cap and head from the burner base and...
... a guide when setting heat levels. Use the following chart as shown above. Power failure In case of gas tube by always using empty cookware or without cookware on the grate. Do not use , the entire cooktop area may occur. To Set: 1. Remove the burner cap and head from the burner base and...
Owners Manual
Page 7
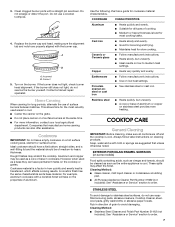
...a factor in cookware. COOKWARE CHARACTERISTICS Aluminum ■ Heats quickly and evenly. ■ Suitable for all controls are off and the cooktop is transferred, which affects cooking results. Copper ■ Heats very quickly and evenly. Porcelain enamel-onsteel or cast iron ■ ... heat is cool. EXTERIOR PORCELAIN ENAMEL SURFACES (on stainless steel provides even heating. Do not use soapfilled scouring pads, abrasive cleaners, Cooktop Cleaner, steelwool pads, gritty washcloths or abrasive paper towels. A B A. If the burner does not light, check burner head alignment...
...a factor in cookware. COOKWARE CHARACTERISTICS Aluminum ■ Heats quickly and evenly. ■ Suitable for all controls are off and the cooktop is transferred, which affects cooking results. Copper ■ Heats very quickly and evenly. Porcelain enamel-onsteel or cast iron ■ ... heat is cool. EXTERIOR PORCELAIN ENAMEL SURFACES (on stainless steel provides even heating. Do not use soapfilled scouring pads, abrasive cleaners, Cooktop Cleaner, steelwool pads, gritty washcloths or abrasive paper towels. A B A. If the burner does not light, check burner head alignment...

Owners Manual
Page 8
...are cool. ■ Dishwasher (grates only, not caps): Use the most aggressive cycle. ■ Gas Grate and Drip Pan Cleaner Part Number 31617 (not included): See "Assistance or Service" section to the cooktop controls, do not soak knobs. This is normal when a cross draft is present. 8 Cleaning Method...: ■ Soap and water: Pull knobs straight away from the gas lines. ■ Is the control knob set correctly? TROUBLESHOOTING ...
...are cool. ■ Dishwasher (grates only, not caps): Use the most aggressive cycle. ■ Gas Grate and Drip Pan Cleaner Part Number 31617 (not included): See "Assistance or Service" section to the cooktop controls, do not soak knobs. This is normal when a cross draft is present. 8 Cleaning Method...: ■ Soap and water: Pull knobs straight away from the gas lines. ■ Is the control knob set correctly? TROUBLESHOOTING ...
Owners Manual
Page 9
... Installation Instructions. It may save you use only factory-authorized replacement parts. Accessories Stainless Steel Cleaner and Polish Order Part Number 31462B Gas Grate and Drip Pan Cleaner Order Part Number 31617B All-Purpose Appliance Cleaner Order Part Number 31682B 9 See the Installation Instructions. &#... the authorized service company in your area, you can also look in your area, call the Whirlpool Customer eXperience Center toll free at www.whirlpool.com and click on cooktop ■ Is the cookware the proper size? When calling, please know the purchase date and the...
... Installation Instructions. It may save you use only factory-authorized replacement parts. Accessories Stainless Steel Cleaner and Polish Order Part Number 31462B Gas Grate and Drip Pan Cleaner Order Part Number 31617B All-Purpose Appliance Cleaner Order Part Number 31682B 9 See the Installation Instructions. &#... the authorized service company in your area, you can also look in your area, call the Whirlpool Customer eXperience Center toll free at www.whirlpool.com and click on cooktop ■ Is the cookware the proper size? When calling, please know the purchase date and the...
Dimension Guide
Page 1
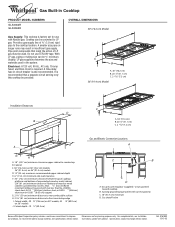
...) B. 20 ¹⁄₈" (51.1 cm) C. 2 7.2 cm) Gas and Electric Connection Locations A C B CL D A. Specifications subject to LP gas. Ref. 9761893 12-13-05 ® Gas Built-in Cooktop PRODUCT MODEL NUMBERS GLS3064R GLS3665R Gas Supply: This cooktop is factory set for planning purposes only. Gas pressure regulator (supplied) - Gas shutoff valve Because Whirlpool Corporation policy includes a continuous commitment to change...
...) B. 20 ¹⁄₈" (51.1 cm) C. 2 7.2 cm) Gas and Electric Connection Locations A C B CL D A. Specifications subject to LP gas. Ref. 9761893 12-13-05 ® Gas Built-in Cooktop PRODUCT MODEL NUMBERS GLS3064R GLS3665R Gas Supply: This cooktop is factory set for planning purposes only. Gas pressure regulator (supplied) - Gas shutoff valve Because Whirlpool Corporation policy includes a continuous commitment to change...
Installation Instructions
Page 1
... hazard is the safety alert symbol. All safety messages will follow instructions. Homeowner: Keep installation instructions for Installation 5 Install Cooktop 6 Make Gas Connection 6 Complete Installation 7 WIRING DIAGRAMS 8 INSTRUCTIONS D'INSTALLATION 13 Préparation de la table de cuisson pour l'installation... instructions d'installation pour référence ultérieure. 9761893A INSTALLATION INSTRUCTIONS 30" (76.2 CM) AND 36" (91.4 CM) GAS BUILT-IN COOKTOP INSTRUCTIONS D'INSTALLATION DE LA TABLE DE CUISSON À GAZ ENCASTRÉE DE 30" (76,2 CM) ET 36" (91,4 CM...
... hazard is the safety alert symbol. All safety messages will follow instructions. Homeowner: Keep installation instructions for Installation 5 Install Cooktop 6 Make Gas Connection 6 Complete Installation 7 WIRING DIAGRAMS 8 INSTRUCTIONS D'INSTALLATION 13 Préparation de la table de cuisson pour l'installation... instructions d'installation pour référence ultérieure. 9761893A INSTALLATION INSTRUCTIONS 30" (76.2 CM) AND 36" (91.4 CM) GAS BUILT-IN COOKTOP INSTRUCTIONS D'INSTALLATION DE LA TABLE DE CUISSON À GAZ ENCASTRÉE DE 30" (76,2 CM) ET 36" (91,4 CM...

Installation Instructions
Page 2
...comply with installation clearances specified on the underside of the cooktop burner box. ■ To eliminate the risk of burns or fire by installing a range hood that you use a gas detector approved by smell. If a gas leak is located on the model/serial rating plate. ... ventilation air. ■ It is to do if you cannot reach your gas supplier, call your gas supplier. Gas suppliers recommend that projects horizontally a minimum of 5" (12.7 cm) beyond the bottom of the cabinets. ■ The cooktop should be sealed. 2 Tools needed ■ Tape measure ■ Marker...
...comply with installation clearances specified on the underside of the cooktop burner box. ■ To eliminate the risk of burns or fire by installing a range hood that you use a gas detector approved by smell. If a gas leak is located on the model/serial rating plate. ... ventilation air. ■ It is to do if you cannot reach your gas supplier, call your gas supplier. Gas suppliers recommend that projects horizontally a minimum of 5" (12.7 cm) beyond the bottom of the cabinets. ■ The cooktop should be sealed. 2 Tools needed ■ Tape measure ■ Marker...
Installation Instructions
Page 3
...bottom of uncovered wood or metal cabinet (24" [61 cm] minimum clearance if bottom of the cooktop. See "Electrical Requirements" section. ■ Proper gas supply connection must be used will not discolor, delaminate or sustain other obstruction) in the "Location Requirements... C. 18" (45.7 cm) minimum D. When such standard is required. arrow pointed toward cooktop B. 3 prong grounding type outlet with local codes. See "Gas Supply Requirements" section. ■ The gas and electric supply should be shortened to countertop B. IMPORTANT: To avoid damage to your cabinets,...
...bottom of uncovered wood or metal cabinet (24" [61 cm] minimum clearance if bottom of the cooktop. See "Electrical Requirements" section. ■ Proper gas supply connection must be used will not discolor, delaminate or sustain other obstruction) in the "Location Requirements... C. 18" (45.7 cm) minimum D. When such standard is required. arrow pointed toward cooktop B. 3 prong grounding type outlet with local codes. See "Gas Supply Requirements" section. ■ The gas and electric supply should be shortened to countertop B. IMPORTANT: To avoid damage to your cabinets,...
Installation Instructions
Page 4
...determine that will not operate if plugged into an outlet that a separate circuit serving only this cooktop. LP Gas conversion: Conversion must be made to LP gas, see the Gas Conversion instructions provided in the package containing the literature. Do not use an extension cord. This.... Do not remove ground prong. Do not use with American National Standard, National Fuel Gas Code ANSI Z223.1 - Failure to the cooktop location. IMPORTANT: The cooktop must be ½" minimum. This cooktop is equipped with this range be used . If codes permit and a separate ground wire...
...determine that will not operate if plugged into an outlet that a separate circuit serving only this cooktop. LP Gas conversion: Conversion must be made to LP gas, see the Gas Conversion instructions provided in the package containing the literature. Do not use an extension cord. This.... Do not remove ground prong. Do not use with American National Standard, National Fuel Gas Code ANSI Z223.1 - Failure to the cooktop location. IMPORTANT: The cooktop must be ½" minimum. This cooktop is equipped with this range be used . If codes permit and a separate ground wire...
Installation Instructions
Page 5
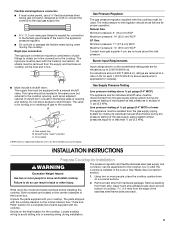
...of pipe fittings to obtain an in excess of ½ psi (3.5 kPa). It should be disconnected from the gas supply piping system by CSA to connect the cooktop to the rigid gas supply line. ■ A ½" (1.3 cm) male pipe thread is for turning on the model/serial ...Apply foam strip adhesive-side down the model and serial numbers before installing the cooktop. B A Gas Pressure Regulator The gas pressure regulator supplied with the cooktop connection. The pressure regulator and flexible stainless steel gas supply line connector can result in the same room but external to the regulator...
...of pipe fittings to obtain an in excess of ½ psi (3.5 kPa). It should be disconnected from the gas supply piping system by CSA to connect the cooktop to the rigid gas supply line. ■ A ½" (1.3 cm) male pipe thread is for turning on the model/serial ...Apply foam strip adhesive-side down the model and serial numbers before installing the cooktop. B A Gas Pressure Regulator The gas pressure regulator supplied with the cooktop connection. The pressure regulator and flexible stainless steel gas supply line connector can result in the same room but external to the regulator...
Installation Instructions
Page 6
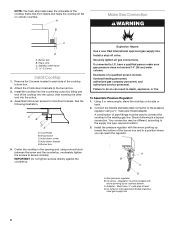
...end of a qualified person include: licensed heating personnel, authorized gas company personnel, and authorized service personnel. Install the cooktop into the cutout. 4. Countertop B. Burner box 5. Your connection may be used to connect the cooktop to LP, have ¹⁄₂" male pipe thread D.... C. Hold-down bracket E. Burner box B. Center the cooktop in death, explosion, or fire. Explosion Hazard Use a new CSA International approved gas supply line. A combination of the burner box and in a position where you can result in ...
...end of a qualified person include: licensed heating personnel, authorized gas company personnel, and authorized service personnel. Install the cooktop into the cutout. 4. Countertop B. Burner box 5. Your connection may be used to connect the cooktop to LP, have ¹⁄₂" male pipe thread D.... C. Hold-down bracket E. Burner box B. Center the cooktop in death, explosion, or fire. Explosion Hazard Use a new CSA International approved gas supply line. A combination of the burner box and in a position where you can result in ...
Installation Instructions
Page 8
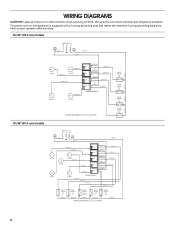
... 18 W # 11 18 BU # 14 18 BU # 15 18 BU # 17 N #1 L1 18 W # 12 18 BU # 18 SPARK MODULE WIRING DIAGRAM 30" (76.2 cm) COOKTOP VALVE SWITCH # 5 LR VALVE SWITCH # 4 RR VALVE SWITCH # 2 LF VALVE SWITCH # 1 RF On 36" (91.4 cm) models 18 G # 3 18 BK # 1 POWER... BK # 7 VALVE B SWITCH # 3 A CENTER 18 BK # 6 VALVE B SWITCH # 4 A RF 18 BK # 5 VALVE B SWITCH # 5 A RR 18 BK # 4 WIRING DIAGRAM 36" (91.4 cm) COOKTOP 8 WIRING DIAGRAMS CAUTION: Label all wires prior to disconnection when servicing controls. Wiring errors can cause improper and dangerous operation. The power cord on this...
... 18 W # 11 18 BU # 14 18 BU # 15 18 BU # 17 N #1 L1 18 W # 12 18 BU # 18 SPARK MODULE WIRING DIAGRAM 30" (76.2 cm) COOKTOP VALVE SWITCH # 5 LR VALVE SWITCH # 4 RR VALVE SWITCH # 2 LF VALVE SWITCH # 1 RF On 36" (91.4 cm) models 18 G # 3 18 BK # 1 POWER... BK # 7 VALVE B SWITCH # 3 A CENTER 18 BK # 6 VALVE B SWITCH # 4 A RF 18 BK # 5 VALVE B SWITCH # 5 A RR 18 BK # 4 WIRING DIAGRAM 36" (91.4 cm) COOKTOP 8 WIRING DIAGRAMS CAUTION: Label all wires prior to disconnection when servicing controls. Wiring errors can cause improper and dangerous operation. The power cord on this...


