
Owners Manual
Page 5
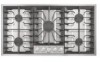
Center control knob E. Right front control knob F. Right rear control knob C B A. Surface burner grate B. Surface burner cap and head 5 Left rear control knob B. Control panel C. Left front control knob A D. Surface burner locator C. HI HI HI HI HI LO 36" (91.4 cm) model Control Panel A B C D E F LO LO LO LO Cooktop A.
Center control knob E. Right front control knob F. Right rear control knob C B A. Surface burner grate B. Surface burner cap and head 5 Left rear control knob B. Control panel C. Left front control knob A D. Surface burner locator C. HI HI HI HI HI LO 36" (91.4 cm) model Control Panel A B C D E F LO LO LO LO Cooktop A.
Dimension Guide
Page 1
...improve Dimensions are for use TEFLON® tape. Ref. 9761893 12-13-05 ® Gas Built-in Cooktop PRODUCT MODEL NUMBERS GLS3064R GLS3665R Gas Supply: This cooktop is recommended that resist the action of wood or metal cabinet is protected by not less than....7 cm) minimum clearance upper cabinet to the cooktop location. Do not use with not less than ¹⁄₄" [0.6 cm] flame retardant millboard covered with Natural gas. A smaller size pipe on 36" models J. Gas shutoff valve Because Whirlpool Corporation policy includes a continuous commitment to change materials...
...improve Dimensions are for use TEFLON® tape. Ref. 9761893 12-13-05 ® Gas Built-in Cooktop PRODUCT MODEL NUMBERS GLS3064R GLS3665R Gas Supply: This cooktop is recommended that resist the action of wood or metal cabinet is protected by not less than....7 cm) minimum clearance upper cabinet to the cooktop location. Do not use with not less than ¹⁄₄" [0.6 cm] flame retardant millboard covered with Natural gas. A smaller size pipe on 36" models J. Gas shutoff valve Because Whirlpool Corporation policy includes a continuous commitment to change materials...
Installation Instructions
Page 1
... are very important. IMPORTANT: Installer: Leave installation instructions with the homeowner. INSTALLATION INSTRUCTIONS 30" (76.2 CM) AND 36" (91.4 CM) GAS BUILT-IN COOKTOP INSTRUCTIONS D'INSTALLATION DE LA TABLE DE CUISSON À GAZ ENCASTRÉE DE 30" (76,2 CM) ET... 36" (91,4 CM) Table of Contents/Table des matières COOKTOP SAFETY 1 SÉCURITÉ DE LA TABLE DE CUISSON 9 INSTALLATION REQUIREMENTS 2 Tools and Parts 2 Location Requirements 2 Electrical Requirements 4 Gas Supply Requirements 4 EXIGENCES D'INSTALLATION 10 Outillage et pi...
... are very important. IMPORTANT: Installer: Leave installation instructions with the homeowner. INSTALLATION INSTRUCTIONS 30" (76.2 CM) AND 36" (91.4 CM) GAS BUILT-IN COOKTOP INSTRUCTIONS D'INSTALLATION DE LA TABLE DE CUISSON À GAZ ENCASTRÉE DE 30" (76,2 CM) ET... 36" (91,4 CM) Table of Contents/Table des matières COOKTOP SAFETY 1 SÉCURITÉ DE LA TABLE DE CUISSON 9 INSTALLATION REQUIREMENTS 2 Tools and Parts 2 Location Requirements 2 Electrical Requirements 4 Gas Supply Requirements 4 EXIGENCES D'INSTALLATION 10 Outillage et pi...
Installation Instructions
Page 3
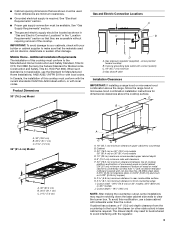
... or cabinet supplier to the top of the drawer (or other damage. Cabinet C. 30" (76.2 cm) on 30" (76.2 cm) models 36" (91.4 cm) on 36" models J. Cutout width - 29³⁄₈" (74.6 cm) on 30" models; 35³⁄₈" (89.9 cm) on...9632; Cabinet opening dimensions that are accessible without requiring removal of the cooktop. Additional Installation Requirements The installation of this cooktop must be shortened to clear the burner box. To avoid this cooktop must be located as shown in "Gas and Electric Connection Locations" in base cabinet is covered by not less...
... or cabinet supplier to the top of the drawer (or other damage. Cabinet C. 30" (76.2 cm) on 30" (76.2 cm) models 36" (91.4 cm) on 36" models J. Cutout width - 29³⁄₈" (74.6 cm) on 30" models; 35³⁄₈" (89.9 cm) on...9632; Cabinet opening dimensions that are accessible without requiring removal of the cooktop. Additional Installation Requirements The installation of this cooktop must be shortened to clear the burner box. To avoid this cooktop must be located as shown in "Gas and Electric Connection Locations" in base cabinet is covered by not less...
Installation Instructions
Page 4
... not exceed 14" (36 cm) water column. In the absence of gas available, check with Natural gas. Do not use with the local gas supplier. Electrical Requirements WARNING Gas Supply Requirements WARNING Electrical Shock Hazard Plug into an outlet that is recommended that a separate circuit serving only this cooktop. Gas Supply Line ■ Provide a gas supply line of...
... not exceed 14" (36 cm) water column. In the absence of gas available, check with Natural gas. Do not use with the local gas supplier. Electrical Requirements WARNING Gas Supply Requirements WARNING Electrical Shock Hazard Plug into an outlet that is recommended that a separate circuit serving only this cooktop. Gas Supply Line ■ Provide a gas supply line of...
Installation Instructions
Page 6
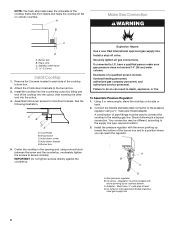
..., explosion, or fire. Must have a qualified person make sure gas pressure does not exceed 14" (36 cm) water column. Examples of the cooktop burner box. 2. Gas pressure regulator B. NOTE: The foam strip helps keep the underside of the cooktop frame free from debris and helps the cooktop sit flat on its side or back. 2. Stainless steel...
..., explosion, or fire. Must have a qualified person make sure gas pressure does not exceed 14" (36 cm) water column. Examples of the cooktop burner box. 2. Gas pressure regulator B. NOTE: The foam strip helps keep the underside of the cooktop frame free from debris and helps the cooktop sit flat on its side or back. 2. Stainless steel...
Installation Instructions
Page 8
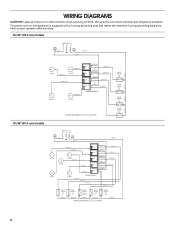
... 18 BU # 15 18 BU # 17 N #1 L1 18 W # 12 18 BU # 18 SPARK MODULE WIRING DIAGRAM 30" (76.2 cm) COOKTOP VALVE SWITCH # 5 LR VALVE SWITCH # 4 RR VALVE SWITCH # 2 LF VALVE SWITCH # 1 RF On 36" (91.4 cm) models 18 G # 3 18 BK # 1 POWER SUPPLY N G L1 N L1 18 W # 2 18 W # 9 18 BK # ... SWITCH # 2 A LF 18 BK # 7 VALVE B SWITCH # 3 A CENTER 18 BK # 6 VALVE B SWITCH # 4 A RF 18 BK # 5 VALVE B SWITCH # 5 A RR 18 BK # 4 WIRING DIAGRAM 36" (91.4 cm) COOKTOP 8 The power cord on this appliance is equipped with a 3 prong grounding plug that mates with standard 3 prong grounding-type plug.
... 18 BU # 15 18 BU # 17 N #1 L1 18 W # 12 18 BU # 18 SPARK MODULE WIRING DIAGRAM 30" (76.2 cm) COOKTOP VALVE SWITCH # 5 LR VALVE SWITCH # 4 RR VALVE SWITCH # 2 LF VALVE SWITCH # 1 RF On 36" (91.4 cm) models 18 G # 3 18 BK # 1 POWER SUPPLY N G L1 N L1 18 W # 2 18 W # 9 18 BK # ... SWITCH # 2 A LF 18 BK # 7 VALVE B SWITCH # 3 A CENTER 18 BK # 6 VALVE B SWITCH # 4 A RF 18 BK # 5 VALVE B SWITCH # 5 A RR 18 BK # 4 WIRING DIAGRAM 36" (91.4 cm) COOKTOP 8 The power cord on this appliance is equipped with a 3 prong grounding plug that mates with standard 3 prong grounding-type plug.