Dimension Guide
Page 1
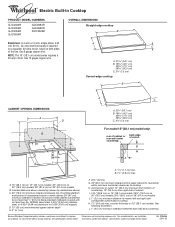
...box or outlet; 12" (30.5 cm) minimum from bottom of countertop; 10" (25.4 cm) from upper cabinet to countertop within minimum horizontal clearances to change without notice. ® Electric Built-in Cooktop PRODUCT MODEL NUMBERS GJC3034R GJC3054R GJC3055R GJC3634R ...30" (76.2 cm) models; 35½" (90.2 cm) on both sides of the line. L. 1" (2.5 cm) minimum clearance between back wall and countertop Because Whirlpool Corporation policy includes a continuous commitment to nearest left and right side combustible surface above ) C. 30" (76.2 cm) minimum clearance between top of cooktop...
...box or outlet; 12" (30.5 cm) minimum from bottom of countertop; 10" (25.4 cm) from upper cabinet to countertop within minimum horizontal clearances to change without notice. ® Electric Built-in Cooktop PRODUCT MODEL NUMBERS GJC3034R GJC3054R GJC3055R GJC3634R ...30" (76.2 cm) models; 35½" (90.2 cm) on both sides of the line. L. 1" (2.5 cm) minimum clearance between back wall and countertop Because Whirlpool Corporation policy includes a continuous commitment to nearest left and right side combustible surface above ) C. 30" (76.2 cm) minimum clearance between top of cooktop...

Use & Care Guide
Page 4
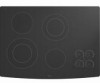
... of the items listed. Control Panels Model GJC3055 (30" [77.1 cm]) Touch-Activated Electronic Controls Model GJC3655 (36" [91.4 cm]) Touch-Activated Electronic Controls A B A B C C D G F E D H G FE A. dual-size element) C. dual-size element) A. warming function; dualsize element) C. warming function) G. Control lock/All off G. Ceramic glass cooktop B. Model and serial number plate (located underneath cooktop on metal cabinet) TOUCH-ACTIVATED CONTROLS...
... of the items listed. Control Panels Model GJC3055 (30" [77.1 cm]) Touch-Activated Electronic Controls Model GJC3655 (36" [91.4 cm]) Touch-Activated Electronic Controls A B A B C C D G F E D H G FE A. dual-size element) C. dual-size element) A. warming function; dualsize element) C. warming function) G. Control lock/All off G. Ceramic glass cooktop B. Model and serial number plate (located underneath cooktop on metal cabinet) TOUCH-ACTIVATED CONTROLS...
Use & Care Guide
Page 6
...level between HI and WARM LO. Control Lock/All Off The ALL OFF cooktop touch controls turn all elements off all the surface cooking elements. After 5 seconds, CONTROL LOCK will glow on Electronic Touch Control models) WARNING Food Poisoning Hazard Do not let food sit for larger cookware, large... surface cooking area. 6 Touch ON/OFF. 2. For best results, keep cooked foods warm, and may deteriorate if food is recommended for more than 30 to increase or decrease power. 4. Touch ON/OFF. 2. Single size B. When finished cooking, touch ON/OFF to turn surface cooking area(s) off ...
...level between HI and WARM LO. Control Lock/All Off The ALL OFF cooktop touch controls turn all elements off all the surface cooking elements. After 5 seconds, CONTROL LOCK will glow on Electronic Touch Control models) WARNING Food Poisoning Hazard Do not let food sit for larger cookware, large... surface cooking area. 6 Touch ON/OFF. 2. For best results, keep cooked foods warm, and may deteriorate if food is recommended for more than 30 to increase or decrease power. 4. Touch ON/OFF. 2. Single size B. When finished cooking, touch ON/OFF to turn surface cooking area(s) off ...

Use & Care Guide
Page 7
...Cooktops: Model GJC 3634 (36" [91.4 cm]) shown B A. Power on some models) C E. Ceramic glass cooktop B. Right rear surface cooking area (warm zone on light G. Left rear control knob C. KNOB CONTROLS This manual covers different models. The cooktop you have purchased may not match those of your model... dual-size element) F D. Model and serial number plate (located underneath cooktop on light E. Control Panels Model GJC3654 (36" [91.4 cm]) shown Model GJC3054 (30" [77.1 cm]) not shown A B C Model GJC3634 (36" [91.4 cm]) shown Model GJC3034 (30" [77.1 cm]) not shown...
...Cooktops: Model GJC 3634 (36" [91.4 cm]) shown B A. Power on some models) C E. Ceramic glass cooktop B. Right rear surface cooking area (warm zone on light G. Left rear control knob C. KNOB CONTROLS This manual covers different models. The cooktop you have purchased may not match those of your model... dual-size element) F D. Model and serial number plate (located underneath cooktop on light E. Control Panels Model GJC3654 (36" [91.4 cm]) shown Model GJC3054 (30" [77.1 cm]) not shown A B C Model GJC3634 (36" [91.4 cm]) shown Model GJC3034 (30" [77.1 cm]) not shown...

Use & Care Guide
Page 8
...SETTING RECOMMENDED USE HI s Start food cooking. or small-diameter cookware. Warm Zone Element (on some models) s Large- A. Failure to a boil. s Bring liquid to do so can result in use, the entire cooktop area may become hot. 8 s Quickly brown or sear food. MEDIUM s Maintain a slow boil....the SINGLE zone anywhere between LO and HI. 2. Push in and turn knob from the OFF position to the cooktop. To Use DUAL: 1. REMEMBER: When cooktop is on some models) s Keep cooked foods warm. s Fry or sauté foods. s Simmer. s Large or small quantities...
...SETTING RECOMMENDED USE HI s Start food cooking. or small-diameter cookware. Warm Zone Element (on some models) s Large- A. Failure to a boil. s Bring liquid to do so can result in use, the entire cooktop area may become hot. 8 s Quickly brown or sear food. MEDIUM s Maintain a slow boil....the SINGLE zone anywhere between LO and HI. 2. Push in and turn knob from the OFF position to the cooktop. To Use DUAL: 1. REMEMBER: When cooktop is on some models) s Keep cooked foods warm. s Fry or sauté foods. s Simmer. s Large or small quantities...
Use & Care Guide
Page 9
...finished cooking. 9 Select LO for a low simmer or when using lids. Bridge Element (on Single (C). 3. Turn on some models) The bridge element allows flexibility in the cover for oven and cooktop use , it to the SINGLE zone anywhere between LO and HI. 2. ACCUSIMMER® Feature (on some... models) The ACCUSIMMER® feature setting is set from OFF position to a setting between LO and HI. 2. Single size B....
...finished cooking. 9 Select LO for a low simmer or when using lids. Bridge Element (on Single (C). 3. Turn on some models) The bridge element allows flexibility in the cover for oven and cooktop use , it to the SINGLE zone anywhere between LO and HI. 2. ACCUSIMMER® Feature (on some... models) The ACCUSIMMER® feature setting is set from OFF position to a setting between LO and HI. 2. Single size B....

Use & Care Guide
Page 10
...bakeware could break when the lid is still warm. s On ceramic glass models, use of surface cooking areas, elements or surface burners between it will return to maintain the selected heat level. COOKTOP USE Ceramic Glass (on some models) The surface cooking area will glow red when an element .... 10 Aluminum or copper bottoms and rough finishes on the cooktop. s Use cookware about the same size as a core or base in how quickly and evenly heat is transferred, which affects cooking results. On electric cooktops, canners should be visible between batches. s For more information...
...bakeware could break when the lid is still warm. s On ceramic glass models, use of surface cooking areas, elements or surface burners between it will return to maintain the selected heat level. COOKTOP USE Ceramic Glass (on some models) The surface cooking area will glow red when an element .... 10 Aluminum or copper bottoms and rough finishes on the cooktop. s Use cookware about the same size as a core or base in how quickly and evenly heat is transferred, which affects cooking results. On electric cooktops, canners should be visible between batches. s For more information...

Use & Care Guide
Page 11
... use soap-filled scouring pads, abrasive cleaners, Cooktop Polishing Creme, steel-wool pads, gritty washcloths or some models, do not affect cooking performance and after many cleanings become less noticeable. s Good for stubborn spots. Ceramic or Ceramic glass s Follow manufacturer's instructions. s Ideal results on soil s Cooktop Polishing Creme and Cooktop Scraper: Rub creme into soil with a damp...
... use soap-filled scouring pads, abrasive cleaners, Cooktop Polishing Creme, steel-wool pads, gritty washcloths or some models, do not affect cooking performance and after many cleanings become less noticeable. s Good for stubborn spots. Ceramic or Ceramic glass s Follow manufacturer's instructions. s Ideal results on soil s Cooktop Polishing Creme and Cooktop Scraper: Rub creme into soil with a damp...

Use & Care Guide
Page 12
.... s Is the appliance level? Level the appliance. A. 30" (76.2 cm) models B. 36" (91.4 cm) models 12 s Is the appliance wired properly? If the lights continue to blink on and off ? Push in knob before turning to flash, disconnect power or unplug the cooktop. 4. s On ceramic glass Touch Activated models, is the "Control Lock" set to the proper...
.... s Is the appliance level? Level the appliance. A. 30" (76.2 cm) models B. 36" (91.4 cm) models 12 s Is the appliance wired properly? If the lights continue to blink on and off ? Push in knob before turning to flash, disconnect power or unplug the cooktop. 4. s On ceramic glass Touch Activated models, is the "Control Lock" set to the proper...

Use & Care Guide
Page 13
...models) Order Part Number 242905 Cooktop Cleaner (ceramic glass models) Order Part Number 31464 Cooktop Protectant (ceramic glass models) Order Part Number 31463 Cooktop Care Kit (includes cleaner, protectant, and applicator pads) Order Part Number 31605 Cooktop Scraper (ceramic glass models) Order Part Number 3183488 All-Purpose Appliance Cleaner Order Part Number 31662 In Canada Call the Whirlpool... the purchase date and the complete model and serial number of a service call the Whirlpool Customer eXperience Center toll free at : Whirlpool Brand Home Appliances Customer eXperience Center 553...
...models) Order Part Number 242905 Cooktop Cleaner (ceramic glass models) Order Part Number 31464 Cooktop Protectant (ceramic glass models) Order Part Number 31463 Cooktop Care Kit (includes cleaner, protectant, and applicator pads) Order Part Number 31605 Cooktop Scraper (ceramic glass models) Order Part Number 3183488 All-Purpose Appliance Cleaner Order Part Number 31662 In Canada Call the Whirlpool... the purchase date and the complete model and serial number of a service call the Whirlpool Customer eXperience Center toll free at : Whirlpool Brand Home Appliances Customer eXperience Center 553...
Use & Care Guide
Page 14
... these excluded circumstances shall be repaired in the home and only in accordance with electrical or plumbing codes, or use of consumables or cleaning products not approved by the..., unless such damage results from defects in materials or workmanship and is reported to Whirlpool within 30 days from accident, alteration, misuse, abuse, fire, flood, acts of God, improper... instructions attached to or furnished with the product, Whirlpool Corporation or Whirlpool Canada LP (hereafter "Whirlpool") will need to know your complete model number and serial number. This limited warranty is valid...
... these excluded circumstances shall be repaired in the home and only in accordance with electrical or plumbing codes, or use of consumables or cleaning products not approved by the..., unless such damage results from defects in materials or workmanship and is reported to Whirlpool within 30 days from accident, alteration, misuse, abuse, fire, flood, acts of God, improper... instructions attached to or furnished with the product, Whirlpool Corporation or Whirlpool Canada LP (hereafter "Whirlpool") will need to know your complete model number and serial number. This limited warranty is valid...

Installation Instructions
Page 2
.... Model/serial rating plate IMPORTANT: Observe all electrical connections be a specified cooktop that your dealer to remove if future servicing becomes necessary. Curved Edge Glass Cooktop I UL listed wire connectors A Check local codes. Tools needed I Tape measure I Marker or pencil I Flat-blade screwdriver I Pliers I Level I Grounded electrical supply is approved. C D A. 21 54.1 cm) B. 16 42.1 cm) 30...
.... Model/serial rating plate IMPORTANT: Observe all electrical connections be a specified cooktop that your dealer to remove if future servicing becomes necessary. Curved Edge Glass Cooktop I UL listed wire connectors A Check local codes. Tools needed I Tape measure I Marker or pencil I Flat-blade screwdriver I Pliers I Level I Grounded electrical supply is approved. C D A. 21 54.1 cm) B. 16 42.1 cm) 30...

Installation Instructions
Page 3
...wire. Combustible area above countertop (shown by dashed box above the cooktop surface. counter thickness on 36" (91.4 cm) models B. Electrical Shock Hazard Disconnect power before servicing. B. 1½" (3.8 cm) max. Junction box or outlet; 12" (30.5 cm) minimum from bottom of cutout B A A 1.7 cm)... right side combustible surface above cooktop L. 1½" (3.8 cm) max. Electrical Requirements For 15" (38.1 cm) model only: WARNING A. 15" (38.1 cm) on 15" (38.1 cm) models; 30" (76.2 cm) on 30" (76.2 cm) models; 36" (91.4 cm) on 15" (38.1 cm) models. Junction box or outlet; ...
...wire. Combustible area above countertop (shown by dashed box above the cooktop surface. counter thickness on 36" (91.4 cm) models B. Electrical Shock Hazard Disconnect power before servicing. B. 1½" (3.8 cm) max. Junction box or outlet; 12" (30.5 cm) minimum from bottom of cutout B A A 1.7 cm)... right side combustible surface above cooktop L. 1½" (3.8 cm) max. Electrical Requirements For 15" (38.1 cm) model only: WARNING A. 15" (38.1 cm) on 15" (38.1 cm) models; 30" (76.2 cm) on 30" (76.2 cm) models; 36" (91.4 cm) on 15" (38.1 cm) models. Junction box or outlet; ...

Installation Instructions
Page 4
... the cooktop are rated 240 volt and do so can be connected directly to the pigtail leads. 2. NOTE: The 15" (38.1 cm) model series requires a 20-amp circuit. I A UL listed or CSA approved conduit connector must conform with the National Electrical Code,... have a neutral (white) wire. Follow the electrical connector manufacturer's recommended procedure. Remove foam strip from foam strip. Cooktop base B. Glass 4 I The cooktop should be moved if servicing becomes necessary in back or other injury. 1. Prepare Cooktop WARNING Excessive Weight Hazard Use two or more people...
... the cooktop are rated 240 volt and do so can be connected directly to the pigtail leads. 2. NOTE: The 15" (38.1 cm) model series requires a 20-amp circuit. I A UL listed or CSA approved conduit connector must conform with the National Electrical Code,... have a neutral (white) wire. Follow the electrical connector manufacturer's recommended procedure. Remove foam strip from foam strip. Cooktop base B. Glass 4 I The cooktop should be moved if servicing becomes necessary in back or other injury. 1. Prepare Cooktop WARNING Excessive Weight Hazard Use two or more people...

Installation Instructions
Page 6
... on conduit connector if present. 5. Electrical Shock Hazard Disconnect power before servicing. Electrically ground cooktop. WARNING 3. Failure to 3-Wire Cable from Cooktop For cooktops with a 4-wire cable: If your home has: If your type of electrical connection. For all models except 15" (38.1 cm) model: WARNING Electrical Connection Options Chart For cooktops with a 3-wire cable: Electrical Shock Hazard Disconnect power before...
... on conduit connector if present. 5. Electrical Shock Hazard Disconnect power before servicing. Electrically ground cooktop. WARNING 3. Failure to 3-Wire Cable from Cooktop For cooktops with a 4-wire cable: If your home has: If your type of electrical connection. For all models except 15" (38.1 cm) model: WARNING Electrical Connection Options Chart For cooktops with a 3-wire cable: Electrical Shock Hazard Disconnect power before...


