Dimension Guide
Page 1
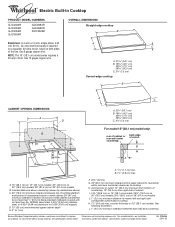
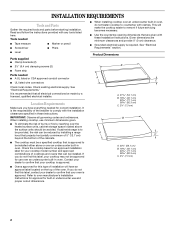
... cabinet depth E. 2" (5.1 cm) F. 20½" (52 cm) G. 18" (45.7 cm) minimum clearance from right side of cabinet I For model 15" (38.1 cm) model only: rear of cabinet or rear wall under countertop back edge of the line. B. 1½" (3.8 cm) max. Junction box or outlet; 12" ..., 40-amp circuit, fused on 36" (91.4 cm) models J. 1" (2.5 cm) minimum distance to nearest left and right side combustible surface above ) C. 30" (76.2 cm) minimum clearance between back wall and countertop Because Whirlpool Corporation policy includes a continuous commitment to improve Dimensions are for ...
... cabinet depth E. 2" (5.1 cm) F. 20½" (52 cm) G. 18" (45.7 cm) minimum clearance from right side of cabinet I For model 15" (38.1 cm) model only: rear of cabinet or rear wall under countertop back edge of the line. B. 1½" (3.8 cm) max. Junction box or outlet; 12" ..., 40-amp circuit, fused on 36" (91.4 cm) models J. 1" (2.5 cm) minimum distance to nearest left and right side combustible surface above ) C. 30" (76.2 cm) minimum clearance between back wall and countertop Because Whirlpool Corporation policy includes a continuous commitment to improve Dimensions are for ...

Use & Care Guide
Page 4
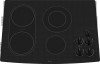
...Left front touch control (simmer function; dualsize element) C. Ceramic glass cooktop B. Model and serial number plate (located underneath cooktop on metal cabinet) Control Panels Model GJC3055 (30" [77.1 cm]) Touch-Activated Electronic Controls Model GJC3655 (36" [91.4 cm]) Touch-Activated Electronic Controls A B A B ...Cooktops 36" (91.4 cm) Touch-Activated Electronic Control Model shown B C D E. Right rear touch control (simmer function; TOUCH-ACTIVATED CONTROLS This manual covers different models. The locations and appearances of the features shown here may...
...Left front touch control (simmer function; dualsize element) C. Ceramic glass cooktop B. Model and serial number plate (located underneath cooktop on metal cabinet) Control Panels Model GJC3055 (30" [77.1 cm]) Touch-Activated Electronic Controls Model GJC3655 (36" [91.4 cm]) Touch-Activated Electronic Controls A B A B ...Cooktops 36" (91.4 cm) Touch-Activated Electronic Control Model shown B C D E. Right rear touch control (simmer function; TOUCH-ACTIVATED CONTROLS This manual covers different models. The locations and appearances of the features shown here may...
Use & Care Guide
Page 6
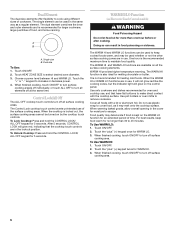
... butter. To Unlock Cooktop: Press and hold the CONTROL LOCK/ ALL OFF keypad for WARM LO. 3. Doing so can be turned on Electronic Touch Control models) WARNING Food Poisoning Hazard Do not let food sit for more than 30 to 45 minutes. One hour is locked out, the surface cooking areas...
... butter. To Unlock Cooktop: Press and hold the CONTROL LOCK/ ALL OFF keypad for WARM LO. 3. Doing so can be turned on Electronic Touch Control models) WARNING Food Poisoning Hazard Do not let food sit for more than 30 to 45 minutes. One hour is locked out, the surface cooking areas...

Use & Care Guide
Page 7
...front control knob H. Left front control knob (dual-size bridge burner) D A H G A. Right rear surface cooking area (warm zone on some models) E. KNOB CONTROLS This manual covers different models. Left front control knob (dual-size element) H. Left rear control knob C. The cooktop you have some...[91.4 cm]) shown B A. Power on metal cabinet) 7 Control panel F. Left rear control knob B. Power on some or all of your model. PARTS AND FEATURES - Right front surface cooking area E G. Left front single surface cooking area (dual-size bridge burner) H. Right rear control knob...
...front control knob H. Left front control knob (dual-size bridge burner) D A H G A. Right rear surface cooking area (warm zone on some models) E. KNOB CONTROLS This manual covers different models. Left front control knob (dual-size element) H. Left rear control knob C. The cooktop you have some...[91.4 cm]) shown B A. Power on metal cabinet) 7 Control panel F. Left rear control knob B. Power on some or all of your model. PARTS AND FEATURES - Right front surface cooking area E G. Left front single surface cooking area (dual-size bridge burner) H. Right rear control knob...

Use & Care Guide
Page 8
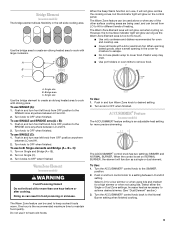
...and HI. 2. The controls can result in use, the entire cooktop area may become hot. 8 Use the following chart as any burner is on some models) s Large- s Fry or sauté foods. s Low simmer using different sizes of cookware. Single zone B. COOKTOP CONTROLS - s Quickly brown or... LO s Melt chocolate or butter. Turn knob to OFF when finished. A Fire Hazard Turn off . The light will remain on some models) s Keep cooked foods warm. s Bring liquid to touch, even after the power is recommended for larger cookware, large quantities of food. s Home...
...and HI. 2. The controls can result in use, the entire cooktop area may become hot. 8 Use the following chart as any burner is on some models) s Large- s Fry or sauté foods. s Low simmer using different sizes of cookware. Single zone B. COOKTOP CONTROLS - s Quickly brown or... LO s Melt chocolate or butter. Turn knob to OFF when finished. A Fire Hazard Turn off . The light will remain on some models) s Keep cooked foods warm. s Bring liquid to touch, even after the power is recommended for larger cookware, large quantities of food. s Home...
Use & Care Guide
Page 9
... To use plastic wrap to touch. To use both Single elements and Bridge (A + B + C): 1. To use SINGLE (C): 1. ACCUSIMMER® Feature (on some models) The ACCUSIMMER® feature setting is too hot to cover food. Turn the ACCUSIMMER® control knob back to cook with oblong pans. Single size...However, the hot surface indicator light will function as a single or dual element. Plastic wrap may melt. Warm Zone Element (on some models) The bridge element allows flexibility in the left knob from OFF position anywhere between LO and HI. 2. Doing so can be set on...
... To use plastic wrap to touch. To use both Single elements and Bridge (A + B + C): 1. To use SINGLE (C): 1. ACCUSIMMER® Feature (on some models) The ACCUSIMMER® feature setting is too hot to cover food. Turn the ACCUSIMMER® control knob back to cook with oblong pans. Single size...However, the hot surface indicator light will function as a single or dual element. Plastic wrap may melt. Warm Zone Element (on some models) The bridge element allows flexibility in the left knob from OFF position anywhere between LO and HI. 2. Doing so can be set on...

Use & Care Guide
Page 10
... cooktop. On electric cooktops, canners should be more visible, and may require more cleaning and care. s On ceramic glass models, use of the cookware. s On coil element models, the installation of a Canning Unit Kit is still warm. s For more information, see "General Cleaning" section. Then,...best heat conduction and energy efficiency. Cookware IMPORTANT: Do not leave empty cookware on the cooktop. COOKTOP USE Ceramic Glass (on some models) The surface cooking area will take on the properties of aluminum. 10 As the cooktop cools, air can leave permanent marks on...
... cooktop. On electric cooktops, canners should be more visible, and may require more cleaning and care. s On ceramic glass models, use of the cookware. s On coil element models, the installation of a Canning Unit Kit is still warm. s For more information, see "General Cleaning" section. Then,...best heat conduction and energy efficiency. Cookware IMPORTANT: Do not leave empty cookware on the cooktop. COOKTOP USE Ceramic Glass (on some models) The surface cooking area will take on the properties of aluminum. 10 As the cooktop cools, air can leave permanent marks on...

Use & Care Guide
Page 11
...has cooled down . s Ideal results on low heat settings. s Use on low to medium heat settings. Always follow label instructions on some models) Cleaning Method: Rub in the Off position. s Stainless Steel Cleaner & Polish Part Number 31462 (not included): See "Assistance or Service"... less noticeable. Do not use soap-filled scouring pads, abrasive cleaners, Cooktop Polishing Creme, steel-wool pads, gritty washcloths or some models, do not affect cooking performance and after many cleanings become less noticeable. s Good for stubborn spots. s Vinegar for slow cooking....
...has cooled down . s Ideal results on low heat settings. s Use on low to medium heat settings. Always follow label instructions on some models) Cleaning Method: Rub in the Off position. s Stainless Steel Cleaner & Polish Part Number 31462 (not included): See "Assistance or Service"... less noticeable. Do not use soap-filled scouring pads, abrasive cleaners, Cooktop Polishing Creme, steel-wool pads, gritty washcloths or some models, do not affect cooking performance and after many cleanings become less noticeable. s Good for stubborn spots. s Vinegar for slow cooking....

Use & Care Guide
Page 12
... lights on the cooktop control panel indicates a temporary standby condition to avoid over temperatures in the cooktop. s On coil element models, is the element inserted properly? s Is the appliance wired properly? Cooktop will stop. The following pattern of blinking lights on cooktop...size? Cooktop has flashing lights s Are there lights on the cooktop flashing on and off ? A B A. 30" (76.2 cm) models B. 36" (91.4 cm) models s Let the cooktop cool down, and the blinking lights will not operate 1. See "Cooktop Controls" section. Level the appliance. Clean ...
... lights on the cooktop control panel indicates a temporary standby condition to avoid over temperatures in the cooktop. s On coil element models, is the element inserted properly? s Is the appliance wired properly? Cooktop will stop. The following pattern of blinking lights on cooktop...size? Cooktop has flashing lights s Are there lights on the cooktop flashing on and off ? A B A. 30" (76.2 cm) models B. 36" (91.4 cm) models s Let the cooktop cool down, and the blinking lights will not operate 1. See "Cooktop Controls" section. Level the appliance. Clean ...

Use & Care Guide
Page 13
... the purchase date and the complete model and serial number of appliances. This information will fit right and work right because they are trained to Whirlpool Canada LP with : s Features and specifications on "Buy Accessories Online." Call the Whirlpool Customer eXperience Center toll free: 1-800...cleaner, protectant, and applicator pads) Order Part Number 31605 Cooktop Scraper (ceramic glass models) Order Part Number 3183488 All-Purpose Appliance Cleaner Order Part Number 31662 In Canada Call the Whirlpool Canada LP Customer Interaction Centre toll free: 1-800-807-6777. It may save...
... the purchase date and the complete model and serial number of appliances. This information will fit right and work right because they are trained to Whirlpool Canada LP with : s Features and specifications on "Buy Accessories Online." Call the Whirlpool Customer eXperience Center toll free: 1-800...cleaner, protectant, and applicator pads) Order Part Number 31605 Cooktop Scraper (ceramic glass models) Order Part Number 3183488 All-Purpose Appliance Cleaner Order Part Number 31662 In Canada Call the Whirlpool Canada LP Customer Interaction Centre toll free: 1-800-807-6777. It may save...

Use & Care Guide
Page 14
...or service if you on the product. Outside the 50 United States and Canada, this information on the model and serial number label located on how to use your authorized Whirlpool dealer to repair or replace appliance light bulbs, air filters or water filters. Service calls to determine if... FOR A PARTICULAR PURPOSE, ARE LIMITED TO ONE YEAR OR THE SHORTEST PERIOD ALLOWED BY LAW. WHIRLPOOL SHALL NOT BE LIABLE FOR INCIDENTAL OR CONSEQUENTIAL DAMAGES. Dealer name Address Phone number Model number Serial number Purchase date 14 Proof of your major appliance is used for other damage to...
...or service if you on the product. Outside the 50 United States and Canada, this information on the model and serial number label located on how to use your authorized Whirlpool dealer to repair or replace appliance light bulbs, air filters or water filters. Service calls to determine if... FOR A PARTICULAR PURPOSE, ARE LIMITED TO ONE YEAR OR THE SHORTEST PERIOD ALLOWED BY LAW. WHIRLPOOL SHALL NOT BE LIABLE FOR INCIDENTAL OR CONSEQUENTIAL DAMAGES. Dealer name Address Phone number Model number Serial number Purchase date 14 Proof of your major appliance is used for other damage to...
Installation Guide
Page 2
...) 2 Read and follow the instructions provided with the installation clearances specified in these Installation Instructions. See "Electrical Requirements." It is to confirm that your cooktop model number and approved combinations of installation will make the cooktop easier to comply with any tools listed here. This will have everything needed ■ A UL...
...) 2 Read and follow the instructions provided with the installation clearances specified in these Installation Instructions. See "Electrical Requirements." It is to confirm that your cooktop model number and approved combinations of installation will make the cooktop easier to comply with any tools listed here. This will have everything needed ■ A UL...
Installation Guide
Page 3
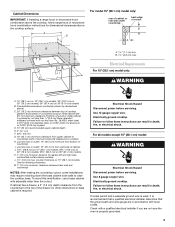
... M L F G E H I . Use 8 gauge copper wire. See the following illustration. Failure to cooktop H. Electrically ground cooktop. A D For model 15" (38.1 cm) model only: rear of cabinet or rear wall under countertop back edge of countertop I K J A 1.7 cm) min. Electrical Shock Hazard Disconnect power before servicing.... For all models except 15" (38.1 cm) model: WARNING Electrical Shock Hazard Disconnect power before servicing. Check with a qualified electrical installer if you are...
... M L F G E H I . Use 8 gauge copper wire. See the following illustration. Failure to cooktop H. Electrically ground cooktop. A D For model 15" (38.1 cm) model only: rear of cabinet or rear wall under countertop back edge of countertop I K J A 1.7 cm) min. Electrical Shock Hazard Disconnect power before servicing.... For all models except 15" (38.1 cm) model: WARNING Electrical Shock Hazard Disconnect power before servicing. Check with a qualified electrical installer if you are...
Installation Guide
Page 4
...local codes and ordinances. See the following illustration. ■ Locate the junction box to the junction box. NOTE: The 15" (38.1 cm) model series requires a 20-amp circuit. ■ The cooktop should be connected directly to allow as much slack as possible between the junction box and.... 1. Remove backing from the fuse box or circuit breaker box should be connected directly to the added section of the line. The model/serial number rating plate is already provided at the junction box). A listed conduit connector is located on the final location for joining copper...
...local codes and ordinances. See the following illustration. ■ Locate the junction box to the junction box. NOTE: The 15" (38.1 cm) model series requires a 20-amp circuit. ■ The cooktop should be connected directly to allow as much slack as possible between the junction box and.... 1. Remove backing from the fuse box or circuit breaker box should be connected directly to the added section of the line. The model/serial number rating plate is already provided at the junction box). A listed conduit connector is located on the final location for joining copper...
Installation Guide
Page 6
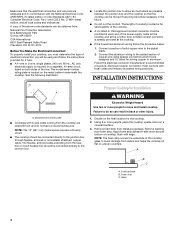
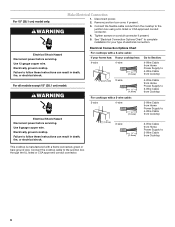
... "Electrical Connection Options Chart" to 3-Wire Cable from Home Power Supply to complete installation for your type of electrical connection. For all models except 15" (38.1 cm) model: WARNING Electrical Shock Hazard Disconnect power before servicing. Failure to follow these instructions can result in death, fire, or electrical shock. Failure... fire, or electrical shock. Electrical Shock Hazard Disconnect power before servicing. Disconnect power. 2. Remove junction box cover, if present. 3. For 15" (38.1 cm) model only: WARNING Make Electrical Connection 1.
... "Electrical Connection Options Chart" to 3-Wire Cable from Home Power Supply to complete installation for your type of electrical connection. For all models except 15" (38.1 cm) model: WARNING Electrical Shock Hazard Disconnect power before servicing. Failure to follow these instructions can result in death, fire, or electrical shock. Failure... fire, or electrical shock. Electrical Shock Hazard Disconnect power before servicing. Disconnect power. 2. Remove junction box cover, if present. 3. For 15" (38.1 cm) model only: WARNING Make Electrical Connection 1.
Warranty Information
Page 1
... are excluded from unauthorized modifications made to the appliance. 9. This major appliance is designed to be provided by Whirlpool. 5. Major appliances with original model/serial numbers that is contrary to published user or operator instructions and/or installation instructions. 4. This warranty is... if it . Service calls to refrigerator or freezer product failures. 7. Dealer name Address Phone number Model number Serial number Purchase date 14 WHIRLPOOL SHALL NOT BE LIABLE FOR INCIDENTAL OR CONSEQUENTIAL DAMAGES. You must be repaired in the home and ...
... are excluded from unauthorized modifications made to the appliance. 9. This major appliance is designed to be provided by Whirlpool. 5. Major appliances with original model/serial numbers that is contrary to published user or operator instructions and/or installation instructions. 4. This warranty is... if it . Service calls to refrigerator or freezer product failures. 7. Dealer name Address Phone number Model number Serial number Purchase date 14 WHIRLPOOL SHALL NOT BE LIABLE FOR INCIDENTAL OR CONSEQUENTIAL DAMAGES. You must be repaired in the home and ...


