Dimension Guide
Page 1
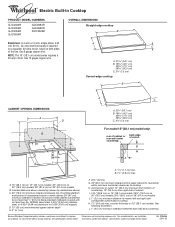
...back edge of the line. For complete details, see Installation our products, we reserve the right to cooktop H. Ref. 8286066 08-11-05 Use 8 gauge copper wire. Use 12 gague copper wire. B. 1½" (3.8 cm) max. Instructions packed with not less than No. 28 MSG sheet...60 Hz., AC only electrical supply is protected by dashed box above) C. 30" (76.2 cm) minimum clearance between back wall and countertop Because Whirlpool Corporation policy includes a continuous commitment to nearest left and right side combustible surface above cooktop K. 1½" (3.8 cm) max. NOTE: The 15...
...back edge of the line. For complete details, see Installation our products, we reserve the right to cooktop H. Ref. 8286066 08-11-05 Use 8 gauge copper wire. Use 12 gague copper wire. B. 1½" (3.8 cm) max. Instructions packed with not less than No. 28 MSG sheet...60 Hz., AC only electrical supply is protected by dashed box above) C. 30" (76.2 cm) minimum clearance between back wall and countertop Because Whirlpool Corporation policy includes a continuous commitment to nearest left and right side combustible surface above cooktop K. 1½" (3.8 cm) max. NOTE: The 15...

Use & Care Guide
Page 3
... the risk of burns, ignition of flammable materials, and spillage due to unintentional contact with ventilating hood - s Protective Liners - SAVE THESE INSTRUCTIONS 3 Moist or damp potholders on a hot cooking area, be referred to avoid steam burn. Flammable materials should never be worn while using the... Do not use , do not touch, or let clothing or other glazed utensils are suitable for Warming or Heating the Room. s Proper Installation - s Use Only Dry Potholders - For units with one or more surface units of utensil to line surface unit drip bowls, except as...
... the risk of burns, ignition of flammable materials, and spillage due to unintentional contact with ventilating hood - s Protective Liners - SAVE THESE INSTRUCTIONS 3 Moist or damp potholders on a hot cooking area, be referred to avoid steam burn. Flammable materials should never be worn while using the... Do not use , do not touch, or let clothing or other glazed utensils are suitable for Warming or Heating the Room. s Proper Installation - s Use Only Dry Potholders - For units with one or more surface units of utensil to line surface unit drip bowls, except as...

Use & Care Guide
Page 10
.... s Do not store jars or cans above the cooktop. s For foods containing sugar in how quickly and evenly heat is not installed, the life of the coil element will take on the properties of aluminum. 10 Cookware should not extend more than ½" (1.3 cm...batches. s Do not use only flat-bottomed canners. Cookware/canner C. ½" (1.3 cm) Maximum overhang s Use flat-bottomed cookware for ordering instructions. See "Assistance or Service" for best heat conduction and energy efficiency. Aluminum and copper may cycle on and off the cooktop before using them...
.... s Do not store jars or cans above the cooktop. s For foods containing sugar in how quickly and evenly heat is not installed, the life of the coil element will take on the properties of aluminum. 10 Cookware should not extend more than ½" (1.3 cm...batches. s Do not use only flat-bottomed canners. Cookware/canner C. ½" (1.3 cm) Maximum overhang s Use flat-bottomed cookware for ordering instructions. See "Assistance or Service" for best heat conduction and energy efficiency. Aluminum and copper may cycle on and off the cooktop before using them...

Use & Care Guide
Page 12
... area, element or surface burner. Cooktop has flashing lights s Are there lights on the cooktop flashing on cooktop s Is the cookware the proper size? See Installation Instructions. Clean the cooktop touch control panel thoroughly. The following pattern of blinking lights on the cooktop control panel indicates that one or more than ½... on and off ? Cookware should not extend more keys are OFF. 2. Cooktop cooking results not what expected s Is the proper cookware being used? See the Installation Instructions.
... area, element or surface burner. Cooktop has flashing lights s Are there lights on the cooktop flashing on cooktop s Is the cookware the proper size? See Installation Instructions. Clean the cooktop touch control panel thoroughly. The following pattern of blinking lights on the cooktop control panel indicates that one or more than ½... on and off ? Cookware should not extend more keys are OFF. 2. Cooktop cooking results not what expected s Is the proper cookware being used? See the Installation Instructions.

Use & Care Guide
Page 13
... , follow the menu prompts. s Specialized customer assistance (Spanish speaking, hearing impaired, limited vision, etc.). To locate the Whirlpool designated service company in your area, you can also look in Canada. Our consultants provide assistance with: s Features and specifications...recommend that you can write to Whirlpool Corporation with any questions or concerns at 1-800-442-9991 and follow the instructions below. Call the Whirlpool Customer eXperience Center toll free: 1-800-253-1301. s Installation information. Whirlpool designated service technicians are trained to...
... , follow the menu prompts. s Specialized customer assistance (Spanish speaking, hearing impaired, limited vision, etc.). To locate the Whirlpool designated service company in your area, you can also look in Canada. Our consultants provide assistance with: s Features and specifications...recommend that you can write to Whirlpool Corporation with any questions or concerns at 1-800-442-9991 and follow the instructions below. Call the Whirlpool Customer eXperience Center toll free: 1-800-253-1301. s Installation information. Whirlpool designated service technicians are trained to...

Use & Care Guide
Page 14
...on the model and serial number label located on how to use your major appliance, to published user or operator instructions and/or installation instructions. 4. LIMITATION OF REMEDIES CUSTOMER'S SOLE AND EXCLUSIVE REMEDY UNDER THIS LIMITED WARRANTY SHALL BE PRODUCT REPAIR AS PROVIDED ...Whirlpool servicer is void if the factory applied serial number has been altered or removed from your major appliance, unless such damage results from defects in materials or workmanship and is required to determine if another warranty applies. Costs associated with published installation instructions...
...on the model and serial number label located on how to use your major appliance, to published user or operator instructions and/or installation instructions. 4. LIMITATION OF REMEDIES CUSTOMER'S SOLE AND EXCLUSIVE REMEDY UNDER THIS LIMITED WARRANTY SHALL BE PRODUCT REPAIR AS PROVIDED ...Whirlpool servicer is void if the factory applied serial number has been altered or removed from your major appliance, unless such damage results from defects in materials or workmanship and is required to determine if another warranty applies. Costs associated with published installation instructions...
Installation Guide
Page 1
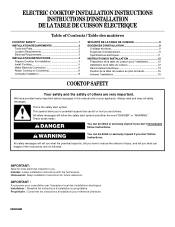
Always read and obey all safety messages. Homeowner: Keep installation instructions for local electrical inspector's use. ELECTRIC COOKTOP INSTALLATION INSTRUCTIONS INSTRUCTIONS D'INSTALLATION DE LA TABLE DE CUISSON ÉLECTRIQUE Table of Contents / Table des matières COOKTOP SAFETY 1 INSTALLATION REQUIREMENTS 2 Tools and Parts 2 Location Requirements 2 Electrical Requirements 3 INSTALLATION INSTRUCTIONS 4 Prepare Cooktop for Installation 4 Install Cooktop 5 Make Electrical Connection 6 Attach Cooktop to...
Always read and obey all safety messages. Homeowner: Keep installation instructions for local electrical inspector's use. ELECTRIC COOKTOP INSTALLATION INSTRUCTIONS INSTRUCTIONS D'INSTALLATION DE LA TABLE DE CUISSON ÉLECTRIQUE Table of Contents / Table des matières COOKTOP SAFETY 1 INSTALLATION REQUIREMENTS 2 Tools and Parts 2 Location Requirements 2 Electrical Requirements 3 INSTALLATION INSTRUCTIONS 4 Prepare Cooktop for Installation 4 Install Cooktop 5 Make Electrical Connection 6 Attach Cooktop to...
Installation Guide
Page 2
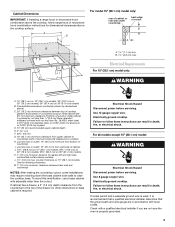
... find this label, contact your dealer to confirm that your cooktop is required. Given dimensions are given with the installation clearances specified in oven. Refer to oven manufacturer's Installation Instructions for approval for correct installation. It is approved. Product Dimensions B A C A. 21 54.1 cm) B. 16 42.1 cm) 30 77.1 cm) 36 92.3 cm) C. 2⁷⁄...
... find this label, contact your dealer to confirm that your cooktop is required. Given dimensions are given with the installation clearances specified in oven. Refer to oven manufacturer's Installation Instructions for approval for correct installation. It is approved. Product Dimensions B A C A. 21 54.1 cm) B. 16 42.1 cm) 30 77.1 cm) 36 92.3 cm) C. 2⁷⁄...
Installation Guide
Page 3
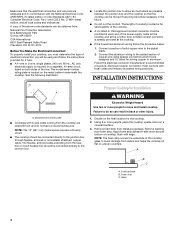
... WARNING Electrical Shock Hazard Disconnect power before servicing. Electrically ground cooktop. Cabinet Dimensions IMPORTANT: If installing a range hood or microwave hood combination above the cooktop, follow these instructions can result in death, fire, or electrical shock. counter thickness on 36" (91.4 cm... 20½" (52 cm) G. 18" (45.7 cm) minimum clearance from the countertop to follow range hood or microwave hood combination instructions for dimensional clearances above the cooktop surface. Failure to nearest left and right side combustible surface above ) C. 30" (76.2 cm) ...
... WARNING Electrical Shock Hazard Disconnect power before servicing. Electrically ground cooktop. Cabinet Dimensions IMPORTANT: If installing a range hood or microwave hood combination above the cooktop, follow these instructions can result in death, fire, or electrical shock. counter thickness on 36" (91.4 cm... 20½" (52 cm) G. 18" (45.7 cm) minimum clearance from the countertop to follow range hood or microwave hood combination instructions for dimensional clearances above the cooktop surface. Failure to nearest left and right side combustible surface above ) C. 30" (76.2 cm) ...
Installation Guide
Page 4
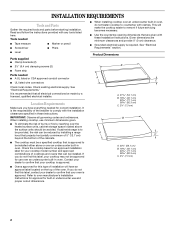
...9632; Do not cut the conduit. See the following illustration. ■ Locate the junction box to do not have a neutral (white) wire. INSTALLATION INSTRUCTIONS A A. Prepare Cooktop for serviceability of the cooktop. ■ A UL listed or CSA approved conduit connector must be connected directly to the pigtail ...foam strip covers the underside of copper wire using and follow the instructions provided for it here. ■ A 4-wire or 3-wire, single phase, 240 volt, 60 Hz., AC only electrical supply is for Installation WARNING Excessive Weight Hazard Use two or more people, place the...
...9632; Do not cut the conduit. See the following illustration. ■ Locate the junction box to do not have a neutral (white) wire. INSTALLATION INSTRUCTIONS A A. Prepare Cooktop for serviceability of the cooktop. ■ A UL listed or CSA approved conduit connector must be connected directly to the pigtail ...foam strip covers the underside of copper wire using and follow the instructions provided for it here. ■ A 4-wire or 3-wire, single phase, 240 volt, 60 Hz., AC only electrical supply is for Installation WARNING Excessive Weight Hazard Use two or more people, place the...
Installation Guide
Page 6
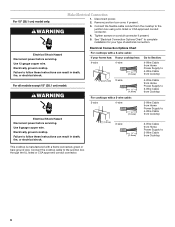
...except 15" (38.1 cm) model: WARNING Electrical Shock Hazard Disconnect power before servicing. Electrically ground cooktop. Failure to follow these instructions can result in death, fire, or electrical shock. Remove junction box cover, if present. 3. Connect the flexible cable conduit from... the junction box using a UL listed or CSA approved conduit connector. 4. Disconnect power. 2. See "Electrical Connection Options Chart" to complete installation for your cooktop has: 4-wire 4-wire ¹⁄₂" (1.3 cm) Go to Section: 4-Wire Cable from Home Power Supply to ...
...except 15" (38.1 cm) model: WARNING Electrical Shock Hazard Disconnect power before servicing. Electrically ground cooktop. Failure to follow these instructions can result in death, fire, or electrical shock. Remove junction box cover, if present. 3. Connect the flexible cable conduit from... the junction box using a UL listed or CSA approved conduit connector. 4. Disconnect power. 2. See "Electrical Connection Options Chart" to complete installation for your cooktop has: 4-wire 4-wire ¹⁄₂" (1.3 cm) Go to Section: 4-Wire Cable from Home Power Supply to ...
Warranty Information
Page 1
... that is contrary to published user or operator instructions and/or installation instructions. 4. Consumable parts are excluded from the date of purchase. 6. Costs associated with electrical or plumbing codes, or use your authorized Whirlpool dealer to determine if another warranty applies. The...major appliance is located in materials or workmanship and is reported to Whirlpool within 30 days from warranty coverage. 3. Service calls to correct the installation of your major appliance, to instruct you ever need it was purchased. Service calls to refrigerator or freezer...
... that is contrary to published user or operator instructions and/or installation instructions. 4. Consumable parts are excluded from the date of purchase. 6. Costs associated with electrical or plumbing codes, or use your authorized Whirlpool dealer to determine if another warranty applies. The...major appliance is located in materials or workmanship and is reported to Whirlpool within 30 days from warranty coverage. 3. Service calls to correct the installation of your major appliance, to instruct you ever need it was purchased. Service calls to refrigerator or freezer...


