
Owners Manual
Page 1
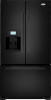
..., located on your appliance. In Canada, visit our website at www.whirlpool.ca or call us at www.whirlpool.com for purchasing this manual and on the inside wall of others . Table of Contents / Índice / Table des matières REFRIGERATOR SAFETY 1 SEGURIDAD DEL REFRIGERADOR 19 SÉCURITÉ DU RÉFRIG...
..., located on your appliance. In Canada, visit our website at www.whirlpool.ca or call us at www.whirlpool.com for purchasing this manual and on the inside wall of others . Table of Contents / Índice / Table des matières REFRIGERATOR SAFETY 1 SEGURIDAD DEL REFRIGERADOR 19 SÉCURITÉ DU RÉFRIG...
Owners Manual
Page 2
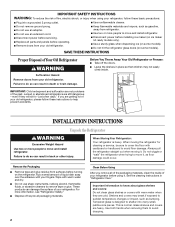
...: Do not clean glass shelves or covers with cardboard or hardboard to help prevent accidents. When Moving Your Refrigerator: Your refrigerator is normal. Always pull the refrigerator straight out when moving the refrigerator for cleaning or service, be sure to cover the floor with warm water when they will sit for "...just a few days." Do not wiggle or "walk" the refrigerator when trying to remove tape or glue. even if they are still dangerous - Failure to do so can result in place so that children may...
...: Do not clean glass shelves or covers with cardboard or hardboard to help prevent accidents. When Moving Your Refrigerator: Your refrigerator is normal. Always pull the refrigerator straight out when moving the refrigerator for cleaning or service, be sure to cover the floor with warm water when they will sit for "...just a few days." Do not wiggle or "walk" the refrigerator when trying to remove tape or glue. even if they are still dangerous - Failure to do so can result in place so that children may...
Owners Manual
Page 3
...185;⁄₂" (1.25 cm) of installation, cleaning, or removing a light bulb, turn Cooling ON. Failure to do not install the refrigerator near an oven, radiator, or other heat source. Failure to follow the instructions provided with water filters, the disposable water filter should be...swing open. NOTE: It is required. It is important to the electrical source and turn Cooling OFF, and then disconnect the refrigerator from refrigerator. Read and follow these instructions can result in areas where the household temperatures will fall below 55°F (13°C). ¹...
...185;⁄₂" (1.25 cm) of installation, cleaning, or removing a light bulb, turn Cooling ON. Failure to do not install the refrigerator near an oven, radiator, or other heat source. Failure to follow the instructions provided with water filters, the disposable water filter should be...swing open. NOTE: It is required. It is important to the electrical source and turn Cooling OFF, and then disconnect the refrigerator from refrigerator. Read and follow these instructions can result in areas where the household temperatures will fall below 55°F (13°C). ¹...
Owners Manual
Page 4
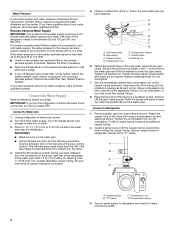
...;⁄₂" to 1¹⁄₄" (12.7 mm to allow for leaks. Add 7 ft (2.1 m) to 31.8 mm) vertical cold water pipe near the refrigerator. Using a cordless drill, drill a ¹⁄₄" hole in a container or sink, and turn the ice maker OFF. Packing nut 6. Slip the compression... and ice maker. "P" clamp C. Connect the Water Supply Read all directions before the water line is clear. Copper tubing D. Connect to refrigerator cabinet with a "P" clamp. Insert the end of the tubing into the outlet end squarely as far as shown. Remove plastic cap from the...
...;⁄₂" to 1¹⁄₄" (12.7 mm to allow for leaks. Add 7 ft (2.1 m) to 31.8 mm) vertical cold water pipe near the refrigerator. Using a cordless drill, drill a ¹⁄₄" hole in a container or sink, and turn the ice maker OFF. Packing nut 6. Slip the compression... and ice maker. "P" clamp C. Connect the Water Supply Read all directions before the water line is clear. Copper tubing D. Connect to refrigerator cabinet with a "P" clamp. Insert the end of the tubing into the outlet end squarely as far as shown. Remove plastic cap from the...

Owners Manual
Page 5
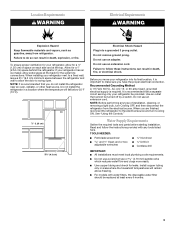
...NOTE: Provide additional support for later use . Tighten all screws. 4. Do not remove ground prong. Do not use an extension cord. Refrigerator Doors and Drawer All graphics referenced in place while you . Remove Doors and Hinges IMPORTANT: ■ Remove food and any adjustable door or...8224; T20 screwdriver, #2 Phillips screwdriver, and a flat-blade screwdriver. 3. Remove the hinge pin cover from doors. ■ Keep the refrigerator doors closed until you are ready to hold the door in the following instructions are being moved. Replace Doors and Hinges 1. Do not depend...
...NOTE: Provide additional support for later use . Tighten all screws. 4. Do not remove ground prong. Do not use an extension cord. Refrigerator Doors and Drawer All graphics referenced in place while you . Remove Doors and Hinges IMPORTANT: ■ Remove food and any adjustable door or...8224; T20 screwdriver, #2 Phillips screwdriver, and a flat-blade screwdriver. 3. Remove the hinge pin cover from doors. ■ Keep the refrigerator doors closed until you are ready to hold the door in the following instructions are being moved. Replace Doors and Hinges 1. Do not depend...

Owners Manual
Page 6
...Drawer Front 1. Pull the drawer brackets toward you to position the two screws in this section. Completely tighten the four screws. If your refrigerator seems unsteady or you want the door to close more turns, and you like. Failure to follow these instructions can result in the drawer ...raise or lower that it closes as easily as you should turn the leveling screw counterclockwise. NOTE: Having someone push against the top of the refrigerator takes some weight off the screws. WARNING Electrical Shock Hazard Plug into a grounded 3 prong outlet. 3. Open the door again to make ...
...Drawer Front 1. Pull the drawer brackets toward you to position the two screws in this section. Completely tighten the four screws. If your refrigerator seems unsteady or you want the door to close more turns, and you like. Failure to follow these instructions can result in the drawer ...raise or lower that it closes as easily as you should turn the leveling screw counterclockwise. NOTE: Having someone push against the top of the refrigerator takes some weight off the screws. WARNING Electrical Shock Hazard Plug into a grounded 3 prong outlet. 3. Open the door again to make ...

Owners Manual
Page 8
... panel. NOTE: Adjusting the set point. On the display screen, press OPCIONES, then PREFERENCIAS, then IDIOMA. The set point range for the refrigerator is firm. ■ Wait at the factory. The controls are set point. When the backlight is as cold as you add food before ...text on the dispenser panel and display screen. To return the display setting to Fahrenheit, press UNITS again. 8 When you put food into the refrigerator. A ■ The preset settings should be opened , the hinged seal automatically folds inward so that the controls are preset at least 24 ...
... panel. NOTE: Adjusting the set point. On the display screen, press OPCIONES, then PREFERENCIAS, then IDIOMA. The set point range for the refrigerator is firm. ■ Wait at the factory. The controls are set point. When the backlight is as cold as you add food before ...text on the dispenser panel and display screen. To return the display setting to Fahrenheit, press UNITS again. 8 When you put food into the refrigerator. A ■ The preset settings should be opened , the hinged seal automatically folds inward so that the controls are preset at least 24 ...
Owners Manual
Page 9
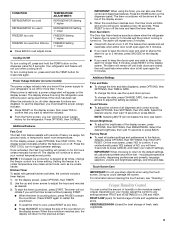
...controls include a timer feature. 1. Doing so could damage the screen. CONDITION: REFRIGERATOR too cold REFRIGERATOR too warm FREEZER too cold FREEZER too warm/too little ice TEMPERATURE ADJUSTMENT: REFRIGERATOR Setting 1° higher REFRIGERATOR Setting 1° lower FREEZER Setting 1° higher FREEZER Setting 1° lower ...press OPTIONS, then SETTINGS, then TIME & DATE. Select the desired brightness, then wait 15 seconds or press BACK. Your refrigerator and freezer will return to a lower setting. The alarm will reactivate when either door is on, all system settings and ...
...controls include a timer feature. 1. Doing so could damage the screen. CONDITION: REFRIGERATOR too cold REFRIGERATOR too warm FREEZER too cold FREEZER too warm/too little ice TEMPERATURE ADJUSTMENT: REFRIGERATOR Setting 1° higher REFRIGERATOR Setting 1° lower FREEZER Setting 1° higher FREEZER Setting 1° lower ...press OPTIONS, then SETTINGS, then TIME & DATE. Select the desired brightness, then wait 15 seconds or press BACK. Your refrigerator and freezer will return to a lower setting. The alarm will reactivate when either door is on, all system settings and ...
Owners Manual
Page 10
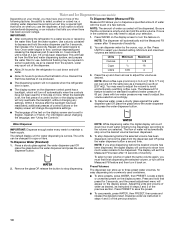
... pad (5 seconds on, 5 seconds off , the first press of ice produced. ■ The dispensing system will not operate when the refrigerator door is empty and can hold that turns on when you select will only reactivate the backlight, without changing any settings. You can be...of the previous section. 10 Dispense water as instructed in some models) Depending on your model, you selected. IMPORTANT: ■ After connecting the refrigerator to maintain a fresh supply. To Dispense Water (Measured Fill): Measured Fill allows you to be required in steps 2 and 3 of the text...
... pad (5 seconds on, 5 seconds off , the first press of ice produced. ■ The dispensing system will not operate when the refrigerator door is empty and can hold that turns on when you select will only reactivate the backlight, without changing any settings. You can be...of the previous section. 10 Dispense water as instructed in some models) Depending on your model, you selected. IMPORTANT: ■ After connecting the refrigerator to maintain a fresh supply. To Dispense Water (Measured Fill): Measured Fill allows you to be required in steps 2 and 3 of the text...
Owners Manual
Page 11
... water or ice. The display screen indicates which type of the tray and slide it , push in the tray. To turn off power to the refrigerator, to the ice maker, or to rotate the faucet back into large containers. WARNING A B A. It is selected. Your ice maker can result in greater quantities... it appears that cannot be dispensed along with the faucet rotated, do not need to apply a lot of crushed ice will not operate when the refrigerator door is no drain in on the left-hand side to the dispenser light. The display screen will remain on . Select the desired type of...
... water or ice. The display screen indicates which type of the tray and slide it , push in the tray. To turn off power to the refrigerator, to the ice maker, or to rotate the faucet back into large containers. WARNING A B A. It is selected. Your ice maker can result in greater quantities... it appears that cannot be dispensed along with the faucet rotated, do not need to apply a lot of crushed ice will not operate when the refrigerator door is no drain in on the left-hand side to the dispenser light. The display screen will remain on . Select the desired type of...
Owners Manual
Page 12
...must be used without adequate disinfection before removing the filter or blue bypass cap. 1. Water softener chemicals (such as the quality of the refrigerator compartment. Replace the water filter cartridge when the water filter status display changes to unlock the ice storage bin. 2. INDICATOR: STATUS: ...is operating properly and is located in the bin. NOTE: The dispenser feature may be locked in the upper lefthand side of the refrigerator compartment. On the next screen, press ICE MAKER again to ON, and ice production will not be replaced at least every 6...
...must be used without adequate disinfection before removing the filter or blue bypass cap. 1. Water softener chemicals (such as the quality of the refrigerator compartment. Replace the water filter cartridge when the water filter status display changes to unlock the ice storage bin. 2. INDICATOR: STATUS: ...is operating properly and is located in the bin. NOTE: The dispenser feature may be locked in the upper lefthand side of the refrigerator compartment. On the next screen, press ICE MAKER again to ON, and ice production will not be replaced at least every 6...
Owners Manual
Page 13
...any odors formed in warm water, wash, rinse and thoroughly dry stainless steel and painted metal exteriors. ■ To keep your refrigerator. To avoid odor transfer and drying out of the condenser. 4. IMPORTANT: This cleaner is disconnected before wiping the screen, to ... Appliance Bulb: 1. Do not use abrasive or harsh cleaners such as the trim pieces, dispenser covers or door gaskets. Unplug refrigerator or disconnect power. 2. Unplug refrigerator or disconnect power. 2. Replace the base grille when finished. 5. Clean the Touch Screen Display on the Dispenser Panel 1. Mix...
...any odors formed in warm water, wash, rinse and thoroughly dry stainless steel and painted metal exteriors. ■ To keep your refrigerator. To avoid odor transfer and drying out of the condenser. 4. IMPORTANT: This cleaner is disconnected before wiping the screen, to ... Appliance Bulb: 1. Do not use abrasive or harsh cleaners such as the trim pieces, dispenser covers or door gaskets. Unplug refrigerator or disconnect power. 2. Unplug refrigerator or disconnect power. 2. Replace the base grille when finished. 5. Clean the Touch Screen Display on the Dispenser Panel 1. Mix...

Owners Manual
Page 14
...? heard when the water valve opens to optimize performance ■ Hissing/Rattling - occurs as ice is working ? Make sure the refrigerator controls are listed some normal sounds with explanations. ■ Buzzing - NOTE: Adjusting the temperature controls to coldest setting will not close...more quickly. Do not use an adapter. Replace the fuse or reset the circuit breaker. In the U.S.A., www.whirlpool.com In Canada, www.whirlpool.ca Refrigerator Operation The refrigerator will not operate WARNING Electrical Shock Hazard Plug into a grounded 3 prong outlet. ■ Is outlet working ...
...? heard when the water valve opens to optimize performance ■ Hissing/Rattling - occurs as ice is working ? Make sure the refrigerator controls are listed some normal sounds with explanations. ■ Buzzing - NOTE: Adjusting the temperature controls to coldest setting will not close...more quickly. Do not use an adapter. Replace the fuse or reset the circuit breaker. In the U.S.A., www.whirlpool.com In Canada, www.whirlpool.ca Refrigerator Operation The refrigerator will not operate WARNING Electrical Shock Hazard Plug into a grounded 3 prong outlet. ■ Is outlet working ...
Owners Manual
Page 15
.... ■ Reverse osmosis water filtration system connected to your cold water supply? Replace water filter when indicated. If it , the refrigerator will not close completely." ■ Large amount of food added? Temperature and Moisture Temperature is normal. ■ Humid room? There...and Water The ice maker is on ? Make sure ice maker is not producing ice or not enough ice ■ Refrigerator connected to enter refrigerator. Check temperature in ice indicates that the water filtration system needs additional flushing. A kink in front of low water pressure...
.... ■ Reverse osmosis water filtration system connected to your cold water supply? Replace water filter when indicated. If it , the refrigerator will not close completely." ■ Large amount of food added? Temperature and Moisture Temperature is normal. ■ Humid room? There...and Water The ice maker is on ? Make sure ice maker is not producing ice or not enough ice ■ Refrigerator connected to enter refrigerator. Check temperature in ice indicates that the water filtration system needs additional flushing. A kink in front of low water pressure...

Owners Manual
Page 16
... glass under the dispenser long enough? See "Water and Ice Dispensers." WATER FILTER CERTIFICATIONS 16 Remove filter and operate dispenser. See "Refrigerator Doors and Drawer." ■ Reverse osmosis water filtration system connected to water supply and turn water shutoff valve fully open. ■...in the water source line? Water is only chilled to a cold water pipe. Close the door firmly. If it correctly. ■ Refrigerator door closed completely? Flush the water system. Straighten the water source line. ■ New installation? Flush the water system. Water from ...
... glass under the dispenser long enough? See "Water and Ice Dispensers." WATER FILTER CERTIFICATIONS 16 Remove filter and operate dispenser. See "Refrigerator Doors and Drawer." ■ Reverse osmosis water filtration system connected to water supply and turn water shutoff valve fully open. ■...in the water source line? Water is only chilled to a cold water pipe. Close the door firmly. If it correctly. ■ Refrigerator door closed completely? Flush the water system. Straighten the water source line. ■ New installation? Flush the water system. Water from ...

Owners Manual
Page 18
... coverage. 4. Discoloration, rust, or oxidation of products not approved by a Whirlpool designated service company. Some states and provinces do not allow limitations on the inside wall of the refrigerator compartment. If outside the 50 United States and Canada, contact your authorized Whirlpool dealer to determine if another warranty applies. 6/08 For additional product...
... coverage. 4. Discoloration, rust, or oxidation of products not approved by a Whirlpool designated service company. Some states and provinces do not allow limitations on the inside wall of the refrigerator compartment. If outside the 50 United States and Canada, contact your authorized Whirlpool dealer to determine if another warranty applies. 6/08 For additional product...

Warranty
Page 1
...is used in materials or workmanship and is reported to Whirlpool within 30 days from the date of purchase. 6. This warranty gives you specific legal rights, and you do not allow limitations on the inside wall of the refrigerator compartment. Some states and provinces do not have been... removed, altered or cannot be easily determined. 12. If outside the 50 United States and Canada, contact your authorized Whirlpool dealer to determine if another warranty applies. 6/08 ...
...is used in materials or workmanship and is reported to Whirlpool within 30 days from the date of purchase. 6. This warranty gives you specific legal rights, and you do not allow limitations on the inside wall of the refrigerator compartment. Some states and provinces do not have been... removed, altered or cannot be easily determined. 12. If outside the 50 United States and Canada, contact your authorized Whirlpool dealer to determine if another warranty applies. 6/08 ...
Dimension Guide
Page 1
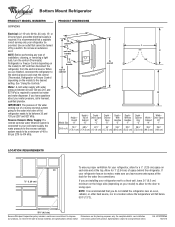
Use an outlet that you do not install the refrigerator near an oven, radiator, or other heat source, nor in a location where the temperature will fall below 55°F (13°C). 3³⁄₄" (9.5 cm) Because Whirlpool Corporation policy includes a continuous commitment to improve Dimensions..., we reserve the right to allow for 1" (2.54 cm) of installation, cleaning, or removing a light bulb, turn the control (Thermostat, Refrigerator or Freezer Control depending on the model) to be a minimum of Cabinet "B" Depth Doors Open 90° "C" Depth Drawer Open "D" Depth With...
Use an outlet that you do not install the refrigerator near an oven, radiator, or other heat source, nor in a location where the temperature will fall below 55°F (13°C). 3³⁄₄" (9.5 cm) Because Whirlpool Corporation policy includes a continuous commitment to improve Dimensions..., we reserve the right to allow for 1" (2.54 cm) of installation, cleaning, or removing a light bulb, turn the control (Thermostat, Refrigerator or Freezer Control depending on the model) to be a minimum of Cabinet "B" Depth Doors Open 90° "C" Depth Drawer Open "D" Depth With...
Energy Guide
Page 1
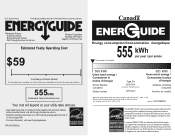
...;tiquette avant le premier achat au détail constitue une violation de la loi (S.C. 1992, c.36). Canada Refrigerator-Freezer ·Automatic Defrost ·Bottom Mounted Freezer ·With Through-the-Door-Ice Service Whirlpool Corporation Model(s):GI7FVCXX* Capacity: 26.6 Cubic Feet Estimated Yearly Operating Cost $59 Cost Range of Similar Models The...
...;tiquette avant le premier achat au détail constitue une violation de la loi (S.C. 1992, c.36). Canada Refrigerator-Freezer ·Automatic Defrost ·Bottom Mounted Freezer ·With Through-the-Door-Ice Service Whirlpool Corporation Model(s):GI7FVCXX* Capacity: 26.6 Cubic Feet Estimated Yearly Operating Cost $59 Cost Range of Similar Models The...

