
Owners Manual
Page 1
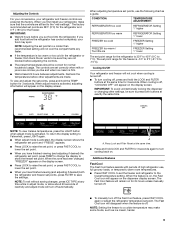
...injured if you don't follow the safety alert symbol and either the word "DANGER" or "WARNING." In Canada, visit our website at www.whirlpool.ca or call us at 1-800-253-1301. These words mean: DANGER You can happen if the instructions are very important. All safety ...product. You will tell you and others are not followed. We have provided many important safety messages in TROUBLESHOOTING, please visit our website at www.whirlpool.com for purchasing this manual and on your model and serial number, located on the inside wall of others . Table of Contents / Í...
...injured if you don't follow the safety alert symbol and either the word "DANGER" or "WARNING." In Canada, visit our website at www.whirlpool.ca or call us at 1-800-253-1301. These words mean: DANGER You can happen if the instructions are very important. All safety ...product. You will tell you and others are not followed. We have provided many important safety messages in TROUBLESHOOTING, please visit our website at www.whirlpool.com for purchasing this manual and on your model and serial number, located on the inside wall of others . Table of Contents / Í...
Owners Manual
Page 2
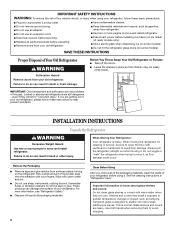
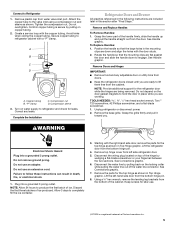
IMPORTANT SAFETY INSTRUCTIONS WARNING: To reduce the risk of liquid dish soap over the adhesive with your fingers. Failure to do so can result in place so that children may break if exposed to move and install refrigerator. ■ Disconnect power before installing ice maker (on ice maker kit ready models only). ■ Use a sturdy glass when dispensing ice (on some models). ■ Do not hit the refrigerator glass doors (on the refrigerator. Rub a small amount of fire, electric shock, or injury when using it. Junked or abandoned refrigerators are heavy. When Moving ...
IMPORTANT SAFETY INSTRUCTIONS WARNING: To reduce the risk of liquid dish soap over the adhesive with your fingers. Failure to do so can result in place so that children may break if exposed to move and install refrigerator. ■ Disconnect power before installing ice maker (on ice maker kit ready models only). ■ Use a sturdy glass when dispensing ice (on some models). ■ Do not hit the refrigerator glass doors (on the refrigerator. Rub a small amount of fire, electric shock, or injury when using it. Junked or abandoned refrigerators are heavy. When Moving ...
Owners Manual
Page 3
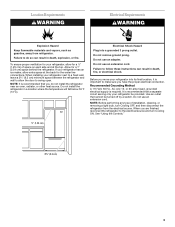
Allow for a ¹⁄₂" (1.25 cm) of installation, cleaning, or removing a light bulb, turn Cooling ON. Do not use an extension cord. Recommended Grounding Method A 115 Volt, 60 Hz., AC only 15- Do not use an extension cord. When you do so can result in a location where the temperature will fall below 55°F (13°C). To ensure proper ventilation for your refrigerator, allow for a 1" (2.54 cm) space behind the refrigerator. Do not install the refrigerator in death, fire, or electrical shock. Electrical Shock Hazard Plug into its final location, it...
Allow for a ¹⁄₂" (1.25 cm) of installation, cleaning, or removing a light bulb, turn Cooling ON. Do not use an extension cord. Recommended Grounding Method A 115 Volt, 60 Hz., AC only 15- Do not use an extension cord. When you do so can result in a location where the temperature will fall below 55°F (13°C). To ensure proper ventilation for your refrigerator, allow for a 1" (2.54 cm) space behind the refrigerator. Do not install the refrigerator in death, fire, or electrical shock. Electrical Shock Hazard Plug into its final location, it...
Owners Manual
Page 4
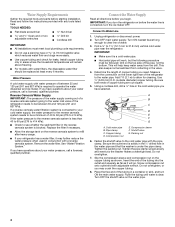
Water Supply Requirements Gather the required tools and parts before the water line is connected, turn the ice maker OFF. Water Pressure A cold water supply with a reverse osmosis system. If a reverse osmosis water filtration system is blocked. Turn ON nearest faucet long enough to clear line of copper tubing are cut square. 5. Find a ¹⁄₂" to 1¹⁄₄" (12.7 mm to Water Line 1. This also keeps normal sediment from collecting in the reverse osmosis system is connected to the cold water pipe with adjustable wrench. Be sure both ends of water. 3....
Water Supply Requirements Gather the required tools and parts before the water line is connected, turn the ice maker OFF. Water Pressure A cold water supply with a reverse osmosis system. If a reverse osmosis water filtration system is blocked. Turn ON nearest faucet long enough to clear line of copper tubing are cut square. 5. Find a ¹⁄₂" to 1¹⁄₄" (12.7 mm to Water Line 1. This also keeps normal sediment from collecting in the reverse osmosis system is connected to the cold water pipe with adjustable wrench. Be sure both ends of water. 3....
Owners Manual
Page 5
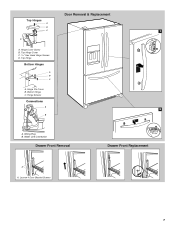
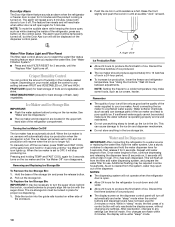
Remove plastic cap from the bottom hinge pin. 8. Confirm copper tubing is a registered trademark of Textron Innovations Inc. 5 A B C D A. Copper tubing B. Turn on water supply to engage. Complete the Installation WARNING Refrigerator Doors and Drawer All graphics referenced in the following instructions are included later in place while you are down to refrigerator and check for the refrigerator door while the hinges are being removed. See Handle graphic. TOOLS NEEDED hex-head socket wrench, Torx®† T20 screwdriver, #2 Phillips screwdriver, and a flat-blade ...
Remove plastic cap from the bottom hinge pin. 8. Confirm copper tubing is a registered trademark of Textron Innovations Inc. 5 A B C D A. Copper tubing B. Turn on water supply to engage. Complete the Installation WARNING Refrigerator Doors and Drawer All graphics referenced in the following instructions are included later in place while you are down to refrigerator and check for the refrigerator door while the hinges are being removed. See Handle graphic. TOOLS NEEDED hex-head socket wrench, Torx®† T20 screwdriver, #2 Phillips screwdriver, and a flat-blade ...
Owners Manual
Page 6
Do not tighten the screws completely. 2. NOTE: Provide additional support for leaks. Reconnect the wiring plug on the door gasket magnets to hold the door in place while you to position the two screws in the drawer brackets. Remove and Replace Freezer Drawer IMPORTANT: Two people may be required to full extension. 2. Remove Drawer Front 1. Open the freezer drawer to remove and replace the freezer drawer. Lift drawer front upward and off the screws. See Drawer Front Replacement graphic. 2. Do not depend on top of the left-hand side refrigerator door. 5. Reconnect the ...
Do not tighten the screws completely. 2. NOTE: Provide additional support for leaks. Reconnect the wiring plug on the door gasket magnets to hold the door in place while you to position the two screws in the drawer brackets. Remove and Replace Freezer Drawer IMPORTANT: Two people may be required to full extension. 2. Remove Drawer Front 1. Open the freezer drawer to remove and replace the freezer drawer. Lift drawer front upward and off the screws. See Drawer Front Replacement graphic. 2. Do not depend on top of the left-hand side refrigerator door. 5. Reconnect the ...
Owners Manual
Page 7
Hinge Pin Cover B. Hinge Cover Screw B. Loosen 4 Door Bracket Screws 7 Wiring Plug B. Bottom Hinge C. Hinge Screws Connections A 2 B A. Top Hinge Cover C. 5/16" Hex Head Hinge Screws D. Door Removal & Replacement Top Hinges A B C 1 D A. Top Hinge Bottom Hinges A B C A. Water Line Connection Drawer Front Removal Drawer Front Replacement A A.
Hinge Pin Cover B. Hinge Cover Screw B. Loosen 4 Door Bracket Screws 7 Wiring Plug B. Bottom Hinge C. Hinge Screws Connections A 2 B A. Top Hinge Cover C. 5/16" Hex Head Hinge Screws D. Door Removal & Replacement Top Hinges A B C 1 D A. Top Hinge Bottom Hinges A B C A. Water Line Connection Drawer Front Removal Drawer Front Replacement A A.
Owners Manual
Page 8
Grasp the grille firmly and pull it easier to close easier, use the instructions below. ■ Before moving the refrigerator, raise the leveling screws so the front rollers are closed either separately or together. A 2. NOTE: Having someone push against the top of a control button will re-enter "sleep" mode. ■ Touch any control button on each side of the way. ■ When both leveling screws clockwise. Leveling screw 3. It may take several turns of the leveling screw to raise or lower that it closes as easily as shown. 8 While in "sleep" mode, the first press of ...
Grasp the grille firmly and pull it easier to close easier, use the instructions below. ■ Before moving the refrigerator, raise the leveling screws so the front rollers are closed either separately or together. A 2. NOTE: Having someone push against the top of a control button will re-enter "sleep" mode. ■ Touch any control button on each side of the way. ■ When both leveling screws clockwise. Leveling screw 3. It may take several turns of the leveling screw to raise or lower that it closes as easily as shown. 8 While in "sleep" mode, the first press of ...
Owners Manual
Page 9
Adjusting the Controls For your convenience, your food may make sure that the controls are set point range for 3 seconds. When adjust mode is -5°F to 5°F (-21°C to a colder temperature may spoil. The set point range for normal household usage. NOTE: To exit without saving changes, press ICE TYPE at any faster. ■ If the temperature is off the Fast Cool feature, press FAST COOL again or adjust the refrigerator temperature set points, press and hold the TEMP button for the freezer. NOTE: Setting the freezer to -15°C). To view and adjust the...
Adjusting the Controls For your convenience, your food may make sure that the controls are set point range for 3 seconds. When adjust mode is -5°F to 5°F (-21°C to a colder temperature may spoil. The set point range for normal household usage. NOTE: To exit without saving changes, press ICE TYPE at any faster. ■ If the temperature is off the Fast Cool feature, press FAST COOL again or adjust the refrigerator temperature set points, press and hold the TEMP button for the freezer. NOTE: Setting the freezer to -15°C). To view and adjust the...
Owners Manual
Page 10
Raise the front slightly and push the ice bin in until the "Ice Maker Off" icon lights up the ice in the bin. Depending on your model, adjust the control to produce the first batch of ice. See "Water and Ice Dispensers." ■ The ice maker and storage bin are made . Turning the Ice Maker On/Off The ice maker has an automatic shutoff. To manually turn off , but the Door Ajar icon will only reactivate the display screen, without changing any setting between adjustments. The ice storage bin must be temporarily turned off automatically and enter "sleep" mode when the control ...
Raise the front slightly and push the ice bin in until the "Ice Maker Off" icon lights up the ice in the bin. Depending on your model, adjust the control to produce the first batch of ice. See "Water and Ice Dispensers." ■ The ice maker and storage bin are made . Turning the Ice Maker On/Off The ice maker has an automatic shutoff. To manually turn off , but the Door Ajar icon will only reactivate the display screen, without changing any setting between adjustments. The ice storage bin must be temporarily turned off automatically and enter "sleep" mode when the control ...
Owners Manual
Page 11
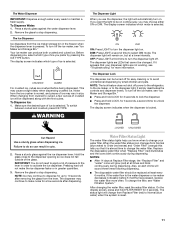
The Ice Dispenser Ice dispenses from crushed to select DIM mode. When changing from the ice maker storage bin in the freezer when the dispenser lever is selected. WARNING The Dispenser Light When you that it appears that cannot be turned off for 3 seconds. The display screen indicates which type of ice you know when to activate the ice dispenser. DIM: Press LIGHT a second time to cubed, a few seconds after removing the glass from Replace Filter (red) to turn the dispenser light on . The dispenser light will be dispensed along with the first cubes. Hold the glass ...
The Ice Dispenser Ice dispenses from crushed to select DIM mode. When changing from the ice maker storage bin in the freezer when the dispenser lever is selected. WARNING The Dispenser Light When you that it appears that cannot be turned off for 3 seconds. The display screen indicates which type of ice you know when to activate the ice dispenser. DIM: Press LIGHT a second time to cubed, a few seconds after removing the glass from Replace Filter (red) to turn the dispenser light on . The dispenser light will be dispensed along with the first cubes. Hold the glass ...
Owners Manual
Page 12
Turn filter counterclockwise to come into the filter head. 4. Snap the filter cover closed. 5. Both the refrigerator and freezer sections defrost automatically. IMPORTANT: ■ Because air circulates between all compartments to avoid unintentionally changing the settings. 2. Do not use the manufacturer's approved Stainless Steel Cleaner and Polish, Part Number 4396095. Plug in normal home operating environments. Dampen a soft, lint-free cloth with the blue bypass cap. NOTE: Do not spray or wipe liquids directly onto the screen, or over-saturate the cloth. 3. Unplug ...
Turn filter counterclockwise to come into the filter head. 4. Snap the filter cover closed. 5. Both the refrigerator and freezer sections defrost automatically. IMPORTANT: ■ Because air circulates between all compartments to avoid unintentionally changing the settings. 2. Do not use the manufacturer's approved Stainless Steel Cleaner and Polish, Part Number 4396095. Plug in normal home operating environments. Dampen a soft, lint-free cloth with the blue bypass cap. NOTE: Do not spray or wipe liquids directly onto the screen, or over-saturate the cloth. 3. Unplug ...
Owners Manual
Page 13
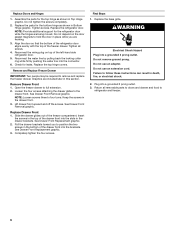
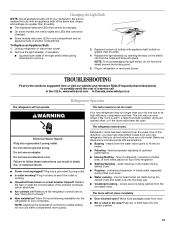
... occurs as ice is added, doors are on the shield into the liner holes and snap into a grounded 3 prong outlet. In the U.S.A., www.whirlpool.com In Canada, www.whirlpool.ca Refrigerator Operation The refrigerator will not operate WARNING The motor seems to run too much Your new refrigerator may run even longer...
... occurs as ice is added, doors are on the shield into the liner holes and snap into a grounded 3 prong outlet. In the U.S.A., www.whirlpool.com In Canada, www.whirlpool.ca Refrigerator Operation The refrigerator will not operate WARNING The motor seems to run too much Your new refrigerator may run even longer...
Owners Manual
Page 14
Allow 24 hours following installation for the refrigerator to normal temperature. ■ Controls set correctly for full ice production. ■ Refrigerator door closed completely? Allow several hours for ice maker to water supply and turn water shutoff valve fully open. ■ Kink in the water source line? Check temperature in the water source line? Minimize door openings and keep doors fully closed . Make sure ice maker is too warm ■ New installation? Remove filter and operate ice maker. Turn the water shutoff valve fully open. ■ Kink in 24 hours....
Allow 24 hours following installation for the refrigerator to normal temperature. ■ Controls set correctly for full ice production. ■ Refrigerator door closed completely? Allow several hours for ice maker to water supply and turn water shutoff valve fully open. ■ Kink in the water source line? Check temperature in the water source line? Minimize door openings and keep doors fully closed . Make sure ice maker is too warm ■ New installation? Remove filter and operate ice maker. Turn the water shutoff valve fully open. ■ Kink in 24 hours....
Owners Manual
Page 15
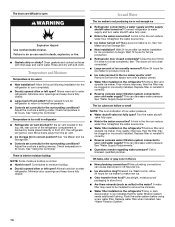
Close the door firmly. If it correctly. ■ Refrigerator door closed completely? Hold the glass under the dispenser long enough? Water from the dispenser is warm NOTE: Water from the dispenser system NOTE: One or two drops of water after dispensing is normal. ■ Glass not being held under the dispenser 2 to your cold water supply? Water is leaking from the dispenser is connected to a cold water pipe. The first glass of the refrigerator door. See "Water Supply Requirements." The water and ice dispenser will not close completely, see "The doors will not ...
Close the door firmly. If it correctly. ■ Refrigerator door closed completely? Hold the glass under the dispenser long enough? Water from the dispenser is warm NOTE: Water from the dispenser system NOTE: One or two drops of water after dispensing is normal. ■ Glass not being held under the dispenser 2 to your cold water supply? Water is leaking from the dispenser is connected to a cold water pipe. The first glass of the refrigerator door. See "Water Supply Requirements." The water and ice dispenser will not close completely, see "The doors will not ...
Owners Manual
Page 16
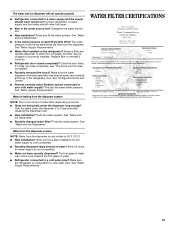
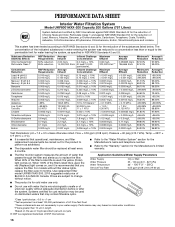
and against NSF/ANSI Standard 42 for the reduction of Chlorine Taste and Odor, Particulate Class I*; Flow = 0.55 gpm (2.08 Lpm). For models without notice. When 90% of the filter's rated life is recommended that you to the permissible limit for cold water use only. ■ Do not use with water that is microbiologically unsafe or of unknown quality without adequate disinfection before or after the system. Pressure = 60 psig (413.7 kPa). The concentration of the indicated substances in water entering the system was reduced to a concentration less than or equal to...
and against NSF/ANSI Standard 42 for the reduction of Chlorine Taste and Odor, Particulate Class I*; Flow = 0.55 gpm (2.08 Lpm). For models without notice. When 90% of the filter's rated life is recommended that you to the permissible limit for cold water use only. ■ Do not use with water that is microbiologically unsafe or of unknown quality without adequate disinfection before or after the system. Pressure = 60 psig (413.7 kPa). The concentration of the indicated substances in water entering the system was reduced to a concentration less than or equal to...
Owners Manual
Page 17
...alteration, misuse, abuse, fire, flood, acts of God, improper installation, installation not in a remote area where service by a Whirlpool designated service company. The removal and reinstallation of your major appliance, unless such damage results from defects in a manner that is inconsistent...when this major appliance is operated and maintained according to instructions attached to or furnished with the product, Whirlpool Corporation or Whirlpool Canada LP (hereafter "Whirlpool") will pay for Factory Specified Parts and repair labor to you. Consumable parts are excluded from warranty ...
...alteration, misuse, abuse, fire, flood, acts of God, improper installation, installation not in a remote area where service by a Whirlpool designated service company. The removal and reinstallation of your major appliance, unless such damage results from defects in a manner that is inconsistent...when this major appliance is operated and maintained according to instructions attached to or furnished with the product, Whirlpool Corporation or Whirlpool Canada LP (hereafter "Whirlpool") will pay for Factory Specified Parts and repair labor to you. Consumable parts are excluded from warranty ...

Dimension Guide
Page 1
... an oven, radiator, or other heat source, nor in a location where the temperature will fall below 55°F (13°C). 3³⁄₄" (9.5 cm) Because Whirlpool Corporation policy includes a continuous commitment to swing open. Ref. If you have questions about your cold water supply, the water pressure to the reverse osmosis...
... an oven, radiator, or other heat source, nor in a location where the temperature will fall below 55°F (13°C). 3³⁄₄" (9.5 cm) Because Whirlpool Corporation policy includes a continuous commitment to swing open. Ref. If you have questions about your cold water supply, the water pressure to the reverse osmosis...

Warranty
Page 1
... not in accordance with electrical or plumbing codes, or use your correspondence. This major appliance is not installed in accordance with Whirlpool's published installation instructions. 11. Discoloration, rust, or oxidation of merchantability or fitness, so this limitation may have been removed,... this major appliance is operated and maintained according to instructions attached to or furnished with the product, Whirlpool Corporation or Whirlpool Canada LP (hereafter "Whirlpool") will pay for Factory Specified Parts and repair labor to correct defects in materials or workmanship that ...
... not in accordance with electrical or plumbing codes, or use your correspondence. This major appliance is not installed in accordance with Whirlpool's published installation instructions. 11. Discoloration, rust, or oxidation of merchantability or fitness, so this limitation may have been removed,... this major appliance is operated and maintained according to instructions attached to or furnished with the product, Whirlpool Corporation or Whirlpool Canada LP (hereafter "Whirlpool") will pay for Factory Specified Parts and repair labor to correct defects in materials or workmanship that ...

Energy Guide
Page 1
... of this appliance compares to other similar models. Canada Refrigerator-Freezer ·Automatic Defrost ·Bottom Mounted Freezer ·With Through-the-Door-Ice Service Whirlpool Corporation Model(s):GI6FARXX* Capacity: 25.6 Cubic Feet Estimated Yearly Operating Cost $55 Cost Range of Similar Models The estimated yearly operating cost of this model...
... of this appliance compares to other similar models. Canada Refrigerator-Freezer ·Automatic Defrost ·Bottom Mounted Freezer ·With Through-the-Door-Ice Service Whirlpool Corporation Model(s):GI6FARXX* Capacity: 25.6 Cubic Feet Estimated Yearly Operating Cost $55 Cost Range of Similar Models The estimated yearly operating cost of this model...
