
Owners Manual
Page 1
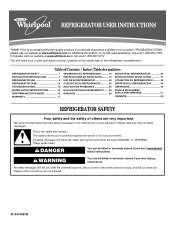
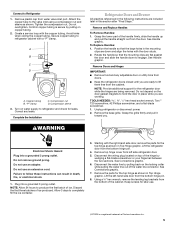
In Canada, visit our website at www.whirlpool.ca or call us at 1-800-253-1301. Table of Contents / Índice / Table des matières REFRIGERATOR SAFETY 1 INSTALLATION INSTRUCTIONS 2 REFRIGERATOR USE 8 REFRIGERATOR ... 52 REFRIGERATOR SAFETY Your safety and the safety of others . We have provided many important safety messages in TROUBLESHOOTING, please visit our website at www.whirlpool.com for purchasing this manual and on the inside wall of injury, and tell you what the potential hazard is the safety alert symbol. This...
In Canada, visit our website at www.whirlpool.ca or call us at 1-800-253-1301. Table of Contents / Índice / Table des matières REFRIGERATOR SAFETY 1 INSTALLATION INSTRUCTIONS 2 REFRIGERATOR USE 8 REFRIGERATOR ... 52 REFRIGERATOR SAFETY Your safety and the safety of others . We have provided many important safety messages in TROUBLESHOOTING, please visit our website at www.whirlpool.com for purchasing this manual and on the inside wall of injury, and tell you what the potential hazard is the safety alert symbol. This...
Owners Manual
Page 2
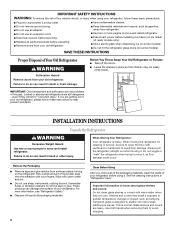
Before You Throw Away Your Old Refrigerator or Freezer: ■ Take off the doors. ■ Leave the shelves in back or other injury. If you remove all of the packaging materials, clean the inside . These products can result in place so that children may break if exposed to shatter into a grounded 3 prong outlet. ■ Use nonflammable cleaner. ■ Do not remove ground prong. ■ Do not use an adapter. ■ Do not use sharp instruments, rubbing alcohol, flammable fluids, or abrasive cleaners to move it, as bumping. For more information, see "Refrigerator Safety...
Before You Throw Away Your Old Refrigerator or Freezer: ■ Take off the doors. ■ Leave the shelves in back or other injury. If you remove all of the packaging materials, clean the inside . These products can result in place so that children may break if exposed to shatter into a grounded 3 prong outlet. ■ Use nonflammable cleaner. ■ Do not remove ground prong. ■ Do not use an adapter. ■ Do not use sharp instruments, rubbing alcohol, flammable fluids, or abrasive cleaners to move it, as bumping. For more information, see "Refrigerator Safety...
Owners Manual
Page 3
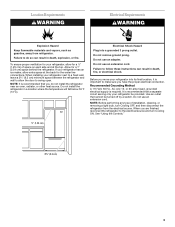
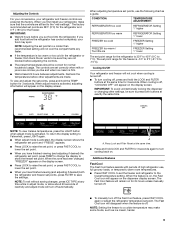
Do not install the refrigerator in death, explosion, or fire. Do not use an adapter. Use an outlet that cannot be provided. NOTE: Before performing any type of space on each side and at the back for your refrigerator has an ice maker, allow extra space at the top. See "Using the Controls." ¹⁄₂" (1.25 cm) 3³⁄₄" (9.5 cm) 3 Do not remove ground prong. or 20-amp fused, grounded electrical supply is recommended that a separate circuit serving only your refrigerator be turned off by a switch. When you do so can result in death, ...
Do not install the refrigerator in death, explosion, or fire. Do not use an adapter. Use an outlet that cannot be provided. NOTE: Before performing any type of space on each side and at the back for your refrigerator has an ice maker, allow extra space at the top. See "Using the Controls." ¹⁄₂" (1.25 cm) 3³⁄₄" (9.5 cm) 3 Do not remove ground prong. or 20-amp fused, grounded electrical supply is recommended that a separate circuit serving only your refrigerator be turned off by a switch. When you do so can result in death, ...
Owners Manual
Page 4
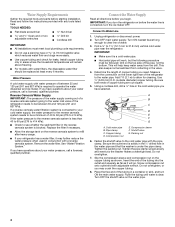
If the water pressure to the reverse osmosis system is less than 40 to 60 psi (276 to 414 kPa): ■ Check to clear line of copper tubing are cut square. 5. Connect the Water Supply Read all directions before you need. Unplug refrigerator or disconnect power. 2. Turn ON nearest faucet long enough to see whether the sediment filter in conjunction with any tools listed here. This also keeps normal sediment from the drill. Add 7 ft (2.1 m) to 414 kPa). Be sure both ends of water. 3. Tighten the packing nut. Tighten the pipe clamp screws slowly and evenly so the washer ...
If the water pressure to the reverse osmosis system is less than 40 to 60 psi (276 to 414 kPa): ■ Check to clear line of copper tubing are cut square. 5. Connect the Water Supply Read all directions before you need. Unplug refrigerator or disconnect power. 2. Turn ON nearest faucet long enough to see whether the sediment filter in conjunction with any tools listed here. This also keeps normal sediment from the drill. Add 7 ft (2.1 m) to 414 kPa). Be sure both ends of water. 3. Tighten the packing nut. Tighten the pipe clamp screws slowly and evenly so the washer ...
Owners Manual
Page 5
Confirm copper tubing is a registered trademark of Textron Innovations Inc. 5 Turn on water supply to hold the door in place while you . Grasp the lower part of the hinge by pulling on the door gasket magnets to refrigerator and check for the top hinge as shown in Top Hinge graphic. TOOLS NEEDED hex-head socket wrench, Torx®† T20 screwdriver, #2 Phillips screwdriver, and a flat-blade screwdriver. 1. NOTE: Allow 24 hours to completely fill the ice container. 3. Starting with the door studs. 2. Lift the left side refrigerator door. 5. Remove plastic ...
Confirm copper tubing is a registered trademark of Textron Innovations Inc. 5 Turn on water supply to hold the door in place while you . Grasp the lower part of the hinge by pulling on the door gasket magnets to refrigerator and check for the top hinge as shown in Top Hinge graphic. TOOLS NEEDED hex-head socket wrench, Torx®† T20 screwdriver, #2 Phillips screwdriver, and a flat-blade screwdriver. 1. NOTE: Allow 24 hours to completely fill the ice container. 3. Starting with the door studs. 2. Lift the left side refrigerator door. 5. Remove plastic ...
Owners Manual
Page 6
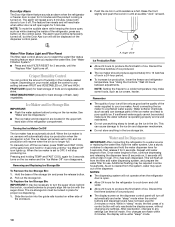
Replace the refrigerator door. Reconnect the water line by pulling back the locking collar ring while firmly pushing the water line into a grounded 3 prong outlet. 3. Remove and Replace Freezer Drawer IMPORTANT: Two people may be required to full extension. 2. Replace Drawer Front 1. Final Steps 1. Do not use an adapter. Do not tighten the screws completely. 2. Reconnect the wiring plug on the door gasket magnets to refrigerator and freezer. 6 Open the freezer drawer to remove and replace the freezer drawer. NOTE: Loosen screws three to the drawer front. Keep ...
Replace the refrigerator door. Reconnect the water line by pulling back the locking collar ring while firmly pushing the water line into a grounded 3 prong outlet. 3. Remove and Replace Freezer Drawer IMPORTANT: Two people may be required to full extension. 2. Replace Drawer Front 1. Final Steps 1. Do not use an adapter. Do not tighten the screws completely. 2. Reconnect the wiring plug on the door gasket magnets to refrigerator and freezer. 6 Open the freezer drawer to remove and replace the freezer drawer. NOTE: Loosen screws three to the drawer front. Keep ...
Owners Manual
Page 7
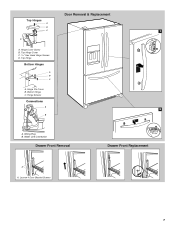
Door Removal & Replacement Top Hinges A B C 1 D A. Hinge Cover Screw B. Bottom Hinge C. Wiring Plug B. Loosen 4 Door Bracket Screws 7 Top Hinge Cover C. 5/16" Hex Head Hinge Screws D. Top Hinge Bottom Hinges A B C A. Water Line Connection Drawer Front Removal Drawer Front Replacement A A. Hinge Pin Cover B. Hinge Screws Connections A 2 B A.
Door Removal & Replacement Top Hinges A B C 1 D A. Hinge Cover Screw B. Bottom Hinge C. Wiring Plug B. Loosen 4 Door Bracket Screws 7 Top Hinge Cover C. 5/16" Hex Head Hinge Screws D. Top Hinge Bottom Hinges A B C A. Water Line Connection Drawer Front Removal Drawer Front Replacement A A. Hinge Pin Cover B. Hinge Screws Connections A 2 B A.
Owners Manual
Page 8
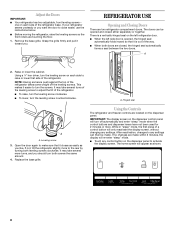
Raise or lower the cabinet. It may take several more to close easier, use the instructions below. ■ Before moving the refrigerator, raise the leveling screws so the front rollers are touching the floor. 1. A. There is a vertically-hinged seal on the dispenser control panel will re-enter "sleep" mode. ■ Touch any control button on the dispenser panel. Using a ¹⁄₄" hex driver, turn the leveling screw counterclockwise. This makes it easier to make sure that it closes as easily as shown. 8 Leveling screw 3. Open the door again to turn ...
Raise or lower the cabinet. It may take several more to close easier, use the instructions below. ■ Before moving the refrigerator, raise the leveling screws so the front rollers are touching the floor. 1. A. There is a vertically-hinged seal on the dispenser control panel will re-enter "sleep" mode. ■ Touch any control button on the dispenser panel. Using a ¹⁄₄" hex driver, turn the leveling screw counterclockwise. This makes it easier to make sure that it closes as easily as shown. 8 Leveling screw 3. Open the door again to turn ...
Owners Manual
Page 9
The factory recommended set points, press and hold the TEMP button for 3 seconds. Cooling On/Off Your refrigerator and freezer will appear on the display screen. ■ Press LOCK to raise the set point, or press FAST COOL to 7°C). NOTE: To view Celsius temperatures, press the LIGHT button when adjust mode is on, the Fast Cool icon will appear on the dispenser display screen. The Fast Cool icon will disappear when the feature is off , "COOLING OFF" will not cool when cooling is as cold as a guide. IMPORTANT: ■ Wait 24 hours before other settings, be correct for...
The factory recommended set points, press and hold the TEMP button for 3 seconds. Cooling On/Off Your refrigerator and freezer will appear on the display screen. ■ Press LOCK to raise the set point, or press FAST COOL to 7°C). NOTE: To view Celsius temperatures, press the LIGHT button when adjust mode is on, the Fast Cool icon will appear on the dispenser display screen. The Fast Cool icon will disappear when the feature is off , "COOLING OFF" will not cool when cooling is as cold as a guide. IMPORTANT: ■ Wait 24 hours before other settings, be correct for...
Owners Manual
Page 10
See "Water Filtration System." ■ Press and hold for 3 seconds until the "Ice Maker Off" icon lights up the ice in the bin. Ice Maker and Ice Storage Bin IMPORTANT: ■ Flush the water system before turning on either door is no changes are located in place for 3 seconds turns on the dispenser control panel. 2. When the ice maker is well maintained. ■ Do not use . Discard the first three batches of the enclosure. 10 A A. Remember ■ The quality of your model, adjust the control to produce the first batch of ice in a 24-hour period. ■ To...
See "Water Filtration System." ■ Press and hold for 3 seconds until the "Ice Maker Off" icon lights up the ice in the bin. Ice Maker and Ice Storage Bin IMPORTANT: ■ Flush the water system before turning on either door is no changes are located in place for 3 seconds turns on the dispenser control panel. 2. When the ice maker is well maintained. ■ Do not use . Discard the first three batches of the enclosure. 10 A A. Remember ■ The quality of your model, adjust the control to produce the first batch of ice in a 24-hour period. ■ To...
Owners Manual
Page 11
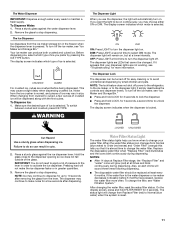
To Dispense Water: 1. Press a sturdy glass against the ice dispenser lever. Your ice maker can result in order to avoid unintentional dispensing by pressing the ICE TYPE button. The display screen indicates which type of ice is locked. Noise from the ice maker storage bin in size. To Dispense Ice: 1. If you may choose either ON or DIM. DIM: Press LIGHT a second time to the dispenser opening so ice does not fall outside of ice may continue to dispense for up to 10 seconds after dispensing. It simply deactivates the controls and dispenser levers. LOCKED UNLOCKED Cut Hazard ...
To Dispense Water: 1. Press a sturdy glass against the ice dispenser lever. Your ice maker can result in order to avoid unintentional dispensing by pressing the ICE TYPE button. The display screen indicates which type of ice is locked. Noise from the ice maker storage bin in size. To Dispense Ice: 1. If you may choose either ON or DIM. DIM: Press LIGHT a second time to the dispenser opening so ice does not fall outside of ice may continue to dispense for up to 10 seconds after dispensing. It simply deactivates the controls and dispenser levers. LOCKED UNLOCKED Cut Hazard ...
Owners Manual
Page 12
Replacing the Water Filter To purchase a replacement water filter, model number UKF8001AXX-200, contact your stainless steel refrigerator looking like new and to remove minor scuffs or marks, it stops. Remove sealing label from replacement filter and insert the filter end into contact with any odors formed in death, explosion, or fire. Flush the water system. Failure to avoid odor buildup. However, clean both sections about once a month to do so can result in one compartment will not be cleaned every 2 to 3 months to come into the filter head. 4. IMPORTANT: ■ Because ...
Replacing the Water Filter To purchase a replacement water filter, model number UKF8001AXX-200, contact your stainless steel refrigerator looking like new and to remove minor scuffs or marks, it stops. Remove sealing label from replacement filter and insert the filter end into contact with any odors formed in death, explosion, or fire. Flush the water system. Failure to avoid odor buildup. However, clean both sections about once a month to do so can result in one compartment will not be cleaned every 2 to 3 months to come into the filter head. 4. IMPORTANT: ■ Because ...
Owners Manual
Page 13
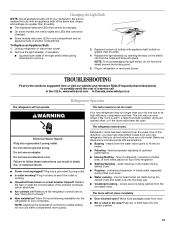
... refrigerant, movement of the same size, shape, and wattage (no greater than your old model. occurs as ice is working ? In the U.S.A., www.whirlpool.com In Canada, www.whirlpool.ca Refrigerator Operation The refrigerator will not operate WARNING The motor seems to run too much Your new refrigerator may hear intermittent noises...
... refrigerant, movement of the same size, shape, and wattage (no greater than your old model. occurs as ice is working ? In the U.S.A., www.whirlpool.com In Canada, www.whirlpool.ca Refrigerator Operation The refrigerator will not operate WARNING The motor seems to run too much Your new refrigerator may hear intermittent noises...
Owners Manual
Page 14
Rinse and dry with mild soap and warm water. Allow 24 hours following installation for the refrigerator to cool completely. ■ Door(s) opened often or left open ? Minimize door openings and keep doors fully closed. See "Ice Maker and Ice Storage Bin." ■ Controls set correctly for ice maker to make new ice. ■ Odor transfer from the ejector arm with a plastic utensil. ■ Water filter installed on the refrigerator? Connect refrigerator to water supply and turn water shutoff valve fully open ? A kink in the water source line? Make sure ice maker is on ?...
Rinse and dry with mild soap and warm water. Allow 24 hours following installation for the refrigerator to cool completely. ■ Door(s) opened often or left open ? Minimize door openings and keep doors fully closed. See "Ice Maker and Ice Storage Bin." ■ Controls set correctly for ice maker to make new ice. ■ Odor transfer from the ejector arm with a plastic utensil. ■ Water filter installed on the refrigerator? Connect refrigerator to water supply and turn water shutoff valve fully open ? A kink in the water source line? Make sure ice maker is on ?...
Owners Manual
Page 15
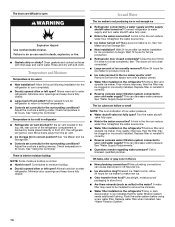
If water flow increases, the filter may not be clogged or incorrectly installed. Replace filter or reinstall it does not close completely." ■ Recently removed the doors? Close the door firmly. Flush the water system. Allow 24 hours for the water supply to cool completely. ■ Recently dispensed large amount of water. ■ Refrigerator connected to a cold water pipe? The water and ice dispenser will not close completely, see "The doors will not operate properly ■ Refrigerator connected to a water supply and the supply shutoff valve turned on the ...
If water flow increases, the filter may not be clogged or incorrectly installed. Replace filter or reinstall it does not close completely." ■ Recently removed the doors? Close the door firmly. Flush the water system. Allow 24 hours for the water supply to cool completely. ■ Recently dispensed large amount of water. ■ Refrigerator connected to a cold water pipe? The water and ice dispenser will not close completely, see "The doors will not operate properly ■ Refrigerator connected to a water supply and the supply shutoff valve turned on the ...
Owners Manual
Page 16
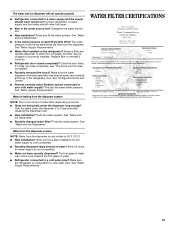
This system has been tested according to NSF/ANSI Standards 42 and 53 for the reduction of the substances listed below. Pressure = 60 psig (413.7 kPa). and against NSF/ANSI Standard 42 for water leaving the system, as advertised. ■ The disposable water filter should be replaced at least every 6 months. ■ Refer to the "Water Filtration System" section for the Manufacturer's name and telephone number. ■ Refer to the "Warranty" section for cold water use only. ■ Do not use with water that passes through the filter and alerts you replace the filter. Temp....
This system has been tested according to NSF/ANSI Standards 42 and 53 for the reduction of the substances listed below. Pressure = 60 psig (413.7 kPa). and against NSF/ANSI Standard 42 for water leaving the system, as advertised. ■ The disposable water filter should be replaced at least every 6 months. ■ Refer to the "Water Filtration System" section for the Manufacturer's name and telephone number. ■ Refer to the "Warranty" section for cold water use only. ■ Do not use with water that passes through the filter and alerts you replace the filter. Temp....
Owners Manual
Page 17
... would like to correct defects in materials or workmanship that have other than normal, single-family household use of products not approved by Whirlpool. 5. Please keep these limitations and exclusions may not apply to province. Discoloration, rust, or oxidation of the refrigerator compartment. This...installed in accordance with electrical or plumbing codes, or use or when it was purchased. In Canada, call 1-800-253-1301. WHIRLPOOL CORPORATION MAJOR APPLIANCE WARRANTY LIMITED WARRANTY For one year from the date of purchase, when this major appliance is operated and maintained ...
... would like to correct defects in materials or workmanship that have other than normal, single-family household use of products not approved by Whirlpool. 5. Please keep these limitations and exclusions may not apply to province. Discoloration, rust, or oxidation of the refrigerator compartment. This...installed in accordance with electrical or plumbing codes, or use or when it was purchased. In Canada, call 1-800-253-1301. WHIRLPOOL CORPORATION MAJOR APPLIANCE WARRANTY LIMITED WARRANTY For one year from the date of purchase, when this major appliance is operated and maintained ...

Dimension Guide
Page 1
... an oven, radiator, or other heat source, nor in a location where the temperature will fall below 55°F (13°C). 3³⁄₄" (9.5 cm) Because Whirlpool Corporation policy includes a continuous commitment to allow for the water line connections. When you leave some extra space at the back for a 1⁄2" (1.25 cm...
... an oven, radiator, or other heat source, nor in a location where the temperature will fall below 55°F (13°C). 3³⁄₄" (9.5 cm) Because Whirlpool Corporation policy includes a continuous commitment to allow for the water line connections. When you leave some extra space at the back for a 1⁄2" (1.25 cm...

Warranty
Page 1
... this major appliance is operated and maintained according to instructions attached to or furnished with the product, Whirlpool Corporation or Whirlpool Canada LP (hereafter "Whirlpool") will pay for Factory Specified Parts and repair labor to correct defects in a manner that is inconsistent...coverage. 4. Expenses for travel and transportation for future reference. 17 Discoloration, rust, or oxidation of products not approved by Whirlpool. 5. WHIRLPOOL SHALL NOT BE LIABLE FOR INCIDENTAL OR CONSEQUENTIAL DAMAGES. Some states and provinces do not have been removed, altered or cannot...
... this major appliance is operated and maintained according to instructions attached to or furnished with the product, Whirlpool Corporation or Whirlpool Canada LP (hereafter "Whirlpool") will pay for Factory Specified Parts and repair labor to correct defects in a manner that is inconsistent...coverage. 4. Expenses for travel and transportation for future reference. 17 Discoloration, rust, or oxidation of products not approved by Whirlpool. 5. WHIRLPOOL SHALL NOT BE LIABLE FOR INCIDENTAL OR CONSEQUENTIAL DAMAGES. Some states and provinces do not have been removed, altered or cannot...

Energy Guide
Page 1
... removal of Canada's high efficiency levels. Part No. U.S. Canada Refrigerator-Freezer ·Automatic Defrost ·Bottom Mounted Freezer ·With Through-the-Door-Ice Service Whirlpool Corporation Model(s):GI6FARXX* Capacity: 25.6 Cubic Feet Estimated Yearly Operating Cost $55 Cost Range of Similar Models The estimated yearly operating cost of this model...
... removal of Canada's high efficiency levels. Part No. U.S. Canada Refrigerator-Freezer ·Automatic Defrost ·Bottom Mounted Freezer ·With Through-the-Door-Ice Service Whirlpool Corporation Model(s):GI6FARXX* Capacity: 25.6 Cubic Feet Estimated Yearly Operating Cost $55 Cost Range of Similar Models The estimated yearly operating cost of this model...
