User Instructions
Page 1
... if you still need your appliance. In Canada, visit our website at www.whirlpool.ca or call us at www.whirlpool.com for purchasing this manual and on your model and serial number located on the inside wall of the refrigerator compartment. Always read and obey all safety messages. All safety messages will...
... if you still need your appliance. In Canada, visit our website at www.whirlpool.ca or call us at www.whirlpool.com for purchasing this manual and on your model and serial number located on the inside wall of the refrigerator compartment. Always read and obey all safety messages. All safety messages will...

User Instructions
Page 2
... adapter. ■ Do not use sharp instruments, rubbing alcohol, flammable fluids, or abrasive cleaners to do so can result in "Refrigerator Care." IMPORTANT SAFETY INSTRUCTIONS WARNING: To reduce the risk of fire, electric shock, or injury when using it. Failure to remove ...to help prevent accidents. Rub a small amount of the past. When Moving Your Refrigerator: Your refrigerator is heavy. Junked or abandoned refrigerators are heavy. Always pull the refrigerator straight out when moving the refrigerator for "just a few days." Remove the Packaging ■ Remove tape and glue ...
... adapter. ■ Do not use sharp instruments, rubbing alcohol, flammable fluids, or abrasive cleaners to do so can result in "Refrigerator Care." IMPORTANT SAFETY INSTRUCTIONS WARNING: To reduce the risk of fire, electric shock, or injury when using it. Failure to remove ...to help prevent accidents. Rub a small amount of the past. When Moving Your Refrigerator: Your refrigerator is heavy. Junked or abandoned refrigerators are heavy. Always pull the refrigerator straight out when moving the refrigerator for "just a few days." Remove the Packaging ■ Remove tape and glue ...

User Instructions
Page 3
...below 55°F (13°C). ¹⁄₂" (1.25 cm) 3³⁄₄" (9.5 cm) Electrical Shock Hazard Plug into its final location, it is required. Use an outlet that cannot be provided. When installing your refrigerator next to a fixed wall, leave a 3³⁄&#...source and turn Cooling OFF, and then disconnect the refrigerator from refrigerator. If your refrigerator, allow extra space at the back for a ¹⁄₂" (1.25 cm) space at the top and behind the refrigerator. Do not install the refrigerator in death, fire, or electrical shock. TOOLS NEEDED...
...below 55°F (13°C). ¹⁄₂" (1.25 cm) 3³⁄₄" (9.5 cm) Electrical Shock Hazard Plug into its final location, it is required. Use an outlet that cannot be provided. When installing your refrigerator next to a fixed wall, leave a 3³⁄&#...source and turn Cooling OFF, and then disconnect the refrigerator from refrigerator. If your refrigerator, allow extra space at the back for a ¹⁄₂" (1.25 cm) space at the top and behind the refrigerator. Do not install the refrigerator in death, fire, or electrical shock. TOOLS NEEDED...

User Instructions
Page 4
...osmosis system needs to be between 35 and 120 psi (241 and 827 kPa) is required to operate the water dispenser and ice maker. Unplug refrigerator or disconnect power. 2. A B C A. Tighten the pipe clamp screws slowly and evenly so washer makes a watertight seal. Slip the compression sleeve... 6. Tighten the packing nut. Turn OFF the shutoff valve on the copper tubing. 4 Connect to 31.8 mm) vertical cold water pipe near the refrigerator. Place brass nut and compression sleeve on the plastic water line to clear line of copper tubing are cut square. 5. A B A. Using an ...
...osmosis system needs to be between 35 and 120 psi (241 and 827 kPa) is required to operate the water dispenser and ice maker. Unplug refrigerator or disconnect power. 2. A B C A. Tighten the pipe clamp screws slowly and evenly so washer makes a watertight seal. Slip the compression sleeve... 6. Tighten the packing nut. Turn OFF the shutoff valve on the copper tubing. 4 Connect to 31.8 mm) vertical cold water pipe near the refrigerator. Place brass nut and compression sleeve on the plastic water line to clear line of copper tubing are cut square. 5. A B A. Using an ...

User Instructions
Page 5
...blade screwdriver or your fingernail between the two sections. A B C A."P" Clamp B. See Plastic Handle graphics 1 and 2. Attach the copper tubing to refrigerator and check for the top hinge as shown in death, fire, or electrical shock. 1. Plug into a grounded 3 prong outlet. NOTE: Provide additional... cover from the bottom hinge pin. 4. Do not use an extension cord. See Bottom Hinge graphic. 5. Keep screws for the refrigerator door while the hinges are included later in the mounting clips are working. Using a ³⁄₈" hex wrench, remove the...
...blade screwdriver or your fingernail between the two sections. A B C A."P" Clamp B. See Plastic Handle graphics 1 and 2. Attach the copper tubing to refrigerator and check for the top hinge as shown in death, fire, or electrical shock. 1. Plug into a grounded 3 prong outlet. NOTE: Provide additional... cover from the bottom hinge pin. 4. Do not use an extension cord. See Bottom Hinge graphic. 5. Keep screws for the refrigerator door while the hinges are included later in the mounting clips are working. Using a ³⁄₈" hex wrench, remove the...

User Instructions
Page 6
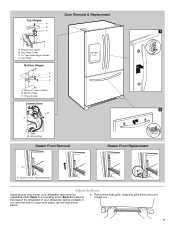
...remove and replace the freezer drawer. See Drawer Front Removal graphic. Slide the drawer glides out of the left-hand side refrigerator door. 5. WARNING Electrical Shock Hazard Plug into the slots in death, fire, or electrical shock. 2. Replace the parts for the...Graphics are working. 3. Replace Drawer Front 1. Do not remove ground prong. Replace Doors and Hinges 1. Assemble the parts for leaks. Replace the refrigerator door. Reconnect the water lines by firmly pushing one line inside the other. Insert the screws in place while you are included later in the...
...remove and replace the freezer drawer. See Drawer Front Removal graphic. Slide the drawer glides out of the left-hand side refrigerator door. 5. WARNING Electrical Shock Hazard Plug into the slots in death, fire, or electrical shock. 2. Replace the parts for the...Graphics are working. 3. Replace Drawer Front 1. Do not remove ground prong. Replace Doors and Hinges 1. Assemble the parts for leaks. Replace the refrigerator door. Reconnect the water lines by firmly pushing one line inside the other. Insert the screws in place while you are included later in the...
User Instructions
Page 7
... want the door to close more easily, use the instructions below. 1. Top Hinge Bottom Hinges A B C A. If your refrigerator may have four adjustable rollers (Style 1) or a leveling screw (Style 2) located at the base of the refrigerator. Loosen 4 Door Bracket Screws Adjust the Doors Depending on some models) B. Remove the base grille. Door Removal...
... want the door to close more easily, use the instructions below. 1. Top Hinge Bottom Hinges A B C A. If your refrigerator may have four adjustable rollers (Style 1) or a leveling screw (Style 2) located at the base of the refrigerator. Loosen 4 Door Bracket Screws Adjust the Doors Depending on some models) B. Remove the base grille. Door Removal...

User Instructions
Page 8
..., and you add food before adjusting the controls. If you should be correct for your refrigerator, make sure that side of the refrigerator. Turn the brake foot clockwise until it easier to turn the screws. 3. A A B C A. Brake foot NOTE: Your refrigerator may spoil. A. Hinged seal Using the Controls The control center is a vertically-hinged seal on...
..., and you add food before adjusting the controls. If you should be correct for your refrigerator, make sure that side of the refrigerator. Turn the brake foot clockwise until it easier to turn the screws. 3. A A B C A. Brake foot NOTE: Your refrigerator may spoil. A. Hinged seal Using the Controls The control center is a vertically-hinged seal on...

User Instructions
Page 9
...On/Off turns off the sound of all lights. 9 Filter Reset The Filter Reset control allows you to set the freezer and refrigerator to turn off . Temperature in the chart as a guide. All control center lights, interior lights and alarm tones will be ... Alarm touch pad to turn on . ■ Press Humidity Control to set user preferences, if desired. Adjusting Controls The REFRIGERATOR control adjusts the refrigerator compartment temperature. If you to the lowest temperature settings. Auto Light Level Selection (LL) This preference allows you to activate ...
...On/Off turns off the sound of all lights. 9 Filter Reset The Filter Reset control allows you to set the freezer and refrigerator to turn off . Temperature in the chart as a guide. All control center lights, interior lights and alarm tones will be ... Alarm touch pad to turn on . ■ Press Humidity Control to set user preferences, if desired. Adjusting Controls The REFRIGERATOR control adjusts the refrigerator compartment temperature. If you to the lowest temperature settings. Auto Light Level Selection (LL) This preference allows you to activate ...

User Instructions
Page 10
...mechanism. ■ Do not store anything sharp to a softened water supply. This can damage parts of ice. Repeat until resistance is displayed, press the Refrigerator (+) or (-) touch pads to produce the first batch of ice in cuts. 1. Dispense Ice and Water WARNING A B A. Use the Freezer (+) ... touch pads to flow. Crisper Humidity Control You can result in a 24-hour period. ■ To increase ice production, lower the freezer and refrigerator temperature. VEGETABLES / HIGH (closed) for three seconds. To turn on , 5 seconds off the ice maker, press the switch to 12 batches of...
...mechanism. ■ Do not store anything sharp to a softened water supply. This can damage parts of ice. Repeat until resistance is displayed, press the Refrigerator (+) or (-) touch pads to produce the first batch of ice in cuts. 1. Dispense Ice and Water WARNING A B A. Use the Freezer (+) ... touch pads to flow. Crisper Humidity Control You can result in a 24-hour period. ■ To increase ice production, lower the freezer and refrigerator temperature. VEGETABLES / HIGH (closed) for three seconds. To turn on , 5 seconds off the ice maker, press the switch to 12 batches of...

User Instructions
Page 11
... or soft cloth and a mild detergent in death, explosion, or fire. If this option is microbiologically unsafe or of the refrigerator compartment. REFRIGERATOR CARE Auto: The dispenser light will illuminate at least 2 minutes before removing the filter or blue bypass cap. 1. NOTE: ...the manufacturer's approved Stainless Steel Cleaner & Polish, Part Number 4396095. Cleaning WARNING Explosion Hazard Use nonflammable cleaner. Both the refrigerator and freezer sections defrost automatically. You must thoroughly clean both sections about once a month to avoid buildup of pressure to the...
... or soft cloth and a mild detergent in death, explosion, or fire. If this option is microbiologically unsafe or of the refrigerator compartment. REFRIGERATOR CARE Auto: The dispenser light will illuminate at least 2 minutes before removing the filter or blue bypass cap. 1. NOTE: ...the manufacturer's approved Stainless Steel Cleaner & Polish, Part Number 4396095. Cleaning WARNING Explosion Hazard Use nonflammable cleaner. Both the refrigerator and freezer sections defrost automatically. You must thoroughly clean both sections about once a month to avoid buildup of pressure to the...

User Instructions
Page 12
...the tabs on the shield into the liner holes and snap into a grounded 3 prong outlet. In the U.S.A., www.whirlpool.com In Canada, www.whirlpool.ca The refrigerator will not cool either compartment more quickly. NOTE: Adjusting the temperature controls to clean the grille, the open . ...flow of refrigerant, movement of water lines, or from your old one due to clean the condenser: ■ Remove the base ...
...the tabs on the shield into the liner holes and snap into a grounded 3 prong outlet. In the U.S.A., www.whirlpool.com In Canada, www.whirlpool.ca The refrigerator will not cool either compartment more quickly. NOTE: Adjusting the temperature controls to clean the grille, the open . ...flow of refrigerant, movement of water lines, or from your old one due to clean the condenser: ■ Remove the base ...

User Instructions
Page 13
... hours for full ice production. ■ Freezer door closed . ■ Large load of food added? Use airtight, moisture proof packaging to enter refrigerator. Replace water filter when indicated. Failure to make new ice. ■ Odor transfer from door. ■ Bin or shelf in the ice maker...ice. ■ Ice cube jammed in the way? The ice cubes are difficult to remove the minerals. ■ Water filter installed on the refrigerator? Discard ice. A water filter may be clogged or incorrectly installed. Allows warm air to begin. See "Using the Controls." See "Water Supply ...
... hours for full ice production. ■ Freezer door closed . ■ Large load of food added? Use airtight, moisture proof packaging to enter refrigerator. Replace water filter when indicated. Failure to make new ice. ■ Odor transfer from door. ■ Bin or shelf in the ice maker...ice. ■ Ice cube jammed in the way? The ice cubes are difficult to remove the minerals. ■ Water filter installed on the refrigerator? Discard ice. A water filter may be clogged or incorrectly installed. Allows warm air to begin. See "Using the Controls." See "Water Supply ...

User Instructions
Page 14
... water flow increases, the filter may not be clogged or incorrectly installed. Close the door firmly. If it correctly. ■ Refrigerator door closed completely? This can decrease water pressure. Allow 24 hours after releasing the dispenser lever. ■ New installation? Straighten the... dispensed? See "Water Supply Requirements." Flush the water system. Make sure the water dispenser tube connections are fully tightened. See "Refrigerator Doors." Water from the dispenser is warm NOTE: Water from the dispenser. Allow 24 hours for the water supply to cool completely...
... water flow increases, the filter may not be clogged or incorrectly installed. Close the door firmly. If it correctly. ■ Refrigerator door closed completely? This can decrease water pressure. Allow 24 hours after releasing the dispenser lever. ■ New installation? Straighten the... dispensed? See "Water Supply Requirements." Flush the water system. Make sure the water dispenser tube connections are fully tightened. See "Refrigerator Doors." Water from the dispenser is warm NOTE: Water from the dispenser. Allow 24 hours for the water supply to cool completely...

User Instructions
Page 16
... damage, including scratches, dents, chips or other than normal, single-family household use of consumables or cleaning products not approved by Whirlpool. 5. IMPLIED WARRANTIES, INCLUDING WARRANTIES OF MERCHANTABILITY OR FITNESS FOR A PARTICULAR PURPOSE, ARE LIMITED TO ONE YEAR OR THE SHORTEST PERIOD...where service by this warranty. 8. Please keep this limited warranty does not apply. Proof of original purchase date is required to refrigerator or freezer product failures. 7. Any food loss due to obtain service under these excluded circumstances shall be provided by the customer...
... damage, including scratches, dents, chips or other than normal, single-family household use of consumables or cleaning products not approved by Whirlpool. 5. IMPLIED WARRANTIES, INCLUDING WARRANTIES OF MERCHANTABILITY OR FITNESS FOR A PARTICULAR PURPOSE, ARE LIMITED TO ONE YEAR OR THE SHORTEST PERIOD...where service by this warranty. 8. Please keep this limited warranty does not apply. Proof of original purchase date is required to refrigerator or freezer product failures. 7. Any food loss due to obtain service under these excluded circumstances shall be provided by the customer...

Dimensions
Page 1
...for planning purposes only. Height "C" 68-5/8" 68-5/8" Overall Height "D" 70-1/8" 70-1/8" LOCATION REQUIREMENTS 1/2" (1.25 cm) 3-3/4" (9.5 cm) To ensure proper ventilation for your refrigerator be between 35 and 120 psi (241 and 827 kPa). NOTE: It is required. Specifications subject to...Cab. ® Bottom Mount Refrigerator PRODUCT MODEL NUMBERS GI5FSAXV GI5FVAXV Electrical: A 115 Volt, 60 Hz., AC only 15- IMPORTANT: The pressure of the water coming out of a reverse osmosis system going to be provided. Because Whirlpool Corporation policy includes a continuous ...
...for planning purposes only. Height "C" 68-5/8" 68-5/8" Overall Height "D" 70-1/8" 70-1/8" LOCATION REQUIREMENTS 1/2" (1.25 cm) 3-3/4" (9.5 cm) To ensure proper ventilation for your refrigerator be between 35 and 120 psi (241 and 827 kPa). NOTE: It is required. Specifications subject to...Cab. ® Bottom Mount Refrigerator PRODUCT MODEL NUMBERS GI5FSAXV GI5FVAXV Electrical: A 115 Volt, 60 Hz., AC only 15- IMPORTANT: The pressure of the water coming out of a reverse osmosis system going to be provided. Because Whirlpool Corporation policy includes a continuous ...

