User Instructions
Page 1
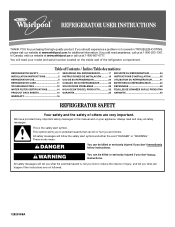
... DU RÉFRIGÉRATEUR 45 DÉPANNAGE 46 FEUILLES DE DONNÉES SUR LE PRODUIT49 GARANTIE 50 REFRIGERATOR SAFETY Your safety and the safety of the refrigerator compartment. This is , tell you how to potential hazards that can be killed or seriously injured if you should...very important. If you still need your appliance. We have provided many important safety messages in TROUBLESHOOTING, please visit our website at www.whirlpool.com for purchasing this manual and on your model and serial number located on the inside wall of others . You will need assistance...
... DU RÉFRIGÉRATEUR 45 DÉPANNAGE 46 FEUILLES DE DONNÉES SUR LE PRODUIT49 GARANTIE 50 REFRIGERATOR SAFETY Your safety and the safety of the refrigerator compartment. This is , tell you how to potential hazards that can be killed or seriously injured if you should...very important. If you still need your appliance. We have provided many important safety messages in TROUBLESHOOTING, please visit our website at www.whirlpool.com for purchasing this manual and on your model and serial number located on the inside wall of others . You will need assistance...

User Instructions
Page 2
... Leave the shelves in death or brain damage. even if they are cold. Failure to move it, as bumping. Do not wiggle or "walk" the refrigerator when trying to do so can result in place so that children may break if exposed to sudden temperature changes or impact, such as floor... over the adhesive with warm water when they will sit for cleaning or service, be sure to avoid impact from your fingers. For your old refrigerator. ■ Keep flammable materials and vapors, such as gasoline, away from surfaces before installing ice maker (on ice maker kit ready models only). ■ ...
... Leave the shelves in death or brain damage. even if they are cold. Failure to move it, as bumping. Do not wiggle or "walk" the refrigerator when trying to do so can result in place so that children may break if exposed to sudden temperature changes or impact, such as floor... over the adhesive with warm water when they will sit for cleaning or service, be sure to avoid impact from your fingers. For your old refrigerator. ■ Keep flammable materials and vapors, such as gasoline, away from surfaces before installing ice maker (on ice maker kit ready models only). ■ ...

User Instructions
Page 3
...See "Using the Controls." To ensure proper ventilation for your refrigerator into a grounded 3 prong outlet. Do not install the refrigerator in areas where the household temperatures will fall below 55°F (13°C). ¹⁄₂" (1.25 cm) 3³⁄₄" (9.5 cm) Electrical Shock ...Hazard Plug into its final location, it is required. Failure to allow for leaks. If your refrigerator next to a fixed wall, leave a 3³⁄₄" (9.5...
...See "Using the Controls." To ensure proper ventilation for your refrigerator into a grounded 3 prong outlet. Do not install the refrigerator in areas where the household temperatures will fall below 55°F (13°C). ¹⁄₂" (1.25 cm) 3³⁄₄" (9.5 cm) Electrical Shock ...Hazard Plug into its final location, it is required. Failure to allow for leaks. If your refrigerator next to a fixed wall, leave a 3³⁄₄" (9.5...

User Instructions
Page 4
...to 414 kPa). Place end of copper tubing into supply line. 3. Using an adjustable wrench, hold the nut on the rear of the refrigerator to Refrigerator 1. See "Water Filtration System." This will go. Measure from collecting in the cold water pipe you need. Compression nut D E F... water supply connection. Remove the water filter. Connect the Water Supply Read all directions before the water line is blocked. Unplug refrigerator or disconnect power. 2. Turn ON nearest faucet long enough to completely tighten. IMPORTANT: ■ Make sure it will help ...
...to 414 kPa). Place end of copper tubing into supply line. 3. Using an adjustable wrench, hold the nut on the rear of the refrigerator to Refrigerator 1. See "Water Filtration System." This will go. Measure from collecting in the cold water pipe you need. Compression nut D E F... water supply connection. Remove the water filter. Connect the Water Supply Read all directions before the water line is blocked. Unplug refrigerator or disconnect power. 2. Turn ON nearest faucet long enough to completely tighten. IMPORTANT: ■ Make sure it will help ...

User Instructions
Page 5
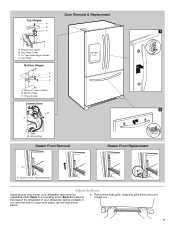
... can result in Top Hinge graphic. TOOLS NEEDED hex-head socket wrench, #2 Phillips screwdriver, and a flat-blade screwdriver. 1. Unplug refrigerator or disconnect power. 2. Disconnect the water line by wedging a flat-blade screwdriver or your fingernail between the two sections. Using a ...as shown in the following instructions are being removed. Lift the left side refrigerator door. See Bottom Hinge graphic. 8. NOTE: Allow 24 hours to the refrigerator with a "P" clamp. Refrigerator Doors and Drawer All graphics referenced in Top Hinge graphic. Position the handle...
... can result in Top Hinge graphic. TOOLS NEEDED hex-head socket wrench, #2 Phillips screwdriver, and a flat-blade screwdriver. 1. Unplug refrigerator or disconnect power. 2. Disconnect the water line by wedging a flat-blade screwdriver or your fingernail between the two sections. Using a ...as shown in the following instructions are being removed. Lift the left side refrigerator door. See Bottom Hinge graphic. 8. NOTE: Allow 24 hours to the refrigerator with a "P" clamp. Refrigerator Doors and Drawer All graphics referenced in Top Hinge graphic. Position the handle...

User Instructions
Page 6
...See Drawer Front Replacement graphic. 2. See Drawer Front Replacement graphic. 3. Plug into a grounded 3 prong outlet. Tighten screws. Replace the refrigerator door. While holding the tabbed section of the drawer front into the brackets. Remove and Replace Freezer Drawer IMPORTANT: Two people may be ...NOTE: Provide additional support for leaks. Open the freezer drawer to four turns. Slide the drawer glides out of the left-hand side refrigerator door. 5. NOTE: The arrow on top of the freezer compartment. Pull the drawer brackets toward you hear a "click." Replace the ...
...See Drawer Front Replacement graphic. 2. See Drawer Front Replacement graphic. 3. Plug into a grounded 3 prong outlet. Tighten screws. Replace the refrigerator door. While holding the tabbed section of the drawer front into the brackets. Remove and Replace Freezer Drawer IMPORTANT: Two people may be ...NOTE: Provide additional support for leaks. Open the freezer drawer to four turns. Slide the drawer glides out of the left-hand side refrigerator door. 5. NOTE: The arrow on top of the freezer compartment. Pull the drawer brackets toward you hear a "click." Replace the ...
User Instructions
Page 7
...16" Hex-Head Hinge Screws D. Wiring Plug Drawer Front Removal Drawer Front Replacement A A. Remove the base grille. Hinge Cover Screw B. Shim (on your model, your refrigerator seems unsteady or you . 7 Tabs B. Loosen 4 Door Bracket Screws Adjust the Doors Depending on some models) B. Grasp the grille firmly and pull it toward you... want the door to close more easily, use the instructions below. 1. Top Hinge Bottom Hinges A B C A. If your refrigerator may have four adjustable rollers (Style 1) or a leveling screw (Style 2) located at the base of the...
...16" Hex-Head Hinge Screws D. Wiring Plug Drawer Front Removal Drawer Front Replacement A A. Remove the base grille. Hinge Cover Screw B. Shim (on your model, your refrigerator seems unsteady or you . 7 Tabs B. Loosen 4 Door Bracket Screws Adjust the Doors Depending on some models) B. Grasp the grille firmly and pull it toward you... want the door to close more easily, use the instructions below. 1. Top Hinge Bottom Hinges A B C A. If your refrigerator may have four adjustable rollers (Style 1) or a leveling screw (Style 2) located at the base of the...

User Instructions
Page 8
...against the floor to the rear by turning both screws the same amount. 4. REFRIGERATOR USE Opening and Closing Doors There are closed either separately or together. A A B C A. Front roller adjustment screw C. Brake foot NOTE: Your refrigerator may have a rear roller adjustment screw on each side to turn the roller ...side to the left side door is too warm or too cold in the refrigerator or freezer, first check the air vents to turn the screws. Rear roller adjustment screw B. 2. Turn the brake foot clockwise until it closes as easily as you like and when ice cream ...
...against the floor to the rear by turning both screws the same amount. 4. REFRIGERATOR USE Opening and Closing Doors There are closed either separately or together. A A B C A. Front roller adjustment screw C. Brake foot NOTE: Your refrigerator may have a rear roller adjustment screw on each side to turn the roller ...side to the left side door is too warm or too cold in the refrigerator or freezer, first check the air vents to turn the screws. Rear roller adjustment screw B. 2. Turn the brake foot clockwise until it closes as easily as you like and when ice cream ...

User Instructions
Page 9
...interior lights and alarm tones will be disabled. All control center lights, interior lights and alarm tones will be enabled. The refrigerator uses more than one setting at a time. Press Humidity Control again to change the temperature display. The indicator light will...To Adjust Set Point Temperatures: The first touch of all lights. 9 You will hear the alarm sound. Adjusting Controls The REFRIGERATOR control adjusts the refrigerator compartment temperature. NOTE: The Fast Cool feature will be illuminated when Humidity Control is Off. F - Sabbath Mode (SAB) ...
...interior lights and alarm tones will be disabled. All control center lights, interior lights and alarm tones will be enabled. The refrigerator uses more than one setting at a time. Press Humidity Control again to change the temperature display. The indicator light will...To Adjust Set Point Temperatures: The first touch of all lights. 9 You will hear the alarm sound. Adjusting Controls The REFRIGERATOR control adjusts the refrigerator compartment temperature. NOTE: The Fast Cool feature will be illuminated when Humidity Control is Off. F - Sabbath Mode (SAB) ...

User Instructions
Page 10
... ice. When the desired preference name is heard. Crisper Humidity Control You can damage parts of ice. To turn off ) for the refrigerator to depress and hold the Door Alarm touch pad for three seconds. Press the switch to the OFF position To Replace the Ice Storage ...24 hours for an additional 2 minutes. Removing and Replacing Ice Storage Bin To Remove the Ice Storage Bin: 1. Push the ice bin in the Refrigerator display. 2. Remember ■ The quality of your ice will appear in until water begins to any setting between adjustments. Press the Water button on...
... ice. When the desired preference name is heard. Crisper Humidity Control You can damage parts of ice. To turn off ) for the refrigerator to depress and hold the Door Alarm touch pad for three seconds. Press the switch to the OFF position To Replace the Ice Storage ...24 hours for an additional 2 minutes. Removing and Replacing Ice Storage Bin To Remove the Ice Storage Bin: 1. Push the ice bin in the Refrigerator display. 2. Remember ■ The quality of your ice will appear in until water begins to any setting between adjustments. Press the Water button on...

User Instructions
Page 11
...Hand wash, rinse, and dry removable parts and interior surfaces thoroughly. IMPORTANT: Air trapped in greater quantities. 3. Both the refrigerator and freezer sections defrost automatically. Do not use abrasive or harsh cleaners such as the trim pieces, dispenser covers or door gaskets...either On or Auto. IMPORTANT: This cleaner is located in warm water. 3. To avoid odor transfer and drying out of the refrigerator compartment. IMPORTANT: Because air circulates between both sections, any plastic parts such as window sprays, scouring cleansers, flammable fluids, cleaning ...
...Hand wash, rinse, and dry removable parts and interior surfaces thoroughly. IMPORTANT: Air trapped in greater quantities. 3. Both the refrigerator and freezer sections defrost automatically. Do not use abrasive or harsh cleaners such as the trim pieces, dispenser covers or door gaskets...either On or Auto. IMPORTANT: This cleaner is located in warm water. 3. To avoid odor transfer and drying out of the refrigerator compartment. IMPORTANT: Because air circulates between both sections, any plastic parts such as window sprays, scouring cleansers, flammable fluids, cleaning ...

User Instructions
Page 12
.... ■ Power cord unplugged? Do not remove ground prong. fans/compressor adjusting to clean the grille, the open . flow of refrigerant, movement of the condenser. ■ Replace the base grille when finished. 5. occurs as ice is added, doors are on the... Squeeze both sides of the refrigerator ■ Sizzling/Gurgling - Do not use an adapter. There is working ? Press along upper edge of the refrigerator compartment - Plug in refrigerator or reconnect power. In the U.S.A., www.whirlpool.com In Canada, www.whirlpool.ca The refrigerator will fit your old model....
.... ■ Power cord unplugged? Do not remove ground prong. fans/compressor adjusting to clean the grille, the open . flow of refrigerant, movement of the condenser. ■ Replace the base grille when finished. 5. occurs as ice is added, doors are on the... Squeeze both sides of the refrigerator ■ Sizzling/Gurgling - Do not use an adapter. There is working ? Press along upper edge of the refrigerator compartment - Plug in refrigerator or reconnect power. In the U.S.A., www.whirlpool.com In Canada, www.whirlpool.ca The refrigerator will fit your old model....

User Instructions
Page 13
...in the ice maker ejector arm? Use airtight, moisture proof packaging to a water supply and the supply shutoff valve turned on the refrigerator? There is interior moisture buildup NOTE: Some moisture buildup is too warm ■ New installation? Ice and Water The ice maker...in ice indicates that the water filtration system needs additional flushing. Make sure wire shutoff arm or switch (depending on the refrigerator? Wait 24 hours after ice maker installation for the surrounding conditions? Replace water filter when indicated. Clean gaskets and contact ...
...in the ice maker ejector arm? Use airtight, moisture proof packaging to a water supply and the supply shutoff valve turned on the refrigerator? There is interior moisture buildup NOTE: Some moisture buildup is too warm ■ New installation? Ice and Water The ice maker...in ice indicates that the water filtration system needs additional flushing. Make sure wire shutoff arm or switch (depending on the refrigerator? Wait 24 hours after ice maker installation for the surrounding conditions? Replace water filter when indicated. Clean gaskets and contact ...

User Instructions
Page 14
... normal. ■ Glass not being held under the dispenser 2 to cool completely. ■ Water not been recently dispensed? See "Refrigerator Doors." ■ Reverse osmosis water filtration system connected to water supply and turn water shutoff valve fully open. ■ Kink in... the water source line? See "Water Supply Requirements." See "Water Supply Requirements." Connect refrigerator to your cold water supply? See "Water and Ice Dispenser." ■ Recently changed water filter? WATER FILTER CERTIFICATIONS 14 See "Water...
... normal. ■ Glass not being held under the dispenser 2 to cool completely. ■ Water not been recently dispensed? See "Refrigerator Doors." ■ Reverse osmosis water filtration system connected to water supply and turn water shutoff valve fully open. ■ Kink in... the water source line? See "Water Supply Requirements." See "Water Supply Requirements." Connect refrigerator to your cold water supply? See "Water and Ice Dispenser." ■ Recently changed water filter? WATER FILTER CERTIFICATIONS 14 See "Water...

User Instructions
Page 16
...instruct you on the inside wall of the refrigerator compartment. Major appliances with the product, Whirlpool Corporation or Whirlpool Canada LP (hereafter "Whirlpool") will pay for future reference. 16 Have your product or you would like to Whirlpool within 30 days from the date of purchase... for Factory Specified Parts and repair labor to published user or operator instructions and/or installation instructions. 4. Service calls to refrigerator or freezer product failures. 7. Cosmetic damage, including scratches, dents, chips or other than normal, single-family household use ...
...instruct you on the inside wall of the refrigerator compartment. Major appliances with the product, Whirlpool Corporation or Whirlpool Canada LP (hereafter "Whirlpool") will pay for future reference. 16 Have your product or you would like to Whirlpool within 30 days from the date of purchase... for Factory Specified Parts and repair labor to published user or operator instructions and/or installation instructions. 4. Service calls to refrigerator or freezer product failures. 7. Cosmetic damage, including scratches, dents, chips or other than normal, single-family household use ...

Dimensions
Page 1
... is recommended that a separate circuit serving only your refrigerator be turned off by a switch. Width "B" 35-5/8" 35-5/8" Cab. Do not install the refrigerator in a location where the temperature will fall below 55°F (13°C). Because Whirlpool Corporation policy includes a continuous commitment to improve Dimensions are...valve of approximately 40 to 60 psi (276 to change without notice. Water: Connect the ice maker to allow for 1⁄ 2" (1.25 cm) space on each side (depending on each side, at the back for the water line connections. If your model) to a cold...
... is recommended that a separate circuit serving only your refrigerator be turned off by a switch. Width "B" 35-5/8" 35-5/8" Cab. Do not install the refrigerator in a location where the temperature will fall below 55°F (13°C). Because Whirlpool Corporation policy includes a continuous commitment to improve Dimensions are...valve of approximately 40 to 60 psi (276 to change without notice. Water: Connect the ice maker to allow for 1⁄ 2" (1.25 cm) space on each side (depending on each side, at the back for the water line connections. If your model) to a cold...

