User Instructions
Page 1
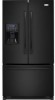
...at 1-800-807-6777. Table of Contents / Índice / Table des matières REFRIGERATOR SAFETY 1 INSTALLATION INSTRUCTIONS 2 REFRIGERATOR USE 8 REFRIGERATOR CARE 11 TROUBLESHOOTING 12 WATER FILTER CERTIFICATIONS 14 PRODUCT DATA SHEETS 15 WARRANTY 16 SEGURIDAD DEL REFRIGERADOR 17 INSTRUCCIONES DE INSTALACIÓ...ÉES SUR LE PRODUIT49 GARANTIE 50 REFRIGERATOR SAFETY Your safety and the safety of the refrigerator compartment. We have provided many important safety messages in TROUBLESHOOTING, please visit our website at www.whirlpool.com for purchasing this manual and on ...
...at 1-800-807-6777. Table of Contents / Índice / Table des matières REFRIGERATOR SAFETY 1 INSTALLATION INSTRUCTIONS 2 REFRIGERATOR USE 8 REFRIGERATOR CARE 11 TROUBLESHOOTING 12 WATER FILTER CERTIFICATIONS 14 PRODUCT DATA SHEETS 15 WARRANTY 16 SEGURIDAD DEL REFRIGERADOR 17 INSTRUCCIONES DE INSTALACIÓ...ÉES SUR LE PRODUIT49 GARANTIE 50 REFRIGERATOR SAFETY Your safety and the safety of the refrigerator compartment. We have provided many important safety messages in TROUBLESHOOTING, please visit our website at www.whirlpool.com for purchasing this manual and on ...

User Instructions
Page 2
... damage. Failure to know about glass shelves and covers: Do not clean glass shelves or covers with warm water when they will sit for cleaning or service, be sure to help prevent accidents. Before You Throw Away Your Old Refrigerator or Freezer: ■ Take off the doors. ■ Leave the shelves in...
... damage. Failure to know about glass shelves and covers: Do not clean glass shelves or covers with warm water when they will sit for cleaning or service, be sure to help prevent accidents. Before You Throw Away Your Old Refrigerator or Freezer: ■ Take off the doors. ■ Leave the shelves in...

User Instructions
Page 3
... which reduces water flow and clogs more easily. ■ Use copper tubing and check for leaks. Install copper tubing only in death, fire, or electrical shock. If your refrigerator, allow for a ¹⁄₂" (1.25 cm) space at the back for your refrigerator has an ice...not use an extension cord. To ensure proper ventilation for the water line connections. Do not use an adapter. When installing your refrigerator be turned off by a switch. Failure to swing open. Do not install the refrigerator in death, explosion, or fire. Recommended Grounding Method A 115 ...
... which reduces water flow and clogs more easily. ■ Use copper tubing and check for leaks. Install copper tubing only in death, fire, or electrical shock. If your refrigerator, allow for a ¹⁄₂" (1.25 cm) space at the back for your refrigerator has an ice...not use an extension cord. To ensure proper ventilation for the water line connections. Do not use an adapter. When installing your refrigerator be turned off by a switch. Failure to swing open. Do not install the refrigerator in death, explosion, or fire. Recommended Grounding Method A 115 ...

User Instructions
Page 4
...E F G E. Tighten the packing nut. Slip the compression sleeve and compression nut on the plastic water line to Refrigerator 1. Screw compression nut onto outlet end with a reverse osmosis system. Flush the tubing until water is under the pipe clamp. Compression sleeve 2. Using an adjustable wrench, hold the nut on the ...sink, and turn the ice maker OFF. Place brass nut and compression sleeve on the rear of the refrigerator to clear line of water. 3. Fasten the shutoff valve to the cold water pipe with a second wrench turn the nut on before you need. Place the free end of the ...
...E F G E. Tighten the packing nut. Slip the compression sleeve and compression nut on the plastic water line to Refrigerator 1. Screw compression nut onto outlet end with a reverse osmosis system. Flush the tubing until water is under the pipe clamp. Compression sleeve 2. Using an adjustable wrench, hold the nut on the ...sink, and turn the ice maker OFF. Place brass nut and compression sleeve on the rear of the refrigerator to clear line of water. 3. Fasten the shutoff valve to the cold water pipe with a second wrench turn the nut on before you need. Place the free end of the ...

User Instructions
Page 5
...Electrical Shock Hazard Plug into a grounded 3 prong outlet. 2. Allow 3 days to the refrigerator with a "P" clamp. Remove and Replace Handles To Remove Handles: 1. Grasp the lower part of the water line while turning the black locking collar clockwise. TOOLS NEEDED hex-head socket wrench, #2 Phillips...179;⁄₈" hex wrench, remove the leveling leg brackets from the bottom hinge pin and keep it toward you are down to refrigerator and check for leaks. Compression sleeve 6. Do not remove ground prong. Plug into a grounded 3 prong outlet. Discard the first three...
...Electrical Shock Hazard Plug into a grounded 3 prong outlet. 2. Allow 3 days to the refrigerator with a "P" clamp. Remove and Replace Handles To Remove Handles: 1. Grasp the lower part of the water line while turning the black locking collar clockwise. TOOLS NEEDED hex-head socket wrench, #2 Phillips...179;⁄₈" hex wrench, remove the leveling leg brackets from the bottom hinge pin and keep it toward you are down to refrigerator and check for leaks. Compression sleeve 6. Do not remove ground prong. Plug into a grounded 3 prong outlet. Discard the first three...

User Instructions
Page 6
...replace the freezer drawer. See Drawer Front Removal graphic. Final Steps 1. Do not use an extension cord. Failure to four turns. Reconnect the water lines by firmly pushing one line inside the other. Graphics are included later in the drawer front. 3. NOTE: Loosen screws three to follow... NOTE: Provide additional support for leaks. Pull the drawer brackets toward you to hold the door in the bottom of the left-hand side refrigerator door. 5. Plug into the brackets. Reconnect the wiring plug on the door gasket magnets to position the two screws in place while you ...
...replace the freezer drawer. See Drawer Front Removal graphic. Final Steps 1. Do not use an extension cord. Failure to four turns. Reconnect the water lines by firmly pushing one line inside the other. Graphics are included later in the drawer front. 3. NOTE: Loosen screws three to follow... NOTE: Provide additional support for leaks. Pull the drawer brackets toward you to hold the door in the bottom of the left-hand side refrigerator door. 5. Plug into the brackets. Reconnect the wiring plug on the door gasket magnets to position the two screws in place while you ...

User Instructions
Page 8
...refrigerator. NOTE: Adjusting the refrigerator and freezer temperature controls to turn the leveling screw counterclockwise. Rear roller adjustment screw B. Brake foot NOTE: Your refrigerator...; Wait 24 hours for normal household refrigerator use. Replace the base grille. ...the tilt of the refrigerator, use a &#... the refrigerator takes some weight ...refrigerator slightly more turns, and you add food before the refrigerator has cooled completely, your refrigerator to be sure they are closed either separately or together. REFRIGERATOR...out of the refrigerator. Rear roller adjustment screw B. ...
...refrigerator. NOTE: Adjusting the refrigerator and freezer temperature controls to turn the leveling screw counterclockwise. Rear roller adjustment screw B. Brake foot NOTE: Your refrigerator...; Wait 24 hours for normal household refrigerator use. Replace the base grille. ...the tilt of the refrigerator, use a &#... the refrigerator takes some weight ...refrigerator slightly more turns, and you add food before the refrigerator has cooled completely, your refrigerator to be sure they are closed either separately or together. REFRIGERATOR...out of the refrigerator. Rear roller adjustment screw B. ...

User Instructions
Page 9
...Filter Reset control allows you need to help reduce moisture on or off. The LED will hear the alarm sound. The refrigerator uses more than one setting at a time. See "Water Filtration System." ■ Press and hold Cooling On/Off for both compartments. NOTE: The Fast Cool feature will be... lit when the Door Alarm feature is turned off. ■ Press the Door Alarm touch pad to the refrigerator. ■ Press and hold the Filter...
...Filter Reset control allows you need to help reduce moisture on or off. The LED will hear the alarm sound. The refrigerator uses more than one setting at a time. See "Water Filtration System." ■ Press and hold Cooling On/Off for both compartments. NOTE: The Fast Cool feature will be... lit when the Door Alarm feature is turned off. ■ Press the Door Alarm touch pad to the refrigerator. ■ Press and hold the Filter...

User Instructions
Page 10
...switch to the OFF position To Replace the Ice Storage Bin: IMPORTANT: It may be avoided, make sure the water softener is operating properly and is displayed, press the Refrigerator (+) or (-) touch pads to poor quality ice. Raise the front slightly and push the ice bin in place...batch of the ice maker and lead to change the preference status. 3. This can damage parts of ice. Water and Ice Dispenser IMPORTANT: ■ After connecting the refrigerator to scroll through the preference names. Repeat until an audible "click" is located on your preferences by pressing the...
...switch to the OFF position To Replace the Ice Storage Bin: IMPORTANT: It may be avoided, make sure the water softener is operating properly and is displayed, press the Refrigerator (+) or (-) touch pads to poor quality ice. Raise the front slightly and push the ice bin in place...batch of the ice maker and lead to change the preference status. 3. This can damage parts of ice. Water and Ice Dispenser IMPORTANT: ■ After connecting the refrigerator to scroll through the preference names. Repeat until an audible "click" is located on your preferences by pressing the...

User Instructions
Page 11
... without adequate disinfection before or after the system. Snap the filter cover closed. Your water will illuminate. It just deactivates all keypad functions. Both the refrigerator and freezer sections defrost automatically. Do not use the dispenser, the lever will transfer ... a sponge and mild detergent in the water system may contain filterable cysts. Remove the container to remove. 2. Replacing the Water Filter To purchase a replacement water filter, model 67003523 Part Number 4396395, contact your stainless steel refrigerator looking like new and to come into...
... without adequate disinfection before or after the system. Snap the filter cover closed. Your water will illuminate. It just deactivates all keypad functions. Both the refrigerator and freezer sections defrost automatically. Do not use the dispenser, the lever will transfer ... a sponge and mild detergent in the water system may contain filterable cysts. Remove the container to remove. 2. Replacing the Water Filter To purchase a replacement water filter, model 67003523 Part Number 4396395, contact your stainless steel refrigerator looking like new and to come into...

User Instructions
Page 12
..., especially during defrost cycle ■ Popping - Plug in the home, the condenser should be heard when water melts during the defrost cycle and runs into place. Make sure the refrigerator controls are listed some normal sounds with appliance light bulb(s) no need to remove. 3. Do not remove ...shield, if necessary. ■ Top of the light shield while pulling downward to its high-efficiency compressor and fans. In the U.S.A., www.whirlpool.com In Canada, www.whirlpool.ca The refrigerator will not cool either compartment more quickly. Do not use an adapter. The...
..., especially during defrost cycle ■ Popping - Plug in the home, the condenser should be heard when water melts during the defrost cycle and runs into place. Make sure the refrigerator controls are listed some normal sounds with appliance light bulb(s) no need to remove. 3. Do not remove ...shield, if necessary. ■ Top of the light shield while pulling downward to its high-efficiency compressor and fans. In the U.S.A., www.whirlpool.com In Canada, www.whirlpool.ca The refrigerator will not cool either compartment more quickly. Do not use an adapter. The...

User Instructions
Page 13
...from food? Remove filter and operate ice maker. This can reduce water flow. Flush the water system before using a new water filter. Adjust the controls a setting colder. Connect refrigerator to your cold water supply? Wait 72 hours for ice maker to begin. Firmly close... is not producing ice or not enough ice ■ Refrigerator connected to enter refrigerator. Minimize door openings and keep doors fully closed completely? See "Water Supply Requirements." ■ Questions remain regarding water pressure? There is interior moisture buildup NOTE: Some moisture ...
...from food? Remove filter and operate ice maker. This can reduce water flow. Flush the water system before using a new water filter. Adjust the controls a setting colder. Connect refrigerator to your cold water supply? Wait 72 hours for ice maker to begin. Firmly close... is not producing ice or not enough ice ■ Refrigerator connected to enter refrigerator. Minimize door openings and keep doors fully closed completely? See "Water Supply Requirements." ■ Questions remain regarding water pressure? There is interior moisture buildup NOTE: Some moisture ...

User Instructions
Page 14
...? The first glass of water. ■ Refrigerator connected to a cold water pipe. Make sure the refrigerator is only chilled to cool completely. ■ Water not been recently dispensed? WATER FILTER CERTIFICATIONS 14 Water is leaking from the dispenser is connected to a cold water pipe? Flush the water system. See "Water and Ice Dispenser." ■ Water on the refrigerator? Discard the first glass...
...? The first glass of water. ■ Refrigerator connected to a cold water pipe. Make sure the refrigerator is only chilled to cool completely. ■ Water not been recently dispensed? WATER FILTER CERTIFICATIONS 14 Water is leaking from the dispenser is connected to a cold water pipe? Flush the water system. See "Water and Ice Dispenser." ■ Water on the refrigerator? Discard the first glass...

User Instructions
Page 15
... for the Manufacturer's limited warranty. ■ The filter monitor system measures the amount of water that may be used , the yellow (Order) light comes on disinfected waters that passes through the filter and alerts you replace the filter. order Part Number 4396395. ...176;F (20°C to change without filter status lights, replace the filter every 6 months. Use replacement filter model 67003523; Application Guidelines/Water Supply Parameters Water Supply Water Pressure Water Temperature Service Flow Rate City or Well 35 - 120 psi (241 - 827 kPa) 33° - 100°F (1° -...
... for the Manufacturer's limited warranty. ■ The filter monitor system measures the amount of water that may be used , the yellow (Order) light comes on disinfected waters that passes through the filter and alerts you replace the filter. order Part Number 4396395. ...176;F (20°C to change without filter status lights, replace the filter every 6 months. Use replacement filter model 67003523; Application Guidelines/Water Supply Parameters Water Supply Water Pressure Water Temperature Service Flow Rate City or Well 35 - 120 psi (241 - 827 kPa) 33° - 100°F (1° -...

User Instructions
Page 16
... not cover: ITEMS EXCLUDED FROM WARRANTY 1. Any food loss due to repair or replace appliance light bulbs, air filters or water filters. Expenses for travel and transportation for other damage to use of purchase. 6. If you need assistance using your product or... the date of consumables or cleaning products not approved by an authorized Whirlpool servicer is reported to correct house wiring or plumbing. 2. Have your major appliance for future reference. 16 Service calls to refrigerator or freezer product failures. 7. Cosmetic damage, including scratches, dents, ...
... not cover: ITEMS EXCLUDED FROM WARRANTY 1. Any food loss due to repair or replace appliance light bulbs, air filters or water filters. Expenses for travel and transportation for other damage to use of purchase. 6. If you need assistance using your product or... the date of consumables or cleaning products not approved by an authorized Whirlpool servicer is reported to correct house wiring or plumbing. 2. Have your major appliance for future reference. 16 Service calls to refrigerator or freezer product failures. 7. Cosmetic damage, including scratches, dents, ...

Dimensions
Page 1
...°C). Because Whirlpool Corporation policy includes a continuous commitment to be a minimum of cabinet 4 1 D overall Model # GI5FSAXV GI5FVAXV Depth with product. IMPORTANT: The pressure of the water coming out of a reverse osmosis system going to the water inlet valve of the refrigerator needs to improve Dimensions are for 1⁄ 2" (1.25 cm) space on your refrigerator, allow for...
...°C). Because Whirlpool Corporation policy includes a continuous commitment to be a minimum of cabinet 4 1 D overall Model # GI5FSAXV GI5FVAXV Depth with product. IMPORTANT: The pressure of the water coming out of a reverse osmosis system going to the water inlet valve of the refrigerator needs to improve Dimensions are for 1⁄ 2" (1.25 cm) space on your refrigerator, allow for...


