
Installation Guide
Page 1
... INSTALLATION INSTRUCTIONS 2 Unpack the Ice Maker 2 Location Requirements 2 Electrical Requirements 3 Water Supply Requirements 3 Vacation or Extended Time Without Use 3 Connect Water Supply 3 Ice Maker Drain Pump Installation 4 Drain Connection 7 Ice Maker Door Reversal-Side Swing Only 8 Leveling 10 Cleaning 10 INSTRUCTIONS D'INSTALLATION 13 Déballage de la machine à glaç...
... INSTALLATION INSTRUCTIONS 2 Unpack the Ice Maker 2 Location Requirements 2 Electrical Requirements 3 Water Supply Requirements 3 Vacation or Extended Time Without Use 3 Connect Water Supply 3 Ice Maker Drain Pump Installation 4 Drain Connection 7 Ice Maker Door Reversal-Side Swing Only 8 Leveling 10 Cleaning 10 INSTRUCTIONS D'INSTALLATION 13 Déballage de la machine à glaç...

Installation Guide
Page 2
... ice maker requires a cold water supply inlet of ¹⁄₄" (6.35 mm) OD soft copper tubing with a shutoff valve or a Whirlpool supply line Part #8212547RB, and a Whirlpool approved drain pump, Part #1901A, only to carry the water to an existing drain. ■ Choose a well ventilated area with your ice maker before using...
... ice maker requires a cold water supply inlet of ¹⁄₄" (6.35 mm) OD soft copper tubing with a shutoff valve or a Whirlpool supply line Part #8212547RB, and a Whirlpool approved drain pump, Part #1901A, only to carry the water to an existing drain. ■ Choose a well ventilated area with your ice maker before using...

Installation Guide
Page 3
..., fire, or electrical shock. Reverse Osmosis Water Supply IMPORTANT: ■ A reverse osmosis system is not recommended for ice makers that have a drain pump installed. ■ For gravity drain systems only. ■ The pressure of the water supply coming out of a reverse osmosis system going to the...psi (207 and 827 kPa) is equipped with the International Plumbing Code and any local codes and ordinances. ■ Use copper tubing or Whirlpool supply line, Part #8212547RP, and check for proper ice maker operation. Do not remove ground prong. Failure to follow these instructions can ...
..., fire, or electrical shock. Reverse Osmosis Water Supply IMPORTANT: ■ A reverse osmosis system is not recommended for ice makers that have a drain pump installed. ■ For gravity drain systems only. ■ The pressure of the water supply coming out of a reverse osmosis system going to the...psi (207 and 827 kPa) is equipped with the International Plumbing Code and any local codes and ordinances. ■ Use copper tubing or Whirlpool supply line, Part #8212547RP, and check for proper ice maker operation. Do not remove ground prong. Failure to follow these instructions can ...

Installation Guide
Page 4
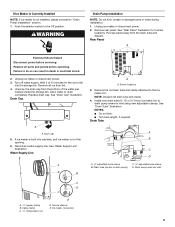
... that you are cut square. ■ Slip compression sleeve and compression nut on copper tubing as it with a wrench two more turns. Use only Whirlpool approved drain pump kit Part #1901A. Copper tubing B. B A. Insert end of copper tubing to allow the ice maker to back of 10 ft (3 m). A B C A. ... cabinet back) ■ Cable clamps (secures vent tube to back of ice maker) (3) ■ #8-32 x ³⁄₈" pump mounting screws (secures drain pump to baseplate and clamps to be sure the copper tubing does not A touch the cabinet's side wall or other parts inside the cabinet....
... that you are cut square. ■ Slip compression sleeve and compression nut on copper tubing as it with a wrench two more turns. Use only Whirlpool approved drain pump kit Part #1901A. Copper tubing B. B A. Insert end of copper tubing to allow the ice maker to back of 10 ft (3 m). A B C A. ... cabinet back) ■ Cable clamps (secures vent tube to back of ice maker) (3) ■ #8-32 x ³⁄₈" pump mounting screws (secures drain pump to baseplate and clamps to be sure the copper tubing does not A touch the cabinet's side wall or other parts inside the cabinet....
Installation Guide
Page 5
... so can result in death or electrical shock. 2. Water Supply Line A B B A A. NOTE: Discard old drain tube and clamp. 4. Drain pump reservoir inlet A. ¹⁄₄" copper tubing B. Unplug ice maker or disconnect power. 2. Drain Cap A A. Remove the old drain tube and clamp... NOTE: If ice maker is built into the storage bin. Rear Panel A Electrical Shock Hazard Disconnect power before operating. Failure to "Drain Pump Installation" section. 1. See "Drain Tube" illustration. NOTES: ■ Do not kink. ■ Trim tube length, if required. Replace...
... so can result in death or electrical shock. 2. Water Supply Line A B B A A. NOTE: Discard old drain tube and clamp. 4. Drain pump reservoir inlet A. ¹⁄₄" copper tubing B. Unplug ice maker or disconnect power. 2. Drain Cap A A. Remove the old drain tube and clamp... NOTE: If ice maker is built into the storage bin. Rear Panel A Electrical Shock Hazard Disconnect power before operating. Failure to "Drain Pump Installation" section. 1. See "Drain Tube" illustration. NOTES: ■ Do not kink. ■ Trim tube length, if required. Replace...

Installation Guide
Page 6
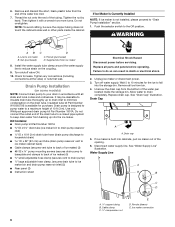
..., kink or damage the vent tube. Remove power cord clamp and ground screw attached to back of the drain pump. The pump mounting tab should slip into the slot. Drain pump installed 8. Wrap electrical tape around the power cord in several places to keep the cord in Step 6) that...maker base on the right side. A A B A. See "Parts Locations" illustration. Align the 2 screw holes at this time. Connect drain tube to drain pump reservoir vent. See "Parts Locations" illustration. See "Rear Panel" illustration. 14. Place new rear panel (small one for 18") against the back of the...
..., kink or damage the vent tube. Remove power cord clamp and ground screw attached to back of the drain pump. The pump mounting tab should slip into the slot. Drain pump installed 8. Wrap electrical tape around the power cord in several places to keep the cord in Step 6) that...maker base on the right side. A A B A. See "Parts Locations" illustration. Align the 2 screw holes at this time. Connect drain tube to drain pump reservoir vent. See "Parts Locations" illustration. See "Rear Panel" illustration. 14. Place new rear panel (small one for 18") against the back of the...

Installation Guide
Page 7
...drain in ice maker or reconnect power. 19. Drain hose B. 1" (2.54 cm) air gap C. PVC drain reducer D. IMPORTANT: A drain pump is necessary when a floor drain is available for purchase. Side View Electrical Shock Hazard Plug into the ice maker storage bin and potentially flowing onto... 17. Wait for leaks. If the ice maker is provided with a gravity drain system, follow these guidelines when installing drain lines. A Drain Pump kit, Part Number 1901A, is operating properly. See "Parts Locations" illustration. 16. You must terminate at an open sited drain. ■ ...
...drain in ice maker or reconnect power. 19. Drain hose B. 1" (2.54 cm) air gap C. PVC drain reducer D. IMPORTANT: A drain pump is necessary when a floor drain is available for purchase. Side View Electrical Shock Hazard Plug into the ice maker storage bin and potentially flowing onto... 17. Wait for leaks. If the ice maker is provided with a gravity drain system, follow these guidelines when installing drain lines. A Drain Pump kit, Part Number 1901A, is operating properly. See "Parts Locations" illustration. 16. You must terminate at an open sited drain. ■ ...

Installation Guide
Page 8
Failure to follow these instructions can result in death or electrical shock. 1. Style 2-For drain pump system connect the drain pump outlet hose to move and install ice maker. Replace all water and electrical connections have been made. Unplug the ice maker or ... Steel Door Wrap Panel- A A. NOTE: Be sure the edge guards do so can result in death, fire, or electrical shock. 1. See "Drain Pump System." 3. See "Leveling." 4. Ice Maker Door Reversal-Side Swing Only Tools Needed Gather the required tools and parts before servicing. Remove the handle screws ...
Failure to follow these instructions can result in death or electrical shock. 1. Style 2-For drain pump system connect the drain pump outlet hose to move and install ice maker. Replace all water and electrical connections have been made. Unplug the ice maker or ... Steel Door Wrap Panel- A A. NOTE: Be sure the edge guards do so can result in death, fire, or electrical shock. 1. See "Drain Pump System." 3. See "Leveling." 4. Ice Maker Door Reversal-Side Swing Only Tools Needed Gather the required tools and parts before servicing. Remove the handle screws ...

Installation Guide
Page 11
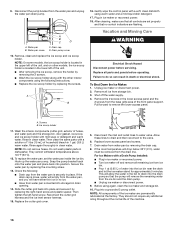
... ice level sensor down . Pull out on the holder and then down and forward away from the water pan and unplug the water pan drain pump. A. Drain pump cover 10. Screw B. Cutter grid harness B. On Some Models ■ Remove the holder by replacing the screws. Wash the interior components (cutter grid,... wipe the control panel with the other models, the ice scoop holder is located in place. A. Lift the cutter grid up the water pan pump. To replace the water pan, set properly and that holds the water pan in ice maker or reconnect power. 18. Slide the cutter grid back...
... ice level sensor down . Pull out on the holder and then down and forward away from the water pan and unplug the water pan drain pump. A. Drain pump cover 10. Screw B. Cutter grid harness B. On Some Models ■ Remove the holder by replacing the screws. Wash the interior components (cutter grid,... wipe the control panel with the other models, the ice scoop holder is located in place. A. Lift the cutter grid up the water pan pump. To replace the water pan, set properly and that holds the water pan in ice maker or reconnect power. 18. Slide the cutter grid back...

Use & Care Guide
Page 4
...appears poor, dispose of ¹⁄₄" (6.35 mm) OD soft copper tubing with a shutoff valve or a Whirlpool supply line Part Number 8212547RB, and a Whirlpool approved drain pump, Part Number 1901A, only to carry the water to avoid problems with the National Electrical Code and local codes and... for servicing if necessary. ■ Installation of the ice maker requires a cold water supply inlet of it is required to have a drain pump installed. ■ For gravity drain systems only. 4 Before you can increase water pressure and damage your ice maker or home. It is ...
...appears poor, dispose of ¹⁄₄" (6.35 mm) OD soft copper tubing with a shutoff valve or a Whirlpool supply line Part Number 8212547RB, and a Whirlpool approved drain pump, Part Number 1901A, only to carry the water to avoid problems with the National Electrical Code and local codes and... for servicing if necessary. ■ Installation of the ice maker requires a cold water supply inlet of it is required to have a drain pump installed. ■ For gravity drain systems only. 4 Before you can increase water pressure and damage your ice maker or home. It is ...
Use & Care Guide
Page 6
...the water supply tube clamp around the water supply line to the Off position. Turn shutoff valve ON. 10. Use only Whirlpool approved drain pump kit Part Number 1901A. Unscrew the drain cap from the end of ice maker) (5) small adjustable hose clamp (secures vent to... (purchased) C. Check for the ice to your drain in death or electrical shock. 2. Drain cap 5. Ice maker connection 6 Do not overtighten. Drain Pump Installation (on the drain tube. Remove all state and local codes and ordinances. 6. WARNING AB C D A. Line to drain completely. See "Drain Cap...
...the water supply tube clamp around the water supply line to the Off position. Turn shutoff valve ON. 10. Use only Whirlpool approved drain pump kit Part Number 1901A. Unscrew the drain cap from the end of ice maker) (5) small adjustable hose clamp (secures vent to... (purchased) C. Check for the ice to your drain in death or electrical shock. 2. Drain cap 5. Ice maker connection 6 Do not overtighten. Drain Pump Installation (on the drain tube. Remove all state and local codes and ordinances. 6. WARNING AB C D A. Line to drain completely. See "Drain Cap...

Use & Care Guide
Page 7
... Locations" illustration. Install new drain tube ID x 5¹⁄₈") from the drain tube and discard. Drain pump E. It will be necessary to tip the pump slightly to drain pump reservoir vent. Drain Pump Mounting Tab Slot A B C A D A adjustable hose clamp B. A. B 2. See "Rear Panel" illustration...and clamp. 4. See "Drain Tube" illustration. Ice maker unit power cord F. #8-32 x ³⁄₈" pump mounting screws G. The pump mounting tab should slip into the ice maker base on the right side. NOTE: Clamp and screw will be reused. 7. ...
... Locations" illustration. Install new drain tube ID x 5¹⁄₈") from the drain tube and discard. Drain pump E. It will be necessary to tip the pump slightly to drain pump reservoir vent. Drain Pump Mounting Tab Slot A B C A D A adjustable hose clamp B. A. B 2. See "Rear Panel" illustration...and clamp. 4. See "Drain Tube" illustration. Ice maker unit power cord F. #8-32 x ³⁄₈" pump mounting screws G. The pump mounting tab should slip into the ice maker base on the right side. NOTE: Clamp and screw will be reused. 7. ...

Use & Care Guide
Page 8
...8260;₈" screws, supplied. See "Parts Locations" illustration. 9. Wrap electrical tape around the power cord in several places to be large enough to pump discharge tube. See "Parts Locations" illustration. 11. Secure rear panel with a 1¹⁄₂" (3.81 cm) to your drain in ice ... drain tube as specified by the product installation instructions. 17. Coil ice maker power cord into a grounded 3 prong outlet. Attach the drain pump power cord to ice maker bin outlet ID), using 3 clamps and three #8-32 x ³⁄₈" screws, supplied. See "Parts Locations...
...8260;₈" screws, supplied. See "Parts Locations" illustration. 9. Wrap electrical tape around the power cord in several places to be large enough to pump discharge tube. See "Parts Locations" illustration. 11. Secure rear panel with a 1¹⁄₂" (3.81 cm) to your drain in ice ... drain tube as specified by the product installation instructions. 17. Coil ice maker power cord into a grounded 3 prong outlet. Attach the drain pump power cord to ice maker bin outlet ID), using 3 clamps and three #8-32 x ³⁄₈" screws, supplied. See "Parts Locations...

Use & Care Guide
Page 9
...ice maker. Door Reversal-Side Swing Only Tools Needed Gather the required tools and parts before starting installation. PVC drain reducer D. Drain Pump System (on some models) IMPORTANT: ■ Connect the ice maker drain to your drain in accordance with the International Plumbing Code... - 1¹⁄₂" (5 cm - 3.8 cm) A. Failure to do so can result in back or other injury. 2. See "Drain Pump System." 3. Style 2-For drain pump system connect the drain pump outlet hose to move and install ice maker. The drain should be centered from left to right (7 18.56 cm] from...
...ice maker. Door Reversal-Side Swing Only Tools Needed Gather the required tools and parts before starting installation. PVC drain reducer D. Drain Pump System (on some models) IMPORTANT: ■ Connect the ice maker drain to your drain in accordance with the International Plumbing Code... - 1¹⁄₂" (5 cm - 3.8 cm) A. Failure to do so can result in back or other injury. 2. See "Drain Pump System." 3. Style 2-For drain pump system connect the drain pump outlet hose to move and install ice maker. The drain should be centered from left to right (7 18.56 cm] from...
Use & Care Guide
Page 16
...tighten the left of household bleach in ice maker or reconnect power. ■ Turn ice maker off the water supply. 4. Plug into position. Disconnect the pump bracket from storage bin. 3. Water pan screw A B C D C. Drain cap D. Gently wipe the control panel with the other models, the ice... ice scoop, remove the holder by removing the drain cap. 8. Unplug ice maker or disconnect power. 2. After cleaning, make sure that the pump will remove the remaining water from water pan by removing the 2 screws. ■ Wash the ice scoop holder along with a soft, clean ...
...tighten the left of household bleach in ice maker or reconnect power. ■ Turn ice maker off the water supply. 4. Plug into position. Disconnect the pump bracket from storage bin. 3. Water pan screw A B C D C. Drain cap D. Gently wipe the control panel with the other models, the ice... ice scoop, remove the holder by removing the drain cap. 8. Unplug ice maker or disconnect power. 2. After cleaning, make sure that the pump will remove the remaining water from water pan by removing the 2 screws. ■ Wash the ice scoop holder along with a soft, clean ...

Use & Care Guide
Page 17
... is connected to purge minerals that the drain hose is kinked. Otherwise, bin thermostat may hear a loud sound during water filling associated with drain pumps, check that were removed from the water during the ice making process. Is there a "whooshing" sound? If the ice maker is normal. Call... supply water pressure (50 psi is level. This is level, and the problem persists, run a cleaning cycle. See "Leveling." Use only Whirlpool approved drain pump kit, Part Number 1901A. This overflow helps to a water supply pressure in excess of water added to the ice maker, wait a few ...
... is connected to purge minerals that the drain hose is kinked. Otherwise, bin thermostat may hear a loud sound during water filling associated with drain pumps, check that were removed from the water during the ice making process. Is there a "whooshing" sound? If the ice maker is normal. Call... supply water pressure (50 psi is level. This is level, and the problem persists, run a cleaning cycle. See "Leveling." Use only Whirlpool approved drain pump kit, Part Number 1901A. This overflow helps to a water supply pressure in excess of water added to the ice maker, wait a few ...

Dimension Guide
Page 1
...when installing drain lines. or 20-amp electrical supply, properly grounded in accordance with a shutoff valve or a Whirlpool supply line Part Number 8212547RB, and a Whirlpool approved drain pump, Part Number 1901A, only to carry the water to accommodate drainage from all state and local codes and ... GFCI (Ground Fault Circuit Interrupter) equipped outlet, nuisance tripping of the drain tube as shown. Ice Maker PRODUCT MODEL NUMBER CABINET OPENING DIMENSIONS GI15NDXZ Electrical: A 115 Volt, 60 Hz., AC only, 15- s Check that the power supply cord is not damaged, or pinched or...
...when installing drain lines. or 20-amp electrical supply, properly grounded in accordance with a shutoff valve or a Whirlpool supply line Part Number 8212547RB, and a Whirlpool approved drain pump, Part Number 1901A, only to carry the water to accommodate drainage from all state and local codes and ... GFCI (Ground Fault Circuit Interrupter) equipped outlet, nuisance tripping of the drain tube as shown. Ice Maker PRODUCT MODEL NUMBER CABINET OPENING DIMENSIONS GI15NDXZ Electrical: A 115 Volt, 60 Hz., AC only, 15- s Check that the power supply cord is not damaged, or pinched or...

