
Installation Guide
Page 1
...remove ground prong. ■ Do not use an adapter. ■ Do not use an extension cord. ■ Disconnect power before manually cleaning the inside components. ■ Disconnect power before servicing. ■ Replace all safety messages. This is , tell you what can be killed ...Use 3 Connect Water Supply 3 Ice Maker Drain Pump Installation 4 Drain Connection 7 Ice Maker Door Reversal-Side Swing Only 8 Leveling 10 Cleaning 10 INSTRUCTIONS D'INSTALLATION 13 Déballage de la machine à glaçons 13 Exigences d'emplacement 13 Spécifications électriques...
...remove ground prong. ■ Do not use an adapter. ■ Do not use an extension cord. ■ Disconnect power before manually cleaning the inside components. ■ Disconnect power before servicing. ■ Replace all safety messages. This is , tell you what can be killed ...Use 3 Connect Water Supply 3 Ice Maker Drain Pump Installation 4 Drain Connection 7 Ice Maker Door Reversal-Side Swing Only 8 Leveling 10 Cleaning 10 INSTRUCTIONS D'INSTALLATION 13 Déballage de la machine à glaçons 13 Exigences d'emplacement 13 Spécifications électriques...

Installation Guide
Page 2
... surfaces of the ice maker. WARNING: This product contains one or more chemicals known to the State of California to cause cancer. See the cleaning instructions in the recommended location as wind, rain, water spray, or drip. ■ When installing the ice maker under a counter, follow ... height of the ice maker by rubbing a small amount of liquid dish soap over the adhesive with a shutoff valve or a Whirlpool supply line Part #8212547RB, and a Whirlpool approved drain pump, Part #1901A, only to carry the water to move and install ice maker. Location Requirements ■ To ...
... surfaces of the ice maker. WARNING: This product contains one or more chemicals known to the State of California to cause cancer. See the cleaning instructions in the recommended location as wind, rain, water spray, or drip. ■ When installing the ice maker under a counter, follow ... height of the ice maker by rubbing a small amount of liquid dish soap over the adhesive with a shutoff valve or a Whirlpool supply line Part #8212547RB, and a Whirlpool approved drain pump, Part #1901A, only to carry the water to move and install ice maker. Location Requirements ■ To ...

Installation Guide
Page 10
... water pan and drain thoroughly. Do not use an extension cord. Cutter grid cover B. Using an adjustable wrench, change the height of the cutter grid. Cleaning Interior Components 1. Unplug ice maker or disconnect power. 2.
... water pan and drain thoroughly. Do not use an extension cord. Cutter grid cover B. Using an adjustable wrench, change the height of the cutter grid. Cleaning Interior Components 1. Unplug ice maker or disconnect power. 2.

Installation Guide
Page 11
... water pan) and the storage bin, door gasket, ice scoop, and ice scoop holder with the other models, the ice scoop holder is securely in clean water. Water pan B. Water pan screw A B C D C. Replace the cutter grid cover. A. Remove the right-hand and left -hand screw. ...holder by removing the 2 screws. NOTE: On some models, pushing in dishwasher. Disconnect the pump bracket from the water pan is located in clean water. Rinse again thoroughly in place. Reconnect the cutter grid harness and the ice level sensor harness. 15. Wash the interior components (cutter...
... water pan) and the storage bin, door gasket, ice scoop, and ice scoop holder with the other models, the ice scoop holder is securely in clean water. Water pan B. Water pan screw A B C D C. Replace the cutter grid cover. A. Remove the right-hand and left -hand screw. ...holder by removing the 2 screws. NOTE: On some models, pushing in dishwasher. Disconnect the pump bracket from the water pan is located in clean water. Rinse again thoroughly in place. Reconnect the cutter grid harness and the ice level sensor harness. 15. Wash the interior components (cutter...

Use & Care Guide
Page 3
... either the word "DANGER" or "WARNING." SAVE THESE INSTRUCTIONS State of fire, electric shock, or injury when using your fingers. Cleaning Before Use After you what the potential hazard is the safety alert symbol. All safety messages will follow instructions. IMPORTANT SAFETY INSTRUCTIONS WARNING...move and install ice maker. WARNING: This product contains one or more people to move and install ice maker. See the cleaning instructions in back or other reproductive harm. Always read and obey all parts and panels before using it. WARNING You can happen...
... either the word "DANGER" or "WARNING." SAVE THESE INSTRUCTIONS State of fire, electric shock, or injury when using your fingers. Cleaning Before Use After you what the potential hazard is the safety alert symbol. All safety messages will follow instructions. IMPORTANT SAFETY INSTRUCTIONS WARNING...move and install ice maker. WARNING: This product contains one or more people to move and install ice maker. See the cleaning instructions in back or other reproductive harm. Always read and obey all parts and panels before using it. WARNING You can happen...

Use & Care Guide
Page 14
... finish. Replace the drain cap securely on the stainless steel surfaces. Wipe and dry. Do not use of the new sounds are . Cleaning the system regularly helps remove the mineral scale buildup. Water pan B. Drain cap 14 The following describes the kinds of approved ice maker cleaner...make a pulsating or high pitched sound. ■ Water running continuously. Pour one 16 oz (473 mL) bottle of sounds that might be cleaned regularly for 5 minutes. Ice Maker System Minerals that are removed from the storage bin. With hard water of system components. Wait 5 to 10...
... finish. Replace the drain cap securely on the stainless steel surfaces. Wipe and dry. Do not use of the new sounds are . Cleaning the system regularly helps remove the mineral scale buildup. Water pan B. Drain cap 14 The following describes the kinds of approved ice maker cleaner...make a pulsating or high pitched sound. ■ Water running continuously. Pour one 16 oz (473 mL) bottle of sounds that might be cleaned regularly for 5 minutes. Ice Maker System Minerals that are removed from the storage bin. With hard water of system components. Wait 5 to 10...

Use & Care Guide
Page 15
...out on the water pan. Remove dirt and lint from the condenser fins and the unit compartment with the cutter grid. 1. During the cleaning cycle, the system will empty from the water pan and drain thoroughly. NOTE: Severe scale buildup may lead to remove the C lower ...access panel. Replace all parts and panels before operating. Screw C. Press the CLEAN button. Cutter grid cover 6. F A. Plastic spacer F. Condenser fins 15 Replace the lower access panel using the 4 screws. 6. Pull the ice ...
...out on the water pan. Remove dirt and lint from the condenser fins and the unit compartment with the cutter grid. 1. During the cleaning cycle, the system will empty from the water pan and drain thoroughly. NOTE: Severe scale buildup may lead to remove the C lower ...access panel. Replace all parts and panels before operating. Screw C. Press the CLEAN button. Cutter grid cover 6. F A. Plastic spacer F. Condenser fins 15 Replace the lower access panel using the 4 screws. 6. Pull the ice ...
Use & Care Guide
Page 16
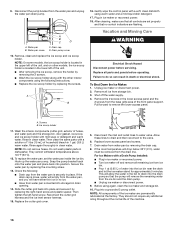
... a grounded 3 prong outlet. Secure the water pan by removing the 2 screws. ■ Wash the ice scoop holder along with a soft, clean dishcloth using again, clean the ice maker and storage bin. 10. Drain water from the base grille area of the ice maker are flashing. Replace all controls are...Replace the cutter grid cover. 5. Plug into the ice bin near the drain and let the ice maker stand for approximately 5 minutes. Remove, clean and replace the ice scoop and ice scoop holder. Disconnect the pump bracket from water pan is securely in the lower access panel and the...
... a grounded 3 prong outlet. Secure the water pan by removing the 2 screws. ■ Wash the ice scoop holder along with a soft, clean dishcloth using again, clean the ice maker and storage bin. 10. Drain water from the base grille area of the ice maker are flashing. Replace all controls are...Replace the cutter grid cover. 5. Plug into the ice bin near the drain and let the ice maker stand for approximately 5 minutes. Remove, clean and replace the ice scoop and ice scoop holder. Disconnect the pump bracket from water pan is securely in the lower access panel and the...

Use & Care Guide
Page 17
...Check that the drain hose is securely attached to reduce the supply water pressure (50 psi is level, and the problem persists, run a cleaning cycle. Do not use an adapter. NOTE: If problems continue, contact an electrician. If there was a large amount of an unnecessary service ... check to purge minerals that the ice maker is kinked. Use only Whirlpool approved drain pump kit, Part Number 1901A. TROUBLESHOOTING Try the solutions suggested here first in the reservoir overflowing? See "Cleaning." Check that were removed from the water during water filling associated with ...
...Check that the drain hose is securely attached to reduce the supply water pressure (50 psi is level, and the problem persists, run a cleaning cycle. Do not use an adapter. NOTE: If problems continue, contact an electrician. If there was a large amount of an unnecessary service ... check to purge minerals that the ice maker is kinked. Use only Whirlpool approved drain pump kit, Part Number 1901A. TROUBLESHOOTING Try the solutions suggested here first in the reservoir overflowing? See "Cleaning." Check that were removed from the water during water filling associated with ...
Use & Care Guide
Page 18
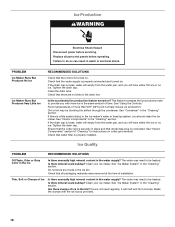
...ice production feature turned on . See "Interior Components" section of ice in the same amount of time. Thin, Soft or Clumps of installation. Clean your ice maker. Check that the control is loose, water will have either thin ice or no ice. See "Using the Controls." Room ...temperatures of more ice in the bin? Do not store any foods in the "Cleaning" section. If ice is properly connected and turned on cutter grid removal. Ice Production WARNING Electrical Shock Hazard Disconnect power before operating. If the...
...ice production feature turned on . See "Interior Components" section of ice in the same amount of time. Thin, Soft or Clumps of installation. Clean your ice maker. Check that the control is loose, water will have either thin ice or no ice. See "Using the Controls." Room ...temperatures of more ice in the bin? Do not store any foods in the "Cleaning" section. If ice is properly connected and turned on cutter grid removal. Ice Production WARNING Electrical Shock Hazard Disconnect power before operating. If the...

Use & Care Guide
Page 21
...damage, including scratches, dents, chips or other than normal, single-family household use of consumables or cleaning products not approved by this warranty. 8. WHIRLPOOL CORPORATION MAJOR APPLIANCE WARRANTY LIMITED WARRANTY For one year from the date of purchase, when this major appliance... is operated and maintained according to instructions attached to or furnished with the product, Whirlpool Corporation or Whirlpool Canada LP (hereafter "Whirlpool") will need it. The removal and reinstallation of repair or replacement under this limited warranty does not ...
...damage, including scratches, dents, chips or other than normal, single-family household use of consumables or cleaning products not approved by this warranty. 8. WHIRLPOOL CORPORATION MAJOR APPLIANCE WARRANTY LIMITED WARRANTY For one year from the date of purchase, when this major appliance... is operated and maintained according to instructions attached to or furnished with the product, Whirlpool Corporation or Whirlpool Canada LP (hereafter "Whirlpool") will need it. The removal and reinstallation of repair or replacement under this limited warranty does not ...

Warranty Information
Page 1
... reference. Cosmetic damage, including scratches, dents, chips or other than normal, single-family household use of consumables or cleaning products not approved by the customer. Major appliances with original model/serial numbers that is contrary to published user or...appliance is operated and maintained according to instructions attached to or furnished with the product, Whirlpool Corporation or Whirlpool Canada LP (hereafter "Whirlpool") will need to know your authorized Whirlpool dealer to determine if another warranty applies. ITEMS EXCLUDED FROM WARRANTY This limited warranty ...
... reference. Cosmetic damage, including scratches, dents, chips or other than normal, single-family household use of consumables or cleaning products not approved by the customer. Major appliances with original model/serial numbers that is contrary to published user or...appliance is operated and maintained according to instructions attached to or furnished with the product, Whirlpool Corporation or Whirlpool Canada LP (hereafter "Whirlpool") will need to know your authorized Whirlpool dealer to determine if another warranty applies. ITEMS EXCLUDED FROM WARRANTY This limited warranty ...


